The A6M Zero in 1/72: Akagi’s Zeros Prepare for Pearl Harbor Diorama, Part 2.4 – The Decaled Zeros

This is Part 2.3 of a series of posts on the construction of a Pearl Harbor diorama. It will depict the Zeros of the Imperial Japanese Navy’s Akagi aircraft carrier preparing to take off during the first wave attack. This post is a follow-up to the previous post and concerns only the pre-built 1/72 scale Zeros to be used in the diorama with renumbered tail markings. To understand the concept of this diorama project, please refer to the previous posts. 

The Actual Akagi Zeros

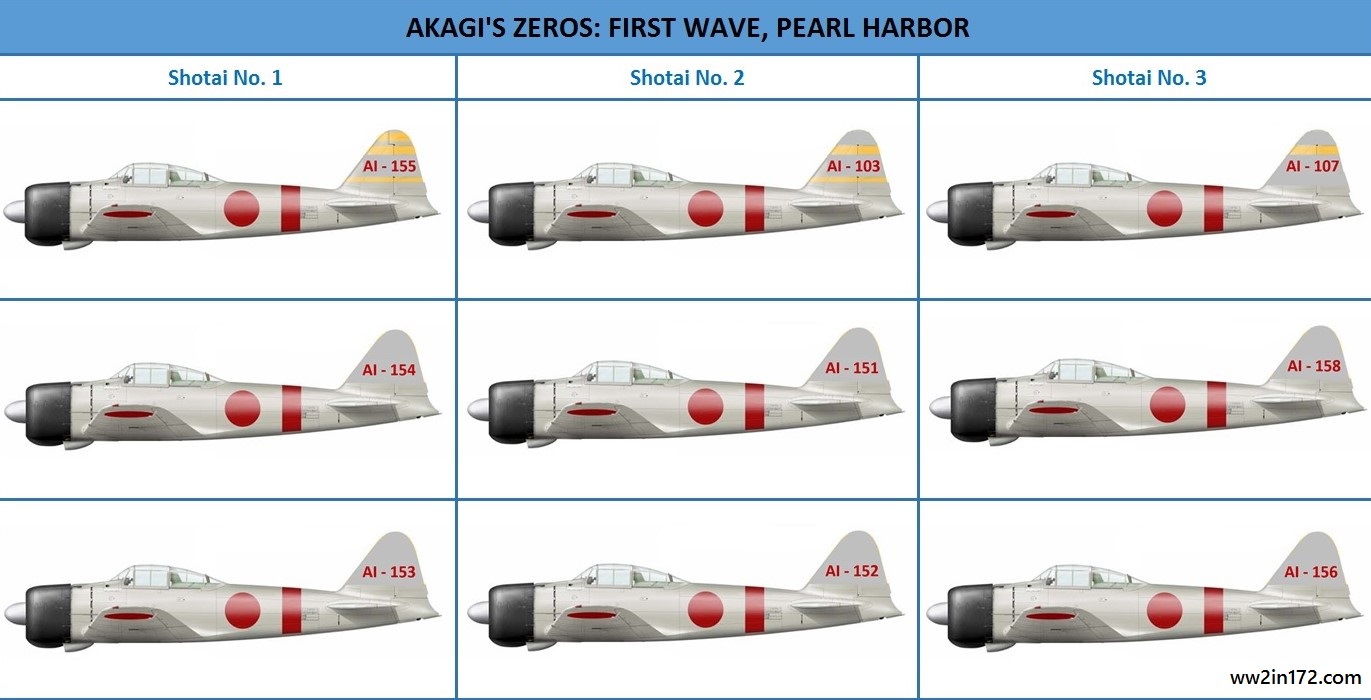
As previously mentioned, the Akagi contributed nine A6M2 Zeros to the first wave attack. As a refresher, below is a table from a previous post of the Zeros that participated in Akagi’s first wave. Akagi's Zeros JPEG from Excel (2) - CopyThe Prebuilt 1/72 Scale Models
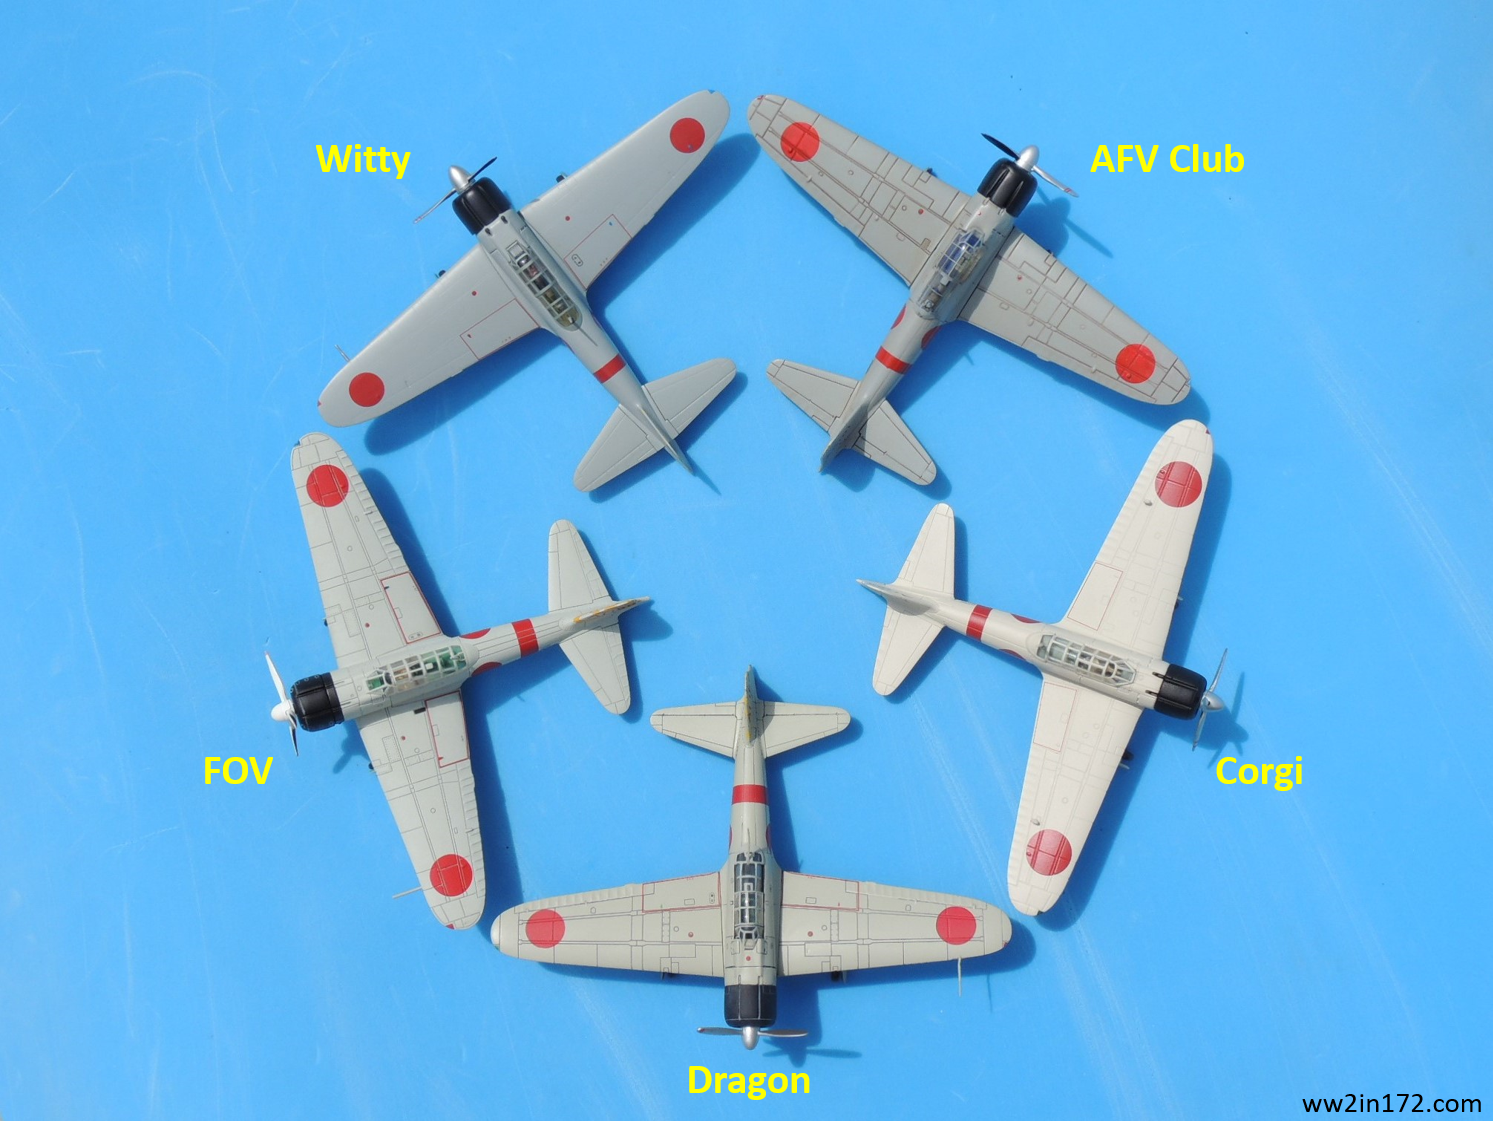
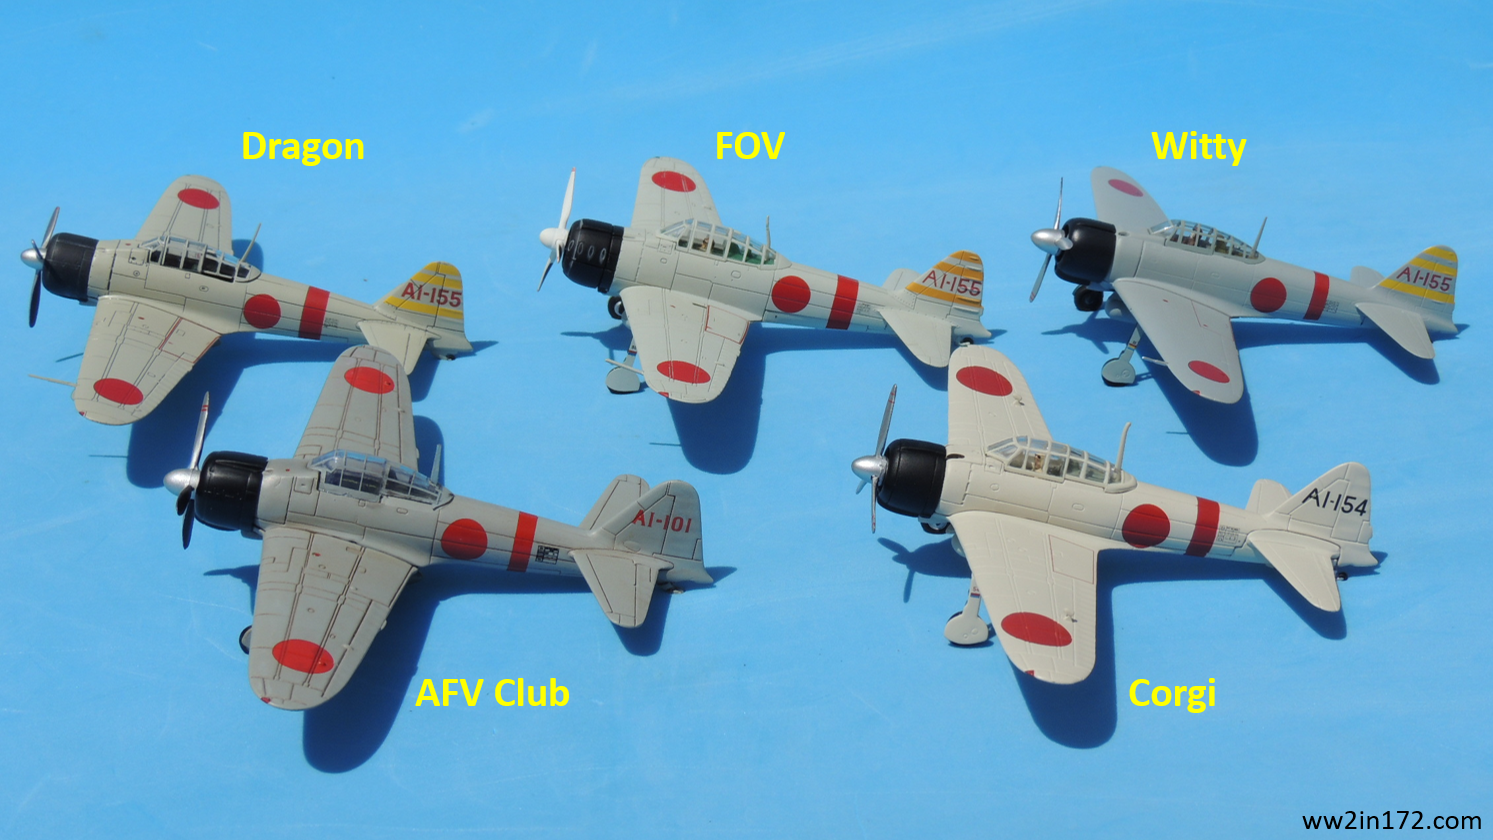
The photo below shows the prebuilt 1/72 scale Akagi Zeros currently available. It is immediately evident that of the nine actual Zeros that participated in Akagi’s first wave, only AI-155 and AI-154 have been produced in diecast. Unfortunately, the Corgi AI-154 is unusable as is, since Corgi used black, rather than red, tail numbers.Zero TailsThe Diorama Zeros
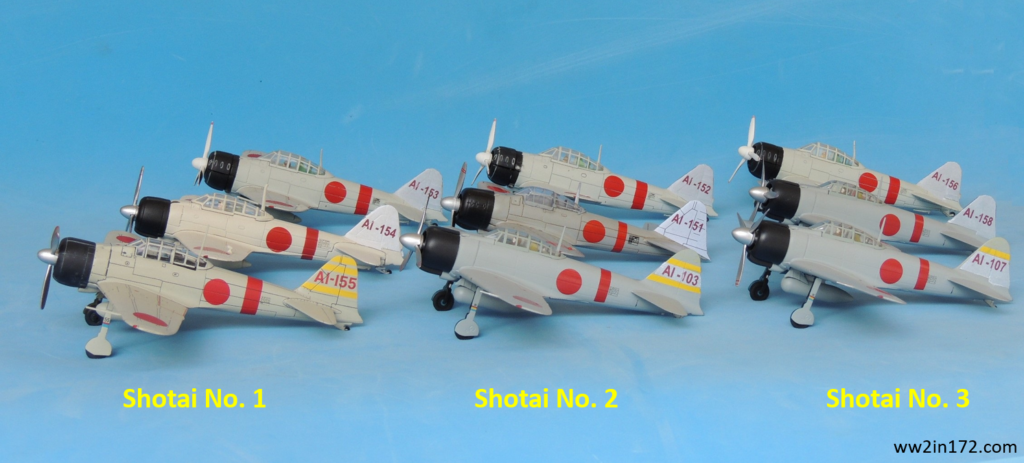
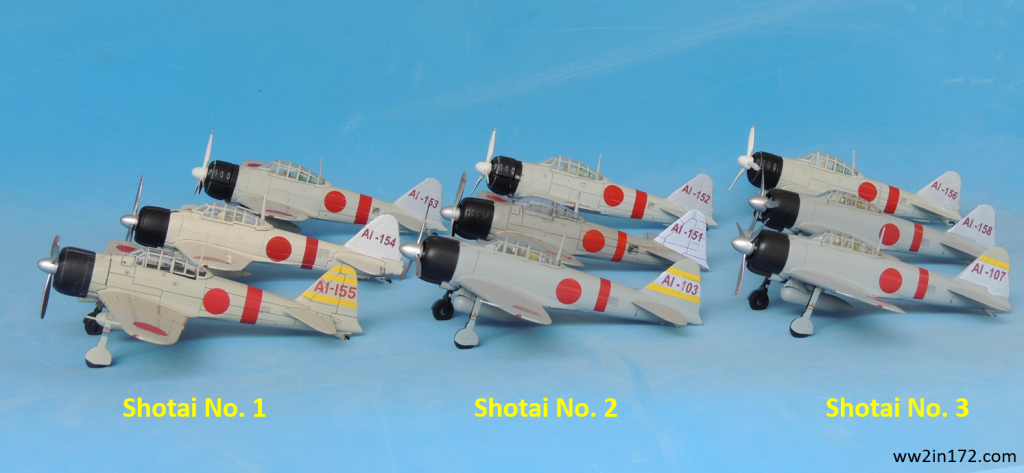
For purposes of the diorama, the goal is to use the five models in the photo above plus four spares — two additional Wittys and two additional FOVs. Only the Dragon AI-155 will be used unmodified; the remaining eight will require new tail numbers as per the chart above. Below is a notional photo of the expected result once the decals are applied. Zeros w New Tails
The Decaled Zeros

I searched extensively for MYK Design’s A-72009 Tora! Tora! Tora! Carrier Akagi 1/72 decal sheet (pictured below), since it includes five of the nine necessary tail numbers: AI-103, AI-107, AI-151, AI-155, and AI-158. (The AI-155 decal is unnecessary as I’ll be using the Dragon model that already carries that tail number.)  Alas, I was unsuccessful as the sheet has been out of print for years.
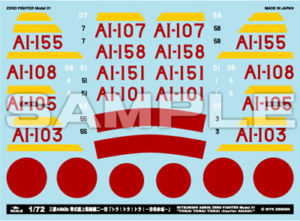
Ultimately, I had no choice but to make the decals myself. I enlarged the image at left, cleaned it up, enhanced the numbers as much as possible, and then reduced it back to 1/72 scale. I then printed the image on Micro-Mark decal paper.

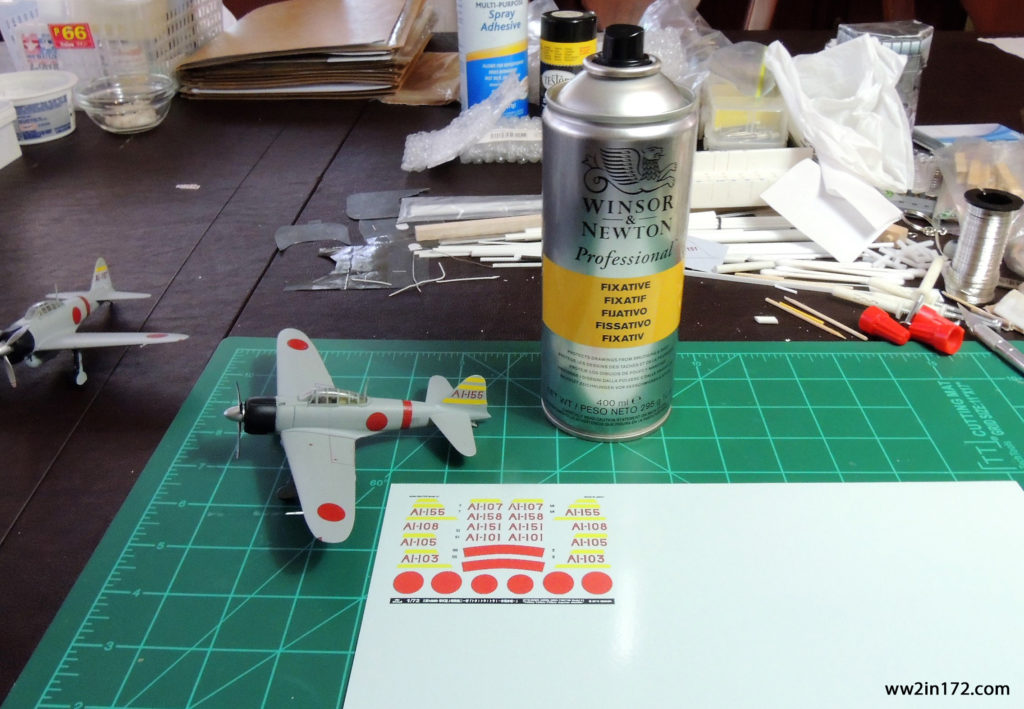
To my dismay, I found that handling the decal sheet resulted in slight smudging. After rereading the decal paper directions, I reprinted the image and “fixed” it onto the sheet with Winsor & Newton fixative. Failure to apply a coat of fixative to protect the image will result in the image smudging like lead on a pencil drawing when touched.

The photo below shows the decal sheet printed on the Micro-Mark decal paper after the fixative had been applied.With decals in hand, I prepared the three Witty models for application of the decals by removing the tail numbers and yellow stripes as necessary — leaving two stripes for the AI-103; one stripe for the AI-107; and no stripes for the AI-158. See photo below.
There are essentially two ways to remove the tampo markings on diecast models: 1) by scraping them off, preferably with an X-Acto #10 curved blade; or 2) by applying some sort of solvent, such as Testors 1148 thinner or standard acetone for nail polish removal. I found that a combination of the two methods worked best for me. (Note: Do not use enamel thinner on plastic models. It will ruin the plastic finish.) Once the original markings were totally removed, I applied a coat of Pledge (Future) floor finish to ensure that the decals found a glossy base that would prevent silvering. (Pledge’s self-leveling properties are amazing!) After waiting a day for the Pledge to cure, I used Micro Set and Micro Sol solutions to apply the decals.
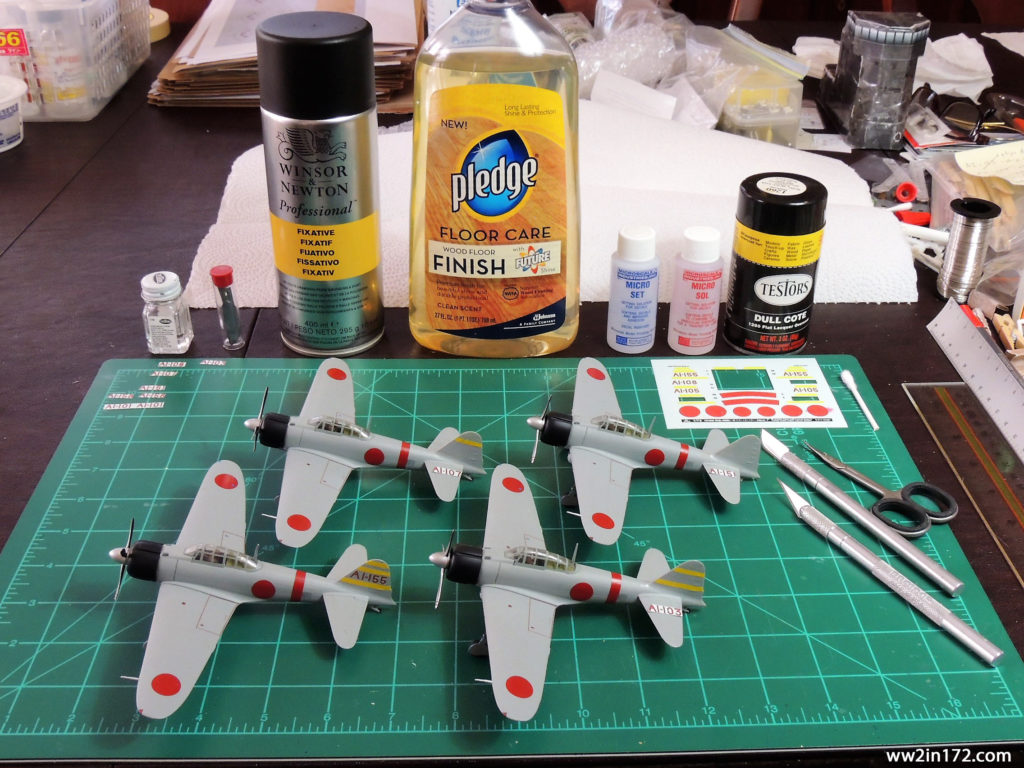
Micro Set prepares the surface where the decal is to be applied by cutting the oils in the paint, thus allowing the decal to slide on the surface, making it easier to reposition the decal as necessary. Micro Sol softens the decal, allowing it to conform to the surface of the model, which is particularly useful on irregular surfaces such as the panel lines and ridges on the Zero tails. Using these two solutions will help make the decals look “painted-on.” 

After waiting another day for the decals to dry, I again applied a coat of Pledge to completely seal the decals between two layers of Pledge. Of course, the Pledge application resulted in a glossy finish. After waiting yet another day, I sprayed the decals with Testors Dull Cote to give the tails a matte finish that matched the rest of the model. The photo below shows the results after the Dull Cote had dried.
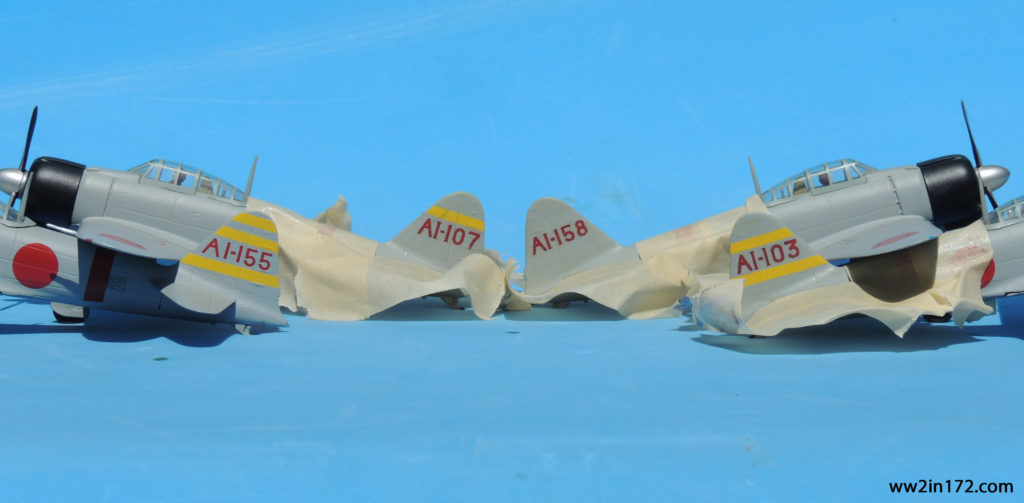
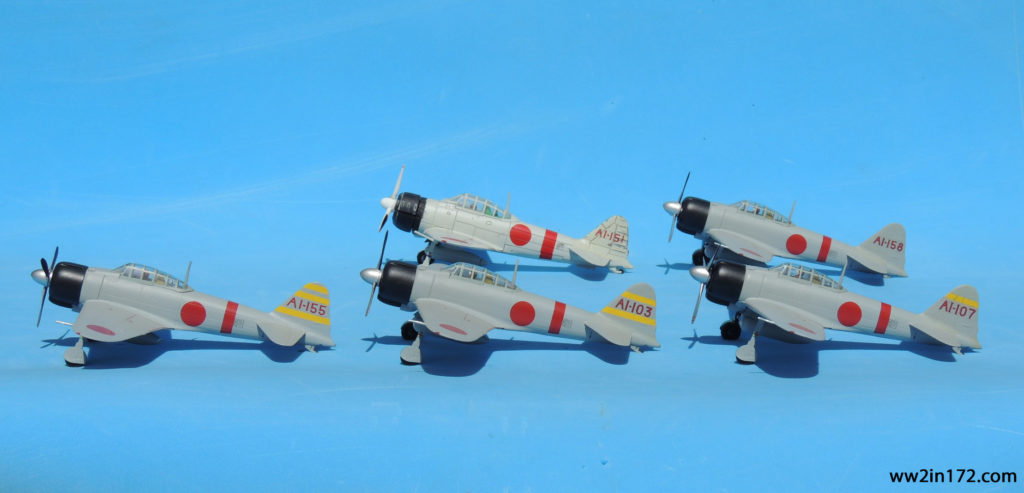
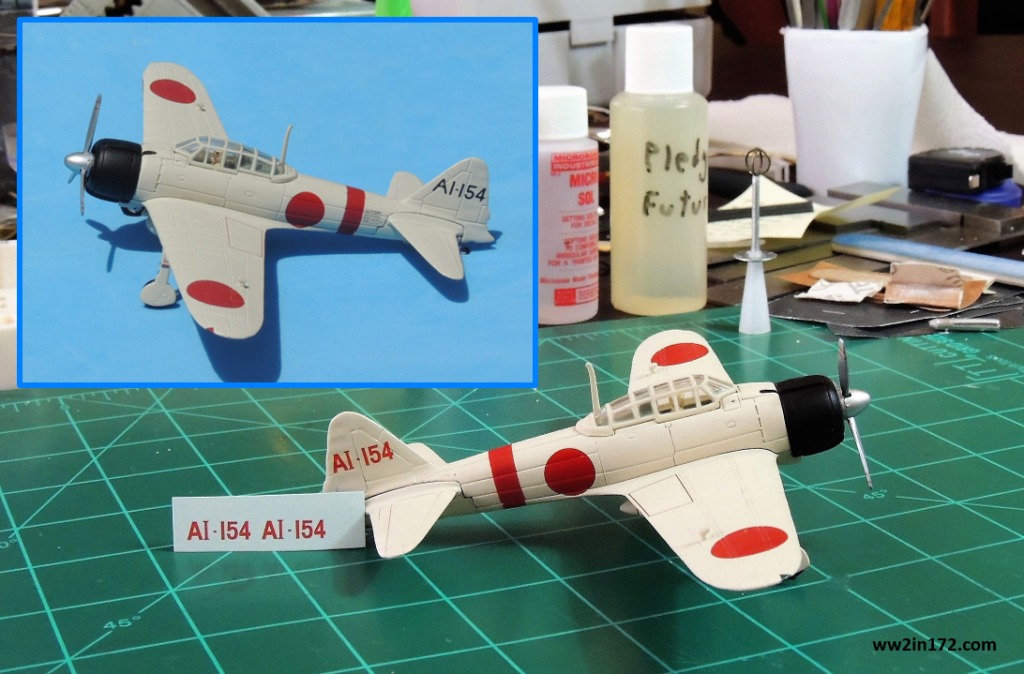
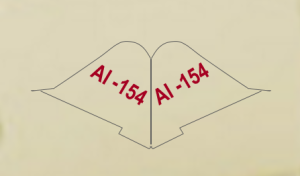
In addition to an unmodified Witty model (AI-155), the photo below shows the three decaled Witty models (AI-103, AI-107, and AI-158), plus one decaled FOV model (AI-151). Note that some paint came off the tail of the FOV when I removed the tampo markings, giving it an unintended — though not totally unwelcome — weathered look. (Yes, I’m accepting that which I cannot change.  🙂  )As previously mentioned, Corgi inexplicably applied black tail numbers to the AI-154 (see inset in the photo below), rather than the well-documented red numbers. I removed the black numbers with Testors thinner and applied a decal with correct red numbers following the process discussed above. Note that the MYK Design A-72009 decal sheet did not include the AI-154 so I made the decals using letters and numbers from different fonts to simulate the MYK Design numbers. The lagniappe photo below shows the result. I made the extra decals standing by the tail in case I botched the first application — a common occurrence, at least for me, when applying decals. To summarize, six models are now ready: the unmodified Dragon AI-155 plus five decaled planes — three Witty models (AI-103, AI-107, and AI-158), one FOV (AI-151), and one Corgi (AI-154). I’ve decided not to decal the last three (AI-152, AI-153, and AI-156) as the FOV model did not respond well to removal of the tampo markings. Instead, I’ll use paper covers using the stencil in the previous post.
I apologize for such a tedious post. I realize that except for diehard readers, discussion of the tail numbers can get repetitive and confusing. Still, I think the photos by themselves tell the story. 

Again, thank you for your indulgence and I hope at least some of you enjoyed the post. If something looks amiss, please let me know. I would be delighted to correct inaccurate information so that this may be useful to other 1/72 scale collectors and wargamers. As always, comments, questions, corrections, and observations are welcome. Stay tuned for a brief discussion of the Zero pilots who participated in Akagi’s first wave attack in the next post.

The A6M Zero in 1/72: Akagi’s Zeros Prepare for Pearl Harbor Diorama, Part 2.3 – The Diorama Zeros

This is Part 2.2 of a series of posts on the construction of a diorama depicting the Zeros of the Imperial Japanese Navy’s Akagi aircraft carrier preparing to take off as part of the first wave attack on Pearl Harbor. Providing the history of the Zero or its technical details is beyond the scope of this article. This post concerns only the prebuilt 1/72 scale Zeros to be used in the diorama. To understand the concept of this diorama project, please refer to the previous posts. 

The Actual Akagi Zeros

As previously mentioned, the Akagi contributed nine A6M2 Zeros and 27 B5N2 Kates to the first wave attack. As a refresher, below is a table from a previous post of the Zeros that participated in Akagi’s first wave. As is readily apparent, the tail numbers are all in the AI-150’s except for AI-103 and AI-107. Up to this point, I had deliberately avoided discussing the tail numbers as creating the correct numbers will be one of the more difficult parts of this project, as discussed below. Akagi's Zeros JPEG from Excel (2) - CopyThe Prebuilt 1/72 Scale Models

The photo below shows the prebuilt 1/72 scale Akagi Zeros currently available.* It is immediately evident that of the nine actual Zeros that participated in Akagi’s first wave, only AI-155 and AI-154 have been produced in diecast. AI-155 — Shigeru Itaya’s Zero — has been produced by Dragon, Forces of Valor, and Witty. A review of each can be found by clicking on the name of the manufacturer. A short biography of Itaya is also available by clicking on his name. AI-154 has been produced by Corgi. Unfortunately, despite all evidence to the contrary, Corgi inexplicably used black tail numbers rather than red numbers, for which there is abundant proof. AFV Club also produced an Akagi Zero — the AI-101 — that participated in the second wave. For the sake of completeness, it will be used in this project so collectors may compare models from all five manufacturers that have thus far produced an Akagi Zero. Zero TailsThe Diorama Zeros

For purposes of the diorama, the goal is to use the five models in the photo above plus four duplicates. The challenge is to create models with all of Akagi first wave numbers other than AI-155. Even AI-154 will be required as the tail number must be in red. The idea is to scrape off the original painted numbers and replace them with appropriate decals so that they match the table above.Corgi AI-154 As thus far I have been unsuccessful in finding the decals, I made a stencil of the tail to cover the tail numbers in the interim. I then scanned the color of each model and applied it to the tail stencil. Matching base colors proved more difficult than I had anticipated.

For those interested in how the colors of the five manufacturers compare, below is a plate showing a scan of each model’s base color. The color of the Corgi model is actually beige and the inset at left matches the model reasonably well. I’m perplexed, however, by the difference in the color of the Corgi model in the photos and conclude it’s due to the lighting. The FOV and Witty colors look very similar but that’s as close to the models as the scanner could make them. Once I made stencils for all five colors, I covered the tail of each model with a new number.The lagniappe photo below provides a notional idea of the intended result. At this point, the tail numbers appear to be a weak part of the project. That will change, however, once the decals are applied. Zeros w New TailsAgain, thank you for your indulgence and I hope you enjoyed the post. If something looks amiss, please let me know. I would be delighted to correct inaccurate information so that this may be useful to other 1/72 scale collectors and wargamers. As always, comments, questions, corrections, and observations are welcome. Stay tuned for photos of the models once the decals are applied.


* Witty also produced AI-101 and AI-102 but both were used in the second wave and, except for the tail numbers, are identical to the AI-155. While Atlas/Oxford (same casting) also produced aircraft carrier A6M2 Zeros, they did not make an Akagi Zero. Instead, Atlas produced a model from the Kaga while Oxford produced one from the Ryujo. 

The A6M Zero in 1/72: Akagi’s Zeros Prepare for Pearl Harbor Diorama, Part 2.2 – Prebuilt 1/72 Models

This is Part 2.1 of a series of posts on the construction of a diorama depicting the Zeros of the Imperial Japanese Navy’s Akagi aircraft carrier preparing to take off as part of the first wave attack on Pearl Harbor. This post concerns only prebuilt 1/72 scale models depicting Zeros from the Akagi. To understand the concept of this diorama project, please refer to the previous two posts. 

Prebuilt 1/72 Scale Akagi Zeros

As I’ve indicated in the past, I lack the modeling skills to build the aircraft necessary for this diorama. Thus, I’ll be using nine prebuilt diecast 1/72 planes. To my knowledge, five manufacturers — AFV Club, Corgi, Dragon Wings, Forces of Valor, and Witty Wings — have tried their hand at producing models of the A6M2 Zero — the version of the Zero used at Pearl Harbor — specifically representing Zeros from the Akagi.*

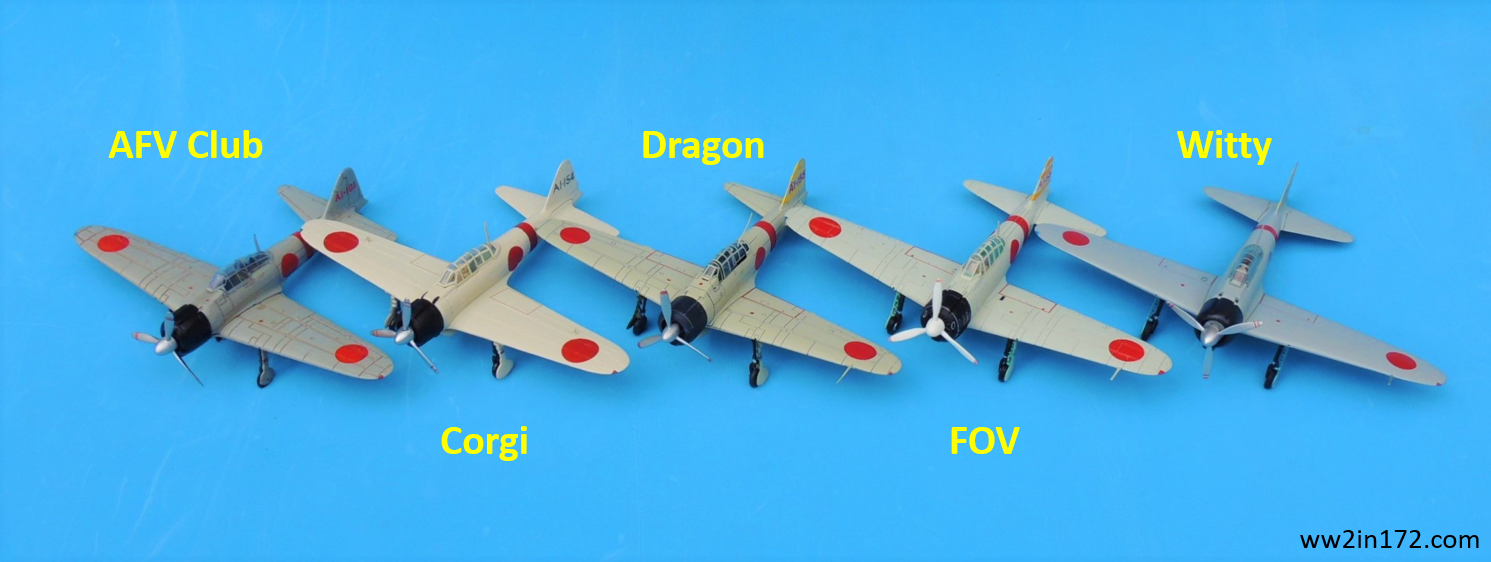
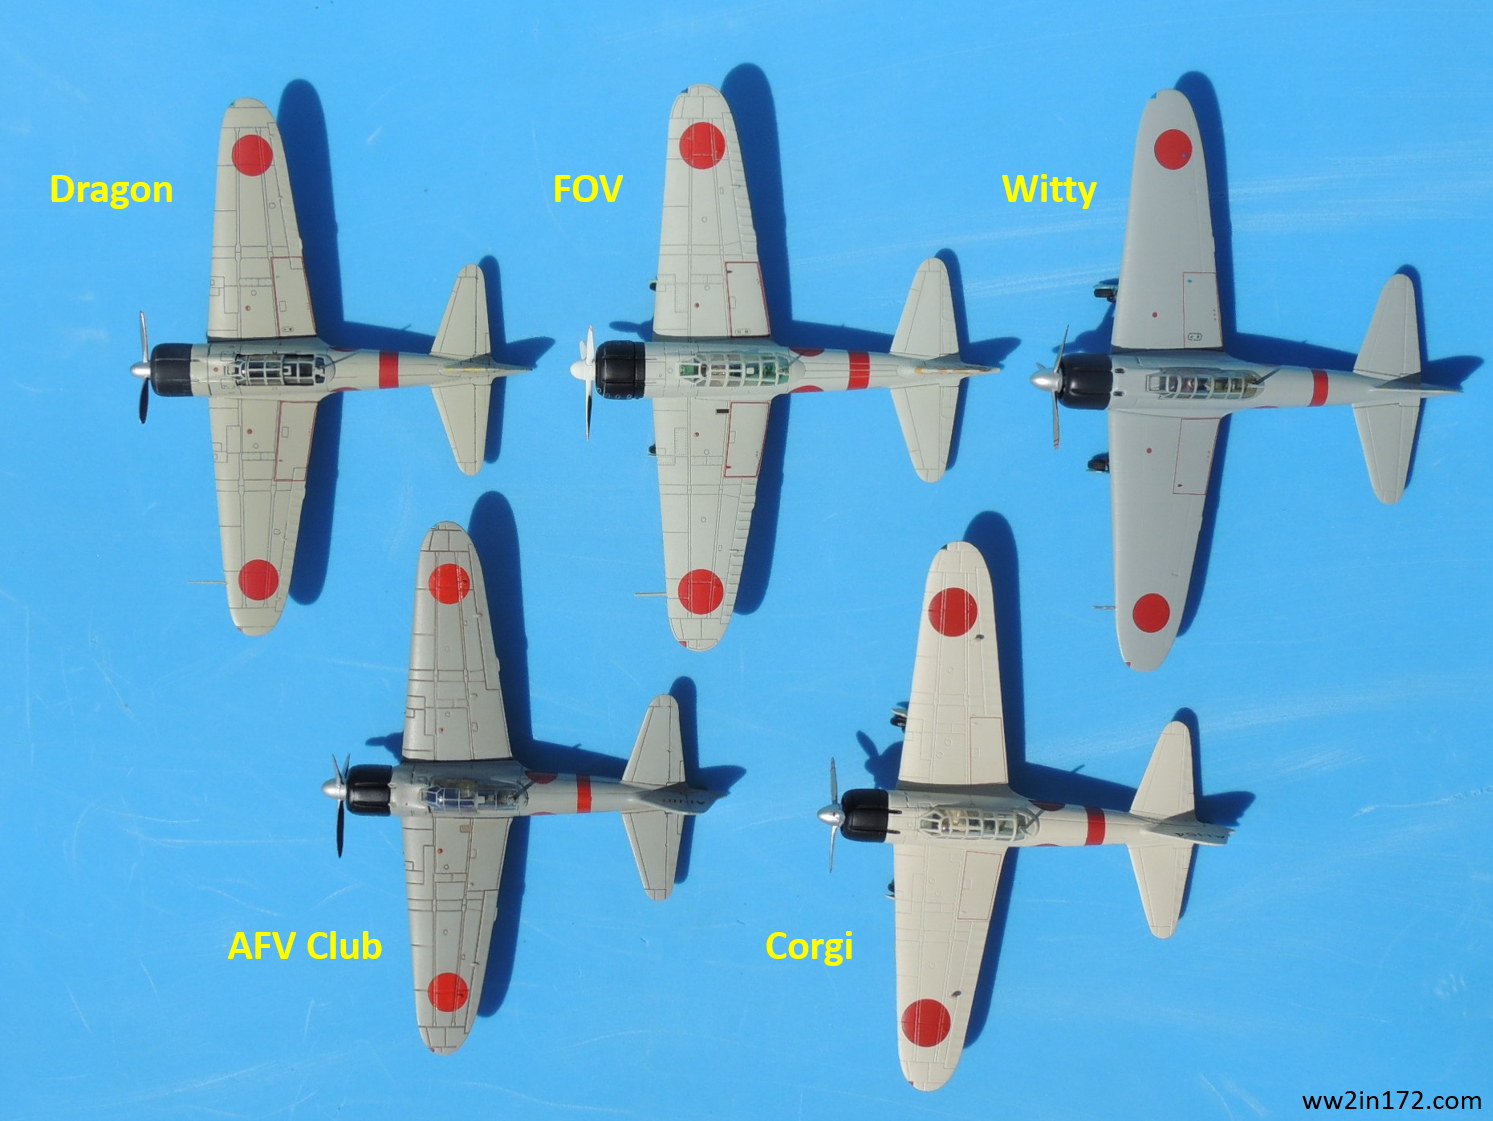
The photo below shows the Akagi Zero models from the five aforementioned manufacturers, in alphabetical order from left to right. Note the difference in the base color, which reflects the continuing debate over the true color of the actual Zeros.Zero Fronts 3Below is an overhead shot of the five models. Note that the AFV Club and Dragon models have “inked” panel lines, burnt umber and black, respectively, which make the lines stand out. By contrast, the panel lines on the Witty, which are widely considered to be close to scale, are barely visible. My preference is the middle route taken by both Corgi and FOV — while their panel lines may be overscaled, the fact that they were not inked results in a Goldilocks look.Zero OverheadFinally, the lagniappe overhead shot below allows better comparison of dimensions. As is apparent from the photo, the difference in dimensions is de minimis (couldn’t resist the alliterative flourish). Ultimately, however, the reader can make that judgment.Zero Pentagon 1For purposes of the diorama, the plan is to use these five prebuilt models plus four duplicates to complete the nine Zeros in Akagi’s first wave. Since these manufacturers combined have produced only the AI-154 and AI-155, the project will require disguising the tail numbers so that they match the nine tail numbers used on the Akagi (see table in previous post). That is the subject of the next post. 

Again, thank you for your indulgence and I hope you enjoyed the post. If something looks amiss, please let me know. I would be delighted to correct inaccurate information so that this may be useful to other 1/72 scale collectors and wargamers. As always, comments, questions, corrections, and observations are welcome. As mentioned, stay tuned to see these Zeros with the nine new tail numbers in the next post.


* While Atlas Editions and Oxford Diecast also produced A6M2 Zeros for aircraft carriers, neither made an Akagi Zero. Atlas produced a model belonging to the Kaga aircraft carrier (AII-105). Using the same Atlas casting, Oxford Diecast later produced an A6M2 Zero model belonging to the Ryujo aircraft carrier (DI-108). In any case, the Atlas/Oxford models are wheels-up only (wheels are molded retracted into the lower fuselage), requiring a stand and making it difficult to pose them next to other models.

The A6M Zero in 1/72: Akagi’s Zeros Prepare for Pearl Harbor Diorama, Part 2.1 – The Tail Numbers

This is Part 2 of a series of posts on the construction of a diorama depicting the Zeros of the Imperial Japanese Navy’s Akagi aircraft carrier preparing to take off as part of the first wave attack on Pearl Harbor. Providing the history of the Zero or its technical details is beyond the scope of this article. This post concerns only the tail numbers of the Zeros of Akagi’s first wave. To understand the concept of this diorama project, please refer to the previous post. 

The Akagi Zeros and Their Tail Numbers

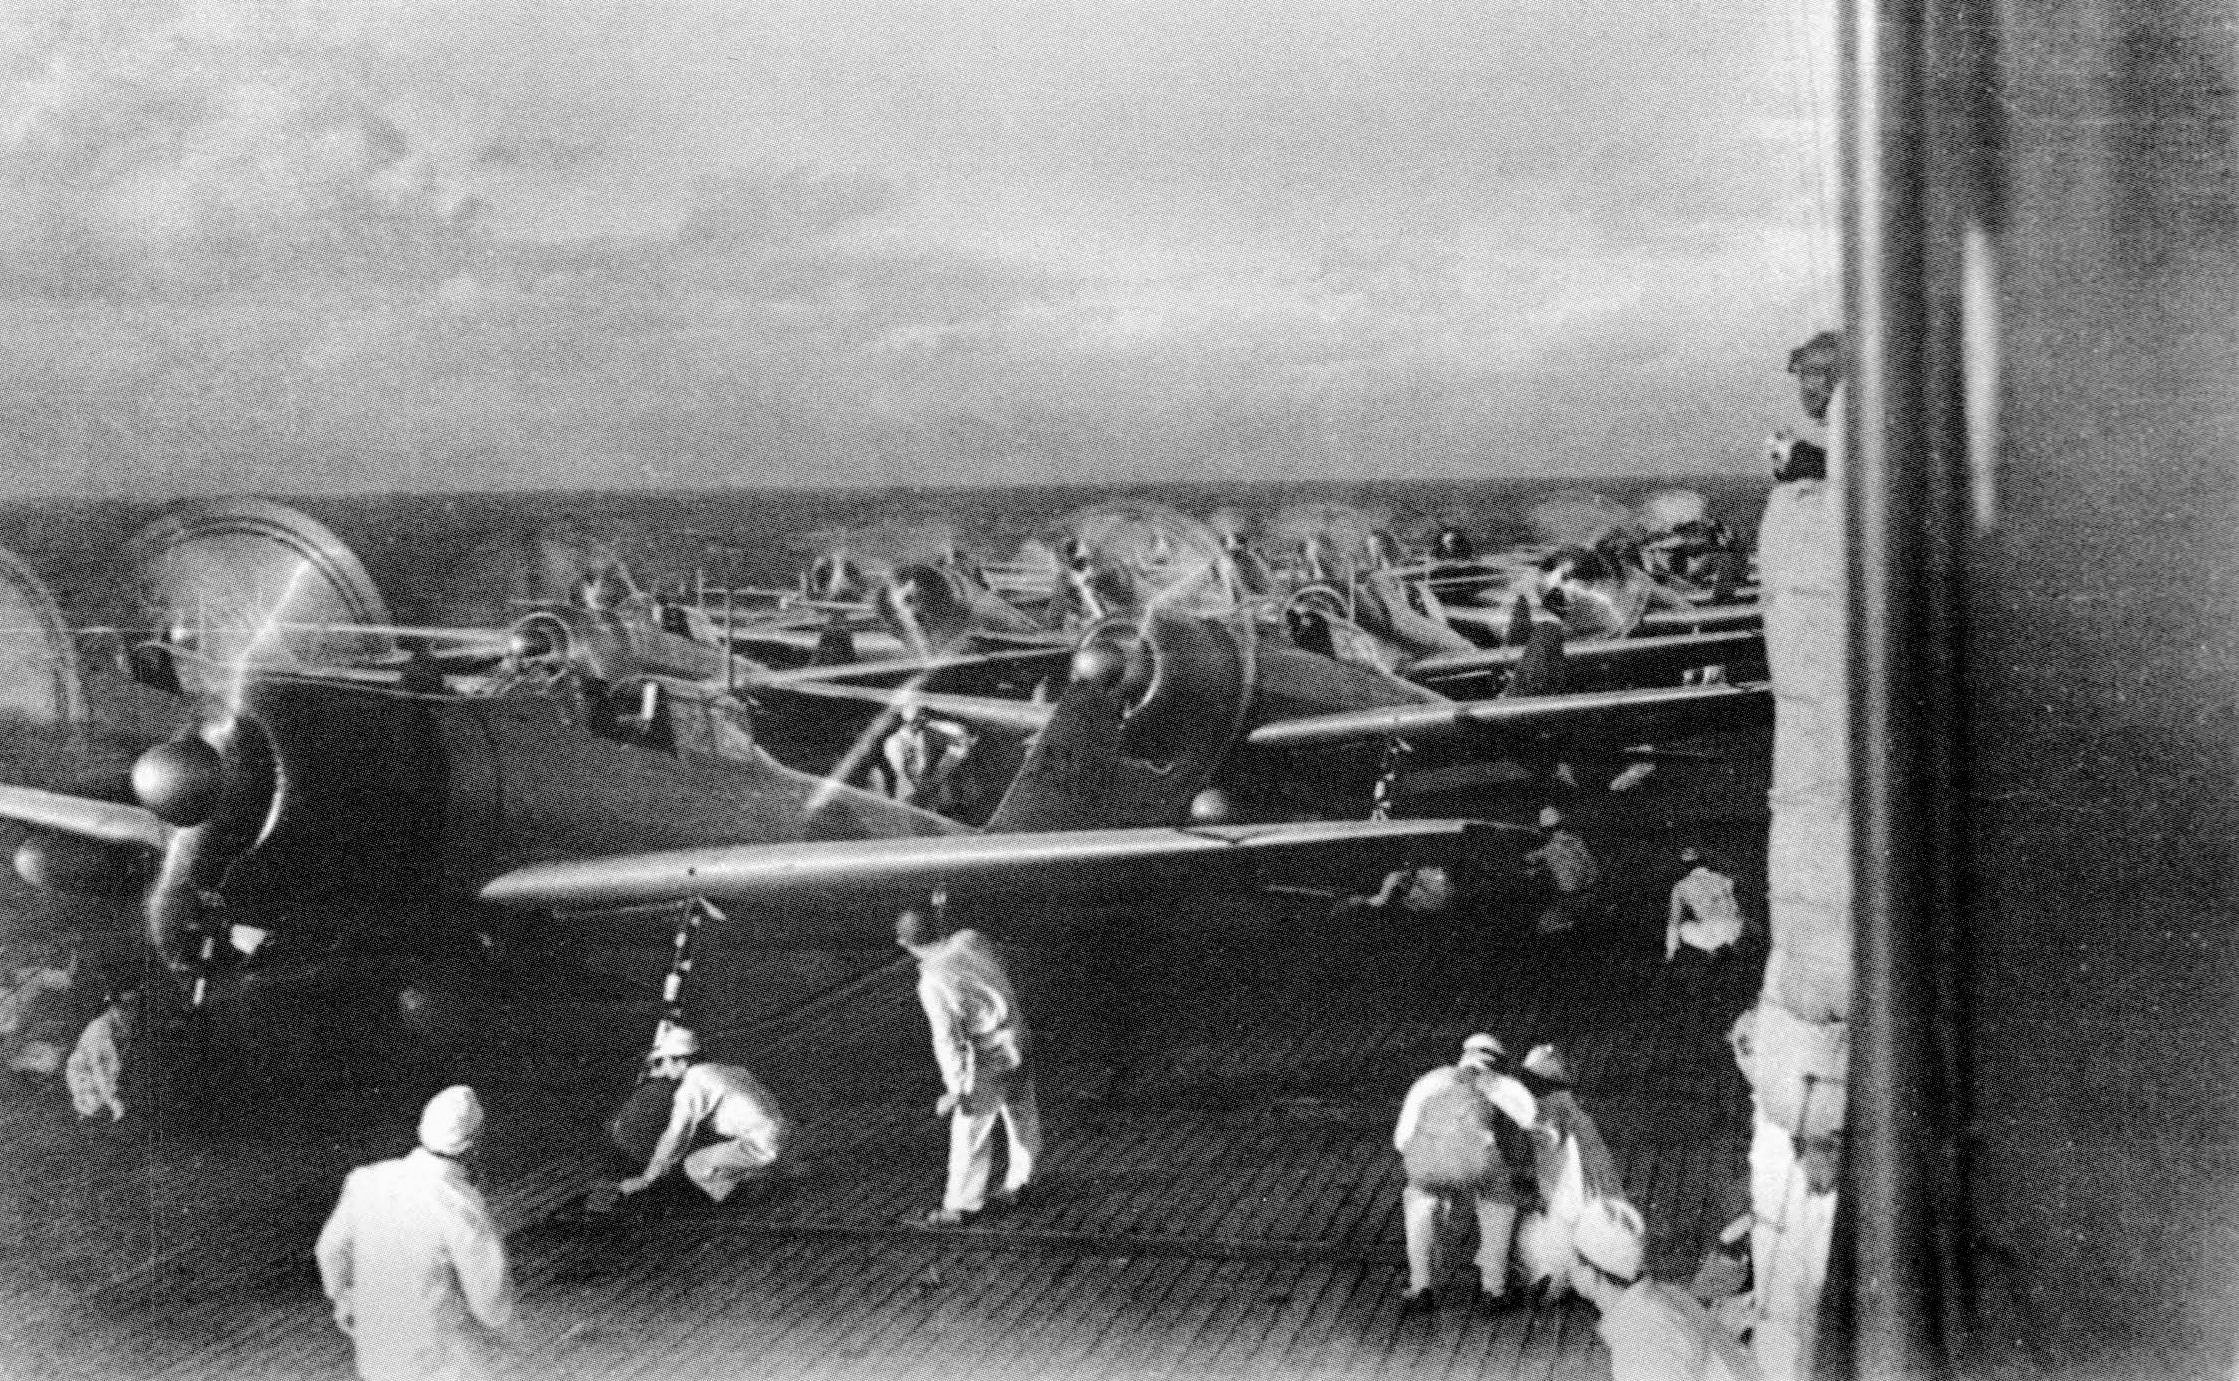
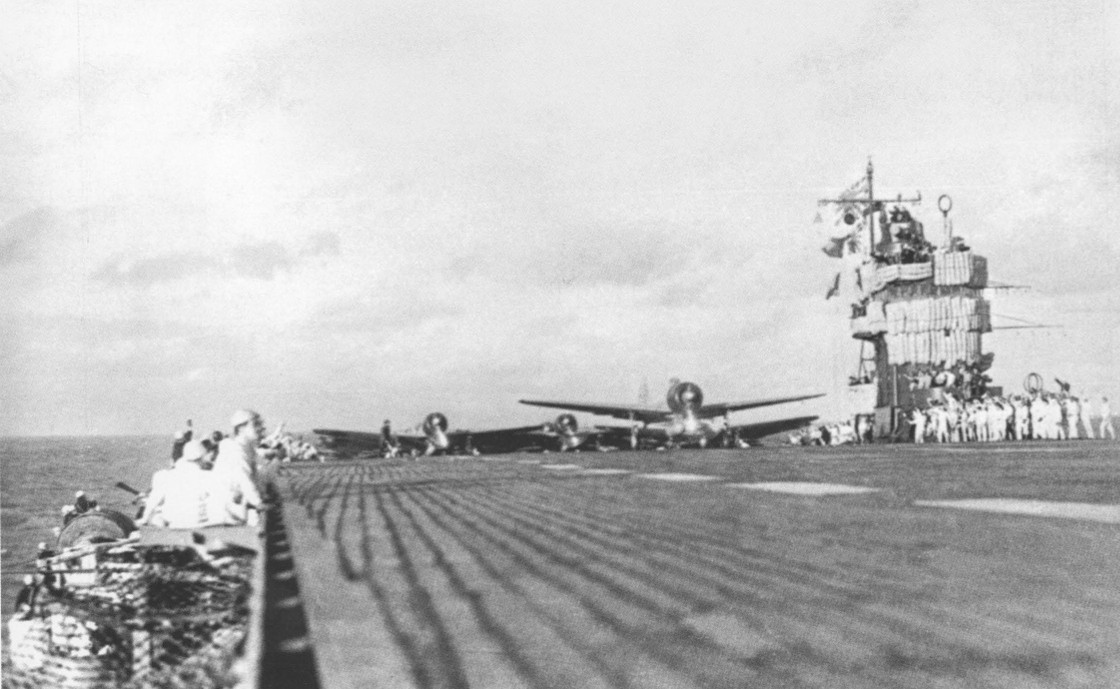
As previously mentioned, the Akagi contributed nine Zeros and 27 Kates to the first wave attack. Below is a photo of the Zeros on the deck of the Akagi just prior to take-off.Akagi_Pearl_Harbor_Second_Wave_PrepTo create the diorama, it is necessary to determine what tail numbers were used in the first wave. In the aftermath of WWII, there was some controversy and confusion concerning the tail numbers of the various aircraft that participated in the attack and whether they Tamiya AI-101were in the first or second wave. Plastic model manufacturers, including Tamiya, even issued models of the AI-101 Zero with yellow command stripes. Photos later proved conclusively that the AI-101 did not carry the horizontal yellow command stripes on the tail and, in fact had participated in the second wave, not the first. Further research shed more light on the tail numbers and at this point the issue is mostly settled.

The table below provides context regarding where each of the Zeros fit within the organizational framework of Akagi’s aircraft. As in the past, I created the table for learners like me who want to visualize where a small piece fits into a larger whole. As I’ve previously made clear, I’m just an amateur enthusiast (redundancy intended) so please use the table at your own risk. I relied on a number of sources, particularly Peter Smith’s Mitsubishi Zero, photos of an Akagi display at the USS Arizona Memorial Museum, and bits and pieces from the internet. Note that the squadron was made up of three flights (shotai) of three aircraft each. The Zeros with horizontal yellow stripes led each three-plane flight. The two Zeros below each yellow-striped Zero belonged to the shotai’s wingmen, in order of rank. Akagi's Zeros JPEG from Excel (2) - CopyFor purposes of the diorama, I will be using nine prebuilt models made by AFV Club, Corgi, Dragon Wings, Forces of Valor, and Witty Wings. 

Again, thank you for your indulgence and I hope you enjoyed the post. If something looks amiss, please let me know. I would be delighted to correct inaccurate information so that this may be useful to other 1/72 scale collectors and wargamers. As always, comments, questions, corrections, and observations are welcome. Stay tuned for a photo overview of prebuilt 1/72 scale Zero models made specifically for the Akagi to be used in the diorama.

The A6M Zero in 1/72: Akagi’s Zeros Prepare for Pearl Harbor Diorama, Part 1 – The Concept

I derive more pleasure from my models when they’re combined with appropriate figures and placed in historically accurate settings — obviously within the limitations posed by 1/72 scale. Thus, I was eager to place the Zeros in my collection in a diorama recreating the scene on the Akagi aircraft carrier as its first wave prepared to take off for the attack on Pearl Harbor. This series of posts concerns the construction of such a diorama.

As mentioned in previous posts, the Akagi was the flagship — and one of six aircraft carriers — of the Imperial Japanese Navy’s Kido Butai — the strike force that carried out the attack on Pearl Harbor. The attack was carried out in two waves, each comprising Mitsubishi A6M Zero fighters, Nakajima B5N Kate torpedo and level bombers, and Aichi D3A Val dive bombers. The Akagi contributed nine Zeros and 27 Kate bombers to that first wave. (Akagi’s Val dive bombers participated in the second wave.)

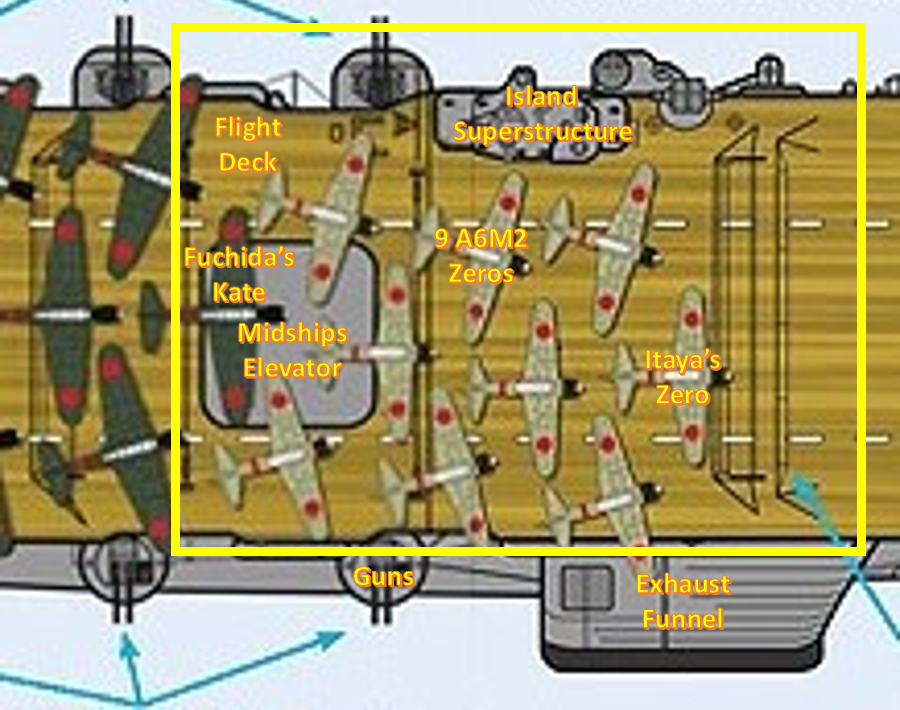
The superb illustration below depicts the Akagi as it prepared to launch its aircraft at Pearl Harbor. Note the nine Zero fighters amidships, parallel to the island, followed by the 27 Kate bombers aft of the midships elevator reaching all the way back to the stern.Force Flagship Akagi 2 (3)(NB: I found the unsourced illustration above on the internet. While sourced illustrations of the Akagi abound, this particular one actually depicts the formation of the Zeros and Kates of the first wave as they prepared to take off for Pearl Harbor. I would appreciate information on its source, both so I may provide proper attribution to the artist and perhaps acquire the plate at higher resolution. If you know the source, please contact me.)

The Akagi measured 855 feet from bow to stern but its wooden flight deck was 817 feet. The goal is to represent the 140 feet of the flight deck delimited by the yellow rectangle shown in the illustration below (roughly 1/6 of the entire flight deck). Akagi Diagram 5The project will require nine A6M2 Zero fighters plus one B5N2 Kate — the lone representative of the 27 Kates of the Akagi in the first wave. That leading Kate is significant, however, as it belonged to Commander Mitsuo Fuchida, who was in overall command of all aircraft participating in the attack on Pearl Harbor. For those of us who grew up watching Tora! Tora! Tora! each year, who could forget Fuchida barking the codeword three times into his radio to indicate the Japanese had achieved complete surprise? 

The diorama will also require construction of the flight deck, the midships elevator, and the island superstructure. The enormous exhaust funnel on the starboard side, as well as the antiaircraft guns on either side of the carrier, are beyond the scope of this project as they’re located below the flight deck. (Forgive the funky orange outlined text. It was necessary to make the text stand out.)

This series of posts will cover the aircraft, pilots, deck crew, flight deck, and island superstructure. With any luck, the last post will bring all these elements together in a fairly straightforward diorama. Here’s the plan:

Part 1:      The Concept

Part 2.1:   The Actual Zeros
Part 2.2:   The Model Zeros
Part 2.3:   The Diorama Zeros
Part 2.4:   The Decaled Zeros

Part 3.1:   The Actual Pilots
Part 3.2:   Masanobu Ibusuki
Part 3.3:   Japanese Pilots and Crew in 1/72 Scale

Part 4:      The Flight Deck

Part 5:      The Island

Part 6:      The Finished Diorama

The lagniappe photo below of aircraft preparing to take off from the Akagi provides a good idea of the project.Akagi__class_PH2W_fullWhile I intend to complete this project in the next three months, please remember the following stanza from Robert Burns’ immortal Scottish poem Tae a Moose, later popularized in English by John Steinbeck’s novel Of Mice and Men:

“But, Mousie, thou art no thy lane,
In proving foresight may be vain;
The best-laid schemes o’ mice an’ men
Gang aft agley,
An’ lea’e us nought but grief an’ pain,
For promis’d joy!”

Again, thank you for your indulgence and I hope you enjoyed the post. If something looks amiss, please let me know. I would be delighted to correct inaccurate information so that this may be useful to other 1/72 scale collectors and wargamers. As always, comments, questions, corrections, and observations are welcome. Please do contact me if you know the source of the illustration. Stay tuned for a synopsis of the Akagi’s first wave Zeros in the next post.