This is Part 2.3 of a series of posts on the construction of a Pearl Harbor diorama. It will depict the Zeros of the Imperial Japanese Navy’s Akagi aircraft carrier preparing to take off during the first wave attack. This post is a follow-up to the previous post and concerns only the pre-built 1/72 scale Zeros to be used in the diorama with renumbered tail markings. To understand the concept of this diorama project, please refer to the previous posts.
The Actual Akagi Zeros
As previously mentioned, the Akagi contributed nine A6M2 Zeros to the first wave attack. As a refresher, below is a table from a previous post of the Zeros that participated in Akagi’s first wave. 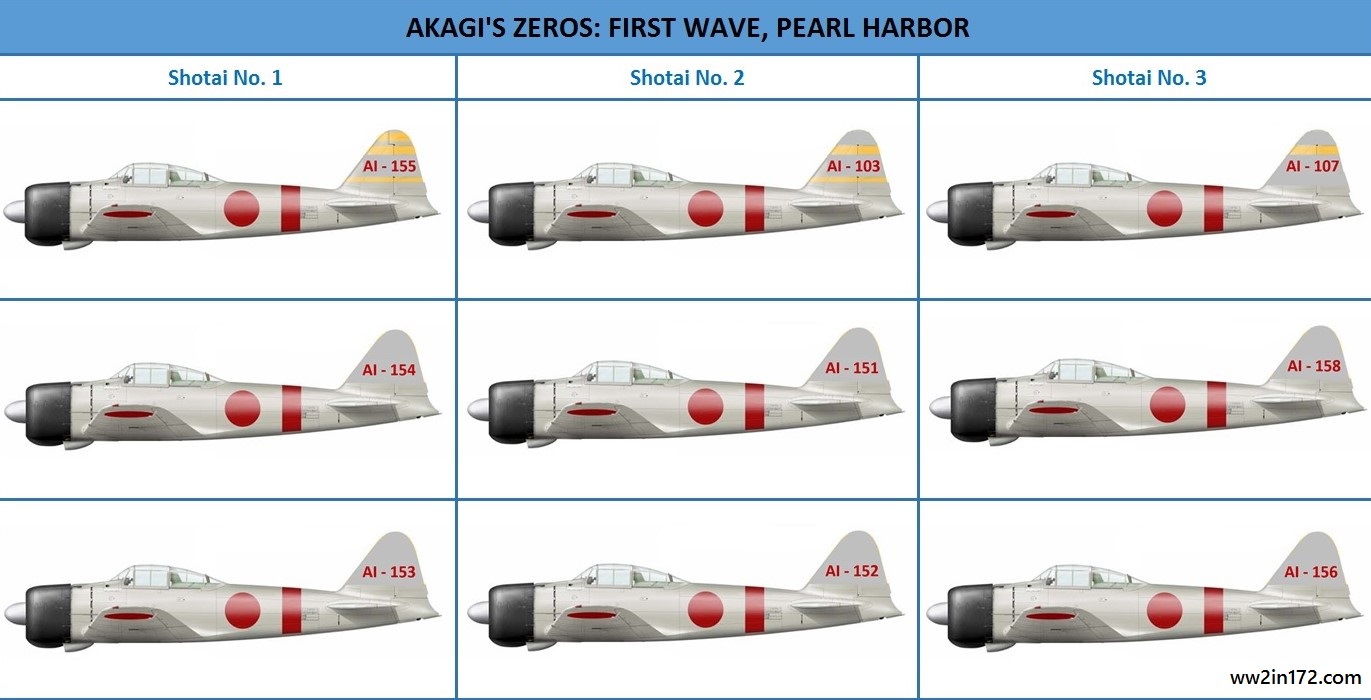 The Prebuilt 1/72 Scale Models
The photo below shows the prebuilt 1/72 scale Akagi Zeros currently available. It is immediately evident that of the nine actual Zeros that participated in Akagi’s first wave, only AI-155 and AI-154 have been produced in diecast. Unfortunately, the Corgi AI-154 is unusable as is, since Corgi used black, rather than red, tail numbers.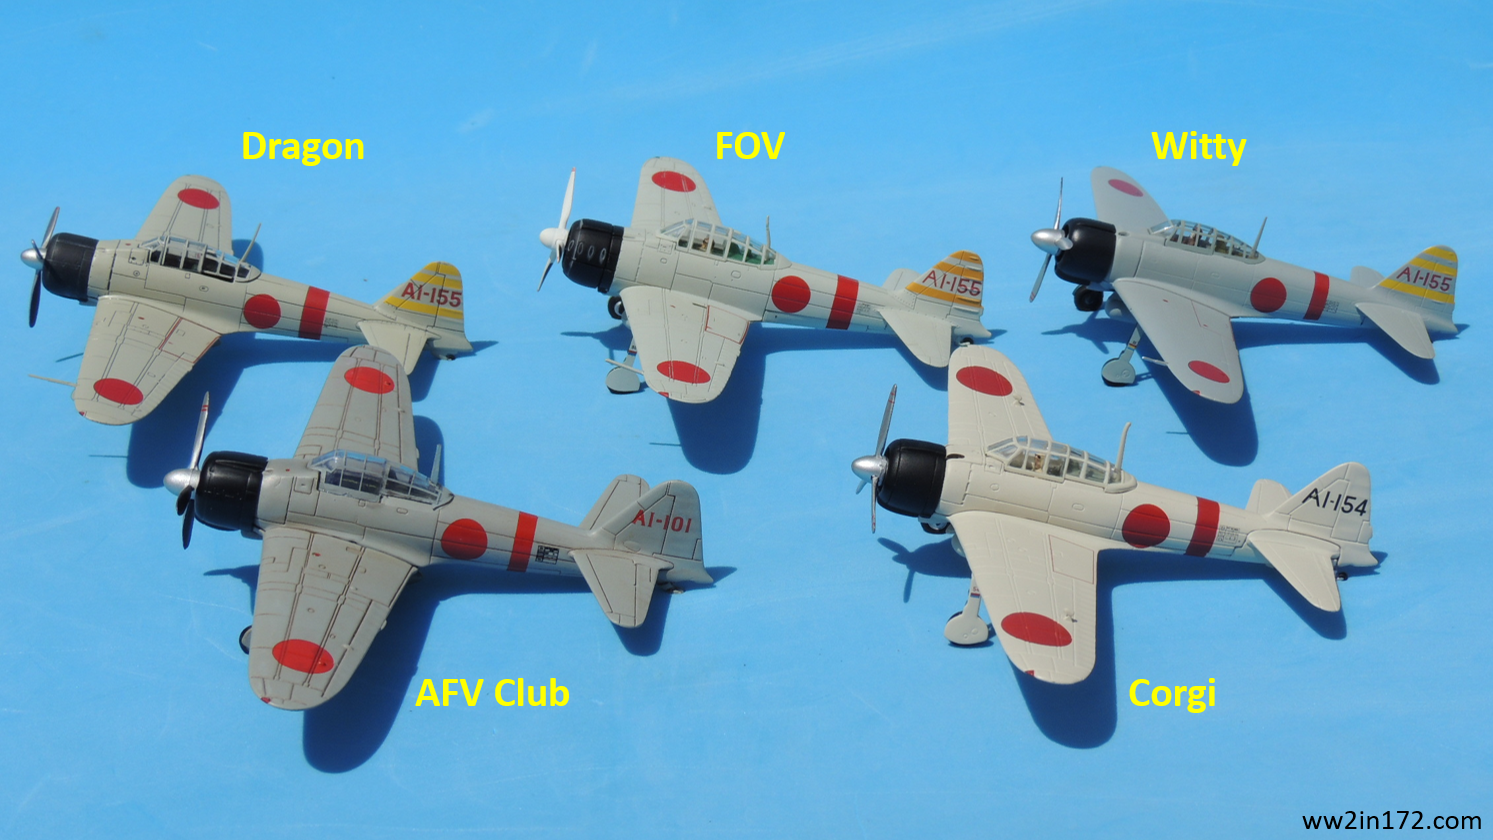 The Diorama Zeros
For purposes of the diorama, the goal is to use the five models in the photo above plus four spares — two additional Wittys and two additional FOVs. Only the Dragon AI-155 will be used unmodified; the remaining eight will require new tail numbers as per the chart above. Below is a notional photo of the expected result once the decals are applied. 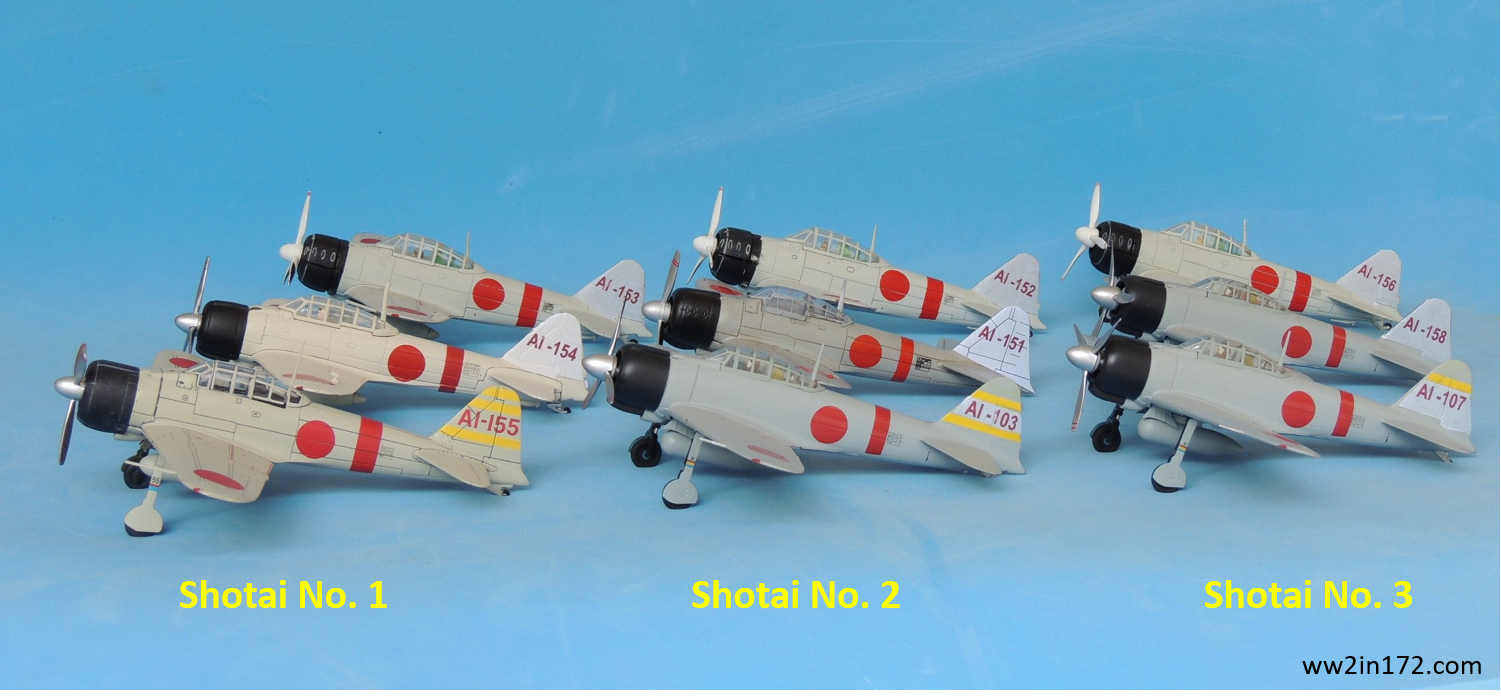
The Decaled Zeros
I searched extensively for MYK Design’s A-72009 Tora! Tora! Tora! Carrier Akagi 1/72 decal sheet (pictured below), since it includes five of the nine necessary tail numbers: AI-103, AI-107, AI-151, AI-155, and AI-158.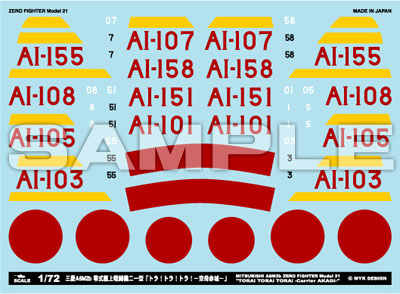 (The AI-155 decal is unnecessary as I’ll be using the Dragon model that already carries that tail number.) Alas, I was unsuccessful as the sheet has been out of print for years.
Ultimately, I had no choice but to make the decals myself. I enlarged the image at left, cleaned it up, enhanced the numbers as much as possible, and then reduced it back to 1/72 scale. I then printed the image on Micro-Mark decal paper.
To my dismay, I found that handling the decal sheet resulted in slight smudging. After rereading the decal paper directions, I reprinted the image and “fixed” it onto the sheet with Winsor & Newton fixative. Failure to apply a coat of fixative to protect the image will result in the image smudging like lead on a pencil drawing when touched.
The photo below shows the decal sheet printed on the Micro-Mark decal paper after the fixative had been applied.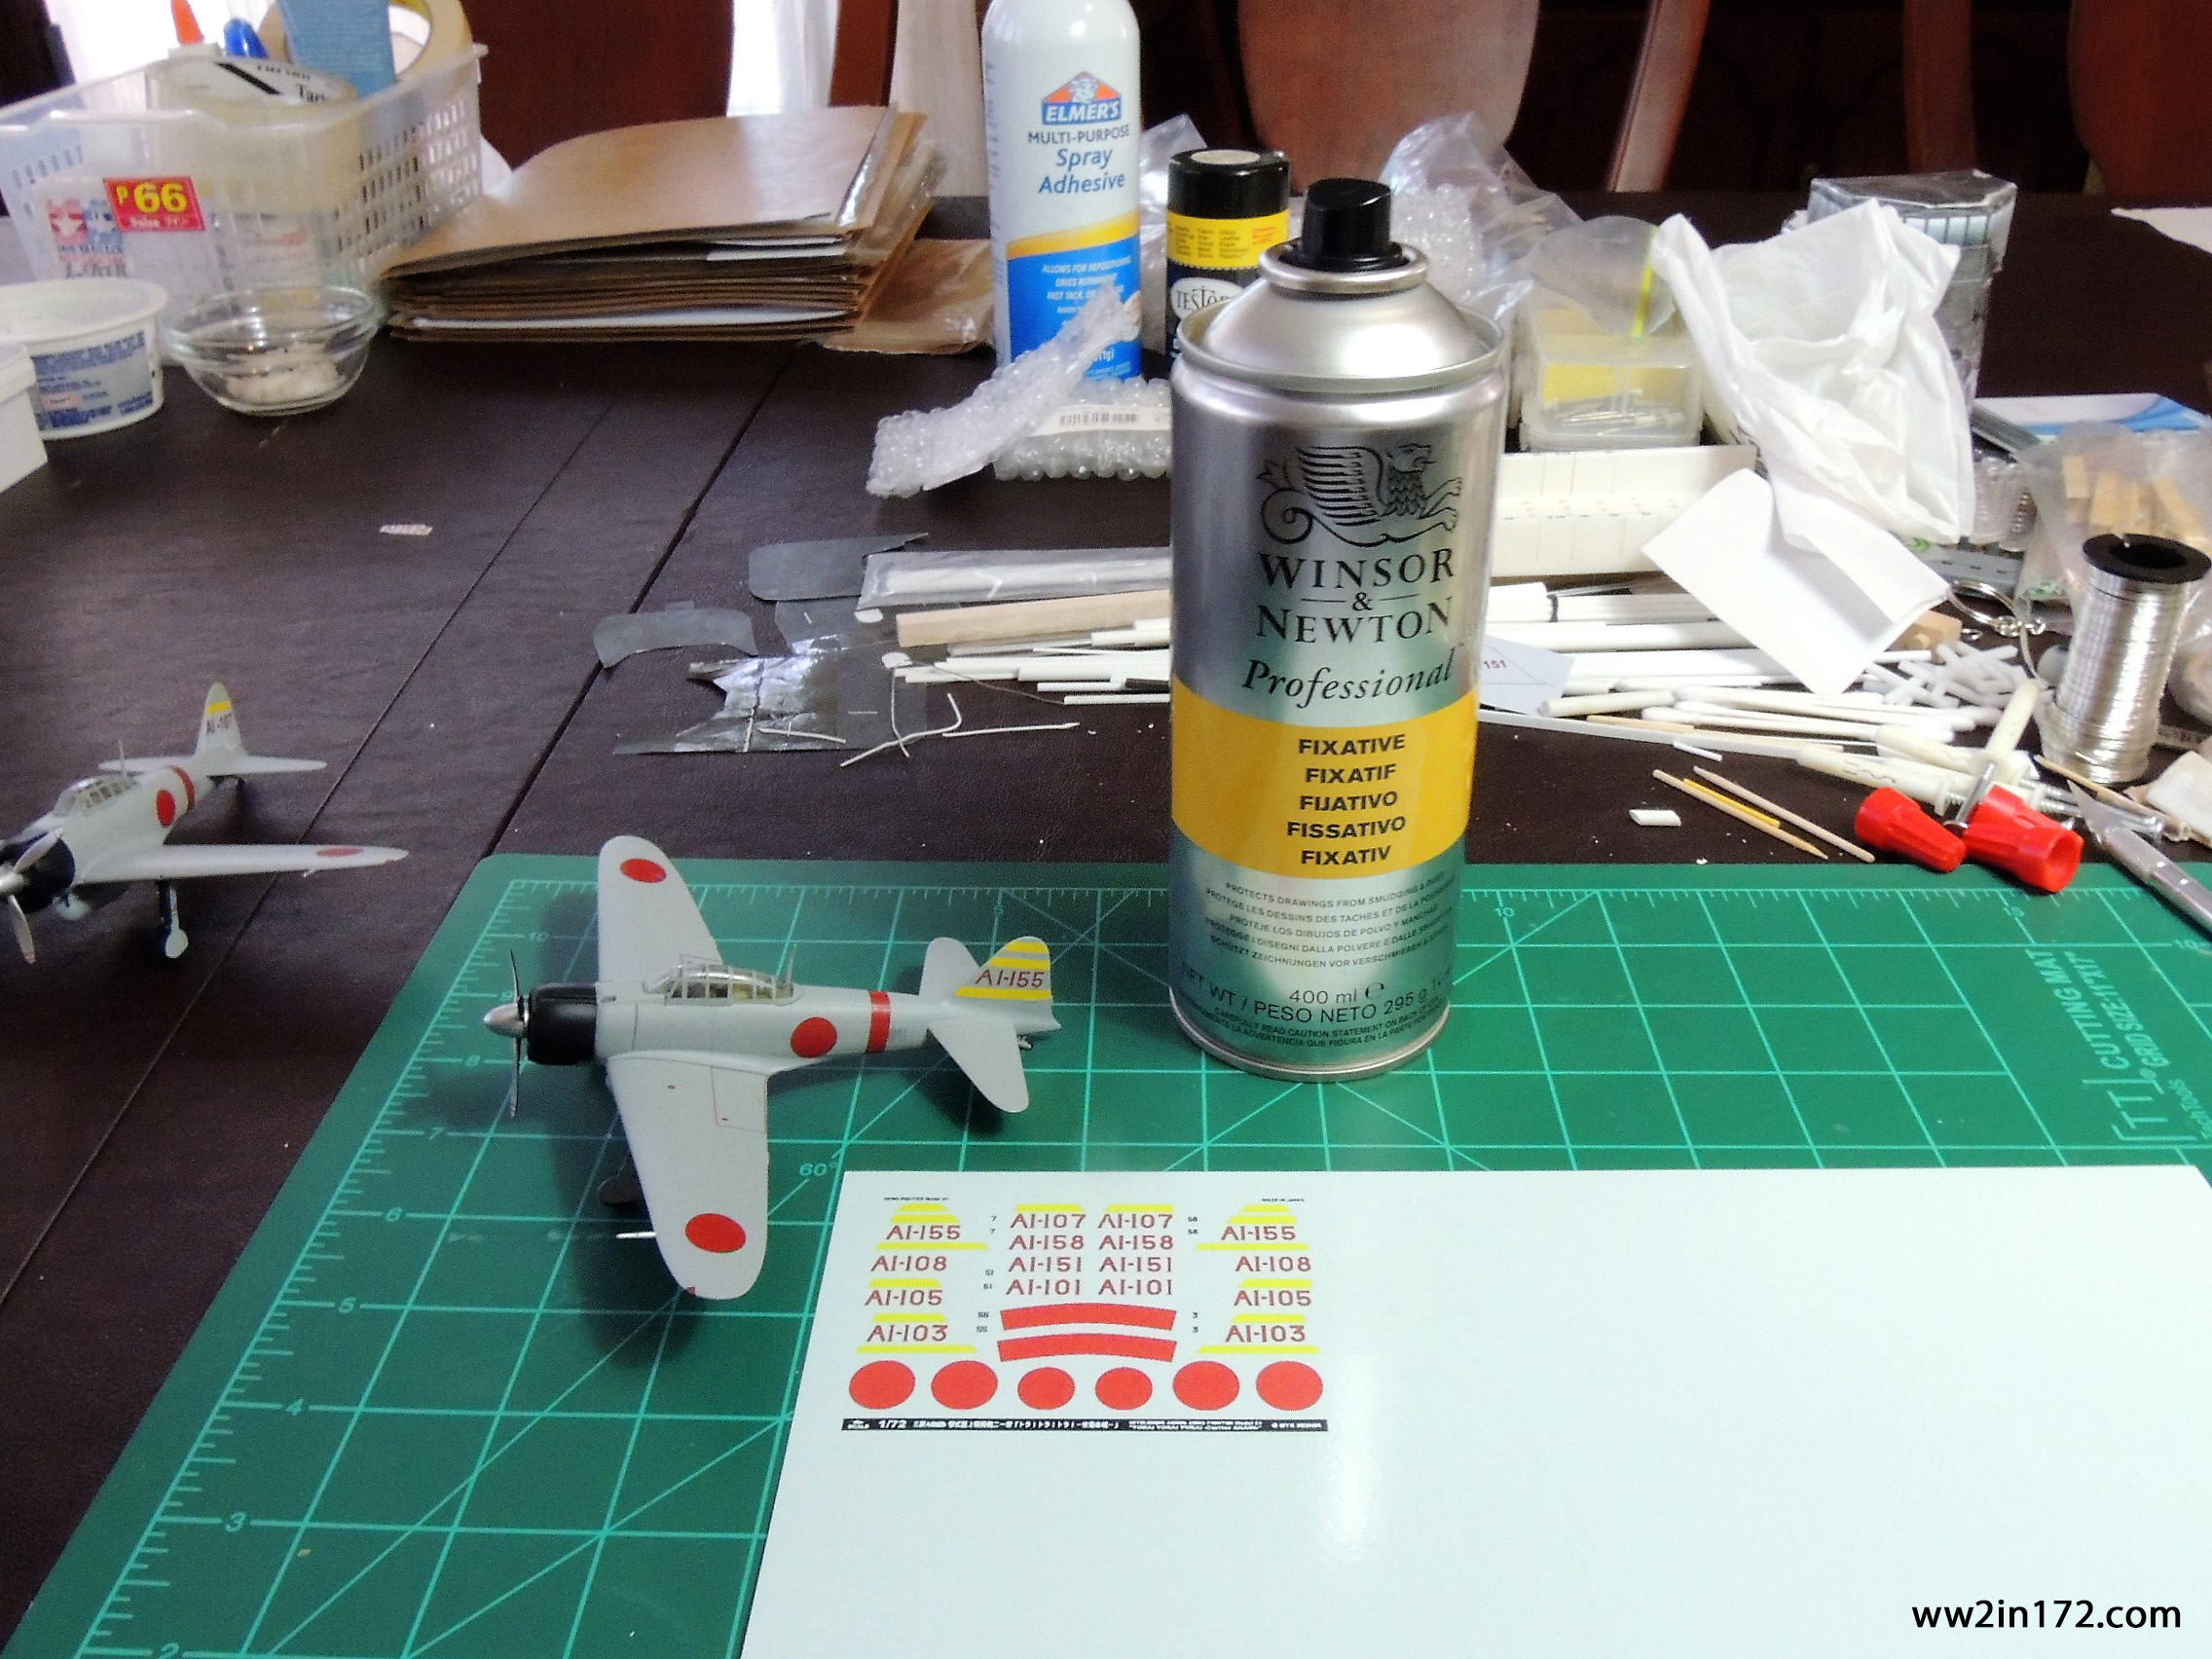 With decals in hand, I prepared the three Witty models for application of the decals by removing the tail numbers and yellow stripes as necessary — leaving two stripes for the AI-103; one stripe for the AI-107; and no stripes for the AI-158. See photo below.
There are essentially two ways to remove the tampo markings on diecast models: 1) by scraping them off, preferably with an X-Acto #10 curved blade; or 2) by applying some sort of solvent, such as Testors 1148 thinner or standard acetone for nail polish removal. I found that a combination of the two methods worked best for me. (Note: Do not use enamel thinner on plastic models. It will ruin the plastic finish.)  Once the original markings were totally removed, I applied a coat of Pledge (Future) floor finish to ensure that the decals found a glossy base that would prevent silvering. (Pledge’s self-leveling properties are amazing!) After waiting a day for the Pledge to cure, I used Micro Set and Micro Sol solutions to apply the decals.
Micro Set prepares the surface where the decal is to be applied by cutting the oils in the paint, thus allowing the decal to slide on the surface, making it easier to reposition the decal as necessary. Micro Sol softens the decal, allowing it to conform to the surface of the model, which is particularly useful on irregular surfaces such as the panel lines and ridges on the Zero tails. Using these two solutions will help make the decals look “painted-on.”
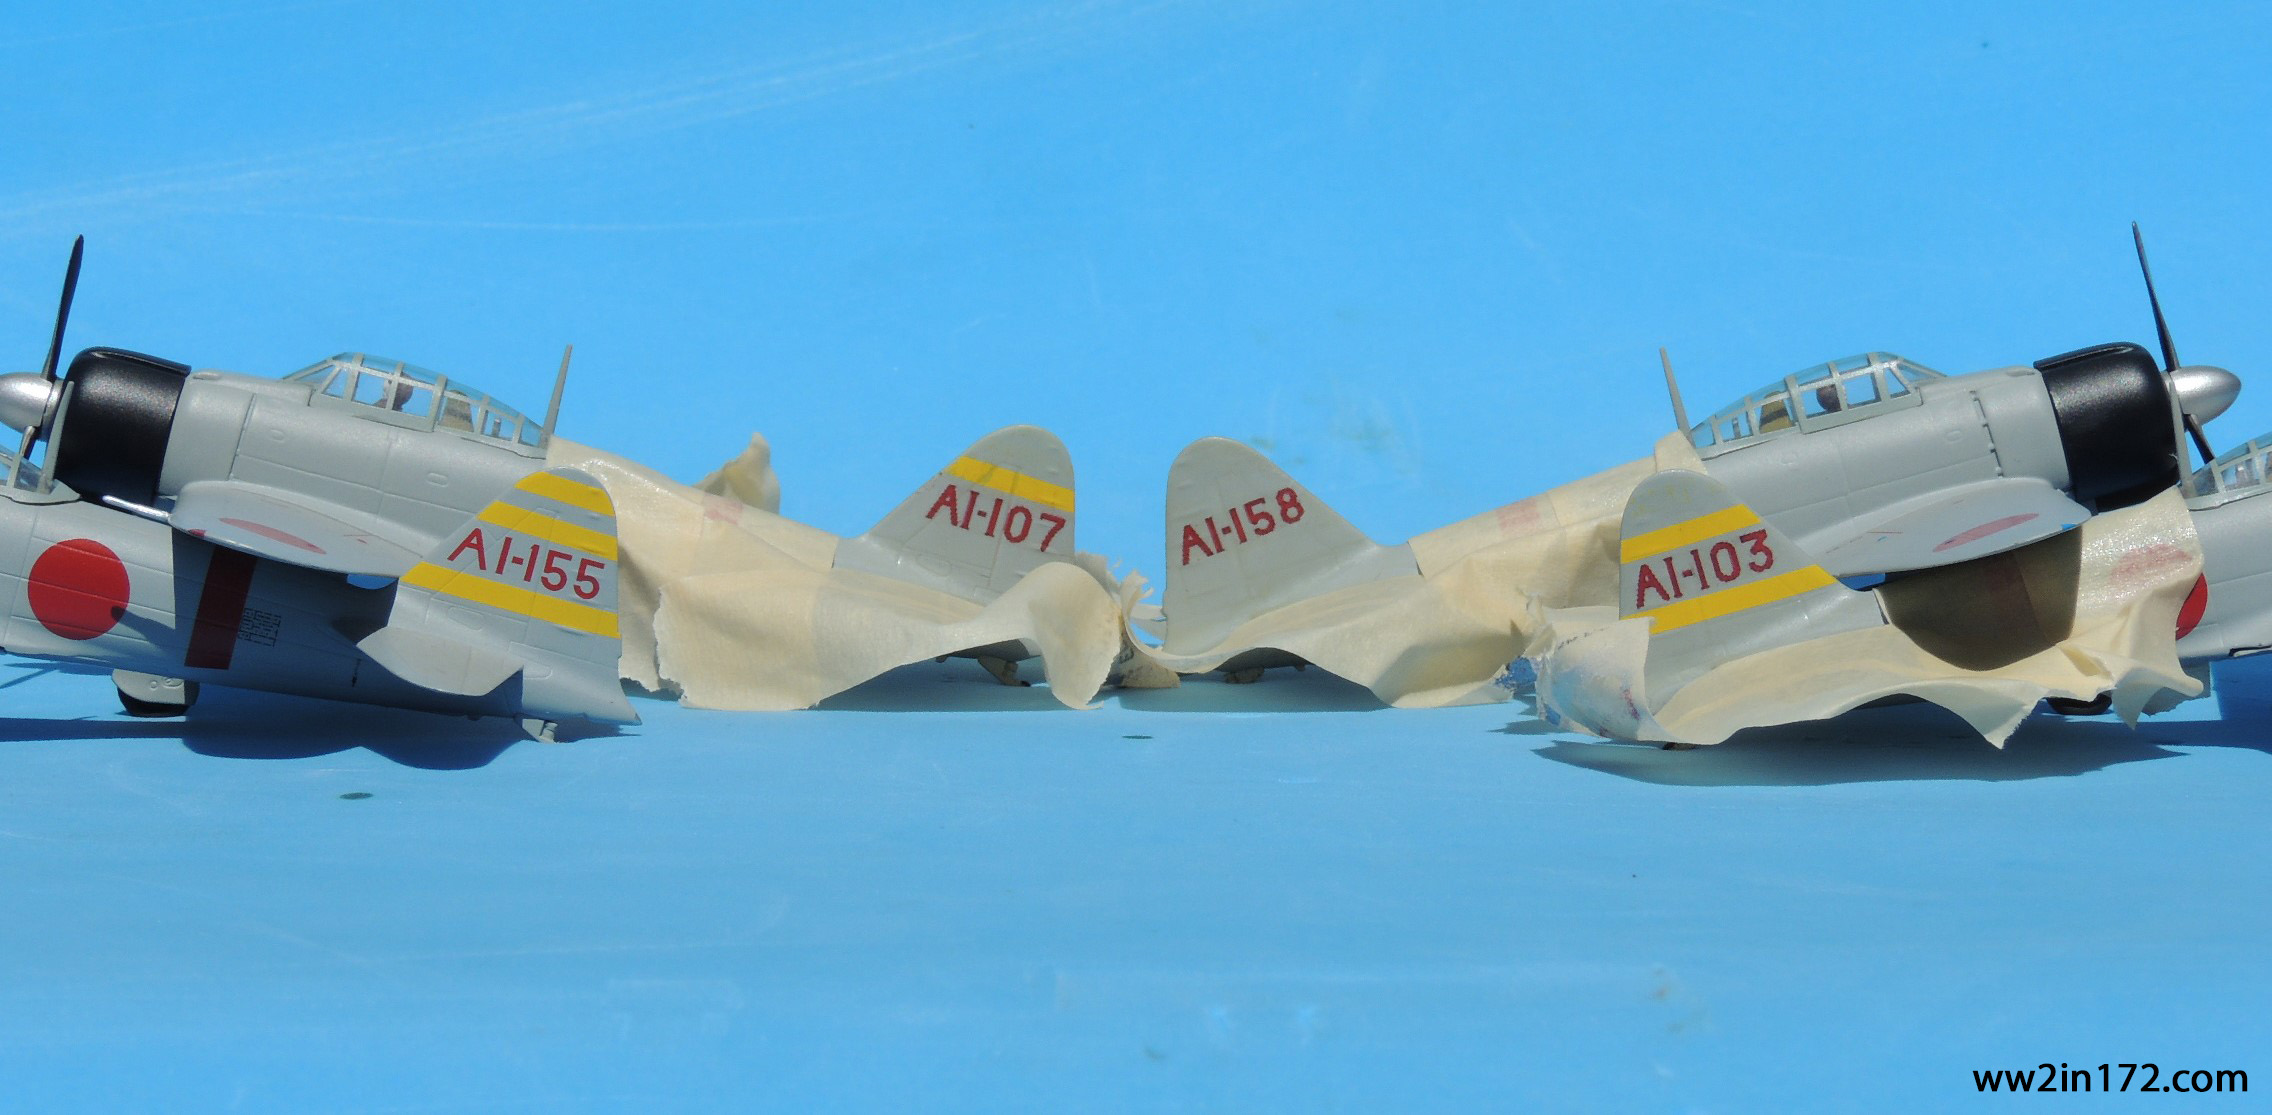
After waiting another day for the decals to dry, I again applied a coat of Pledge to completely seal the decals between two layers of Pledge. Of course, the Pledge application resulted in a glossy finish. After waiting yet another day, I sprayed the decals with Testors Dull Cote to give the tails a matte finish that matched the rest of the model. The photo below shows the results after the Dull Cote had dried.
 In addition to an unmodified Witty model (AI-155), the photo below shows the three decaled Witty models (AI-103, AI-107, and AI-158), plus one decaled FOV model (AI-151). Note that some paint came off the tail of the FOV when I removed the tampo markings, giving it an unintended — though not totally unwelcome — weathered look. (Yes, I’m accepting that which I cannot change. 🙂 )
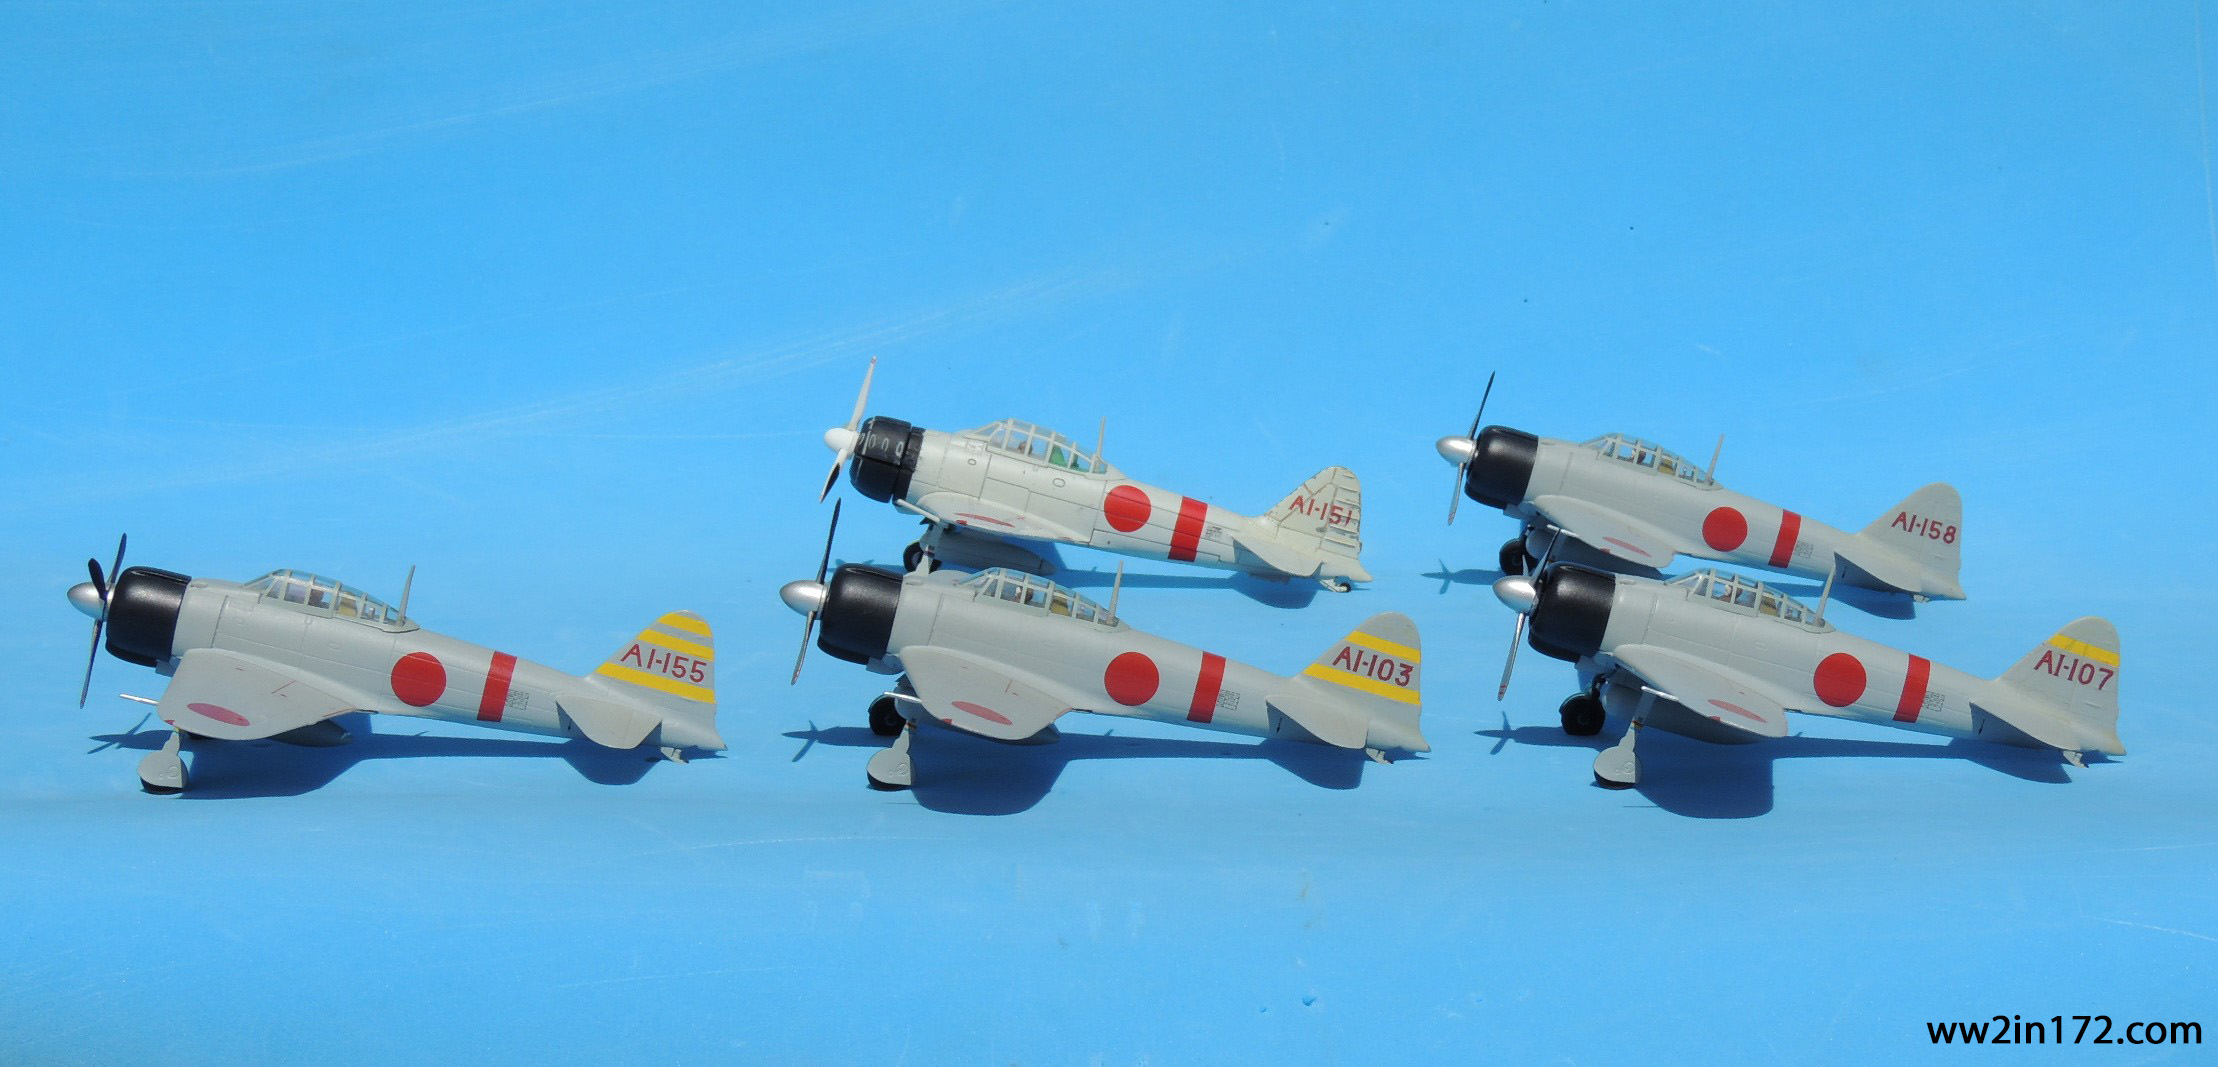 As previously mentioned, Corgi inexplicably applied black tail numbers to the AI-154 (see inset in the photo below), rather than the well-documented red numbers. I removed the black numbers with Testors thinner and applied a decal with correct red numbers following the process discussed above. Note that the MYK Design A-72009 decal sheet did not include the AI-154 so I made the decals using letters and numbers from different fonts to simulate the MYK Design numbers. The lagniappe photo below shows the result. I made the extra decals standing by the tail in case I botched the first application — a common occurrence, at least for me, when applying decals.
 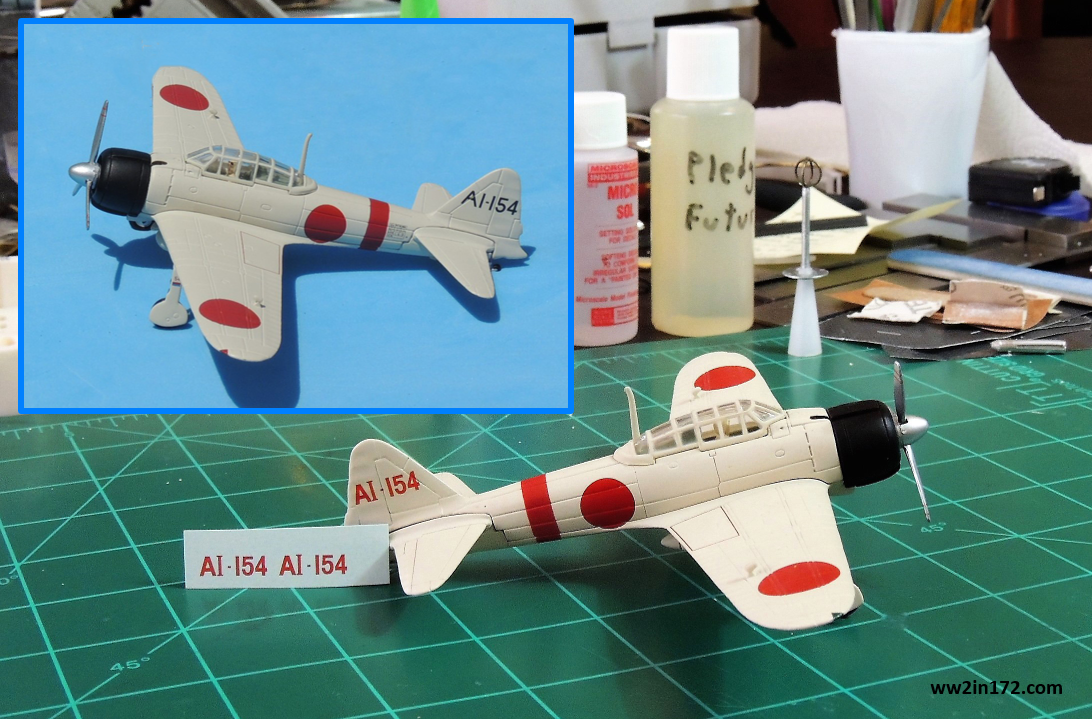 To summarize, six models are now ready: the unmodified Dragon AI-155 plus five decaled planes — three Witty models (AI-103, AI-107, and AI-158), one FOV (AI-151), and one Corgi (AI-154). I’ve decided not to decal the last three (AI-152, AI-153, and AI-156) as the FOV model did not respond well to removal of the tampo markings. Instead, I’ll use paper covers using the stencil in the previous post.
I apologize for such a tedious post. I realize that except for diehard readers, discussion of the tail numbers can get repetitive and confusing. Still, I think the photos by themselves tell the story.
Again, thank you for your indulgence and I hope at least some of you enjoyed the post. If something looks amiss, please let me know. I would be delighted to correct inaccurate information so that this may be useful to other 1/72 scale collectors and wargamers. As always, comments, questions, corrections, and observations are welcome. Stay tuned for a brief discussion of the Zero pilots who participated in Akagi’s first wave attack in the next post.
Ara Hagopian says:
I’m still in awe of the work you did here. You are covering all the bases, making decals, removing model markings, researching what’s correct, and applying the new markings. These are all high level, unique steps!
Chris says:
Great record of your meticulous process, chules! The idea of recreating an entire flight of specific, historic aircraft is awesome.
chules says:
Hi Chris,
Thanks so much for the comment. It’s encouraging feedback like this that makes want to get off my duff and complete this project. So, I’ve just published the next installment.
Thanks and regards,
chules
Ara says:
Wow!!! Look at your work! Fantastic, there’s so much to learn here. How to do the conversions, how to make decals and apply them, and also– we can visualize the Akagi Zeros, each attacker. Fabulous work, and I know it’s a bear to photograph all this. Excellent chules!