October 1, 1942, Quotaifiya, Egypt — 78 years ago today.
The disconsolate, careworn faces of the attendees contrasted sharply with the upbeat cadence of the Cuban Rumba Azul playing on the wind-up gramophone. The pilots and ground crews of Luftwaffe Fighter Wing JG 27 paid their final respects before the remains of their fallen comrade were to be flown to Derna, Libya, 300 miles west, where the body would be interred at the Heroes’ Cemetery that same day. Once in Derna, Generalfeldmarschall Albert Kesselring, the Wehrmacht’s Commander in Chief in the Mediterranean, delivered an emotional paean, recalling the deceased’s legendary aerial exploits.
Marseille’s body lies in state in Derna, Libya, on October 1, 1942.
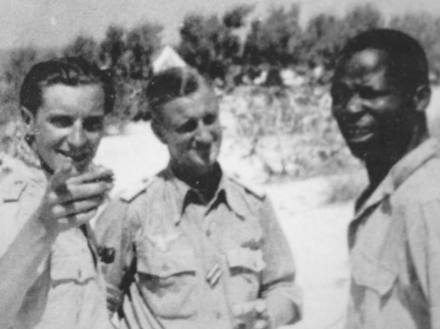
Clearly, this was no ordinary funeral. This final farewell was for a highly decorated hero of the Third Reich, a man who had earned oak leaves, swords, and diamonds to his Knight’s Cross, the Luftwaffe’s youngest captain, and one of the greatest pilots of World War II. His unparalleled technical skills had earned the respect of comrades and foes alike, and his rebellious, yet kind, nature had won their admiration. The newly departed was a maverick – an iconoclast who, eschewing Nazi ideology, counted a black German-speaking South African POW as one of his closest friends and enjoyed “degenerate” American jazz and Latin music — Rumba Azul his favorite melody.
Marseille (left) with South African friend Matthew “Matthias” Letuku (right).
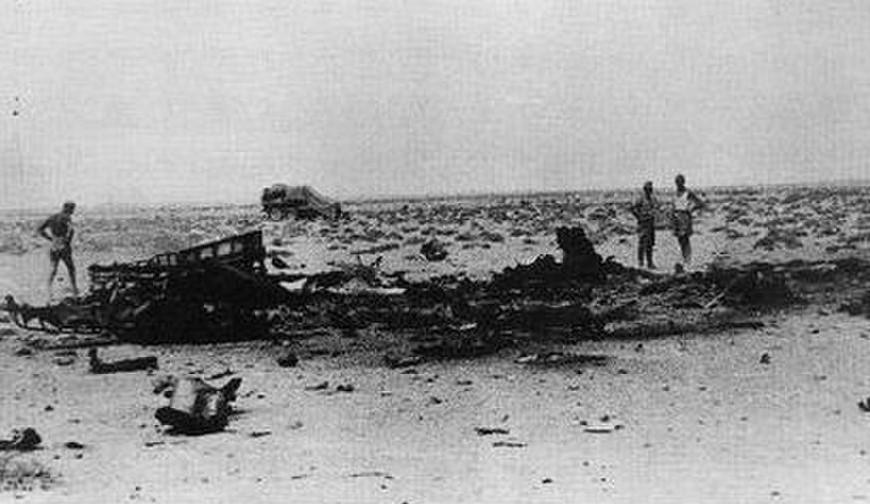
Hans Joachim Marseille, the 22-year-old “Star of Africa,” had shot down 158 enemy aircraft when the engine of his new Messerschmitt Bf 109G malfunctioned over the Egyptian desert on September 30, 1942. When the smoke from the engine filled the cockpit, entirely clouding visibility, Marseille baled out of his Gustav, accidentally hitting his head against the rudder that heralded his many victories. He was rendered unconscious immediately, before he could deploy his parachute, and plummeted thousands of feet to his death.
Members of JG 27 survey the wreckage of Marseille’s Bf 109.
Marseille was a legend even in life. In his eulogy, just one day after Marseille’s passing, Kesselring summed up Marseille thus: “Hauptmann Marseille is fallen. Unbeaten. With his passing, a heroic individual, a marvelous colleague, an artist in the air and the best fighter pilot in the world is gone from our ranks forever.” Adolf Galland, a Luftwaffe legend himself, called him “the unrivaled virtuoso among fighter pilots of the Second World War” in his memoirs.
Marseille was a man who clearly understood that each of his victories meant the loss of a son, father, brother, or husband. In a letter to his mother after his very first victory on August 24, 1940, during the Battle of Britain, Marseille wrote: “Today I shot down my first opponent. It does not set well with me. I keep thinking about how the mother of this young man must feel when she gets the news of her son’s death. And I am to blame for this death. I am sad, instead of being happy about the first victory. I always see the face of the Englishman in front of me and think about his crying mother.”
It is a tragic irony that following Marseille’s last seven victories — 152-158 — Erwin Rommel, the vaunted “Desert Fox,” called September 28 to request that Marseille accompany him to Berlin to attend a ceremony on September 30 — the day Marseille met his fate — where Marseille and Rommel were programmed to sit on either side of Adolf Hitler. Not fond of the Führer, Marseille declined, arguing that he would rather save his leave for December, when he intended to travel to Berlin to marry his fiancée. One can only wonder what destiny had in store had Marseille accepted Rommel’s invitation.
Marseille with Generalfeldmarschall Erwin Rommel.
Marseille’s career as a pilot spanned barely two years – from his first victory in August 1940 to his last in September 1942. Yet he is the subject of several books, countless articles, numerous documentaries, and a full feature German-Spanish film — Der Stern von Afrika (The Star of Africa). The reader is referred to those sources for an account of his aerial accomplishments and a sense of his extraordinary character.
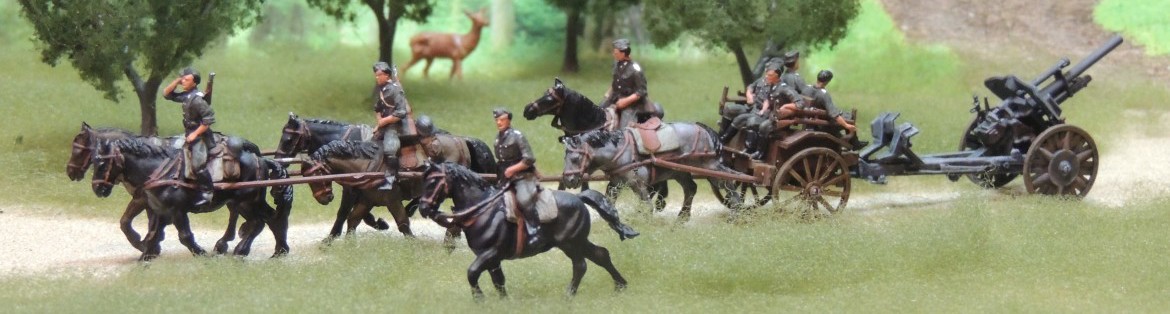
This post is but an introduction to a 1/72 scale diorama depicting Marseille’s aircraft refueling in Quotaifiya, Egypt, circa late September 1942, just days before his death. The diorama will comprise several components, each the subject of a separate post as follows:
I. Introduction – The foregoing post provides a brief sketch of Marseille and outlines the components of the project.
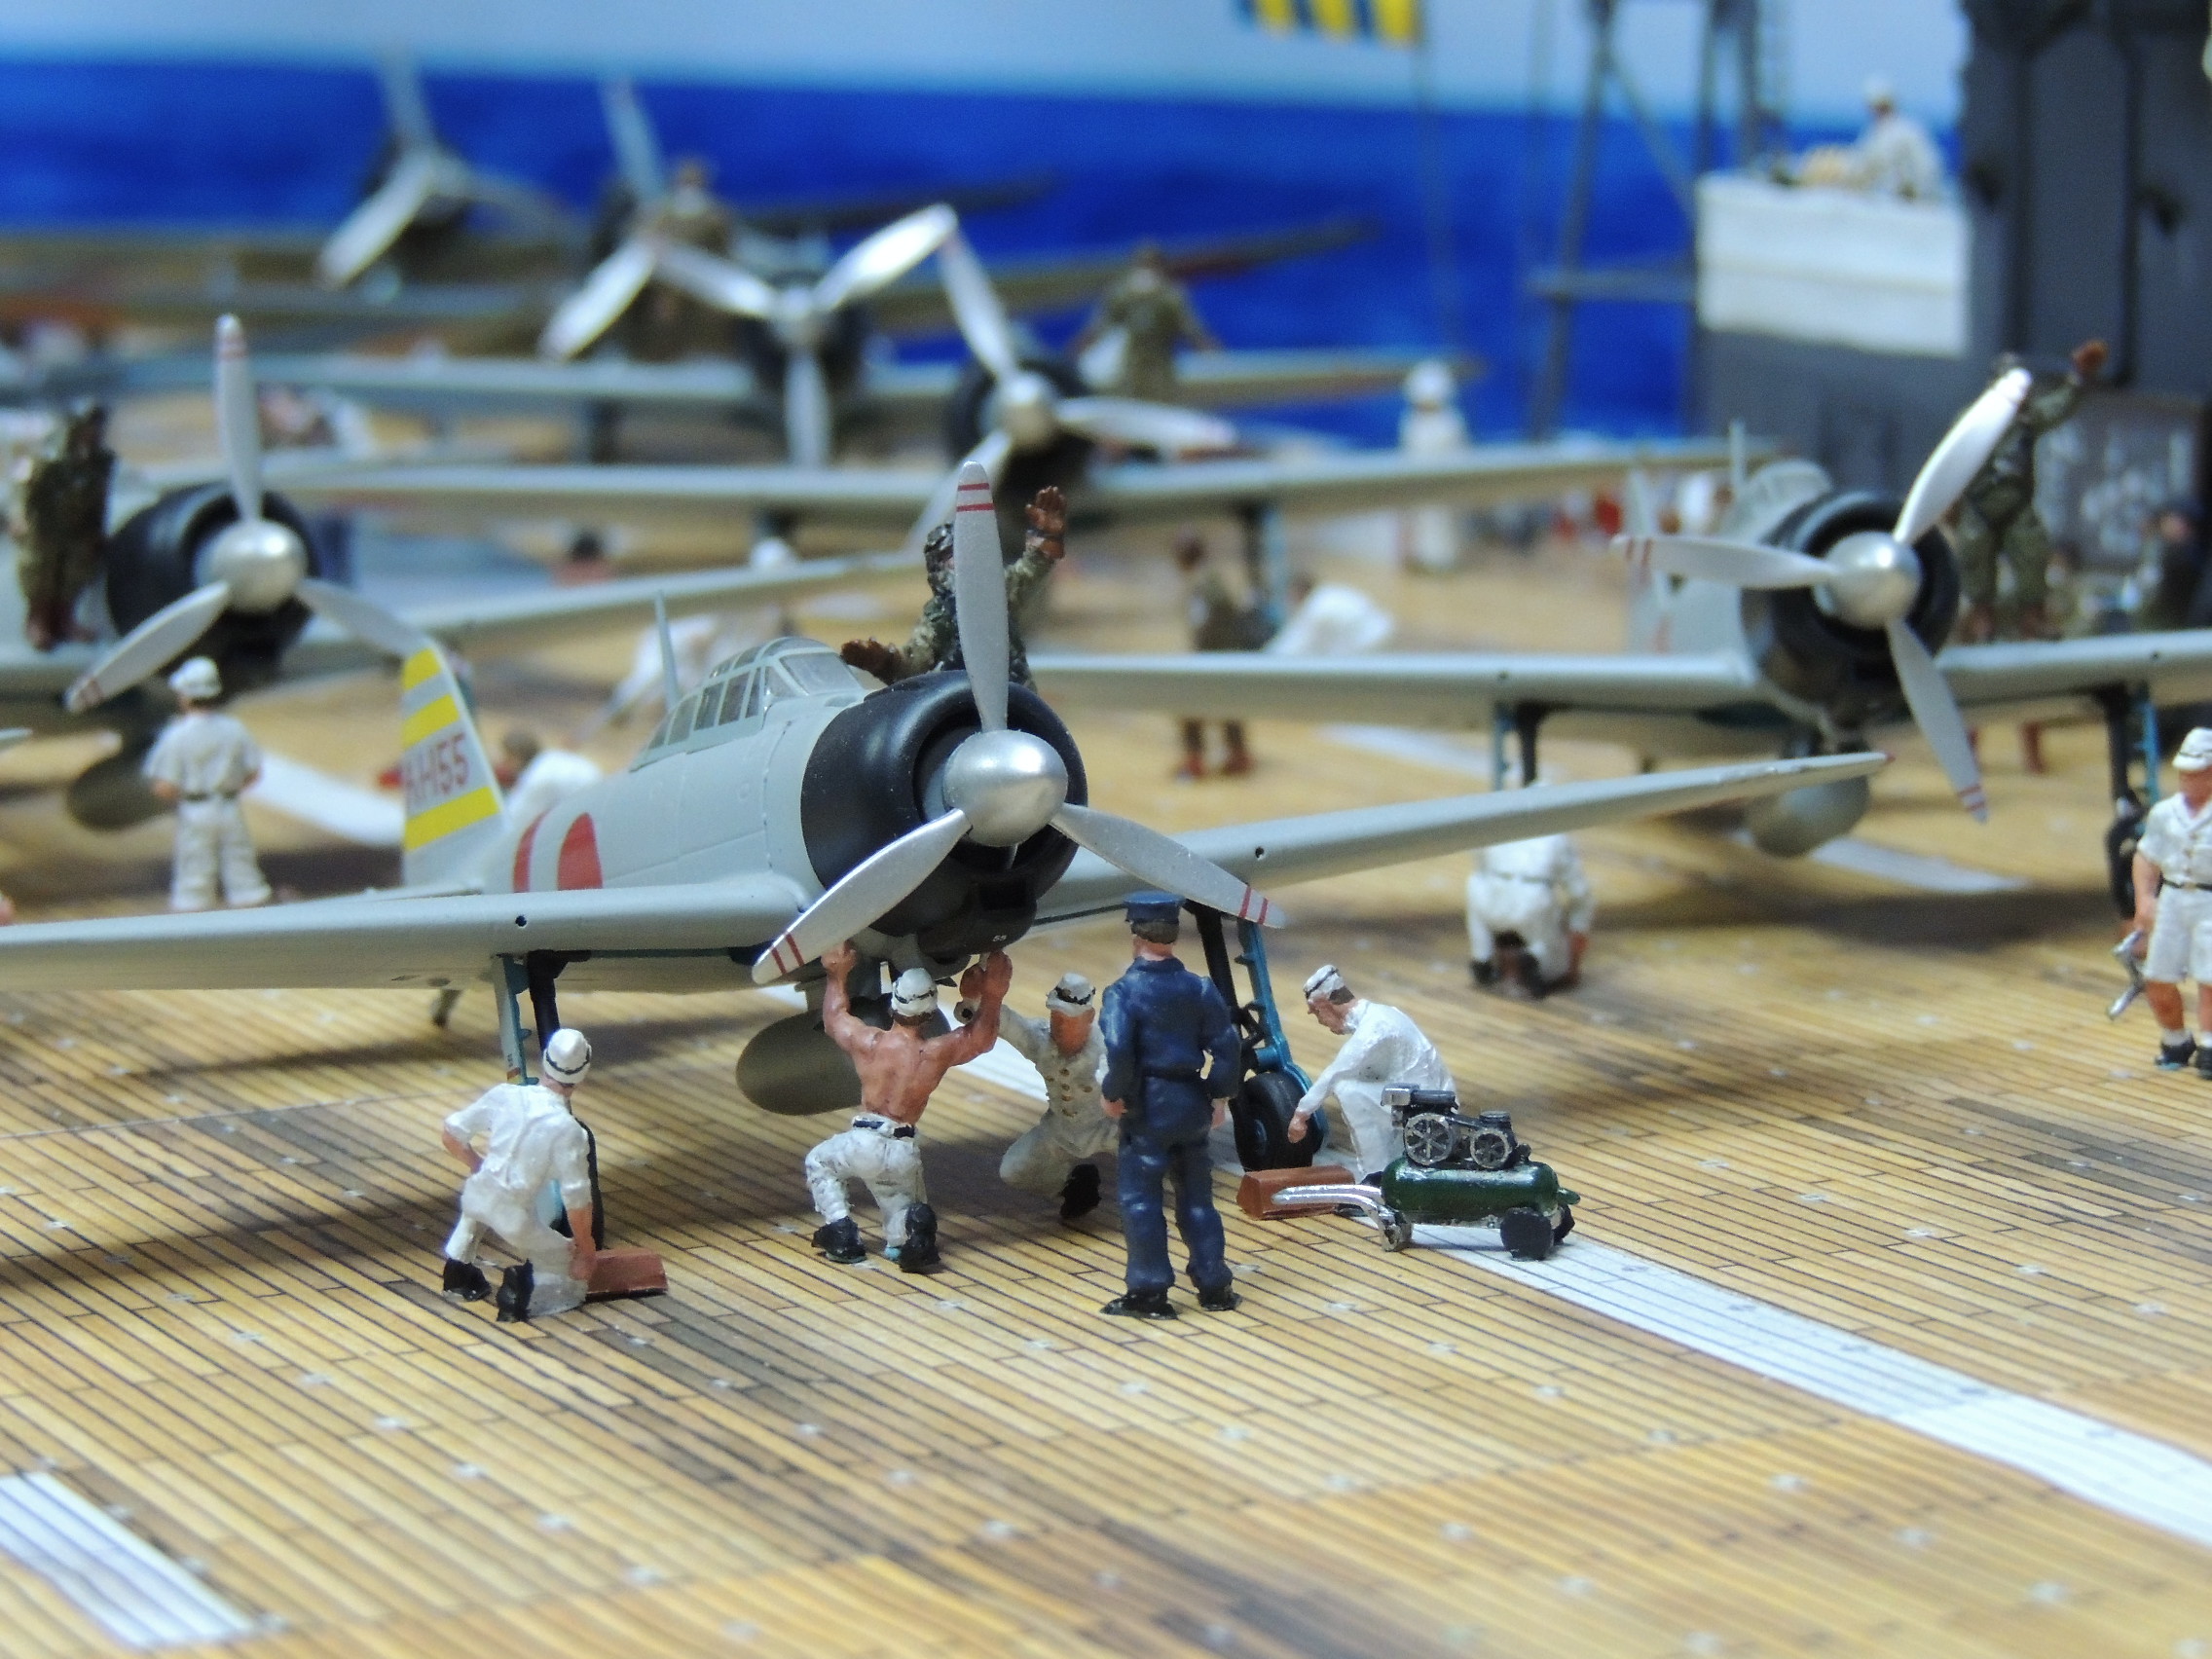
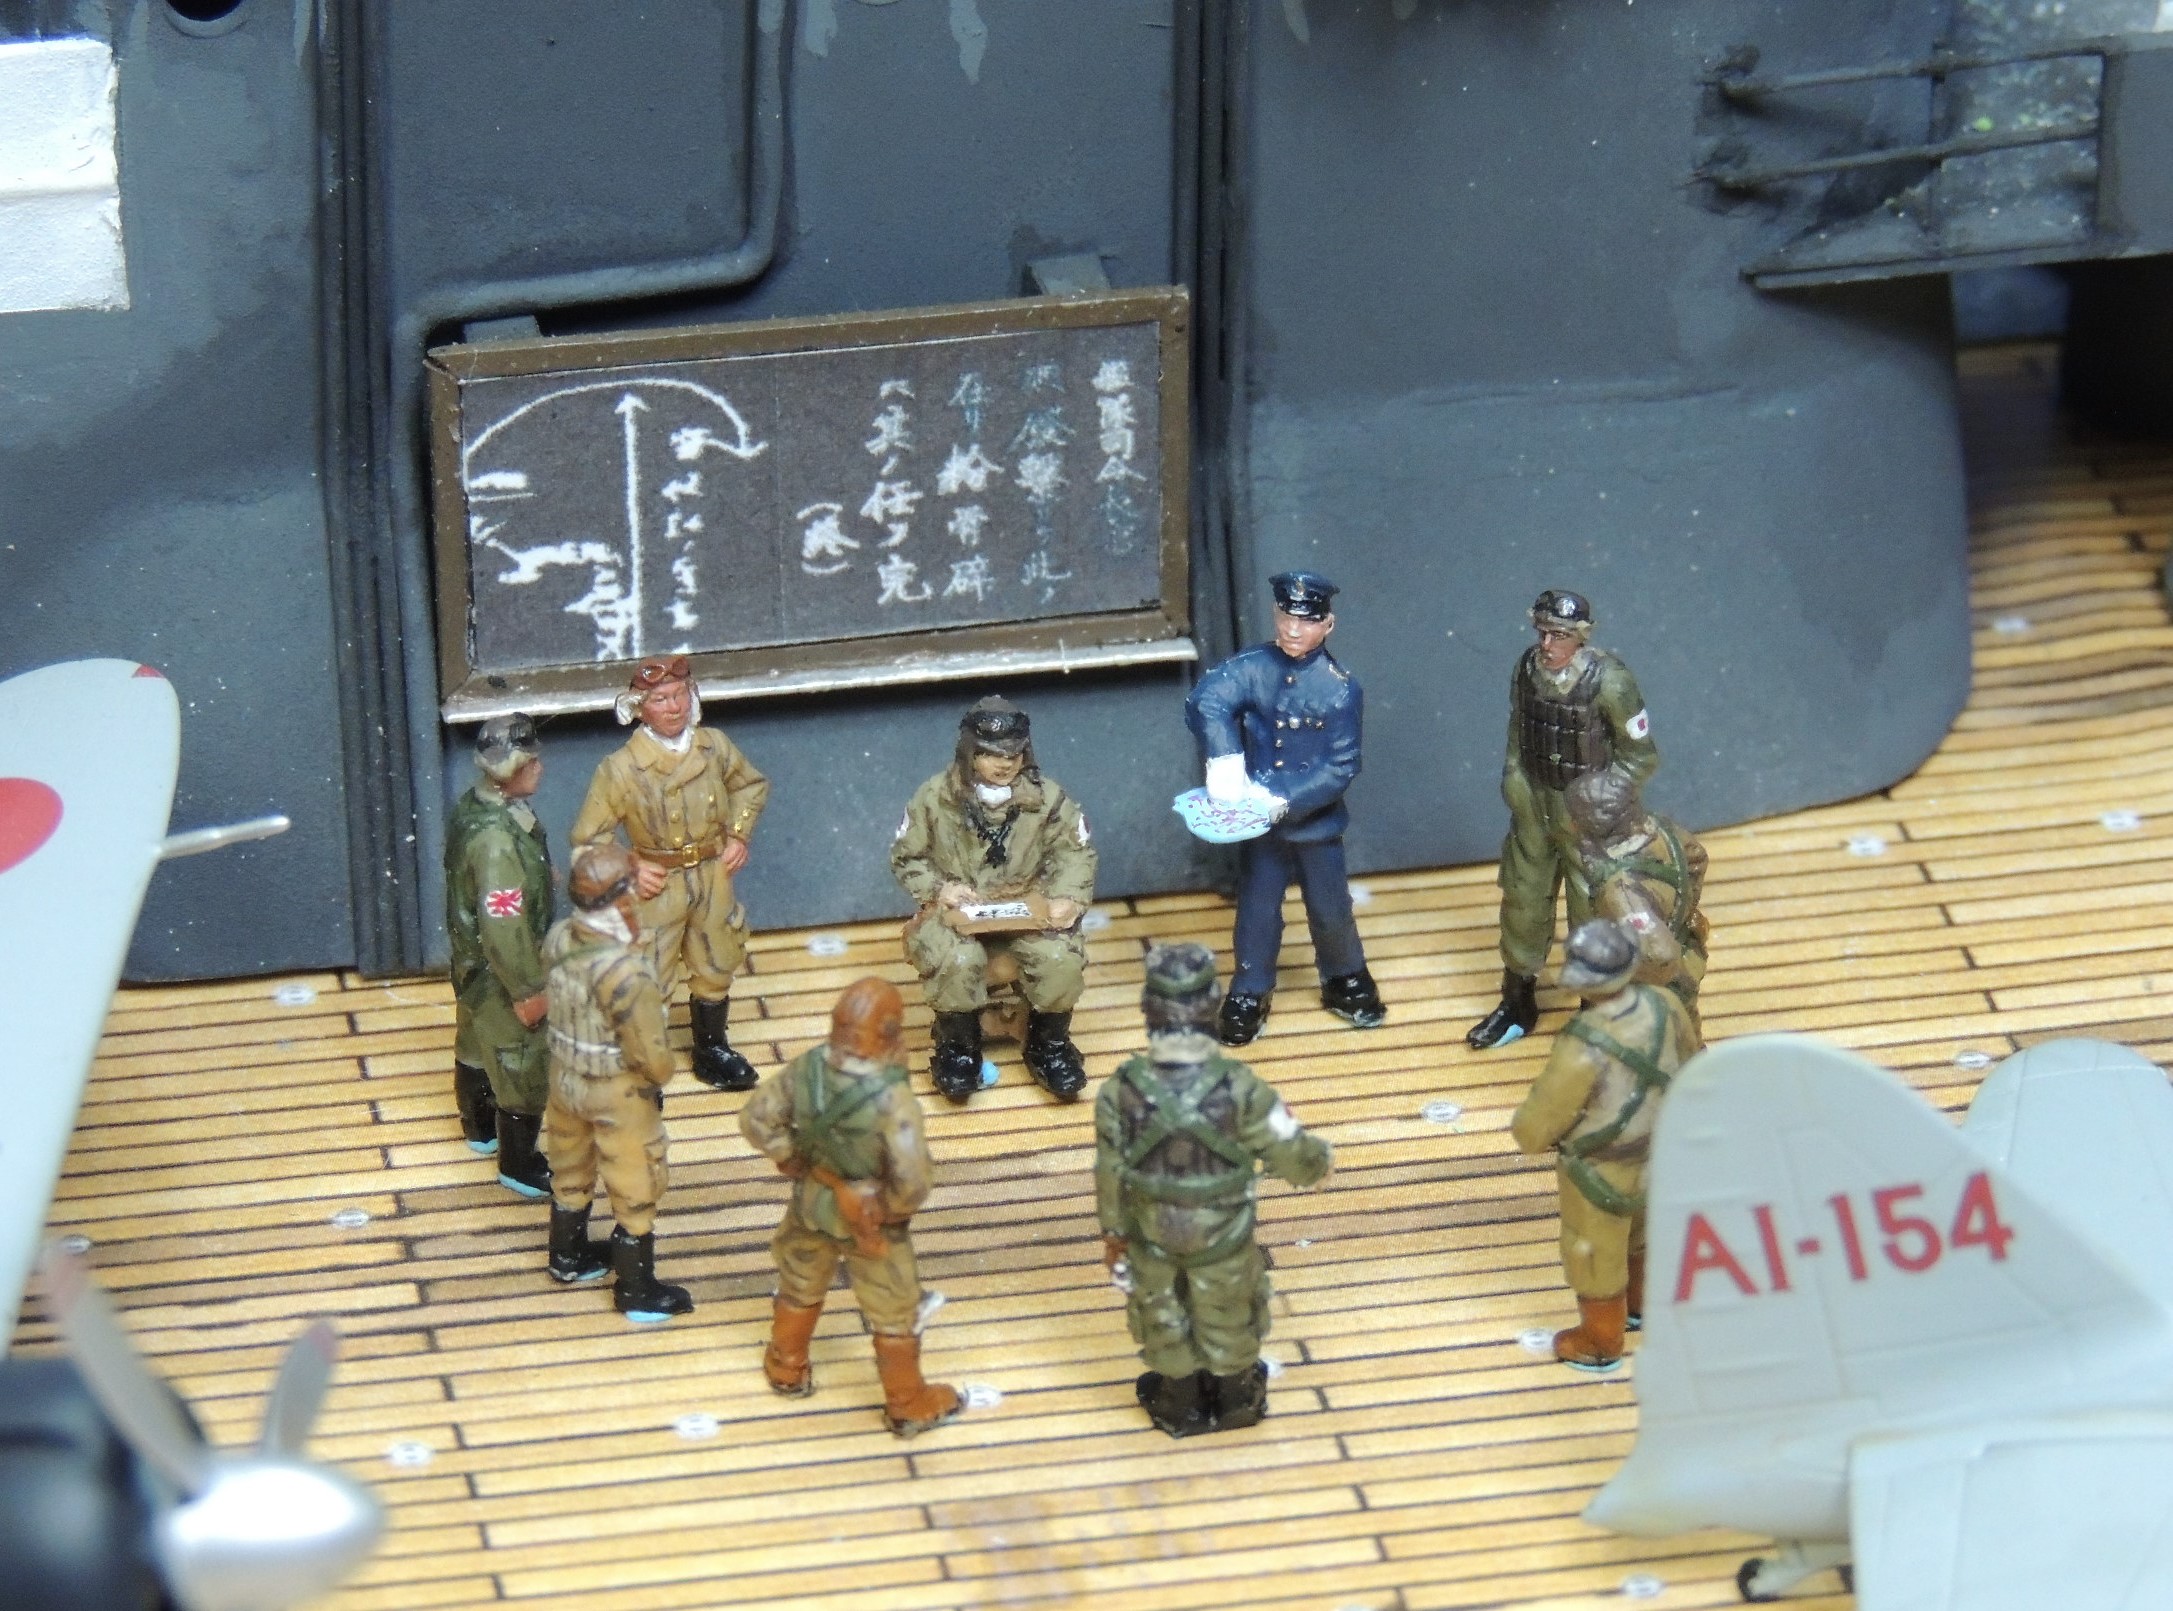
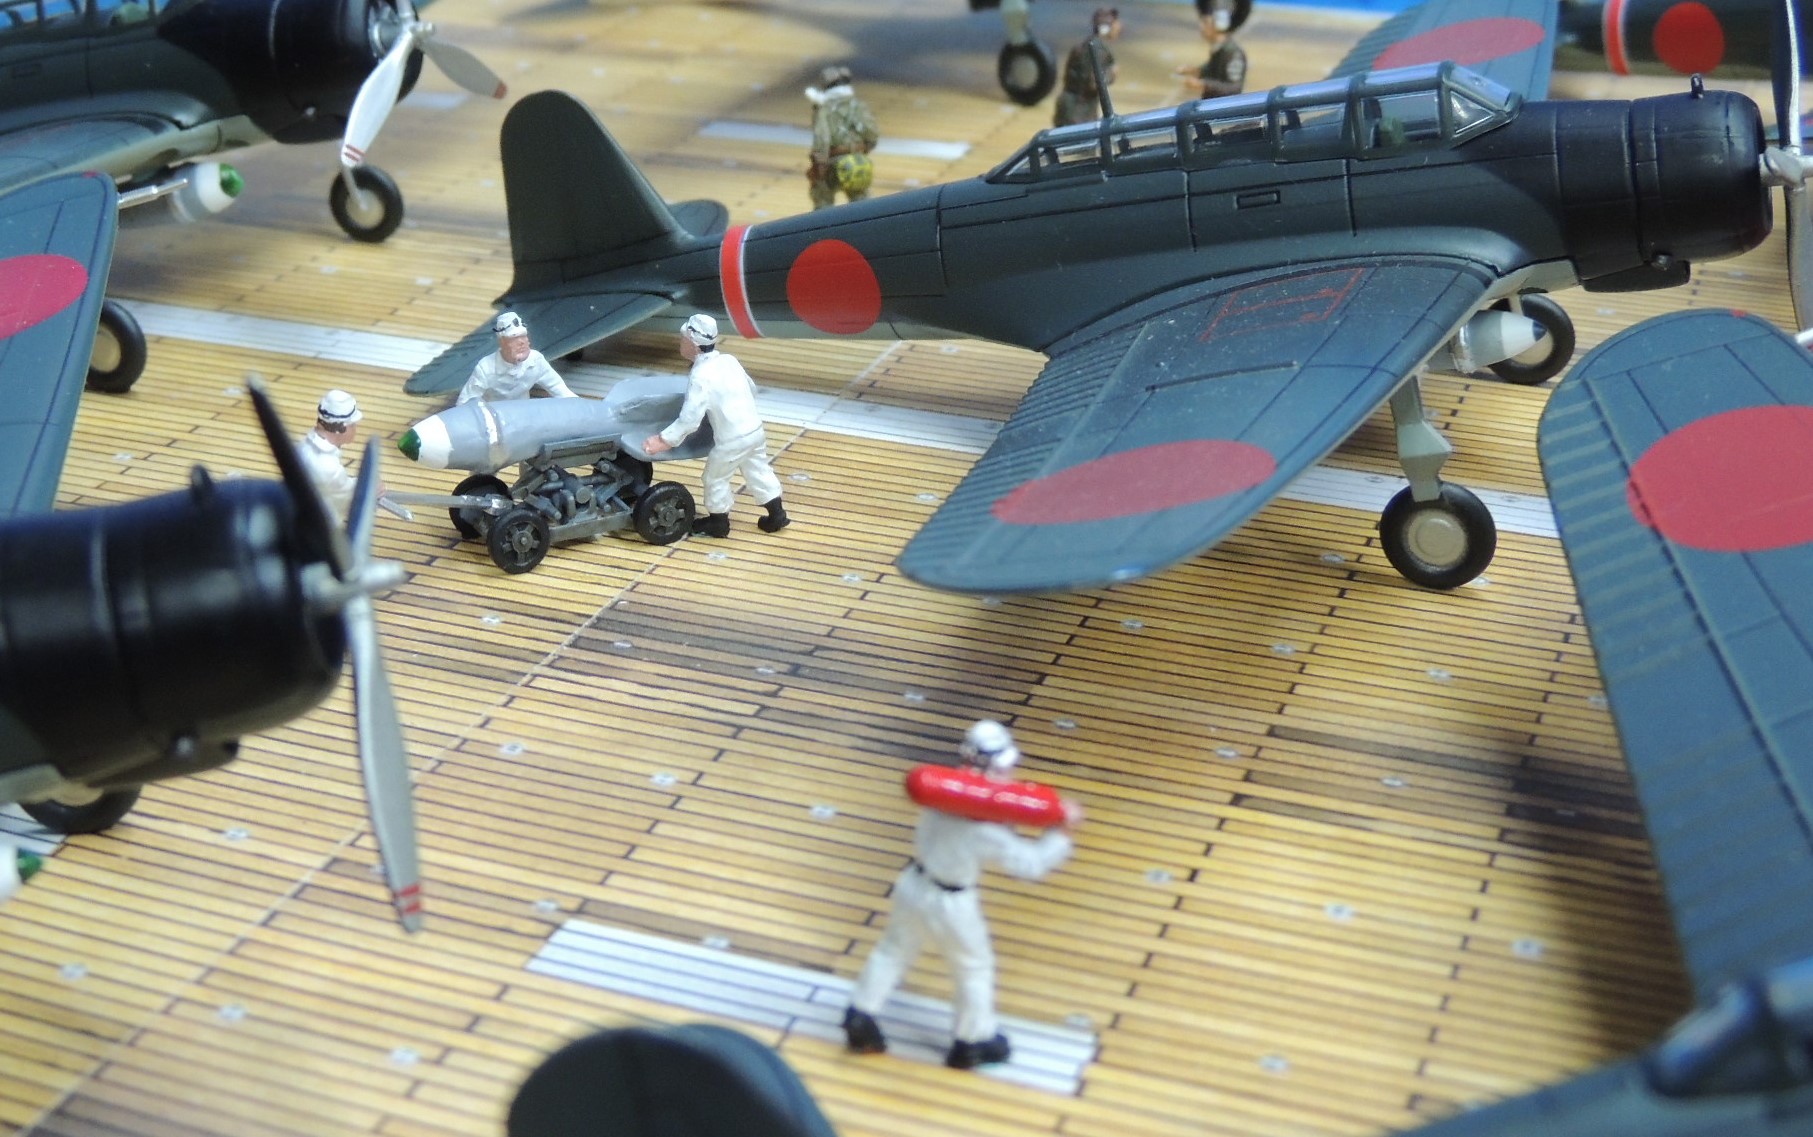
JG 27 engineers and ground crew, stripped from the waist up and wearing shorts and pith helmets due to the extreme heat in the desert, refuel a Messerschmitt Bf 109.
II. Marseille’s Messerschmitt Bf 109s – Marseille flew a number of different Messerschmitt Bf 109s throughout his career. To my knowledge, four different manufacturers – Atlas, Corgi, Easy Model, and Gemini – have produced a total of six prebuilt 1/72 diecast models of Marseille’s various aircraft spanning the two years from his first victory in August 1940 to his last in September 1942. I will be using one of these six for the diorama. This post will provide photos and observations of these models.
Marseille with his Messerschmitt Bf 109 “Yellow 14.”
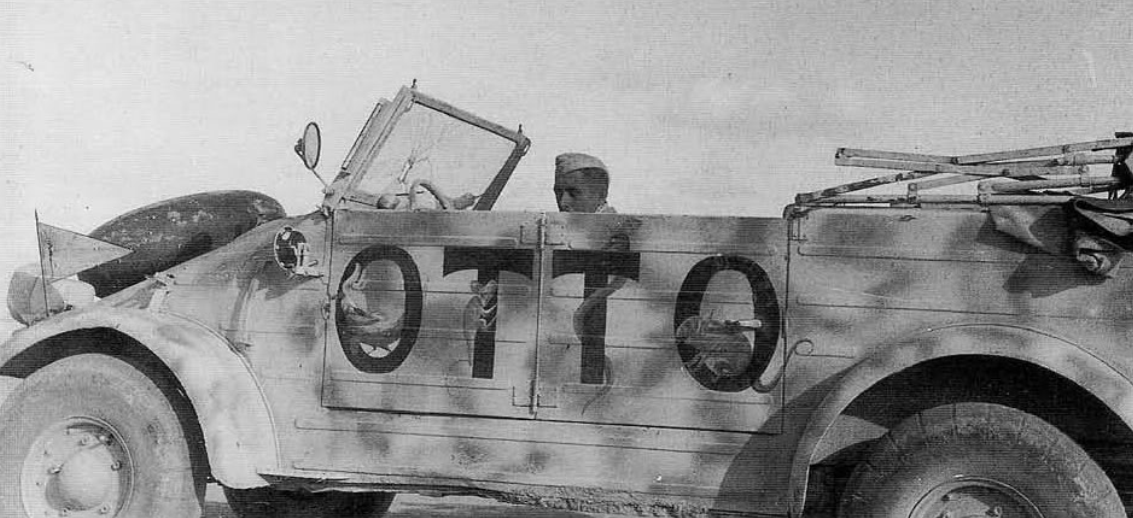
III. Marseille’s “OTTO” Kubelwagen – Upon Marseille’s downing of eight RAF P-40 Tomahawks in a 10-minute sortie on September 1, 1942, the Italians in the camp “borrowed” Marseille’s kubelwagen and painted “OTTO” – “eight” in Italian – on its sides, adorning the four letters with desert fauna. This post will describe the kubelwagen I intend to use for this diorama.
Marseille’s kubelwagen “OTTO.” Note the distinct balloon tires made specially for desert cross-country driving and the pennant on the driver’s side — characteristics often missed by model manufacturers.
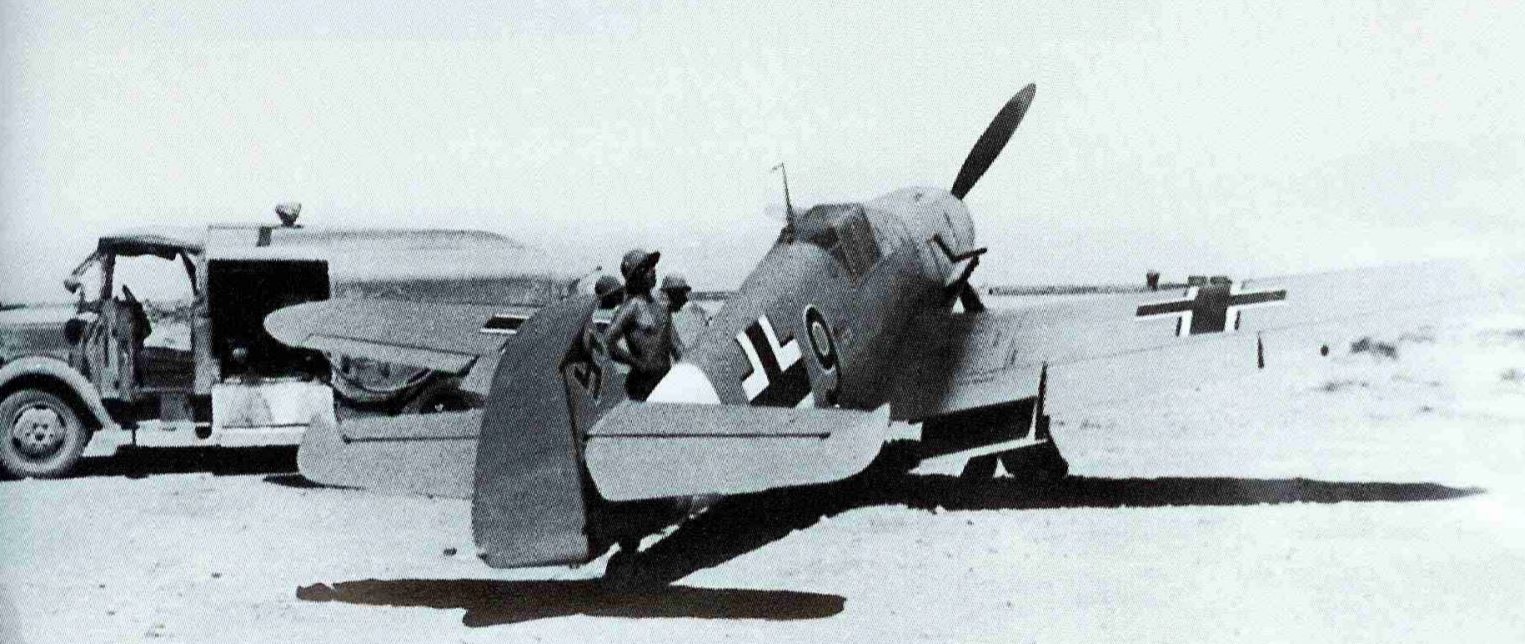
IV. Luftwaffe Opel Blitz Tankwagen – The Luftwaffe used the Opel Blitz tankwagen Kfz. 385 to refuel their aircraft throughout the conflict, including in North Africa. As far as I know, three manufacturers have produced 1/72 model kits of the Kfz. 385 – two in plastic by Roden and MAC Distribution and one in resin by FM Detail Sets. This post will briefly discuss the tankwagen I intend to use for this diorama.
An Opel Blitz tankwagen refuels a Bf 109 of JG 27.
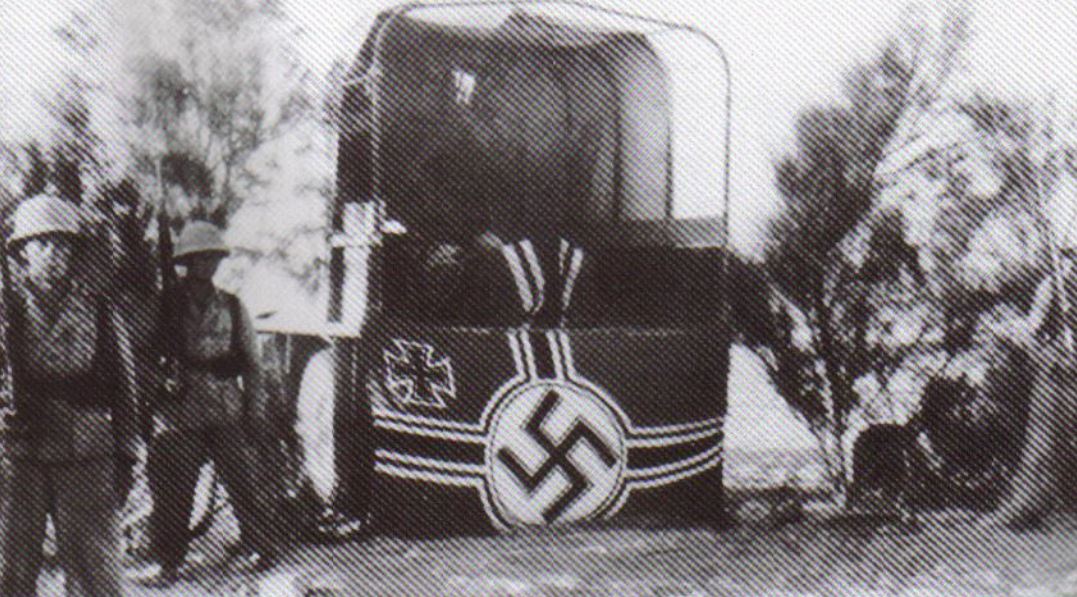
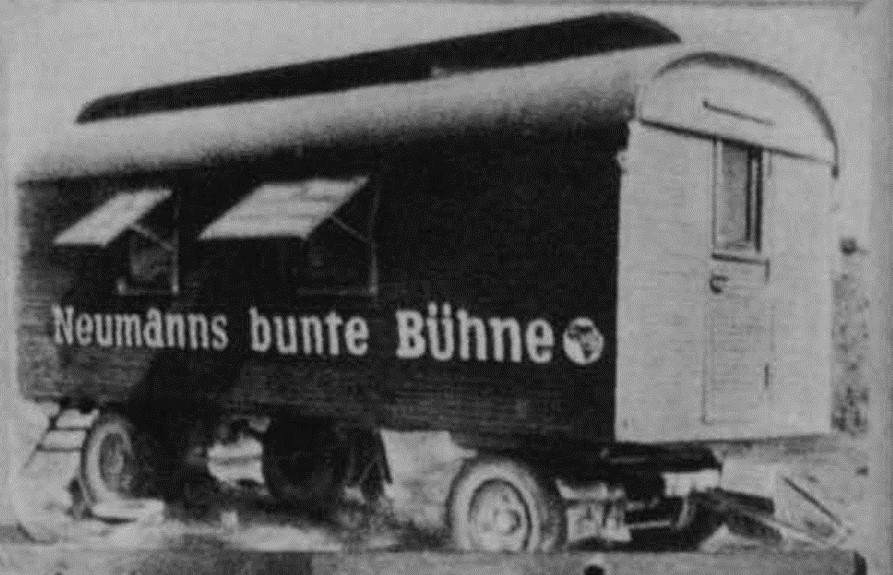
V. Neumanns bunte Bühne – JG 27 Commander Eduard Neumann’s trailer, known as “Neumanns bunte Bühne” (Neumann’s colorful stage), served as the headquarters of JG 27, Marseille’s fighter wing. There is no available model of this trailer in any scale so I will be creating it with plastic card mostly from scratch. Given that, to my knowledge, only a handful of photos of the trailer exist, information on dimensions and details is lacking. Of necessity, a significant portion of this effort will be educated guesswork. This post will describe this most challenging part of the project.
The headquarters of JG 27, a trailer Commander Eduard Neumann had appropriated in France.
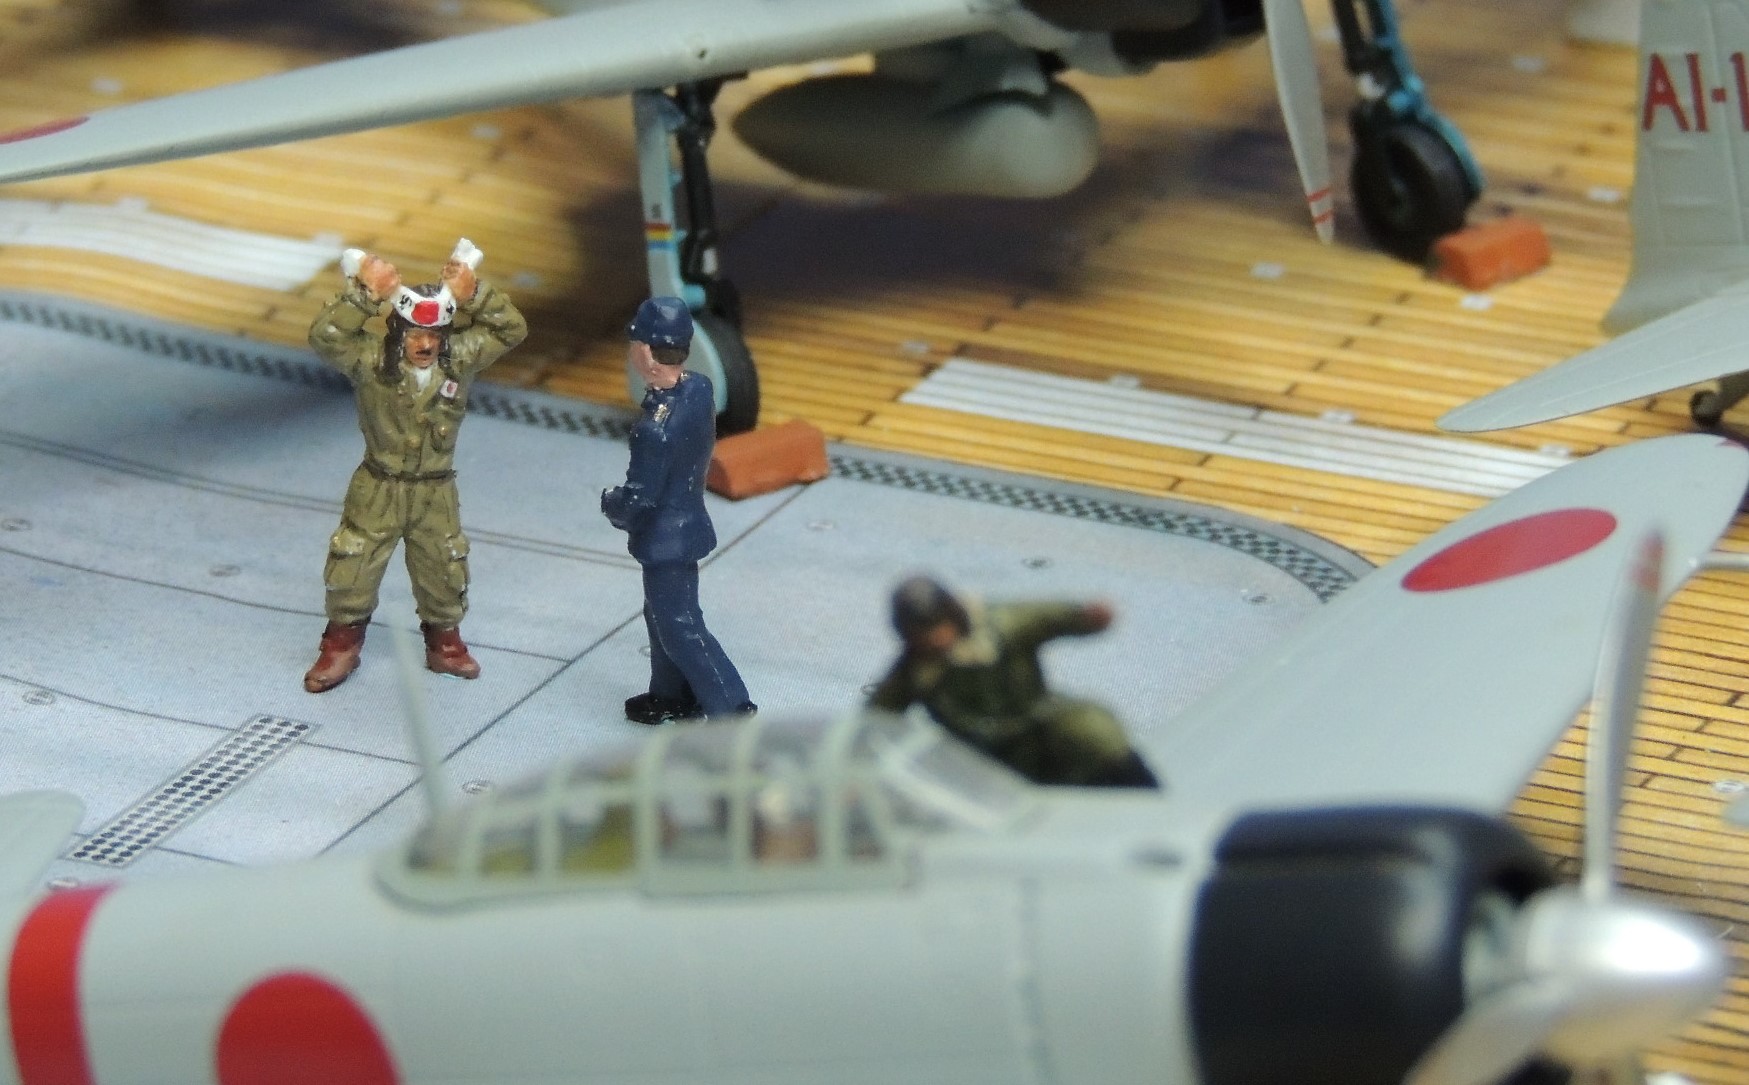
VI. The Figures and other details – No diorama is complete without the figures to bring it to life and provide a sense of scale. We may not know the wingspan of a Messerschmitt Bf 109, but a human figure next to it provides immediate perspective. I am aware of two figures in 1/72 scale – one from Preiser and one from Dragon – clearly intended to represent Marseille. This post will cover these two figures as well as the approximately 60 other figures (plastic, resin, and metal) from many figure sets that I will use in the diorama. The challenge is that there are currently no shirtless figures wearing shorts and pith helmets. Thus, the project will involve many conversions using torsos, heads, and limbs from different figure sets.
Engineers of JG 27 enjoy a break. Again, note the pith helmets, shorts, and lack of shirts.
Lagniappe: Rumba Azul, by the Lecuona Cuban Boys
Finally, for those curious about Rumba Azul, here’s a YouTube video. Music begins at about the 30-second mark and lyrics at about the 90-second mark.
As is probably clear, this is an extremely ambitious project, at least for me, and it will likely take months to complete. Please bear with me and visit the site often.
Thank you for your indulgence and I hope you enjoyed the post. If something looks amiss, please let me know. I would be delighted to correct inaccurate information so that this may be useful to other 1/72 scale collectors and wargamers. As always, comments, questions, corrections, and observations are welcome.
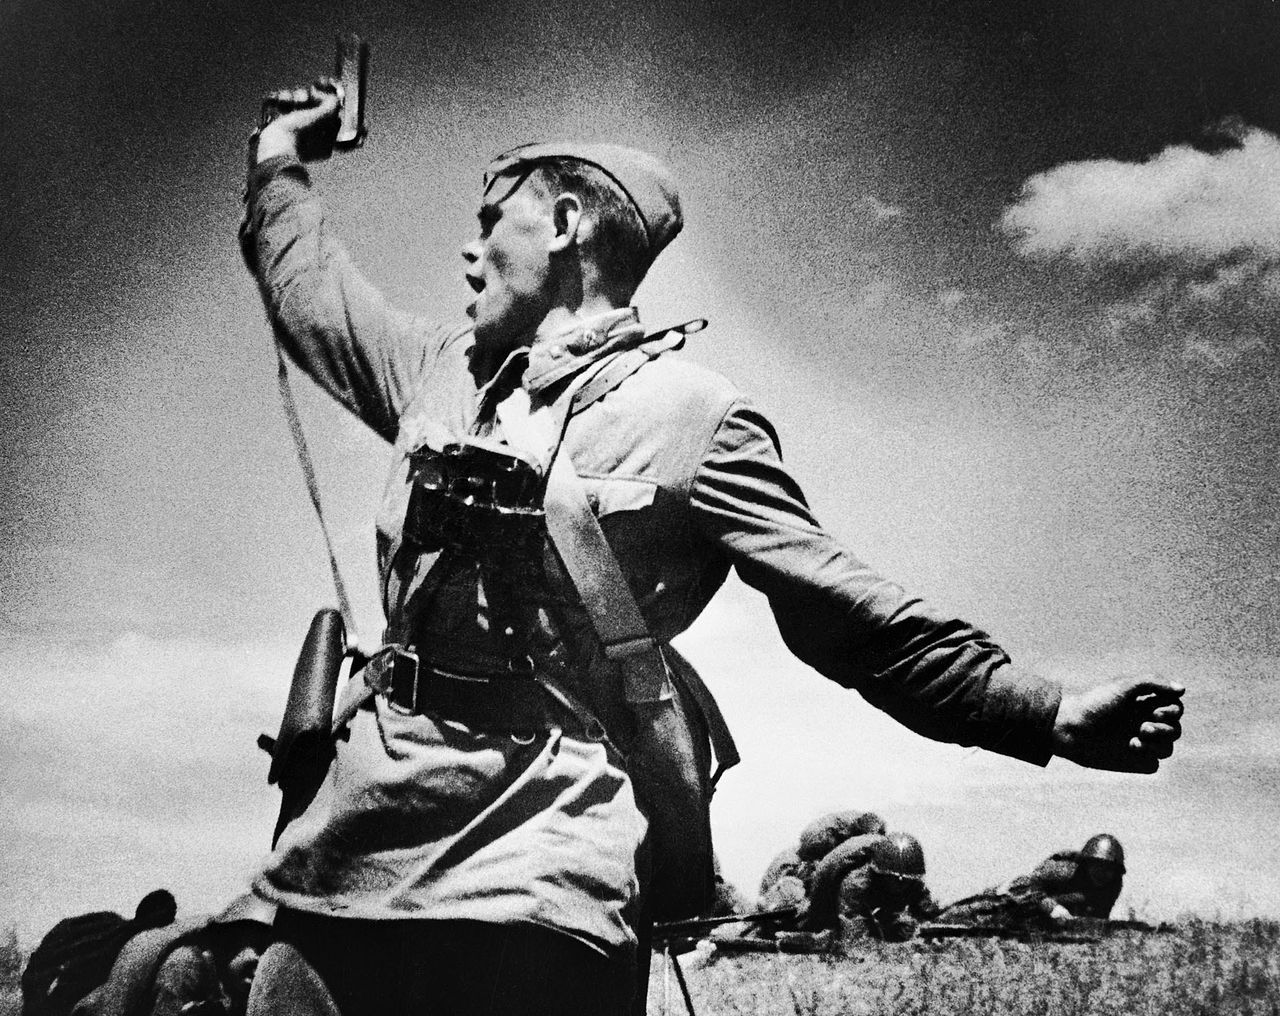
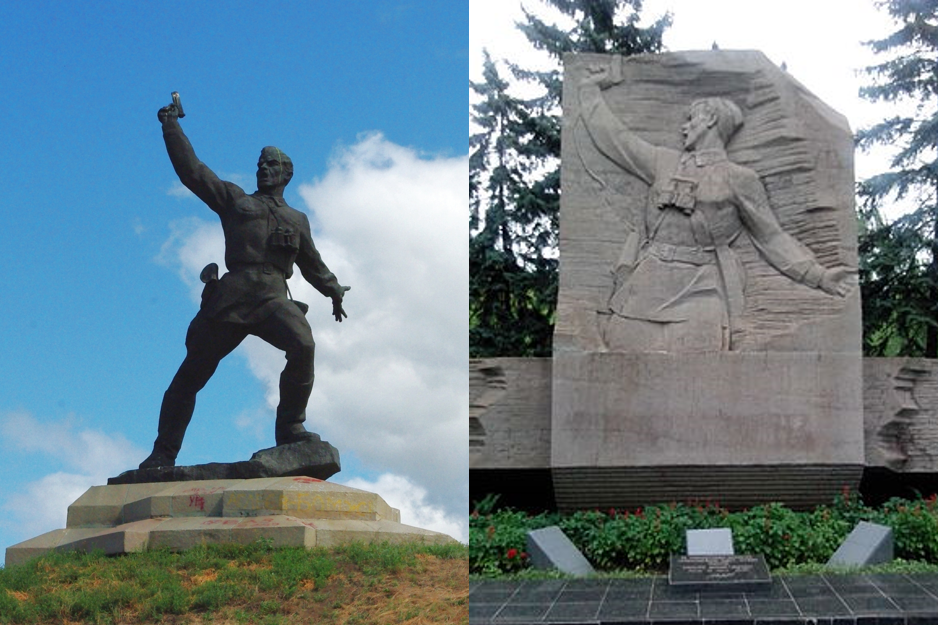
Possibly the most iconic Soviet image of World War II is this photo of a political officer exhorting his comrades to battle on the Eastern Front. Entitled Kombat (a portmanteau of komandir and batal’on, literally “battalion commander”), war correspondent Max Alpert’s timeless photo depicts Alexey Yeremenko just minutes before his death during fighting in Voroshilovgrad Province, Ukraine, on July 12, 1942. Yeremenko, of the Soviet 220th Infantry Regiment, was not a battalion commander but a politruk (political officer).
Alpert’s image holds a special place in the Russian imagination and has been immortalized in monuments in the former Soviet Union.The bronze statue at left is in Stepove; the stone monument at right is in Zaporizhia, both in southern Ukraine, where Yeremenko, who was Ukrainian, was killed.
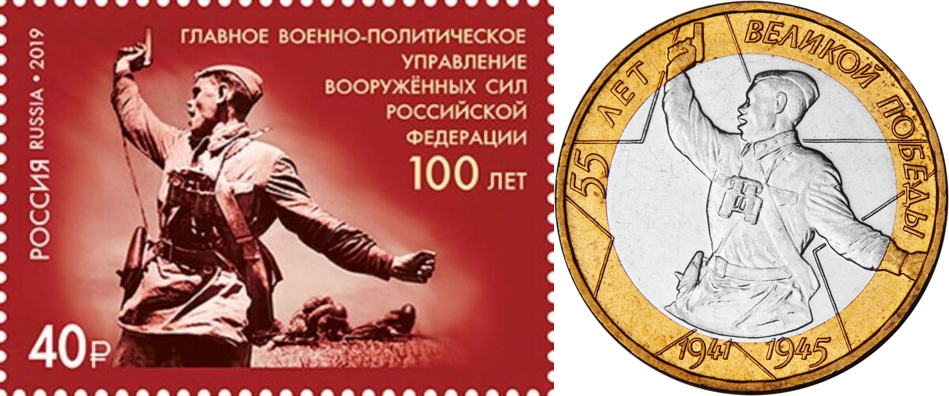
Yeremenko’s image has also appeared on postage stamps and commemorative coins.
As recently as 2017, a commemoration of the 75th anniversary of Alpert’s photo took place in Sloviansk, Ukraine.
Our hobby — ideally a miniaturized reflection of actual historical events — has not been immune to the photo’s allure, with three manufacturers offering a 1/72 scale plastic model of Yeremenko. However, before delving into the 1/72 world, a short description of the politruk (a Russian portmanteau of politicheskiy and rukovoditel, literally “political leader”) is in order.
II. The Red Army Politruk in WWII
In broad terms, the politruk, commonly referred to as “political officer” or “political commissar,” was a military official appointed specifically to ensure civilian control of the military — at least in theory. In practice, the politruk ensured the Soviet military remained under the Bolshevik Party’s control. To become a political officer, an individual must have been registered as a communist and attended special political training. Units from company to division had two officers — a military officer in charge of military decisions, and a political officer of coequal rank and authority who ensured those decisions were carried out in accordance with Communist ideology. Although most lower-level political commissars had little or no military training, they had the authority to countermand the unit’s commander if in their estimation an order undermined party dogma.
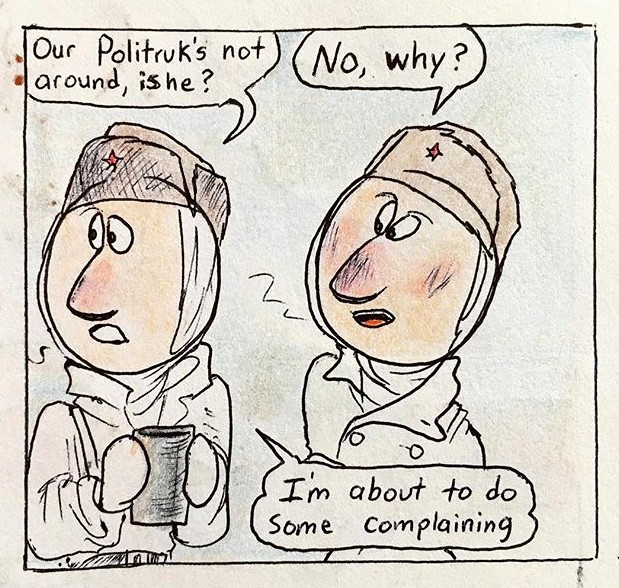
The politruk position came and went, abolished and restored as circumstances dictated, and its role morphed as necessary, with slightly different roles at different times during the war. At the outset of the conflict, the politruk’s primary function was to ensure that soldiers did not retreat in the face of the German onslaught and had authority to shoot transgressors on sight. Following the Red Army’s heavy losses in 1941 and 1942, the dual-command system was deemed unworkable. Politruks were removed from direct command and charged with improving morale, ensuring regulations were followed, indoctrinating troops, and spreading communist propaganda. Thus, distilled to its essence, the politruk’s function was to interpret everything he saw through a political lens and ensure all actions were in accordance with party ideology. Many a Soviet soldier lost his life because a politruk informed on him. The cartoon at left by Knottipine, from the instabusters website, aptly captures what most Red Army soldiers likely thought of the omnipresent politruk [instabusters website].
The Germans so feared political commissars that on June 6, 1941, just prior to the invasion of the Soviet Union, the German High Command issued the “Guidelines for the Treatment of Political Commissars,” commonly known as Kommissarbefehl (Commissar Order), directing the German army to summarily execute any captured political commissars as enforcers of “Judeo-Bolshevism.” Predictably, the Commissar Order resulted in an unwillingness to surrender by Soviet forces and the upshot was increased Soviet resistance to the Werhmacht. Nonetheless, thousands of commissars are believed to have been executed before Hitler cancelled the Commissar Order exactly a year after it was issued.
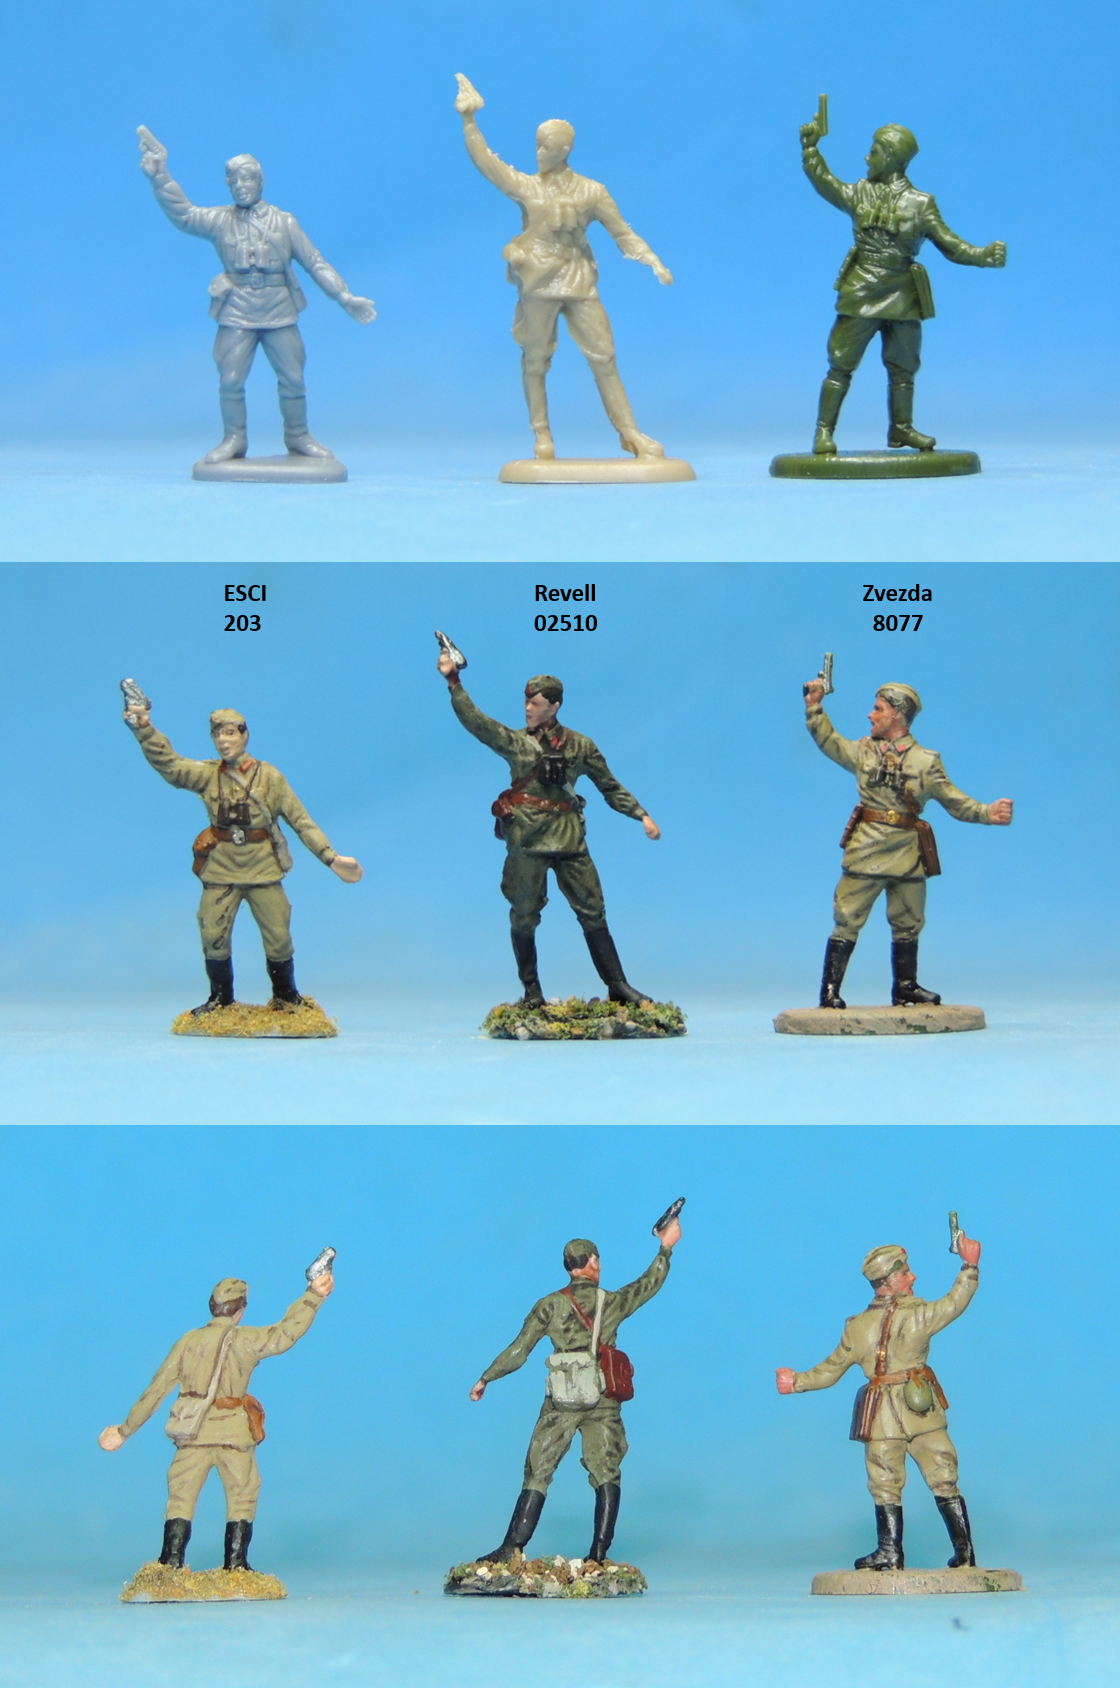
III. The Kombat Figure in 1/72
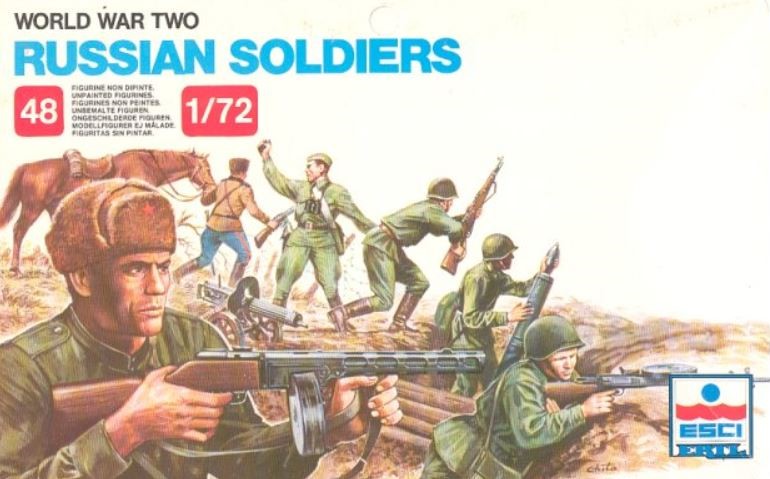
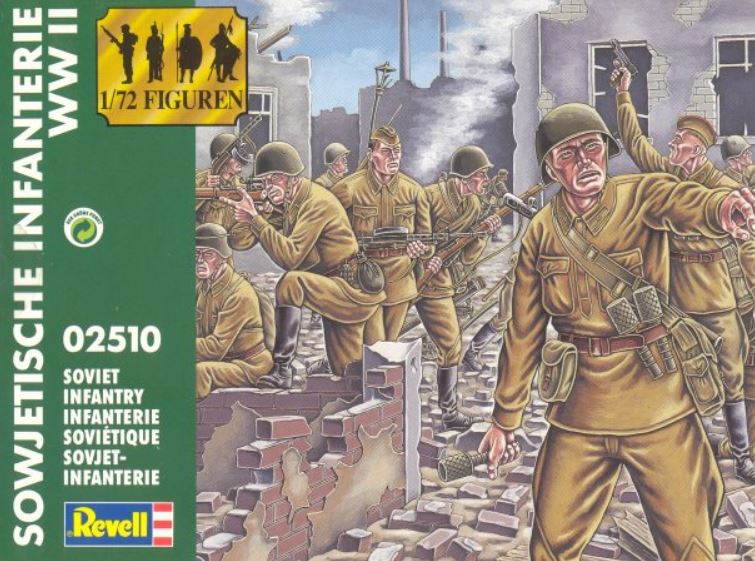
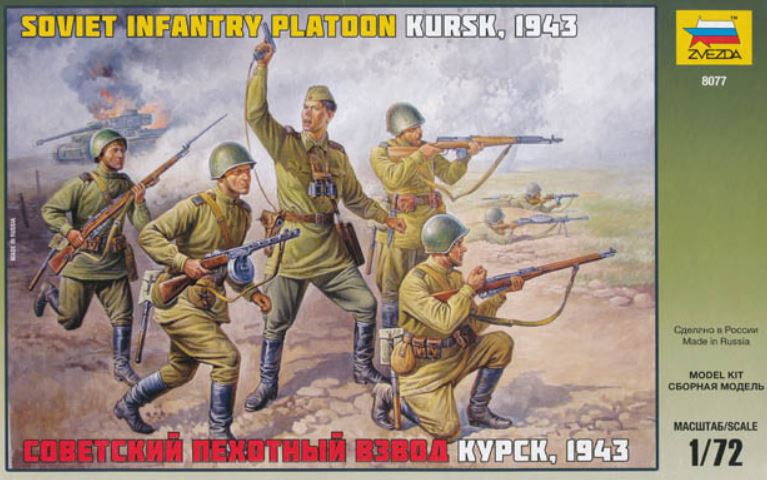
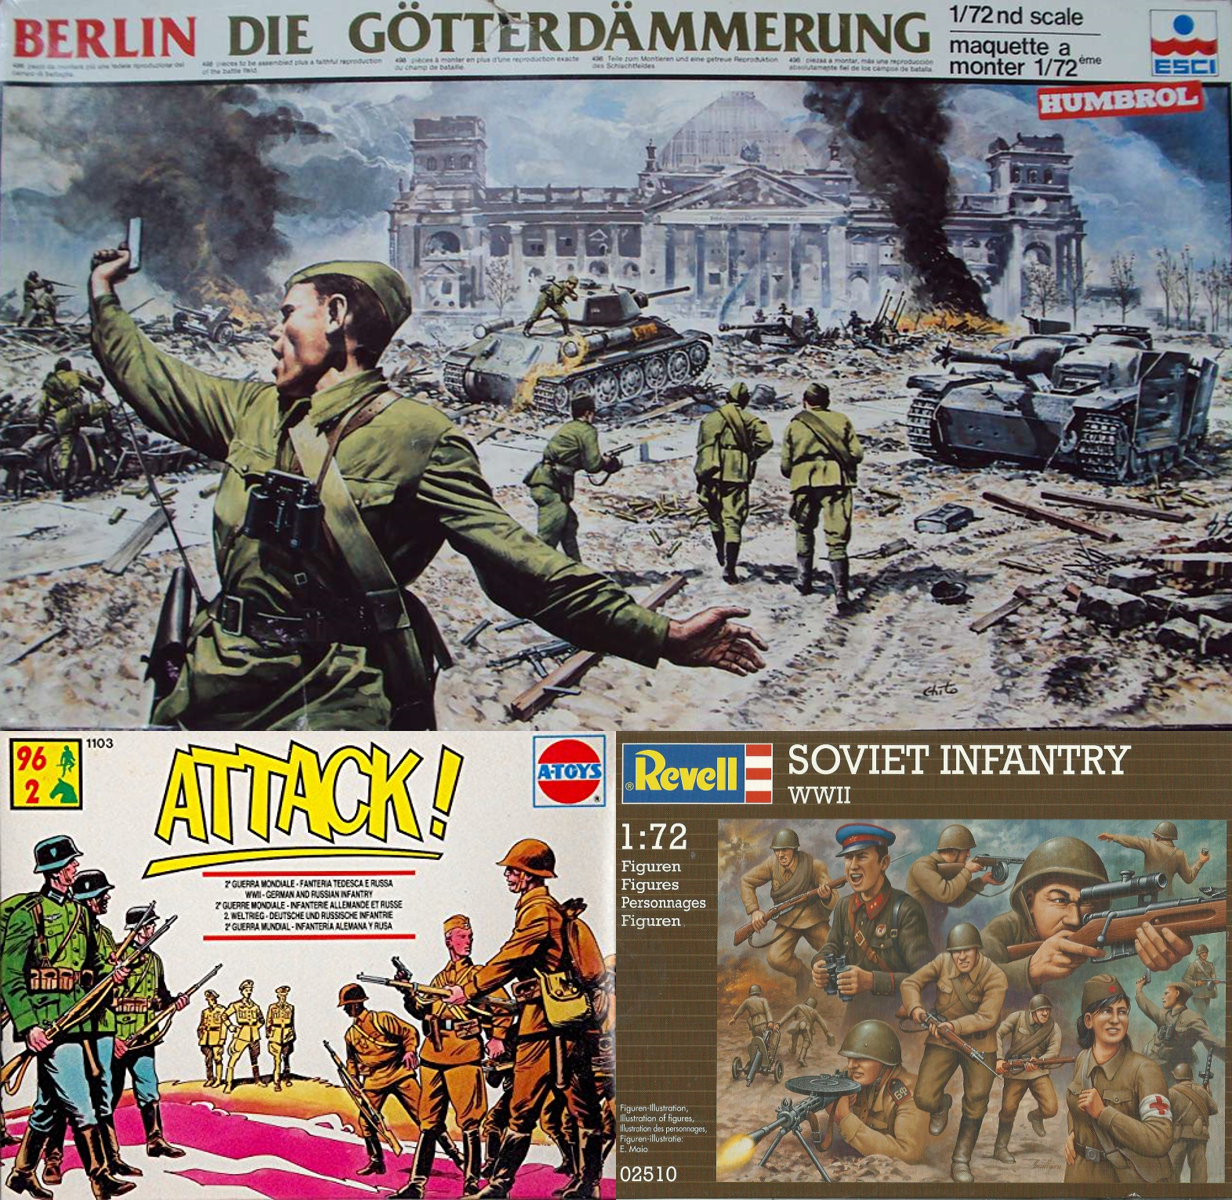
Three plastic soldier manufacturers have tried their hand at sculpting Yeremenko’s distinctive pose — ESCI, Revell, and Zvezda — and all three feature the pose on their Soviet soldiers box covers, as can be seen below. There’s little sense in providing thoughts on these three sets as the terrific Plastic Soldier Review (PSR) website has done a thorough review of each. Click on each title to access the PSR review.
ESCI re-released their 203 Russian Soldiers set in a diorama pack entitled Berlin: Die Götterdämmerung (“Berlin: Twilight of the Gods”). A-Toys 1103 also released the ESCI set in a combination pack with the ESCI 201 German Soldiers. Finally, Revell re-released their 02510 Soviet Infantry with new box art. Note that all three boxes have a depiction of Yeremenko’s image somewhere on the cover.
E. The Figures
As is readily apparent from the photo below, the three sculpts vary significantly, with the ESCI figure being the smallest and the Revell figure being the tallest. I found that under high magnification all three sculpts hold up fairly well, with the Zvezda figure having the greatest detail and the Revell figure the least — the Revell figure’s facial features are particularly poorly defined. To my eye, the ESCI figure has the best anatomical proportions as I find the head on the Zvezda a smidgen oversized. On the whole, however, the Zvezda figure most closely resembles Yeremenko’s pose, though the sculptor gave him a closed left hand, probably to make the sculpting easier.
IV. The NKVD Commissarsin 1/72
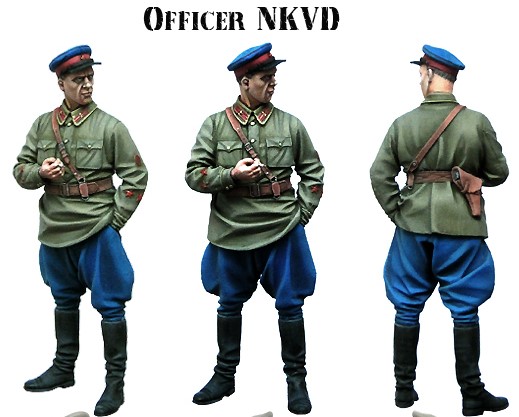
Yeremenko’s uniform notwithstanding, the typical Red Army commissar belonged to the NKVD (People’s Commissariat for Internal Affairs) and was characterized by a different and distinctive uniform: olive green gymnastiorka shirt-tunic (same as the three figures above), blue sharovari trousers, high black leather boots, Sam Browne brown leather belt with its distinctive strap passing diagonally over the right shoulder, holster for the Tokarev TT-33 pistol, brown webbing, and a royal blue peaked cap with a red band and a black visor. Like all Red Army headgear, the cap bore on the forehead a red star on a gold background. Some officers also carried a brown dispatch or map case and, in the field, a brown case for their black binoculars. However, a surefire way to recognize a political officer was the distinctive red worsted star with gold hammer and sickle on the sleeves, about two inches in diameter and three inches from the cuff.
This photo of a painted Evolution Miniatures EM-35122 NKVD 1/35 figure portrays the typical uniform of an NKVD officer.
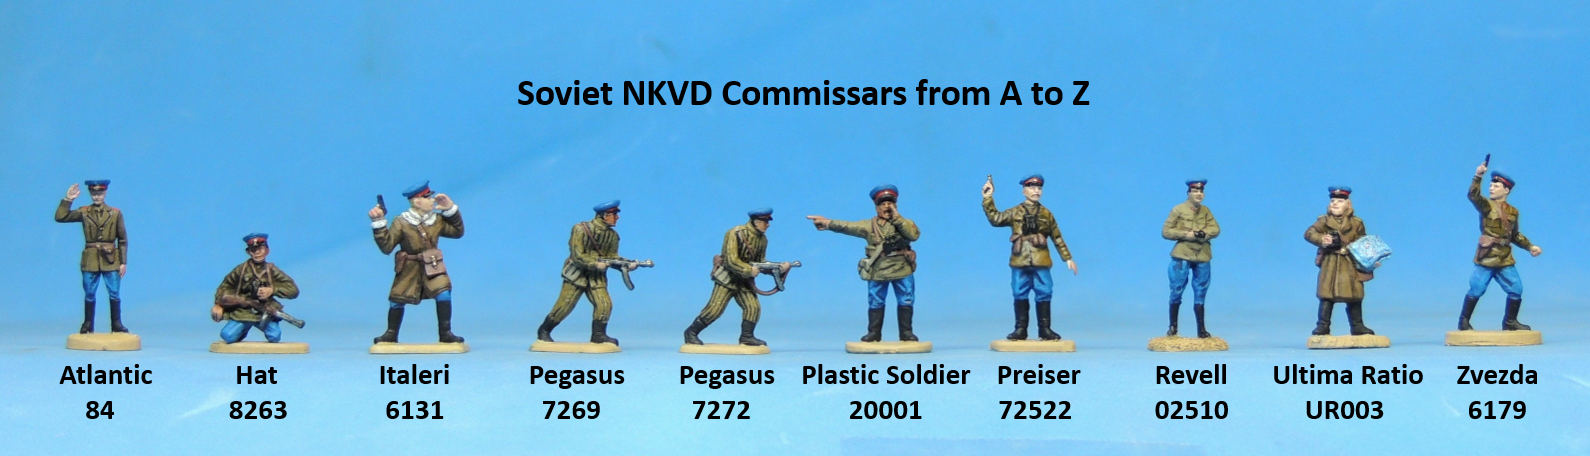
A. The Commissar from A to Z (Atlantic to Zvezda)
The photo below shows Soviet officers from the various plastic soldier manufacturers painted in the typical commissar uniform. While there’s loss of detail with a photograph of the whole lot, comparison of relative sizes is possible. Click the photo to enlarge.
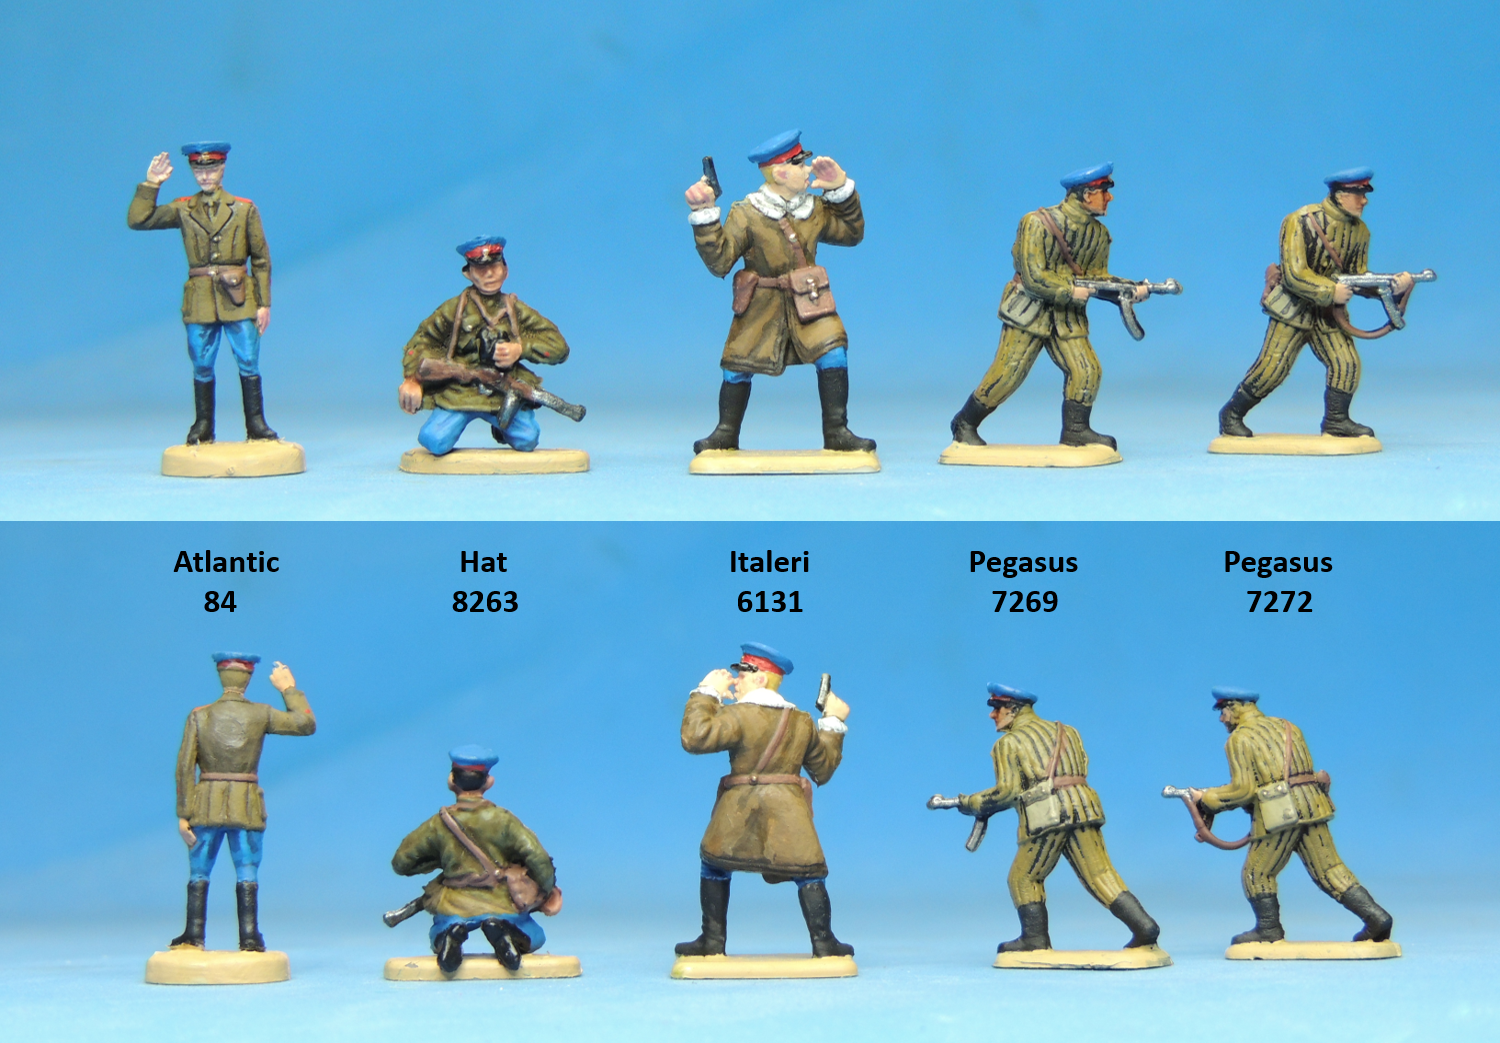
To provide higher resolution and better appreciate the figures, I also photographed five at a time. Below is the first tranche.
1. Atlantic 84 Red Army This is possibly the scrawniest officer in the history of 1/72 scale plastic soldier models. PSR called this set no more than a poorly sculpted “toy.” However, I find the sculpting, at least on this particular figure, considerably better than the miserly 3 out of 10 for sculpting the set received on PSR and, in fact, the facial features are fairly well defined.
2. Hat 8263 Russian Tank Riders At first blush, these Hat soldiers are, as PSR put it, “not particularly appealing figures.” Surprisingly, however, though admittedly a bit clunky, they paint fairly well. PSR called this “[n]ot a great sculpt but a very worthwhile set.” I found the detail to be not too bad and, while the PPSh-41 is not particularly well detailed, it is easily recognizable. However, the Sam Browne belt on this officer goes over the left shoulder, which is incorrect. This is one of four figures wearing the traditional gymnastiorka shirt-tunic (Plastic Soldier, Revell, and Zvezda are the other three). The figures in this set come without bases as they are intended to sit on a tank. I added the base to ensure consistency in comparing height.
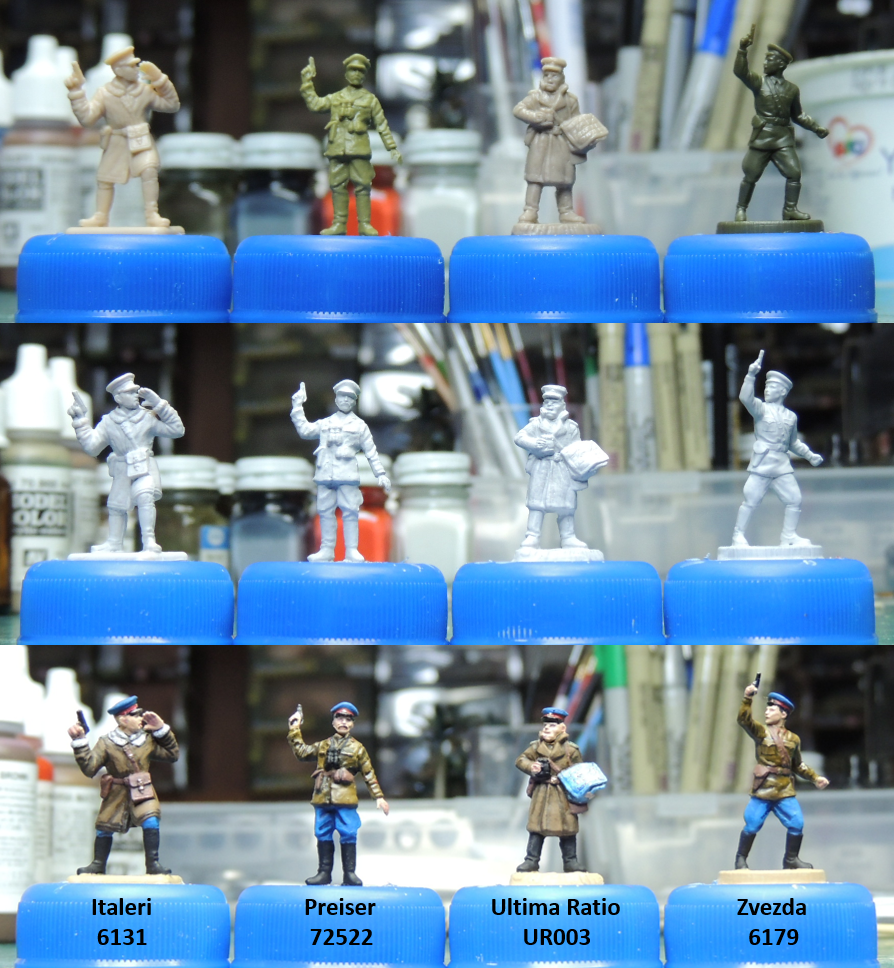
3. Italeri 6131 Anti Tank Teams The first thing that strikes you about this officer is his huge size. The head and hands are particularly large when compared to the other figures. While PSR rated these figures as being of average size, I’m fairly certain the entire set is well overscaled. Still, I don’t mind using one soldier from the set as there were, in fact, men in WWII who were considerably larger than the average. Known as the “Gargoyle,” Japanese Vice-Admiral Jisaburō Ozawa, for example, was 6’7”. The other notable feature about this officer is that he looks to be wearing the fur lined polaschubuk sheepskin coat.
4. Pegasus 7269 Russian Infantry Winter Dress 1 This was Pegasus’ first attempt at this advancing officer pose. This figure and its twin in 7272 (No. 5 below) are the only ones wearing the telogreika quilted jacket and trousers. While it is not a bad sculpt, the photo hides the excess plastic between the PPS-43 submachine gun and the body, where the area is blind to the mold. Although an officer, he does not carry a pistol as there is no holster on the figure. Finally, his submachine gun has no shoulder sling to carry it. It bears noting that PSR gave this set a perfect 10 for sculpting.
5. Pegasus 7272 Russian Infantry Winter Dress 2 Initially indistinguishable from its twin in 7269 (No. 4 above), this was Pegasus’ second attempt at the pose. By molding the figure in two parts — the right arm and submachine gun are a separate piece — Pegasus solved the excess plastic problem and produced a significantly improved figure. Note that making this a two-part figure also allowed Pegasus to add a shoulder sling to the submachine gun. This being an officer, Pegasus correctly added a gun holster and, upon closer inspection, shoulder boards.
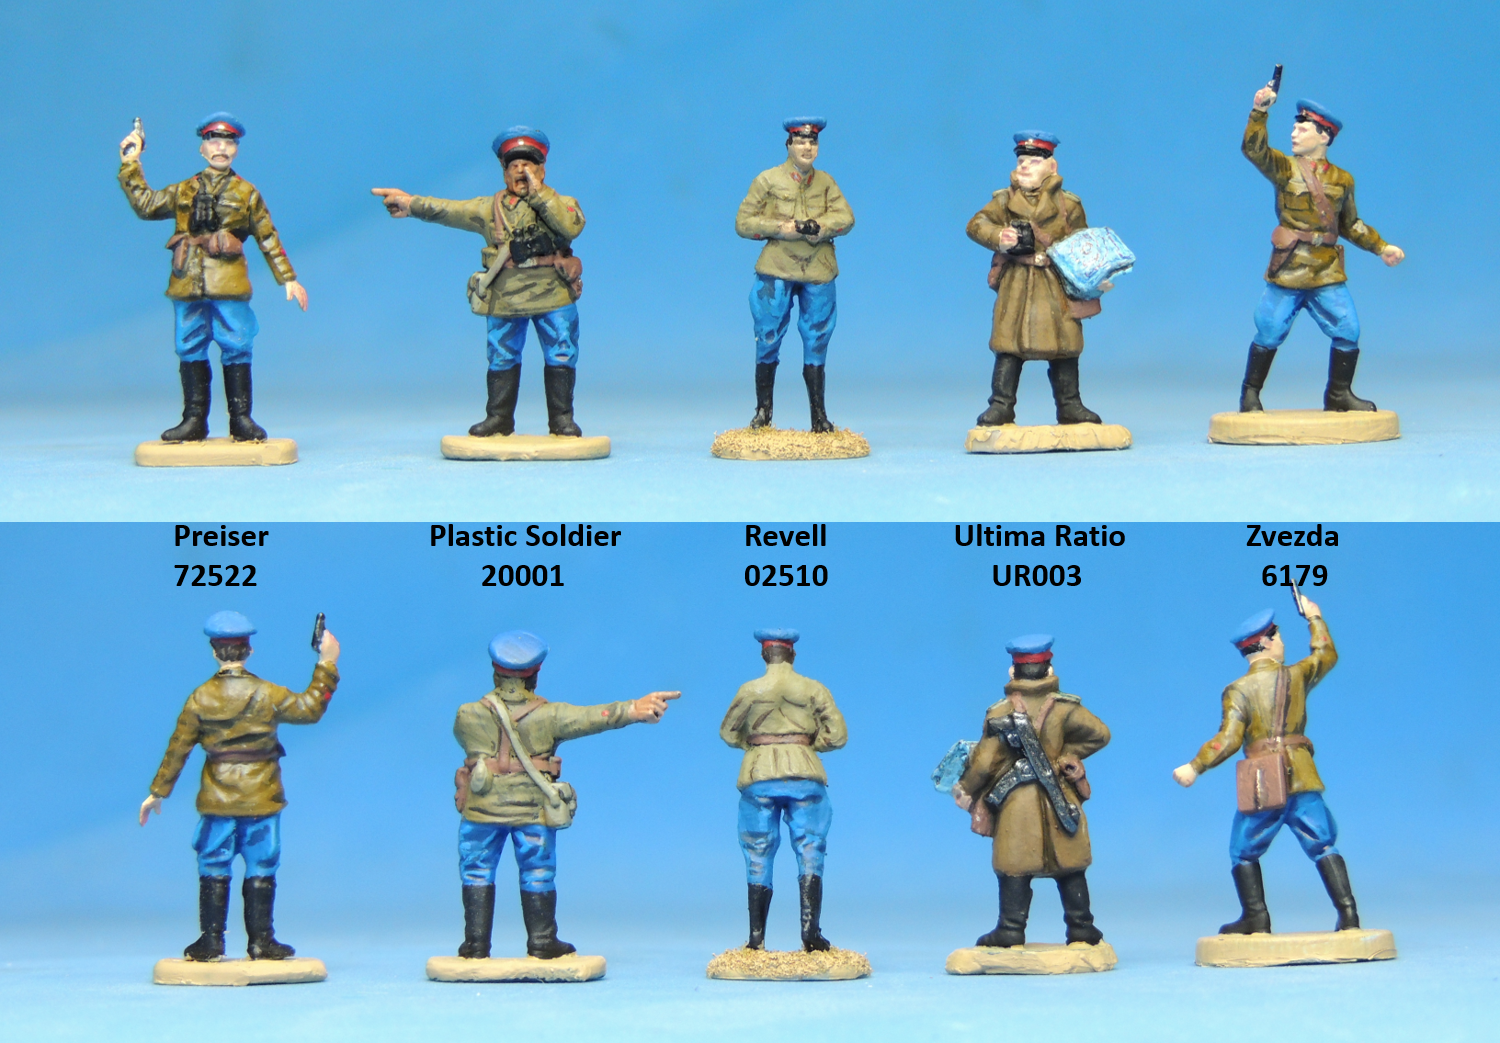
Below is the second tranche. (Yes, alphabetically the Plastic Soldier figure should have come before Preiser as in the photo above showing all ten figures. Sorry, senior moment. 😳 )
6. Preiser 72522 Soviet Infantry Riflemen and Partisans Despite an 8 score for sculpting from PSR, to my mind this Preiser hard plastic figure is the best sculpt in the lot. Proportions are perfect and facial features and hands are well defined (even at this scale you can count all five fingers on his left hand). However, I do have my doubts about the peaked cap, which looks suspiciously like a German peaked cap. Soviet peaked caps tended to be completely round, like the other nine in the group. Akin to the second Pegasus figure (No. 5 above), this is a two-part sculpt comprising the body and two options for the left arm. Like the Hat figures, the soldiers in this set have no bases. I added the base to ensure consistency in comparing height.
7. Plastic Soldier 20001 Russian Infantry in Summer Uniform
Generally speaking, I’m not partial to Plastic Soldier sculpting as the figures tend to be rather short and chunky. Because Plastic Soldier figures are intended for wargaming, which requires constant handling, these hard plastic figures must be robust, like their 28mm metal counterparts. This particular figure, however, is oddly pleasing and passes for a rather rotund, well-fed commissar. Like the Preiser and second Pegasus figures, this officer is made up of two parts, with the left arm being a separate piece. PSR noted that the “extra parts make some of these poses particularly deep and natural,” and gave the set a 10 for sculpting. My only quibble with this officer is that he’s carrying his right hand gun holster cross draw, i.e., on his left hip as Hollywood tells us was done in the Wild West, but something WWII officers would be unlikely to do.
8. Revell 02510 Soviet Infantry As PSR points out, this Revell set was generally overscaled, with most figures 26mm tall, well above the average 25mm for 1/72 scale soldiers. However, this particular chap is about the right size, though, to my eye, he has an odd feminine shape with pronounced hips and a very small head compared to the rest of the figures — particularly the Plastic Soldier figure, whose head is twice as large. This officer is the prototypical commissar who does not engage in combat, as he is lacking a pistol holster or any webbing at all.
9. Ultima Ratio UR003 Soviet and Polish Infantry In addition to the typical accoutrements of an officer — peaked cap, pistol holster, and binoculars — this commissar also carries a map and is armed with a PPS-43 submachine gun. This is an attractive figure, though his ears are so large — just take a gander from the back — that he would be completely at home in the Caesar 105 Goblins set. There are four officer poses in this set — three Poles, identifiable by their traditional Polish four-pointed rogatywka peaked cap, and this Soviet officer.
10. Zvezda 6179 Soviet Regular Infantry
To my mind, this is probably the second best figure in the group and is basically a peaked cap version of the Kombat pose that spawned this article. He wears a dispatch case over the left hip and a pistol holster over the right. The detail is crisp as is typical of Zvezda figures. PSR described this set as “perfectly well done and very natural” and “the sculpting . . . of the usual high Zvezda standard.”
B. Other Soviet Officers
Below are a few other figures that can be used as Soviet officers, purely for the sake of completeness.
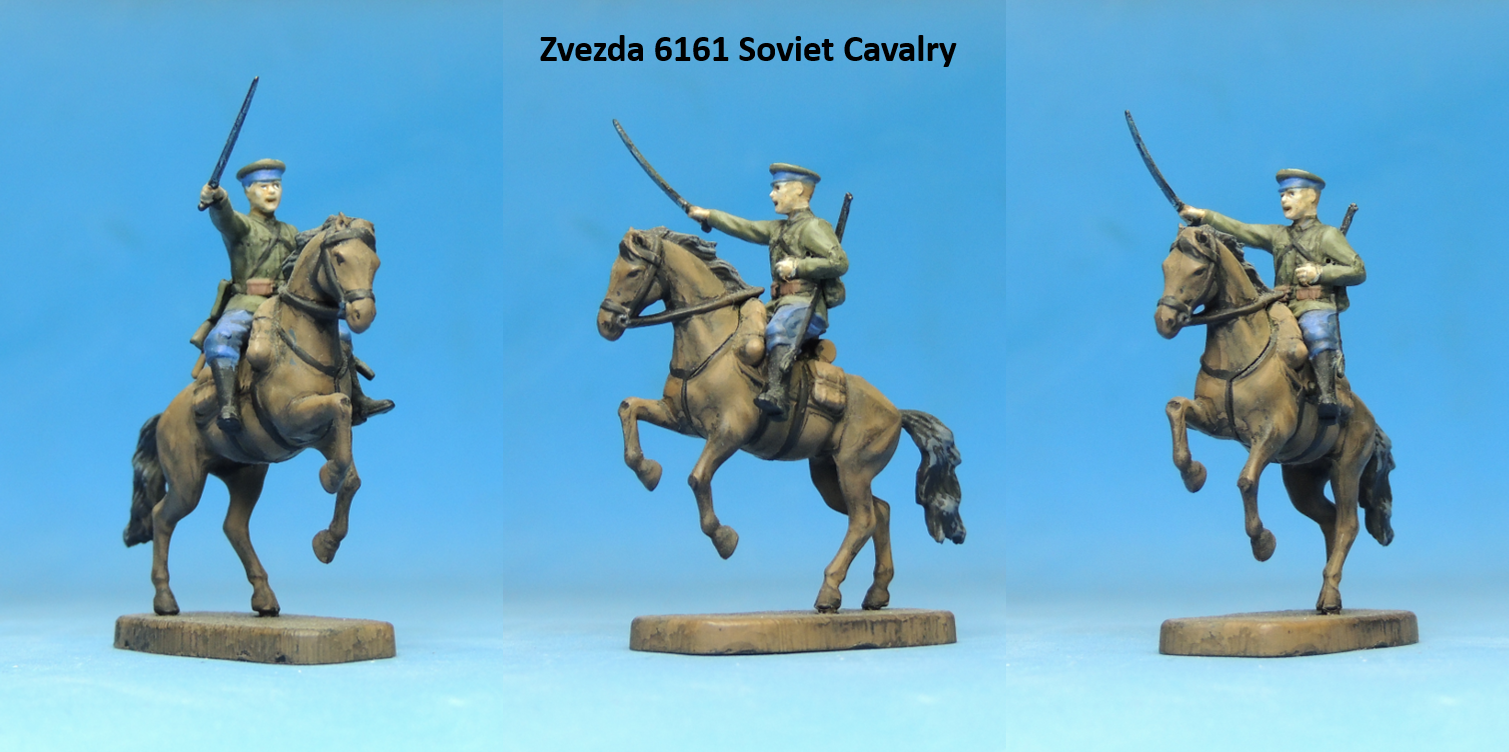
1. Zvezda 6161 Soviet Cavalry
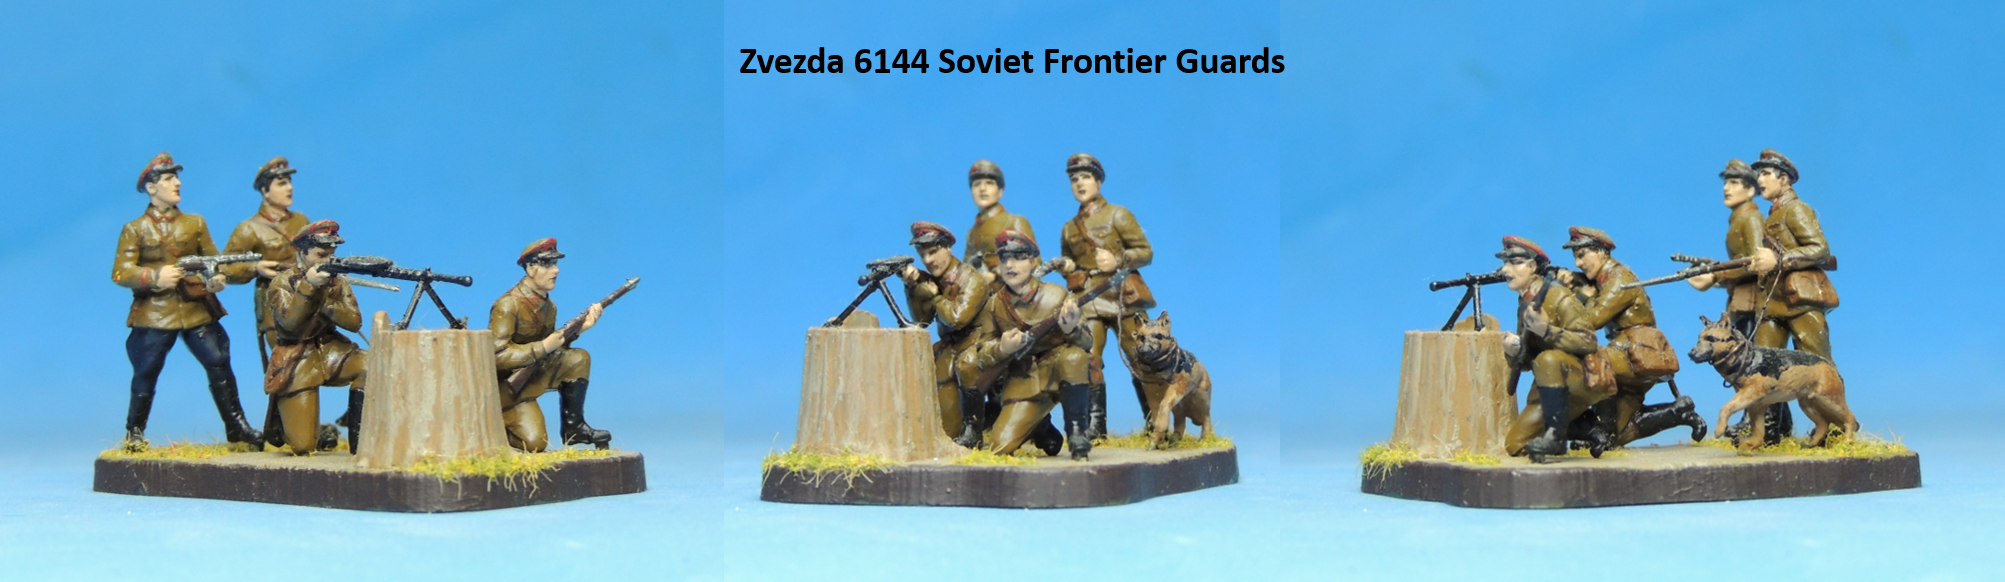
2. Zvezda 6144 Soviet Frontier Guards Click on the photo to enlarge.
As was pointed out by a commenter, these four are not all officers. The peaked cap was an element of the NKVD uniform — of which the Frontier Guards was a part — for all ranks. However, any of these figures could be used as officers.
To my knowledge, these are all the Soviet officers — or those with a peaked cap that can be used as officers — available in plastic in 1/72, with two exceptions: Preiser 72526 Soviet Tank Crewmen and Zvezda 6132 Soviet Headquarters, both of which include an officer, and neither of which I could get in time for this post.
C. CP & TQD White Metal Officers
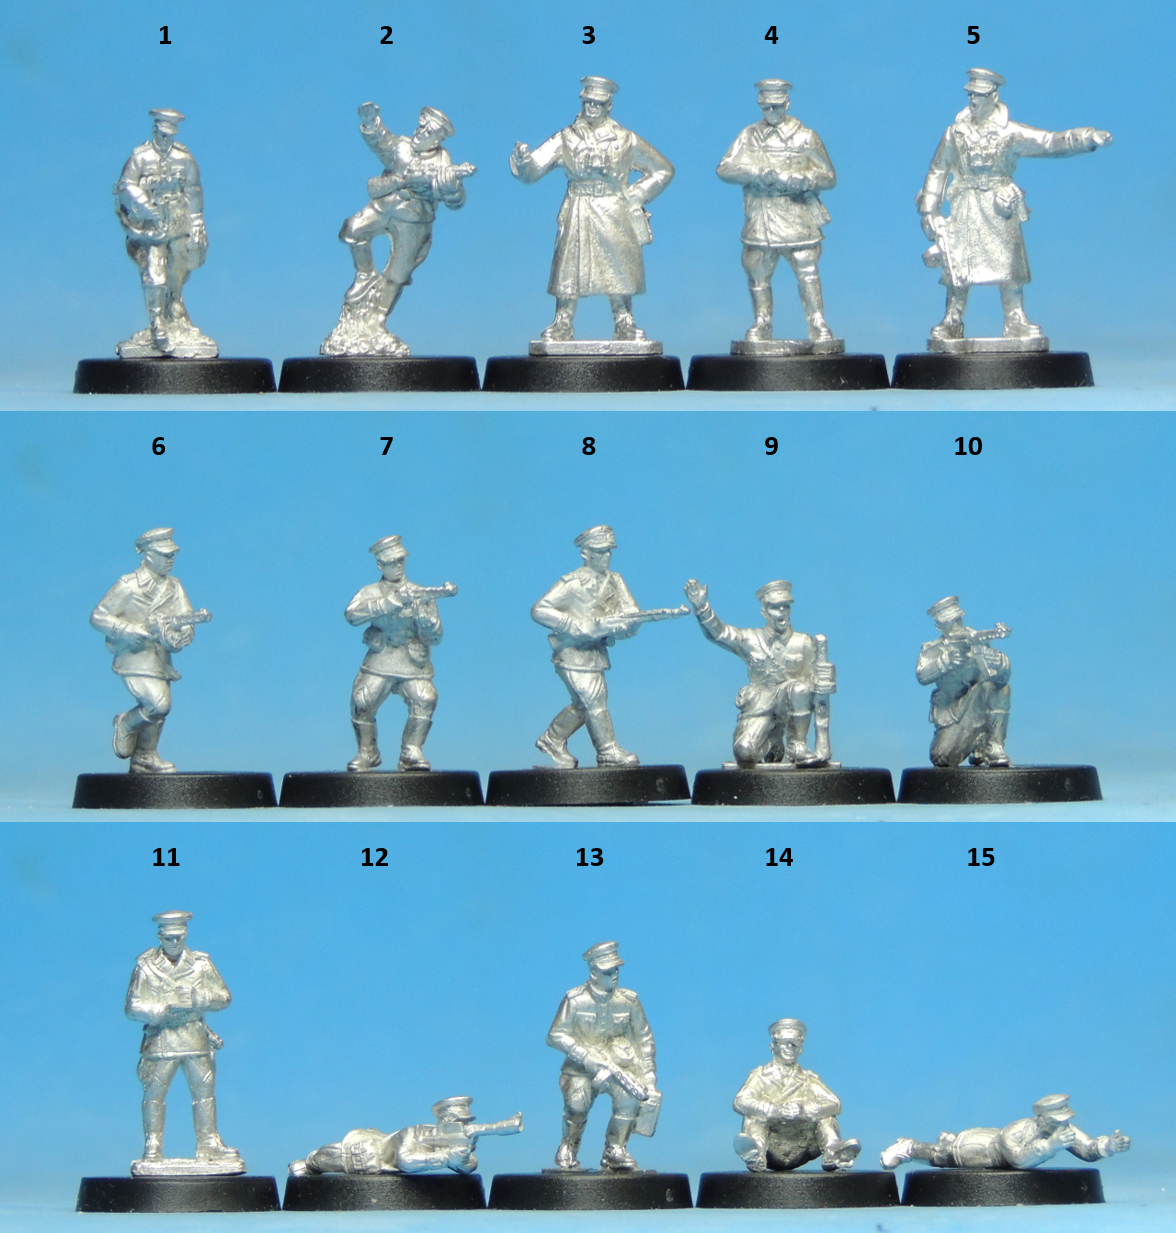
After I had finished painting and photographing the plastic commissars and writing this post, I discovered that CP Models and TQD Castings have a diverse assortment of 1/72 scale Soviet sets in white metal. I ordered the sets that included officers and got them just in time to include below. Note that I only photographed the ones with officers or with a peaked cap, though some sets include several non-peaked cap figures.
1. CP-SOV01 Red Army Infantry with Officer 2. CP-SOV04 Red Army Banner Party 3-5. TQD-RI10 Red Army Officers 6-10. TQD-RK02 NKVD Riflemen I 11. TQD-RK04 NKVD Interrogators 12. TQD-RK05 NKVD Mortar and Anti-Tank Rifle 13-15. TQD-RK06 NKVD Maxim Heavy Machine Gun
As far as I know, these are all the Soviet officers or those with peaked cap available in the CP/TQD line except for TQD-RK03 NKVD Riflemen II, which I could not find.
D. Painting the Figures
In painting these figures, I used Vallejo acrylic colors almost exclusively as listed below. However, I used Testors enamel gold on the peaked caps, buttons, and buckles as I find metallic colors look more realistic in enamel. The Soviet uniform varied somewhat in the shade of green during the war, depending on what fabric was available, so modelers have some latitude in choice of color.
The photos below show four figures undergoing the painting process: The first photo shows them unpainted out of the box; the second photo shows them primed with surface primer; and the third photo shows them fully painted. These four figures are my first serious attempt at painting using various shades of the same base color — a technique most noticeable on the trousers. While the result may not reflect it, I actually spent considerable time painting the faces using various shades of Vallejo’s flat flesh. If anyone is wondering, I fully recognize that going into battle with a bright blue peaked cap is asking for it.
For those interested, I used the following Vallejo Model Color acrylic paints, going from head to toe:
70.963 Medium Blue – top of caps; 70.957 Flat Red – band on caps; 70.861 Glossy Black – peak on caps 70.955 Flat Flesh – faces and hands; 70.921 English Uniform – tunic on Preiser and gymnastiorka on Zvezda; 70.983 Flat Earth – coats on Italeri and Ultima Ratio;
70.918 Ivory – sheepskin trim on Italeri coat;
70.963 Medium Blue – trousers; 70.950 Black – boots;
70.940 Saddle Brown – Sam Browne belts and webbing; 70.863 Gunmetal Grey – pistols and submachine gun on Ultima Ratio;
70.950 Black – binoculars;
70.912 Tan Yellow – bases;
74.601 Grey Surface Primer – all figures; and
1144 Testors Enamel Gold – buttons, buckles, and star on caps.
V. The Political Officer in Russian Cinema
Politruks are ubiquitous in contemporary Russian cinema and television and, at least for this non-Russian-speaking outsider, hint at an apparent love-hate relationship with them on the part of the Russian public. Often portrayed as petty obstructionists, a quick survey of recent Russian shows on Amazon Prime will reveal that the politruk has become a popular staple of Russian films, which are often based on older Soviet literature. An outstanding series currently on Amazon Prime, Night Swallows, about Soviet female pilots in WWII, depicts a pesky political commissar whose mission in life appears to be to make life miserable for the pilots. A similar portrayal can be seen in Stalin’s Tanks, about the legendary T-34 tank. However, in both films the politruk displays some positive traits, including falling in love with one of his victims. A much more positive characterization can be found in Spies, a lavish series about Soviet female spies in WWII.
For a downright chilling portrayal that likely hews closest to reality, the reader is directed to Life and Faith, a series based on Vasily Grossman’s 1960 book that was banned in the Soviet Union due to its brass-knuckled depiction of Stalinism and Soviet culture. The book was considered so detrimental to the Soviet state that it was not published until 1980, when a copy of the manuscript was smuggled out of the Soviet Union. Finally, the summary execution of a political officer under the aforementioned Commissar Order can be seen in the Belorussian film Fortress of War, a harrowing account of the siege of Brest Fortress in Belarus, in June 1941. Yefim Fomin, who commands the defense of the fortress, is ultimately captured and summarily executed after declaring, “I’m a commissar, a communist, and a Jew.”
The politruk was also the subject of a compelling scene in Hollywood’s 2001 Enemy at the Gates. Starring Joseph Fiennes as political officer Danilov and Bob Hoskins making a cameo appearance as Stalingrad’s chief political officer Nikita Khrushchev, the scene captures the essence of what a political officer is supposed to do. Khrushchev eventually succeeded Stalin as Premier of the Soviet Union. Tellingly, Volume I of his memoirs is entitled “Commissar.” For those interested, I’ve pasted below a clip of that scene from YouTube. Unfortunately, the clip comes with YouTube advertisements. Please close the ad when it pops up.
VI. Lagniappe: Der Kommissar’s in Town by After the Fire
For those not familiar with the reference in the title of this post, Der Kommissar was a Billboard Top 10 song recorded by After the Fire in 1982 — actually a cover of Falco’s 1981 German language song of the same title. On the surface, the song is about a reckless young woman living in the fast lane, high on cocaine. However, Der Kommissar is in reality a protest song about the state security police in the socialist Eastern Bloc countries before the fall of the Soviet Union, whose role was essentially unchanged from that of the Soviet political commissars of WWII. By the early 80’s, citizens were increasingly resentful of the secret police who watched their every move and kept surveillance files on them, though it was still uncommon for individuals to air these grievances. The song, with its Don’t turn around, Der Kommissar’s in town refrain, was groundbreaking and reflects the transformation in the social conscience that was beginning to take place. To conclude this post, I’ve pasted below the official video of the song from YouTube.
Thank you for your indulgence and I hope you enjoyed the post. If something looks amiss, please let me know. I would be delighted to correct inaccurate information so that this may be useful to other 1/72 scale collectors and wargamers. As always, comments, questions, corrections, and observations are welcome.
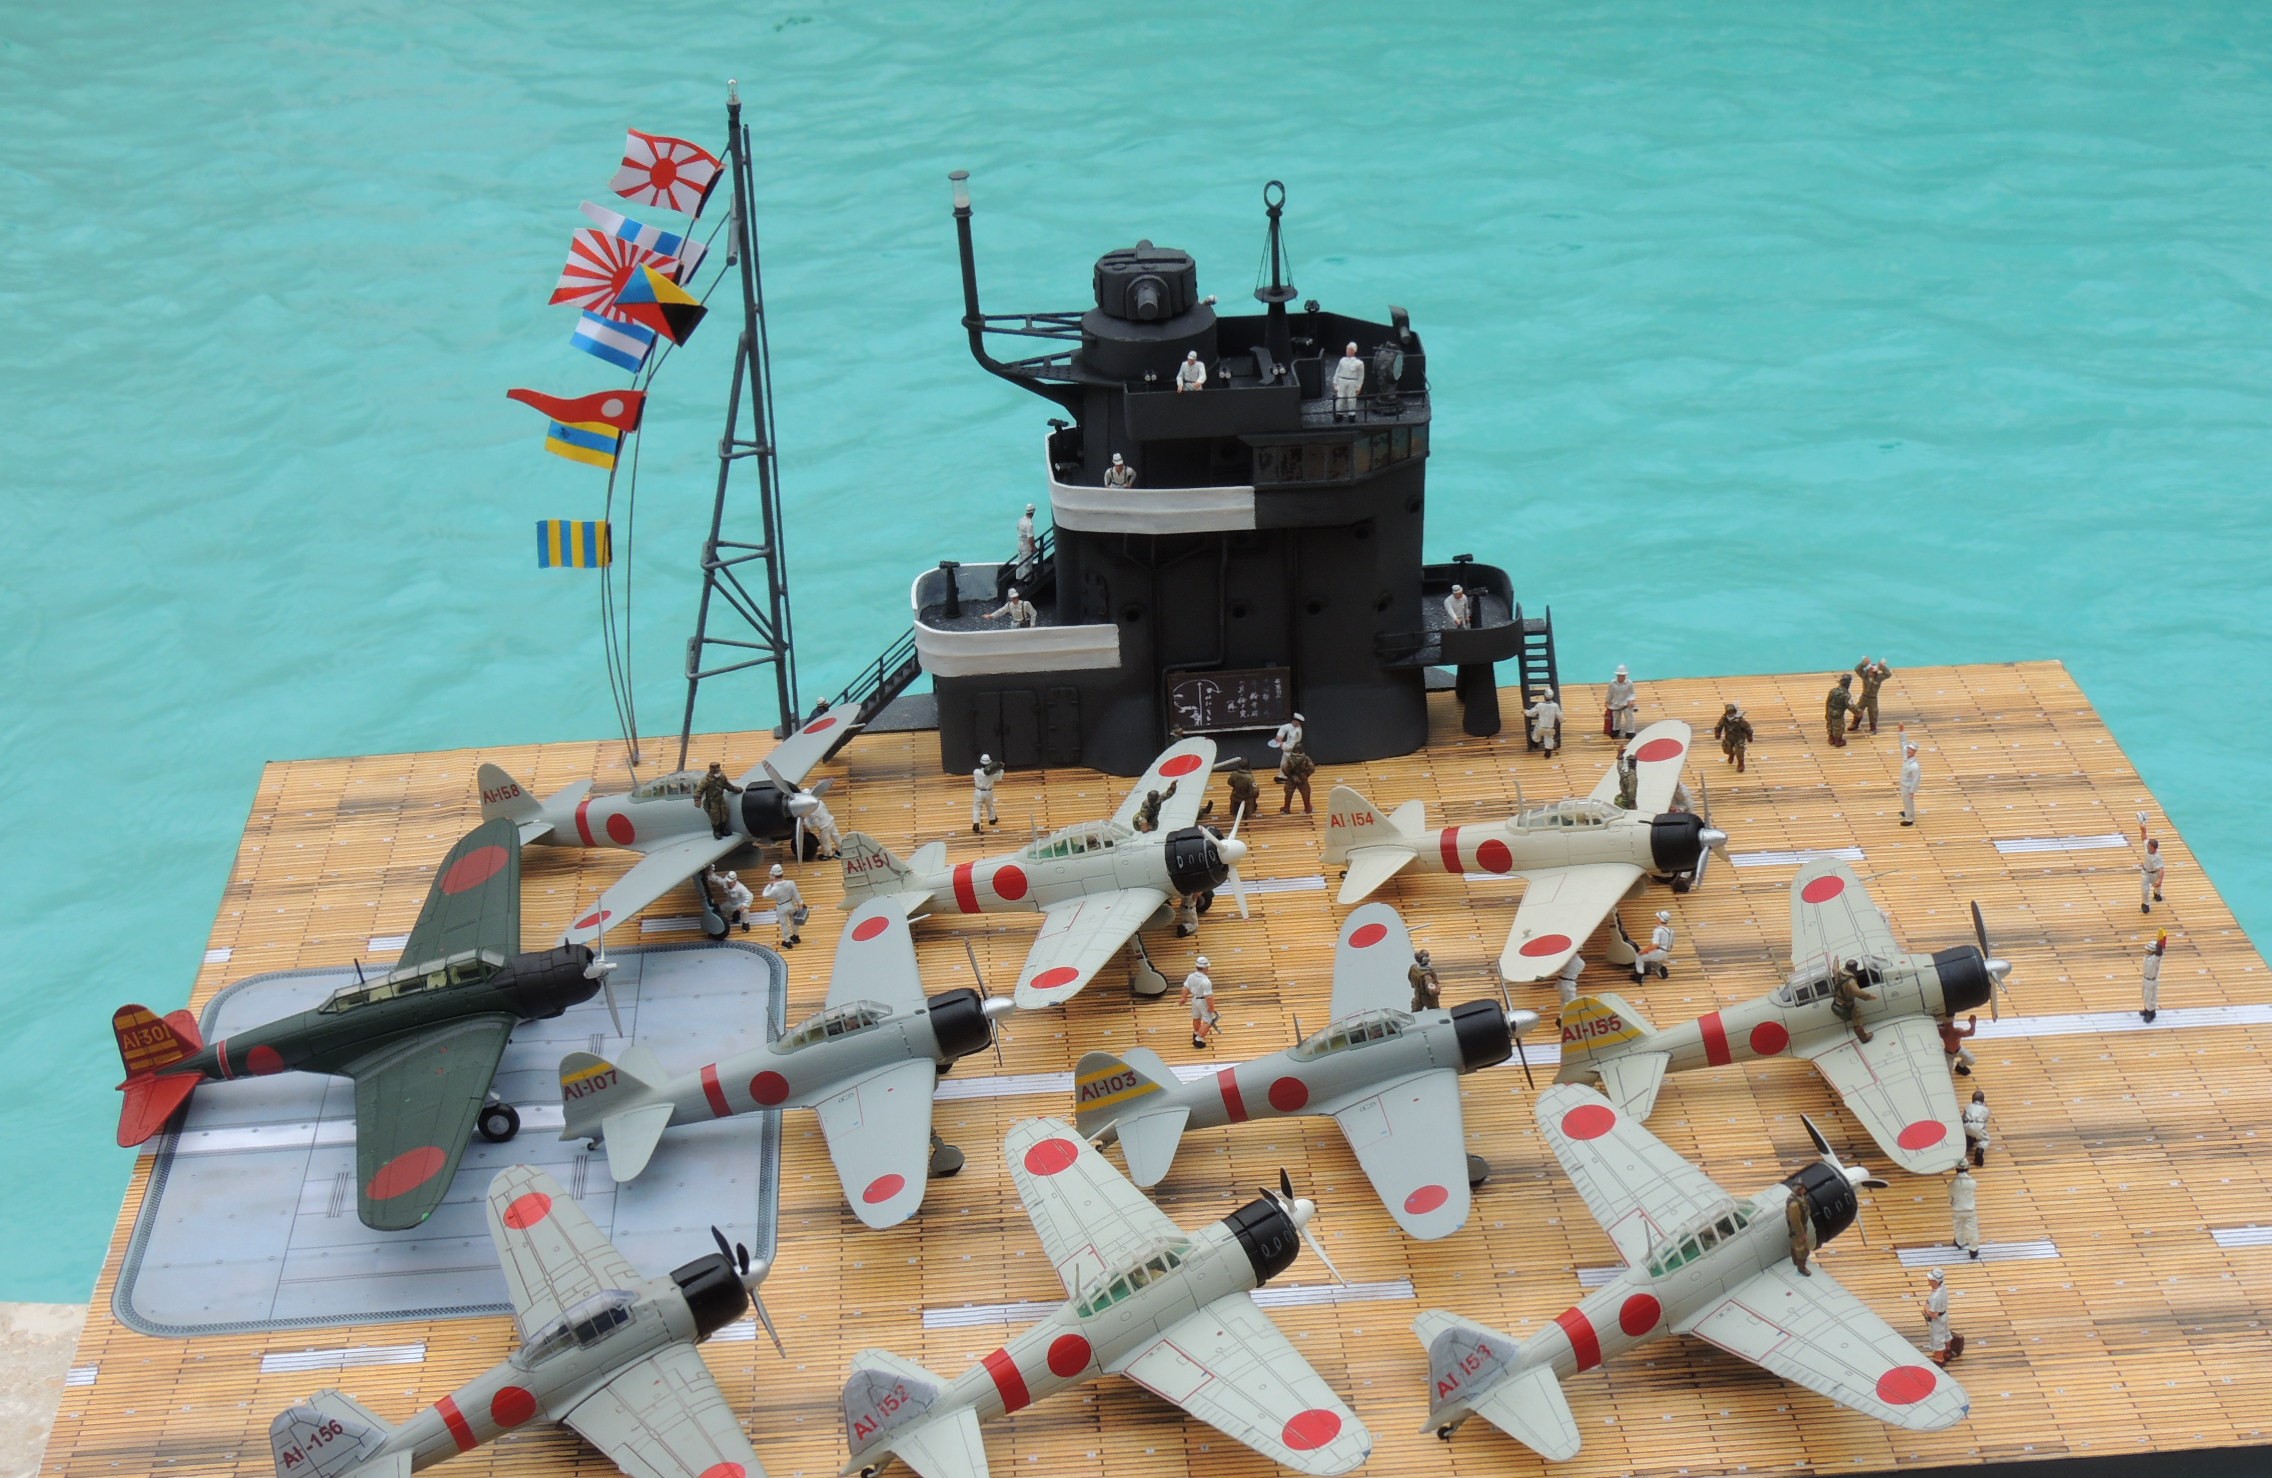
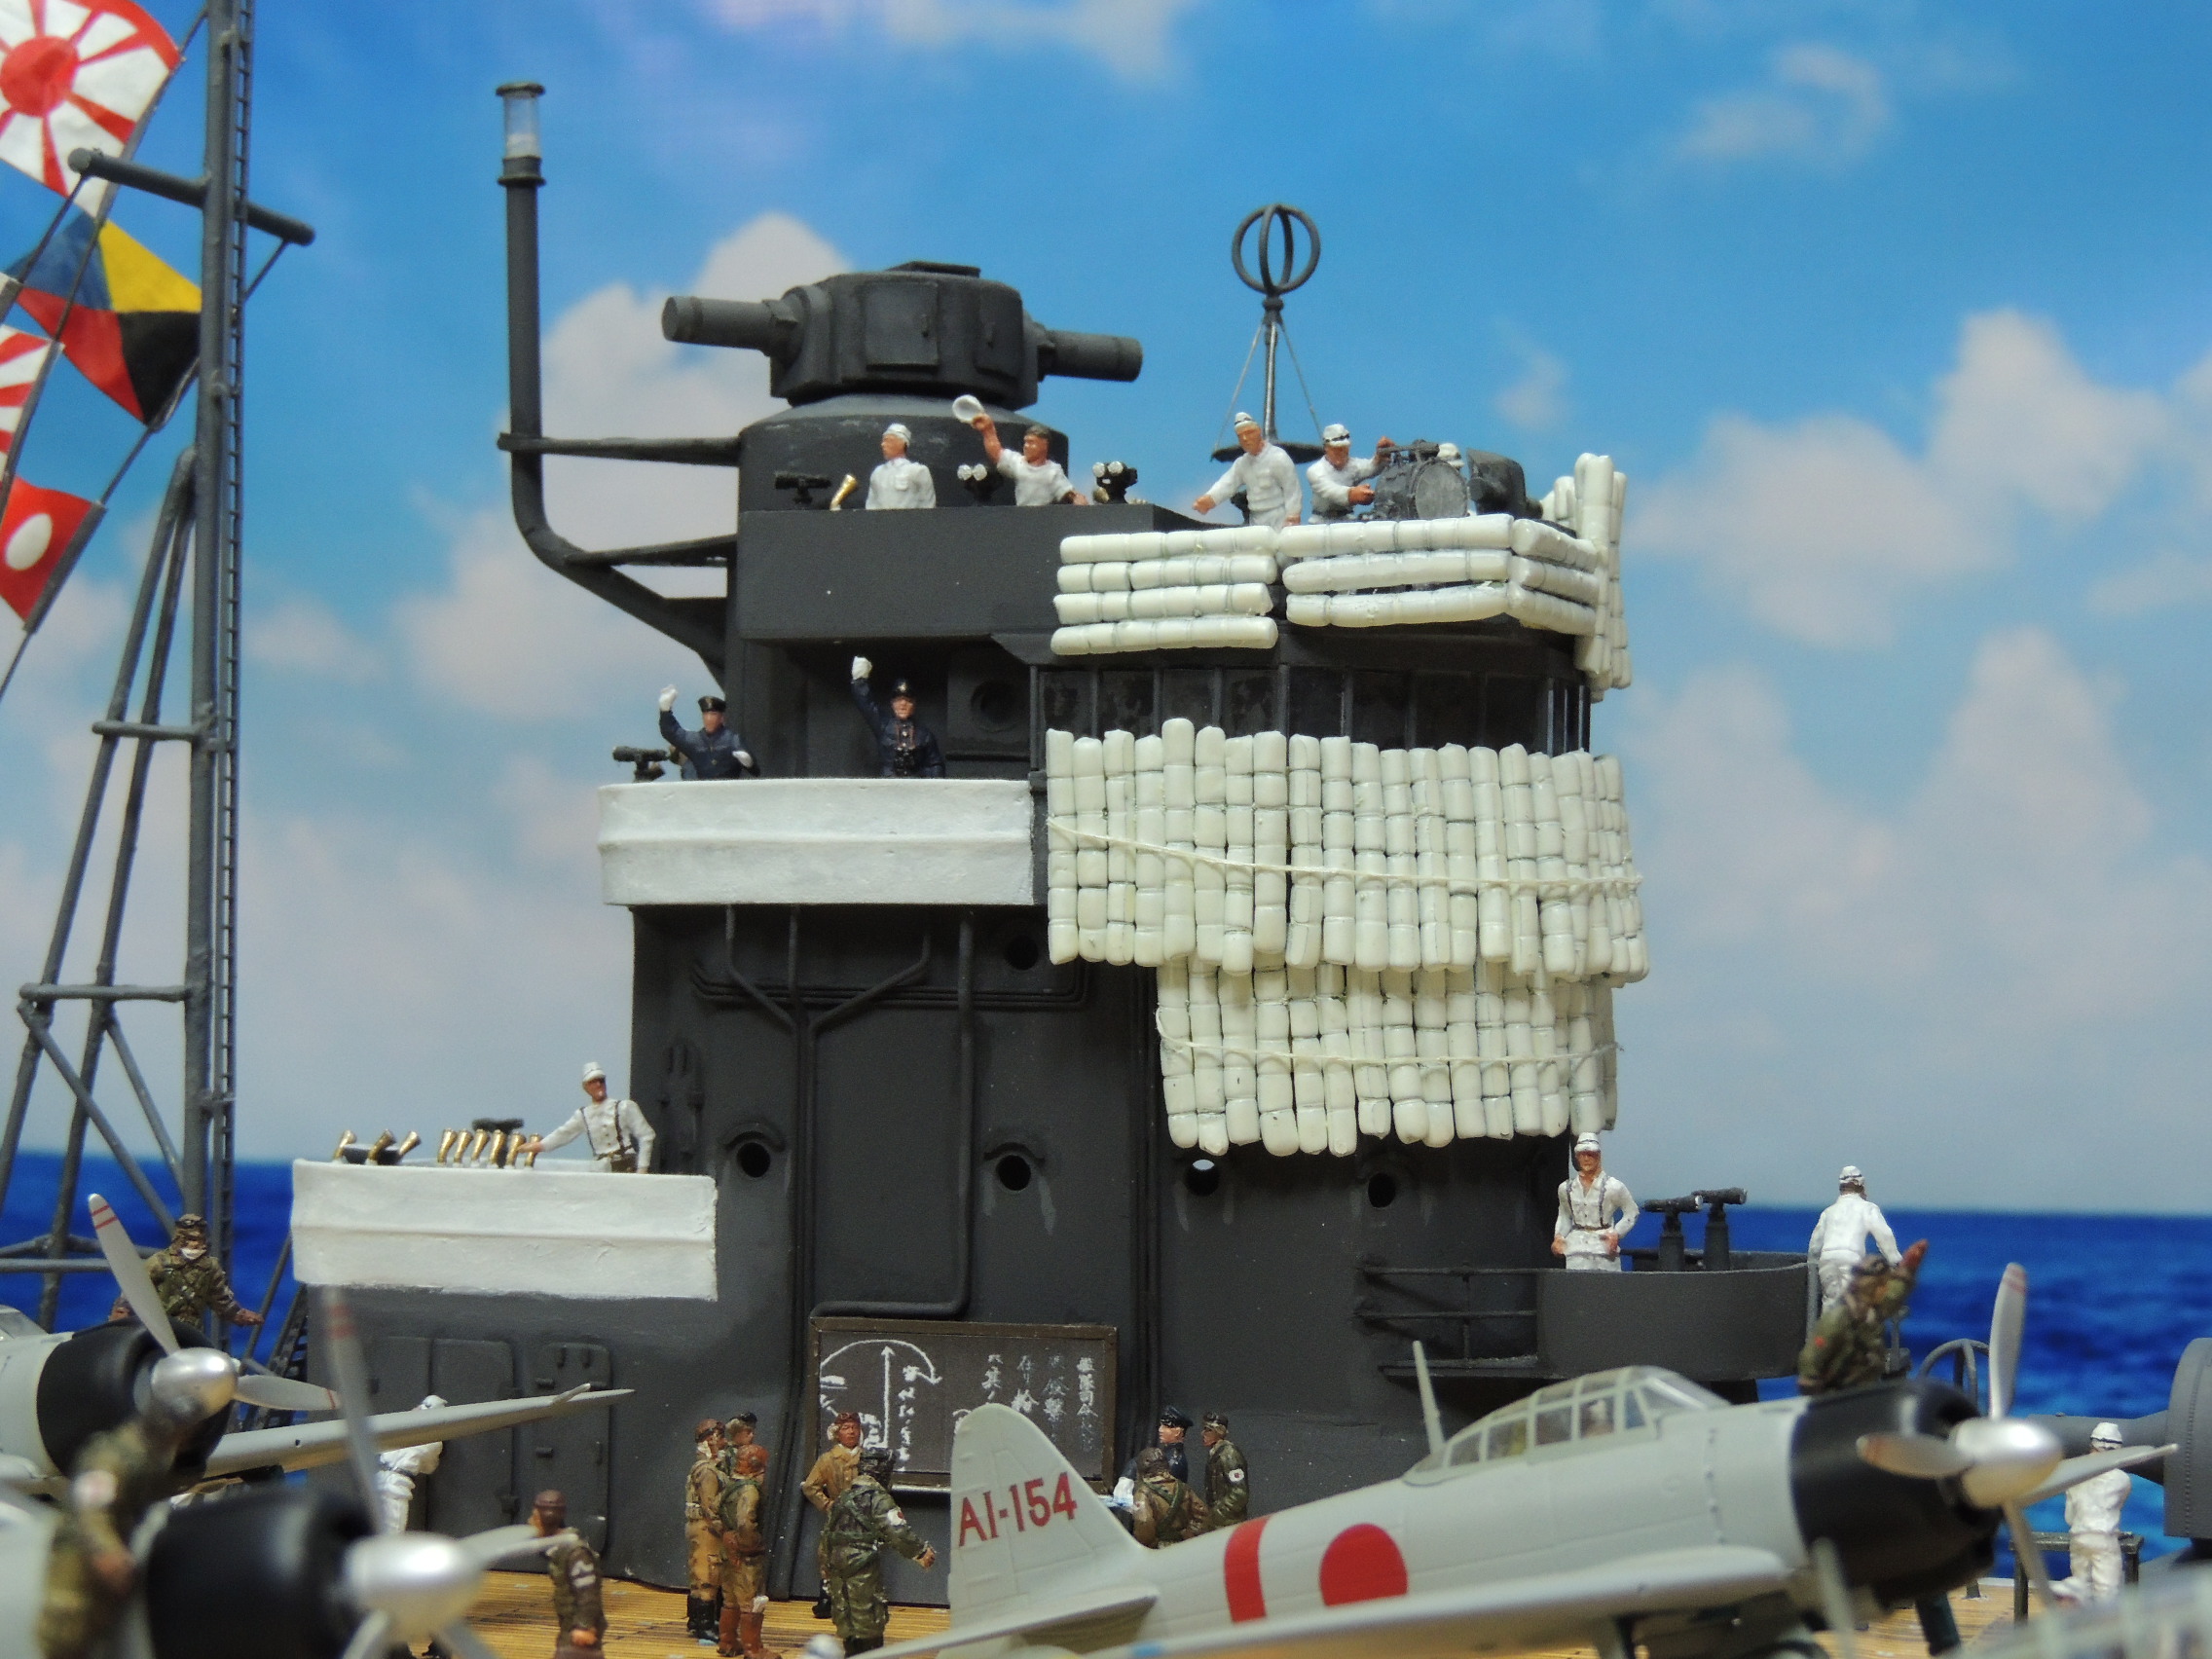
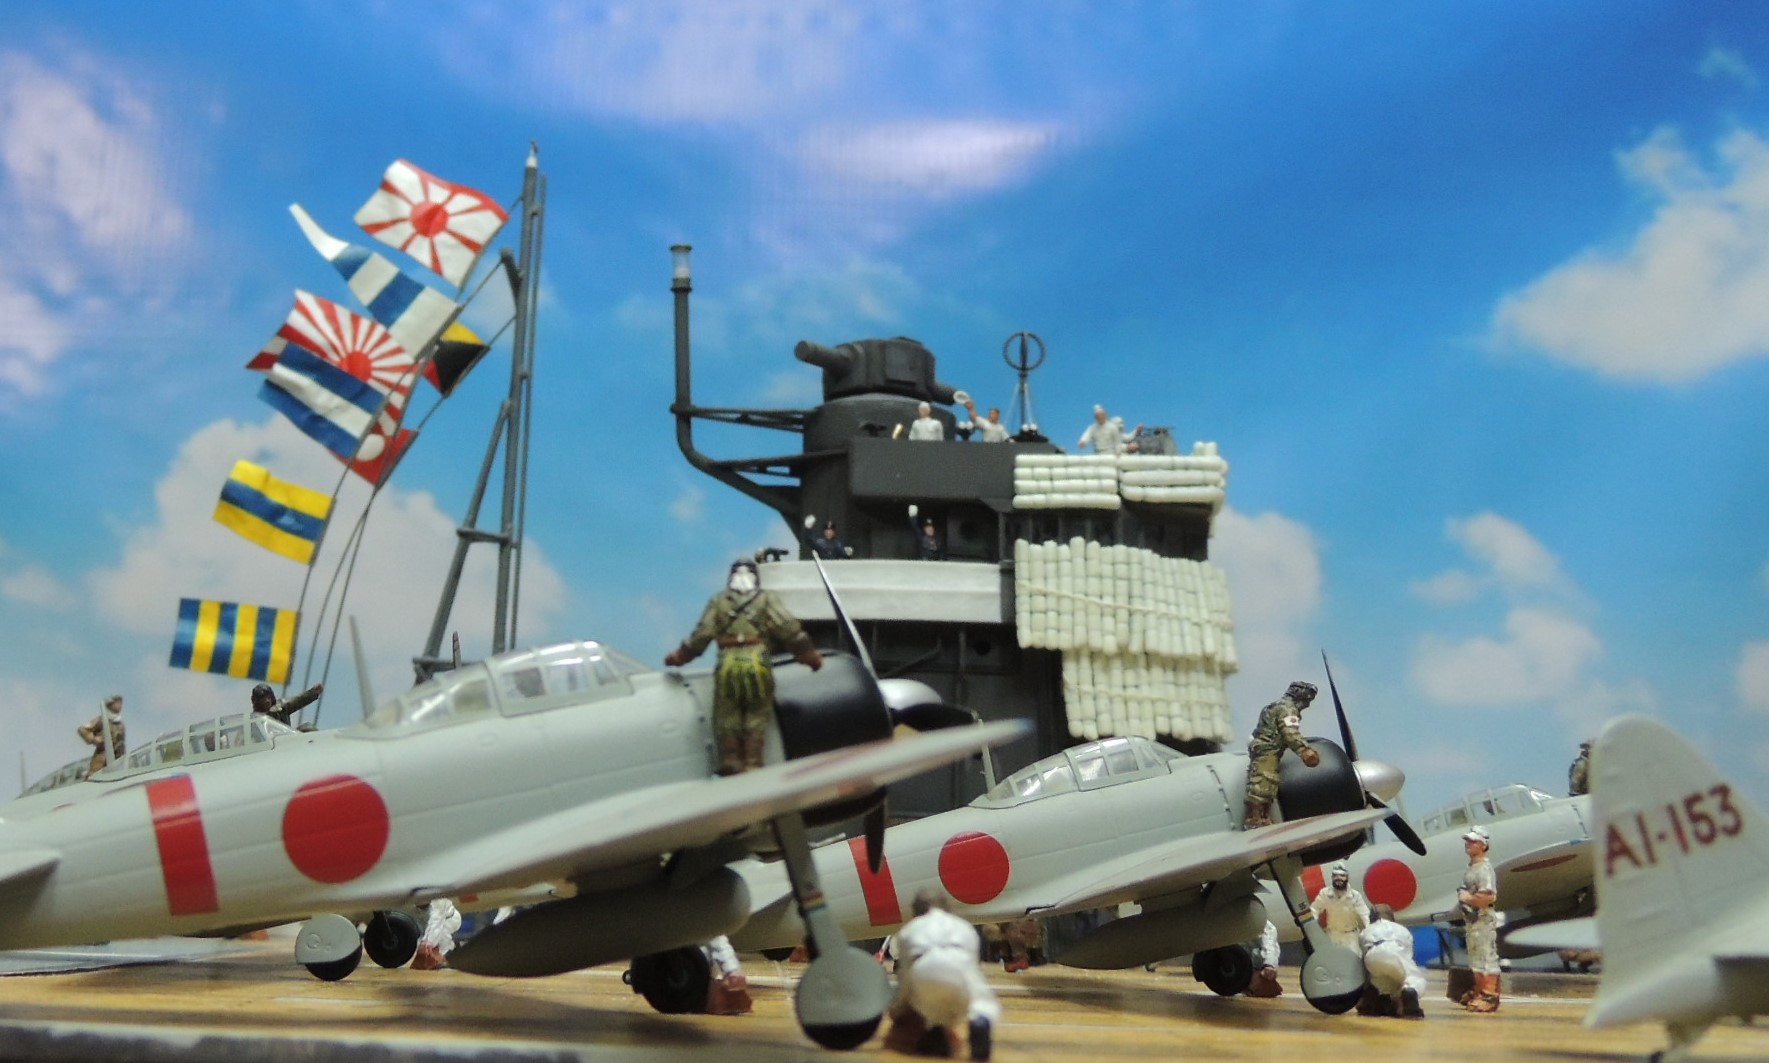
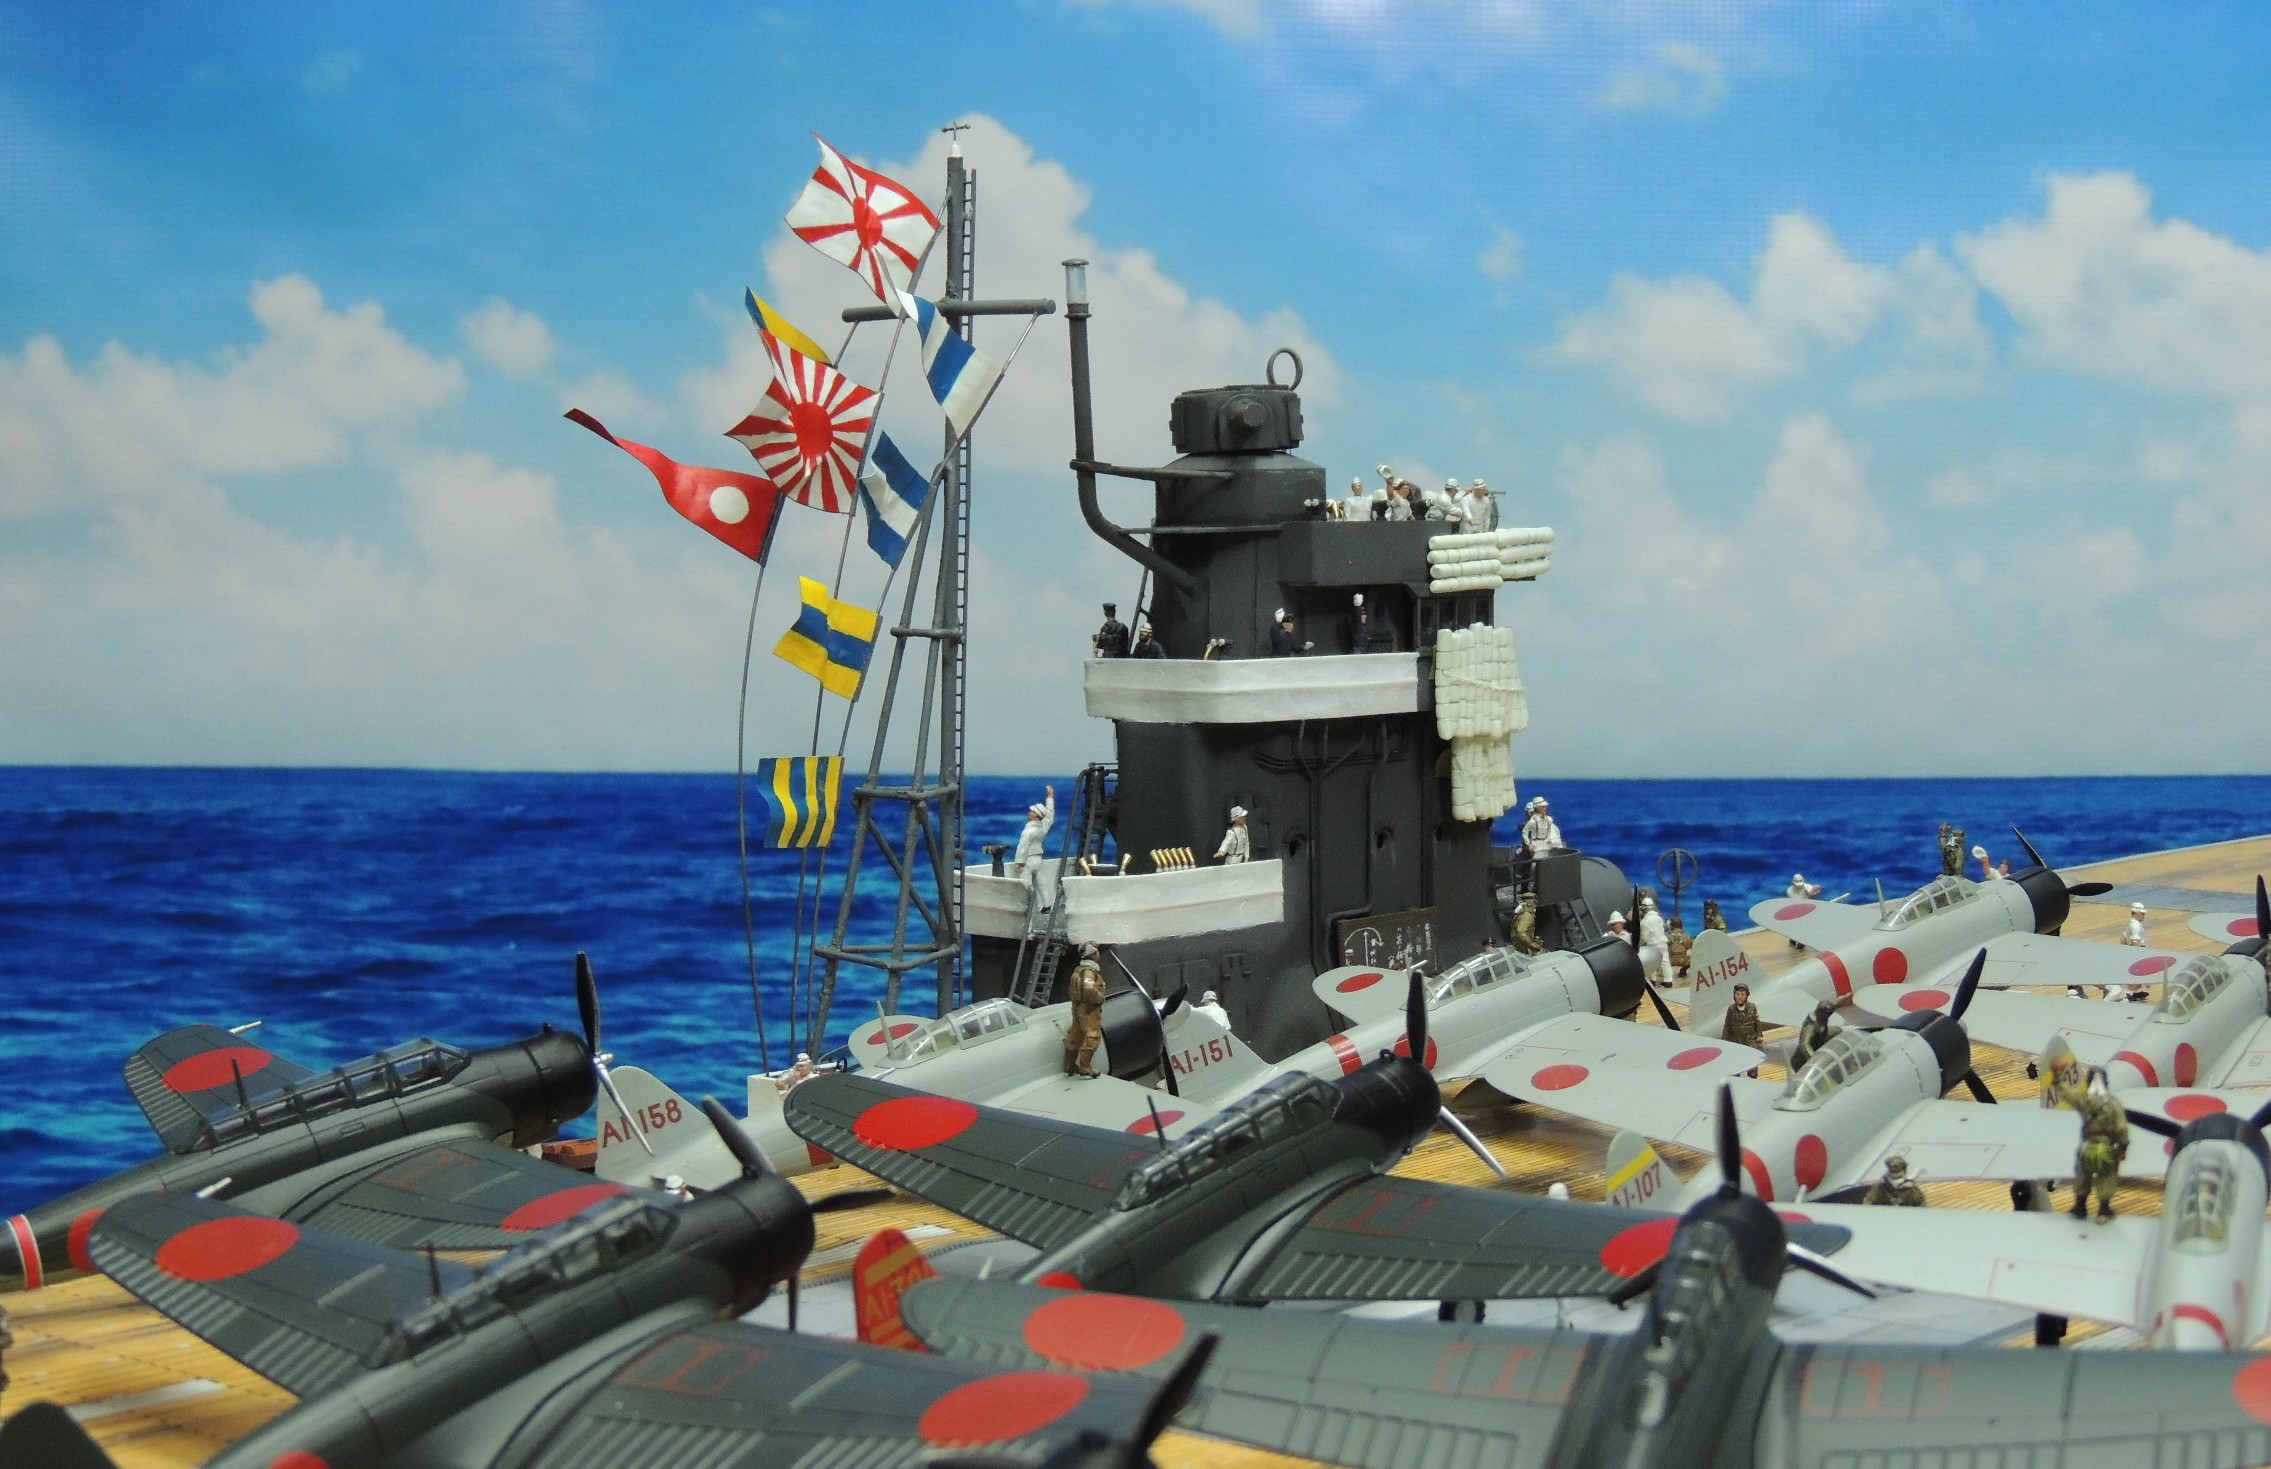
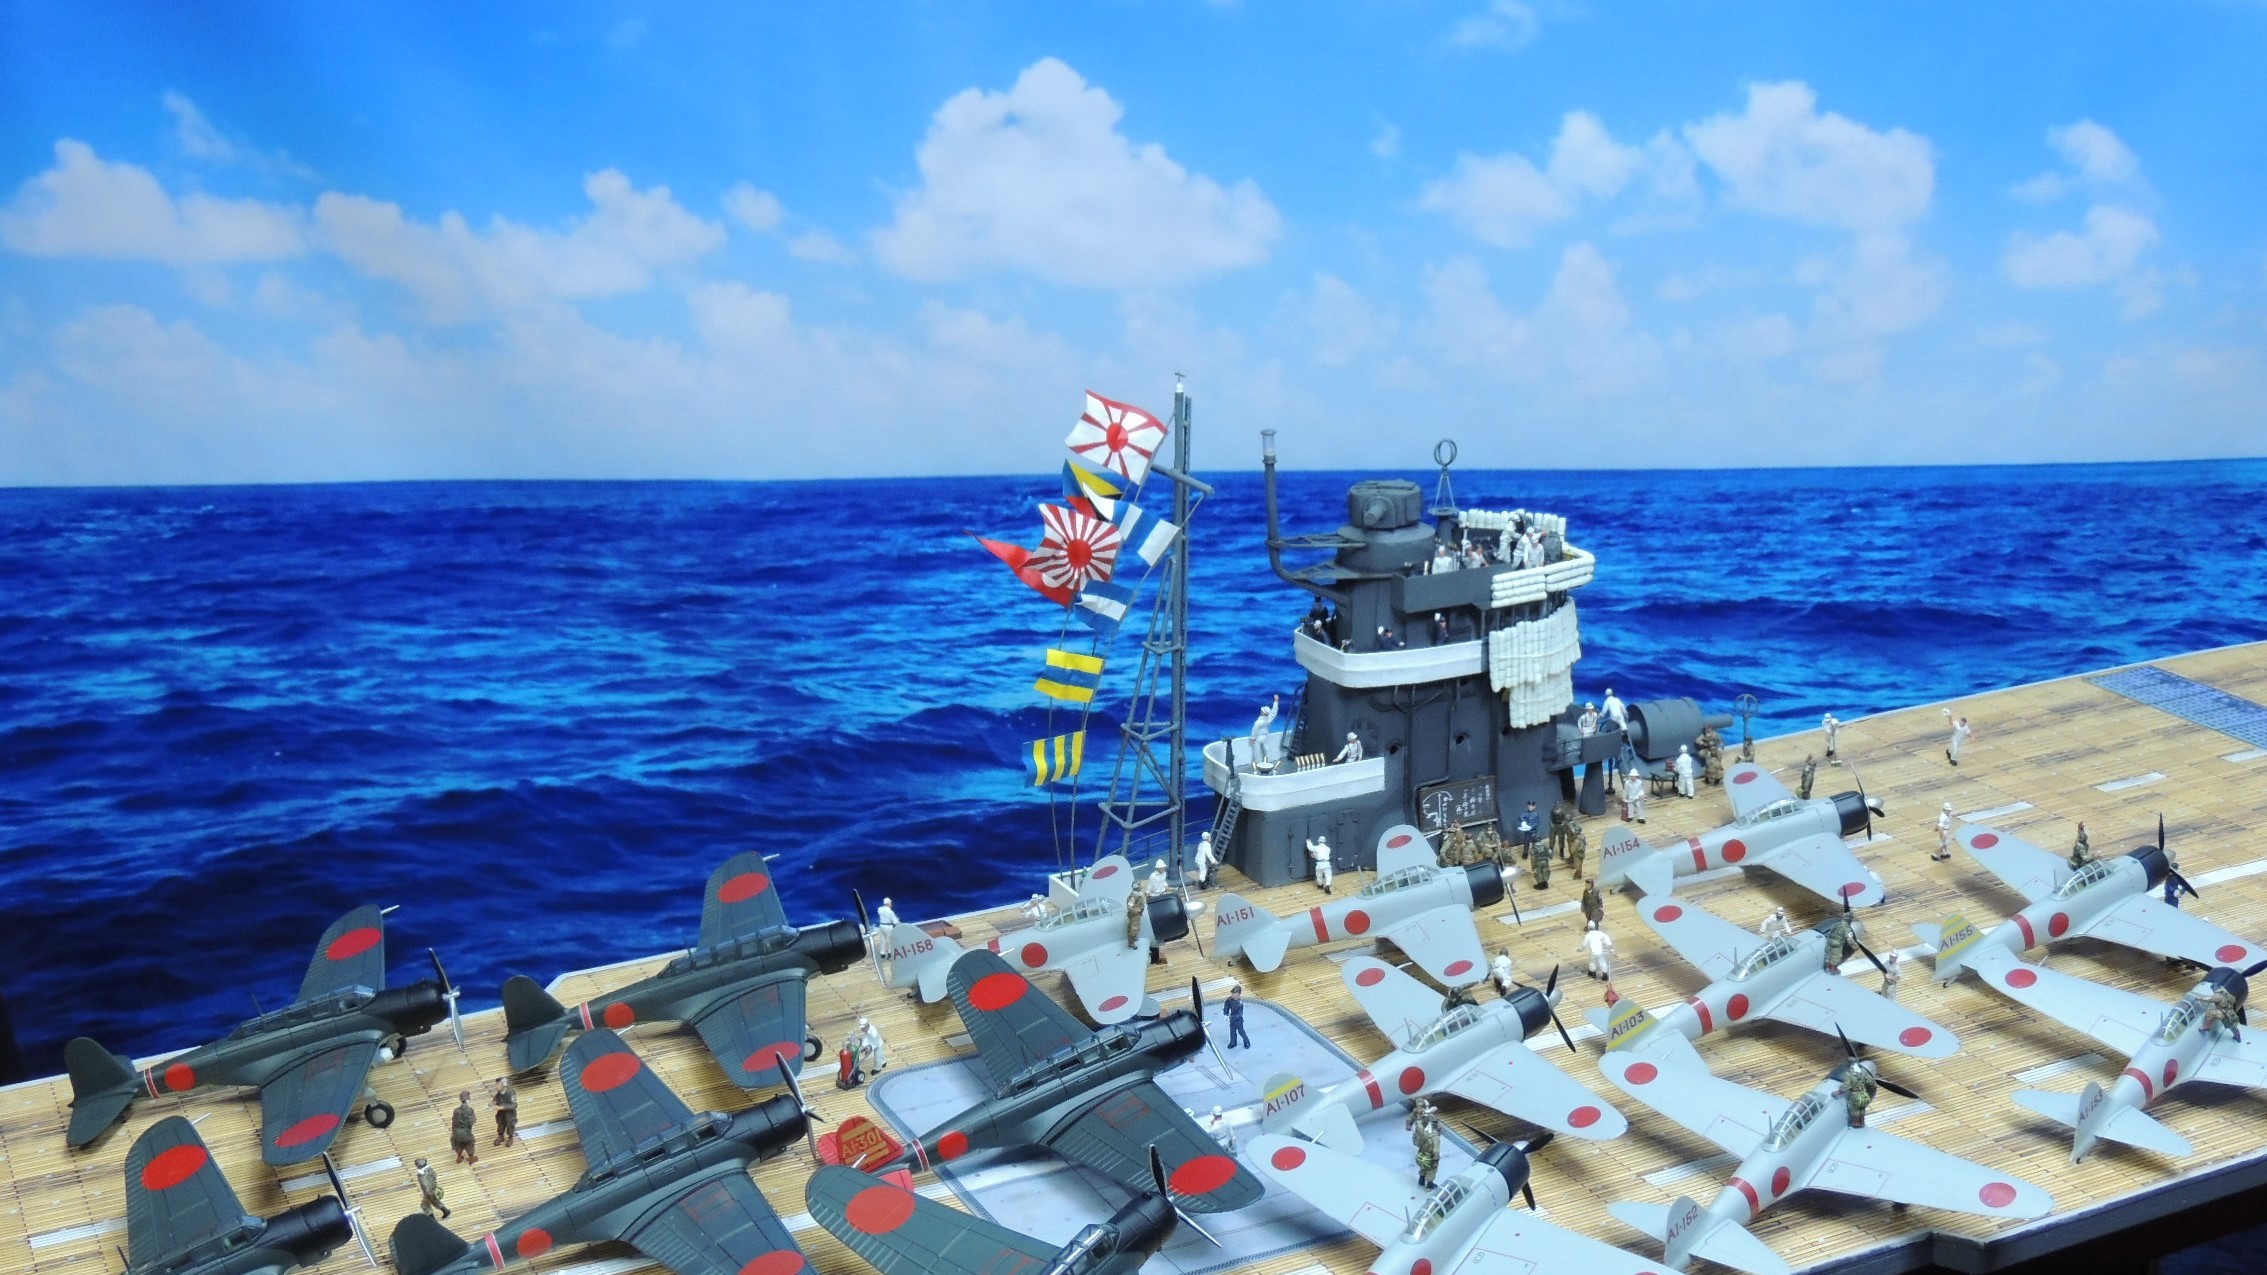
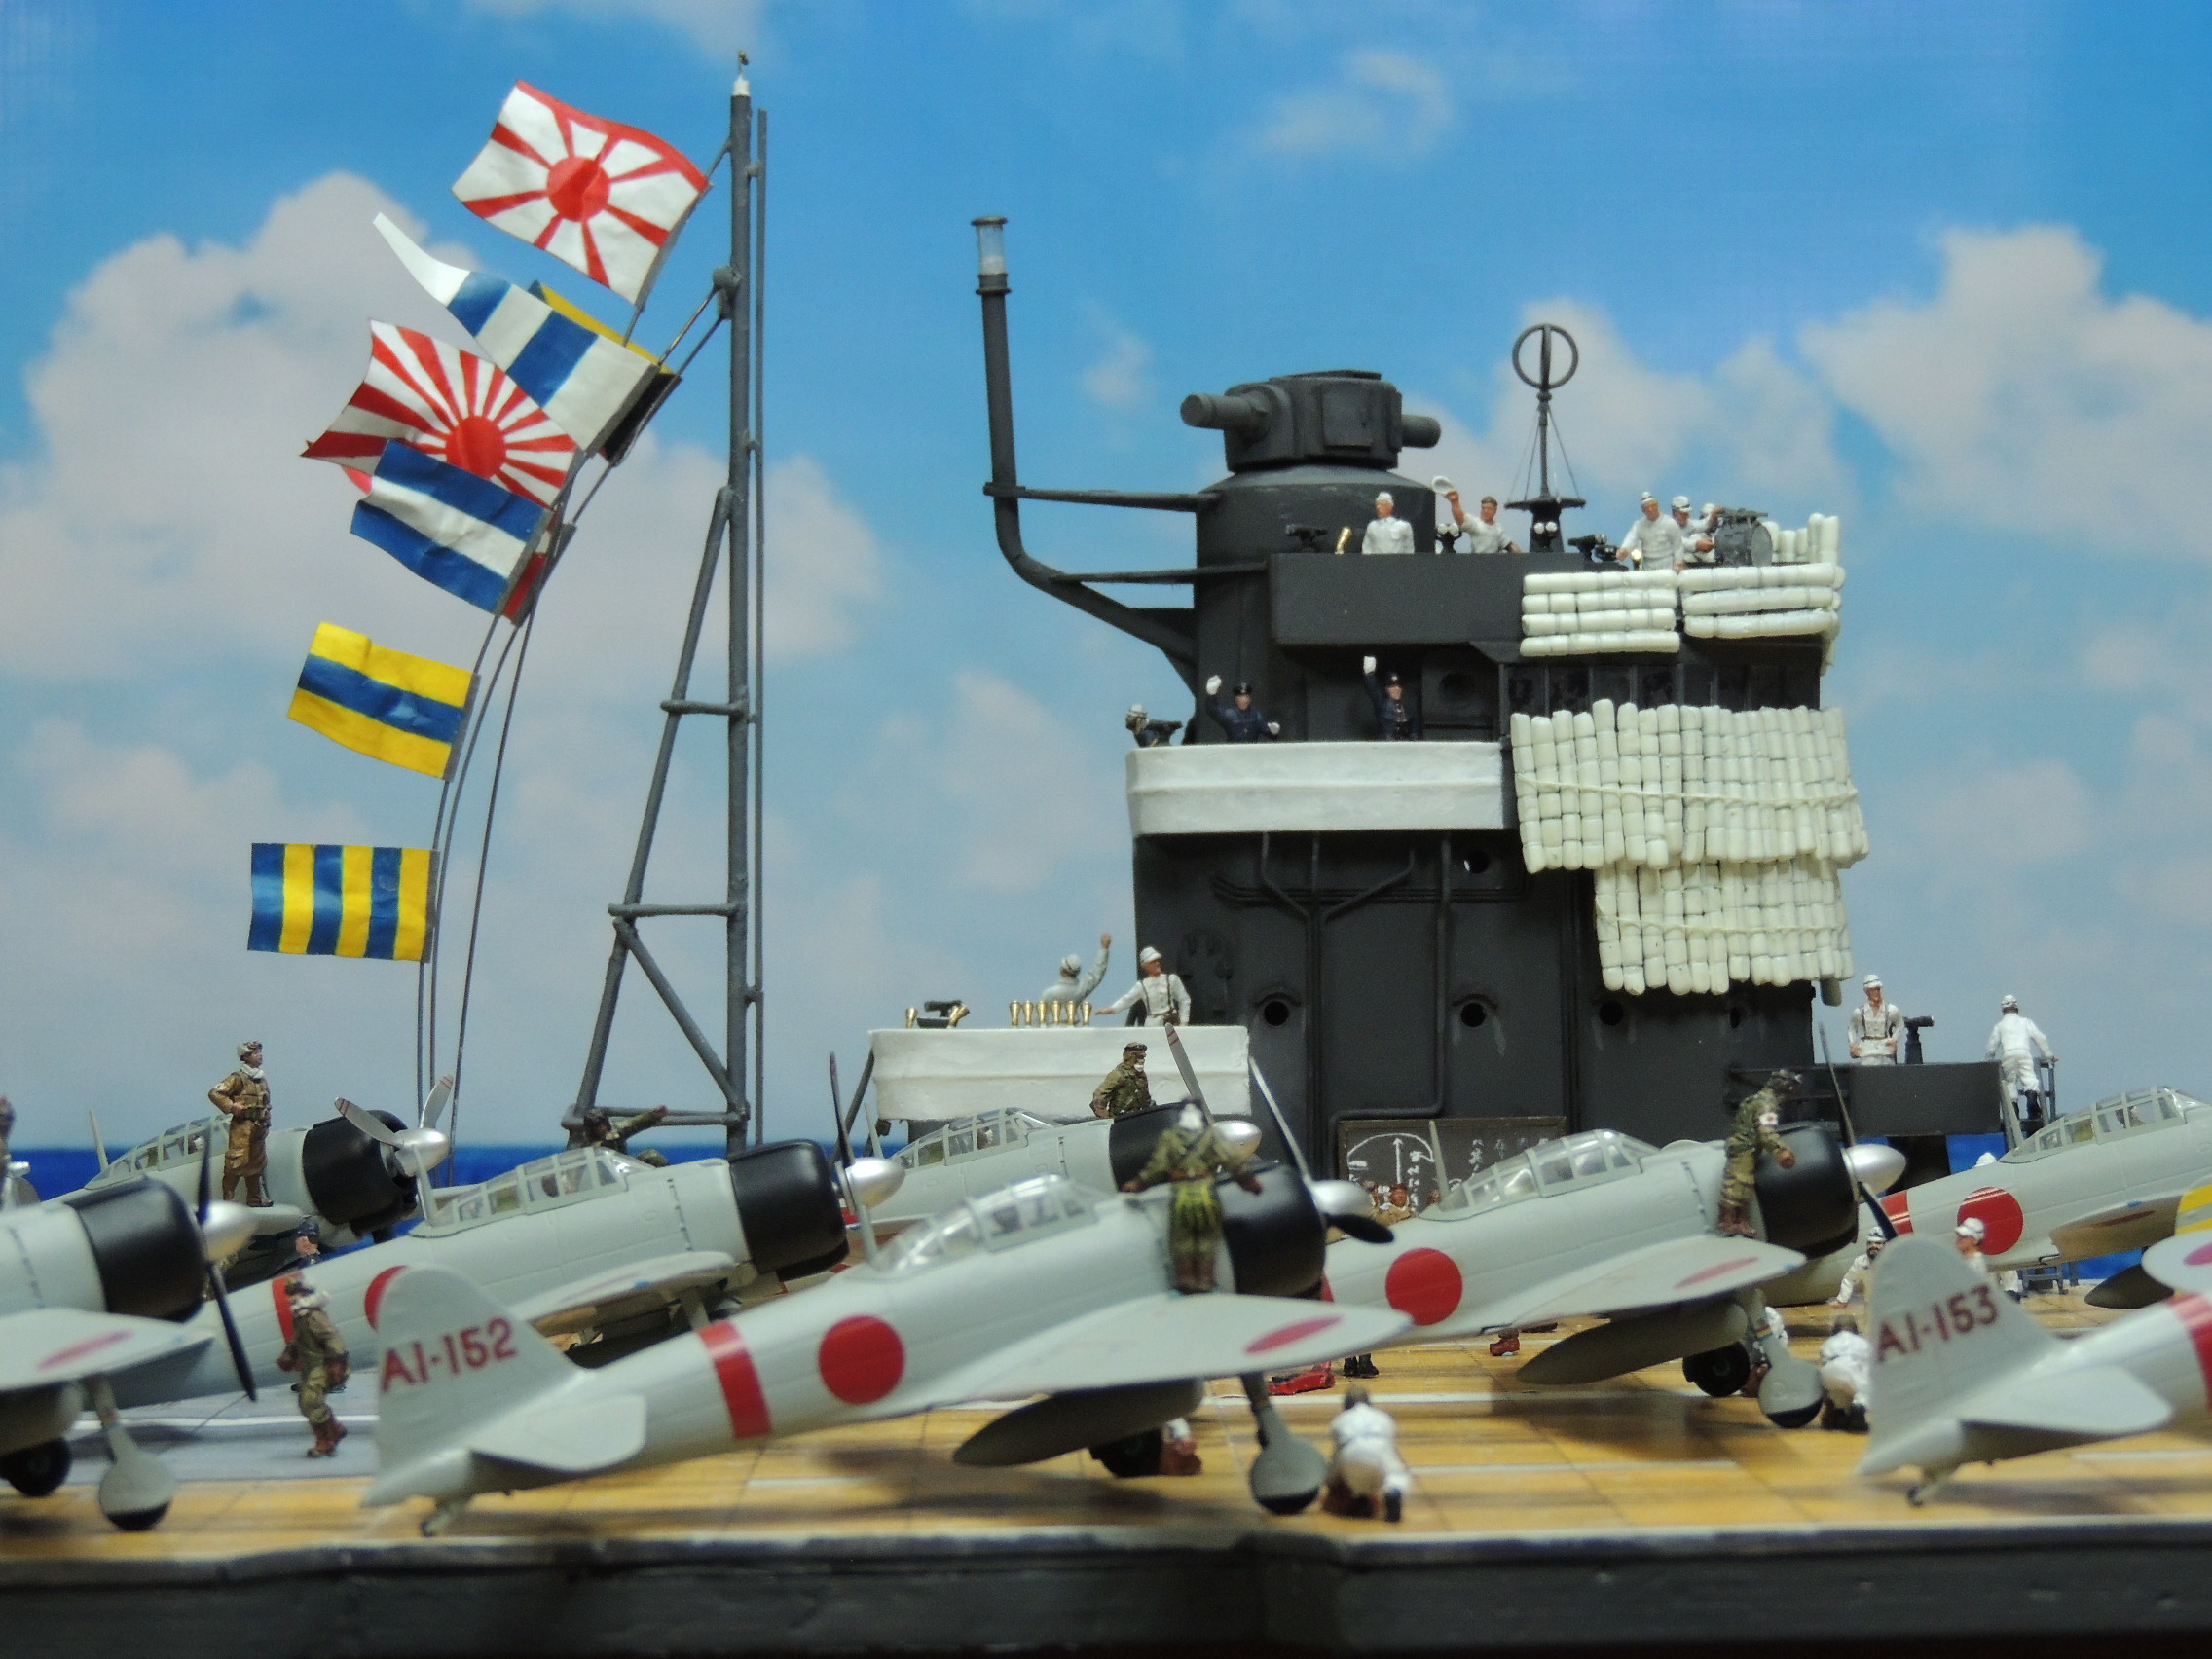
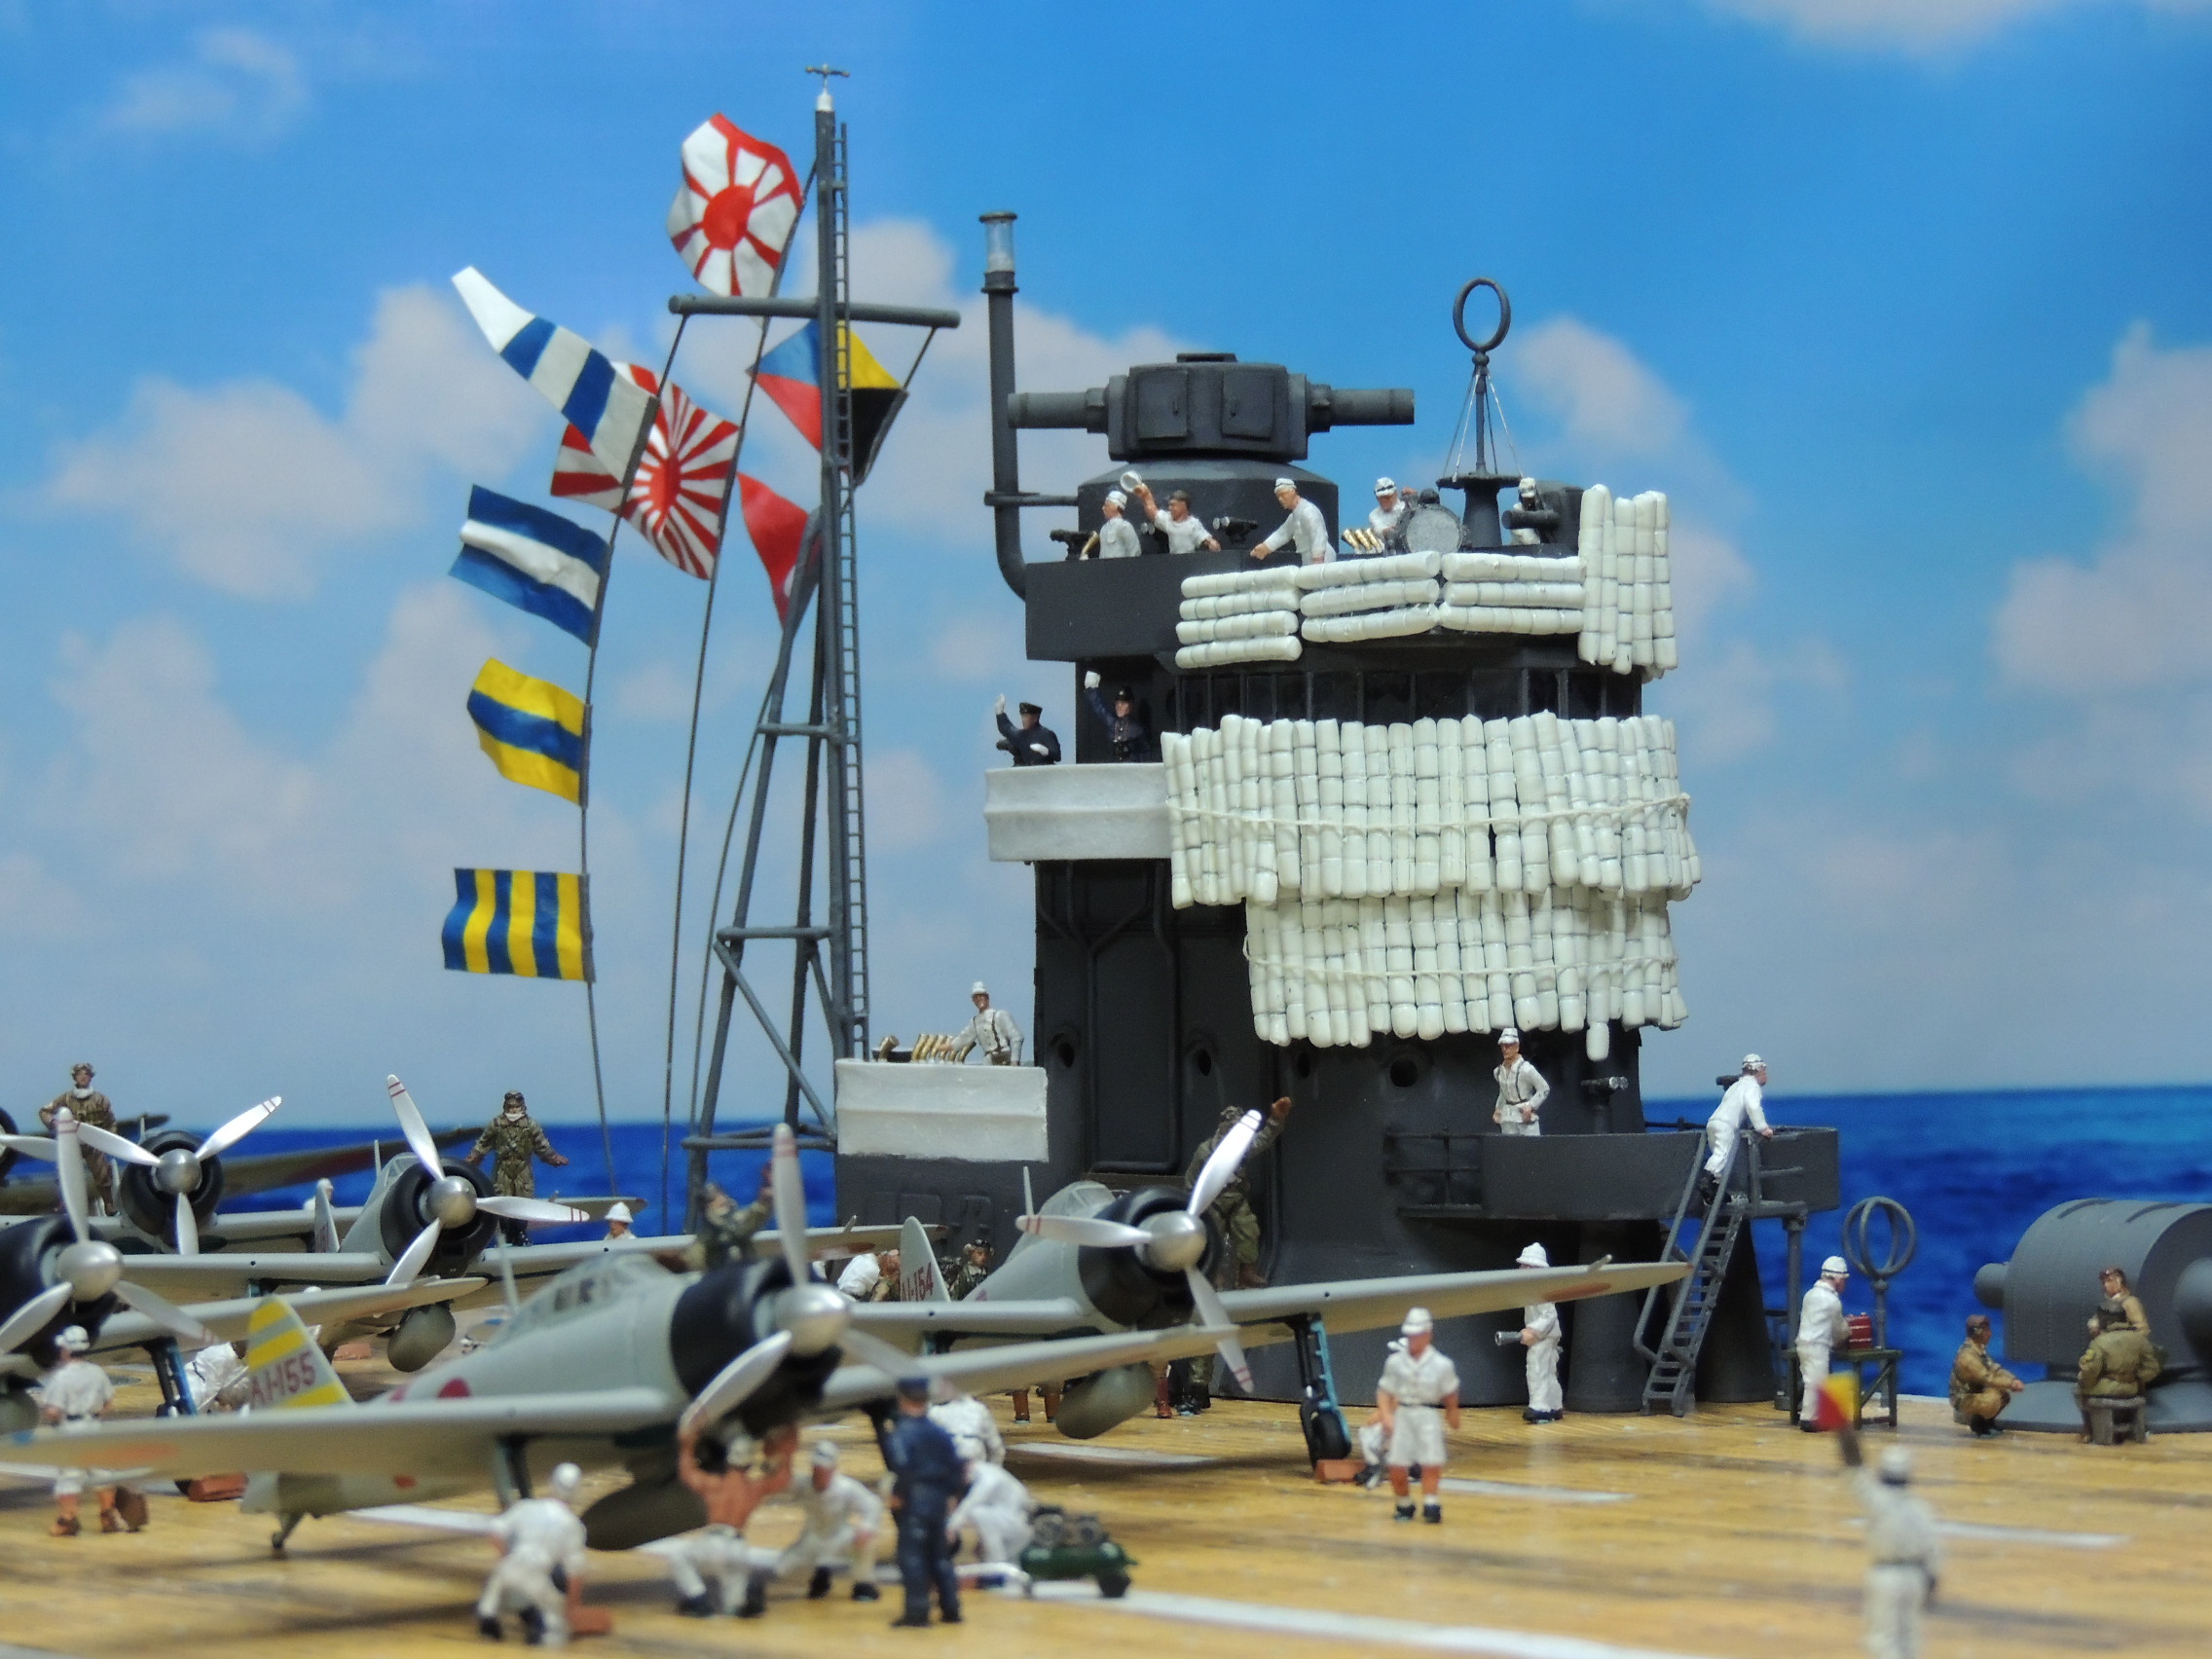
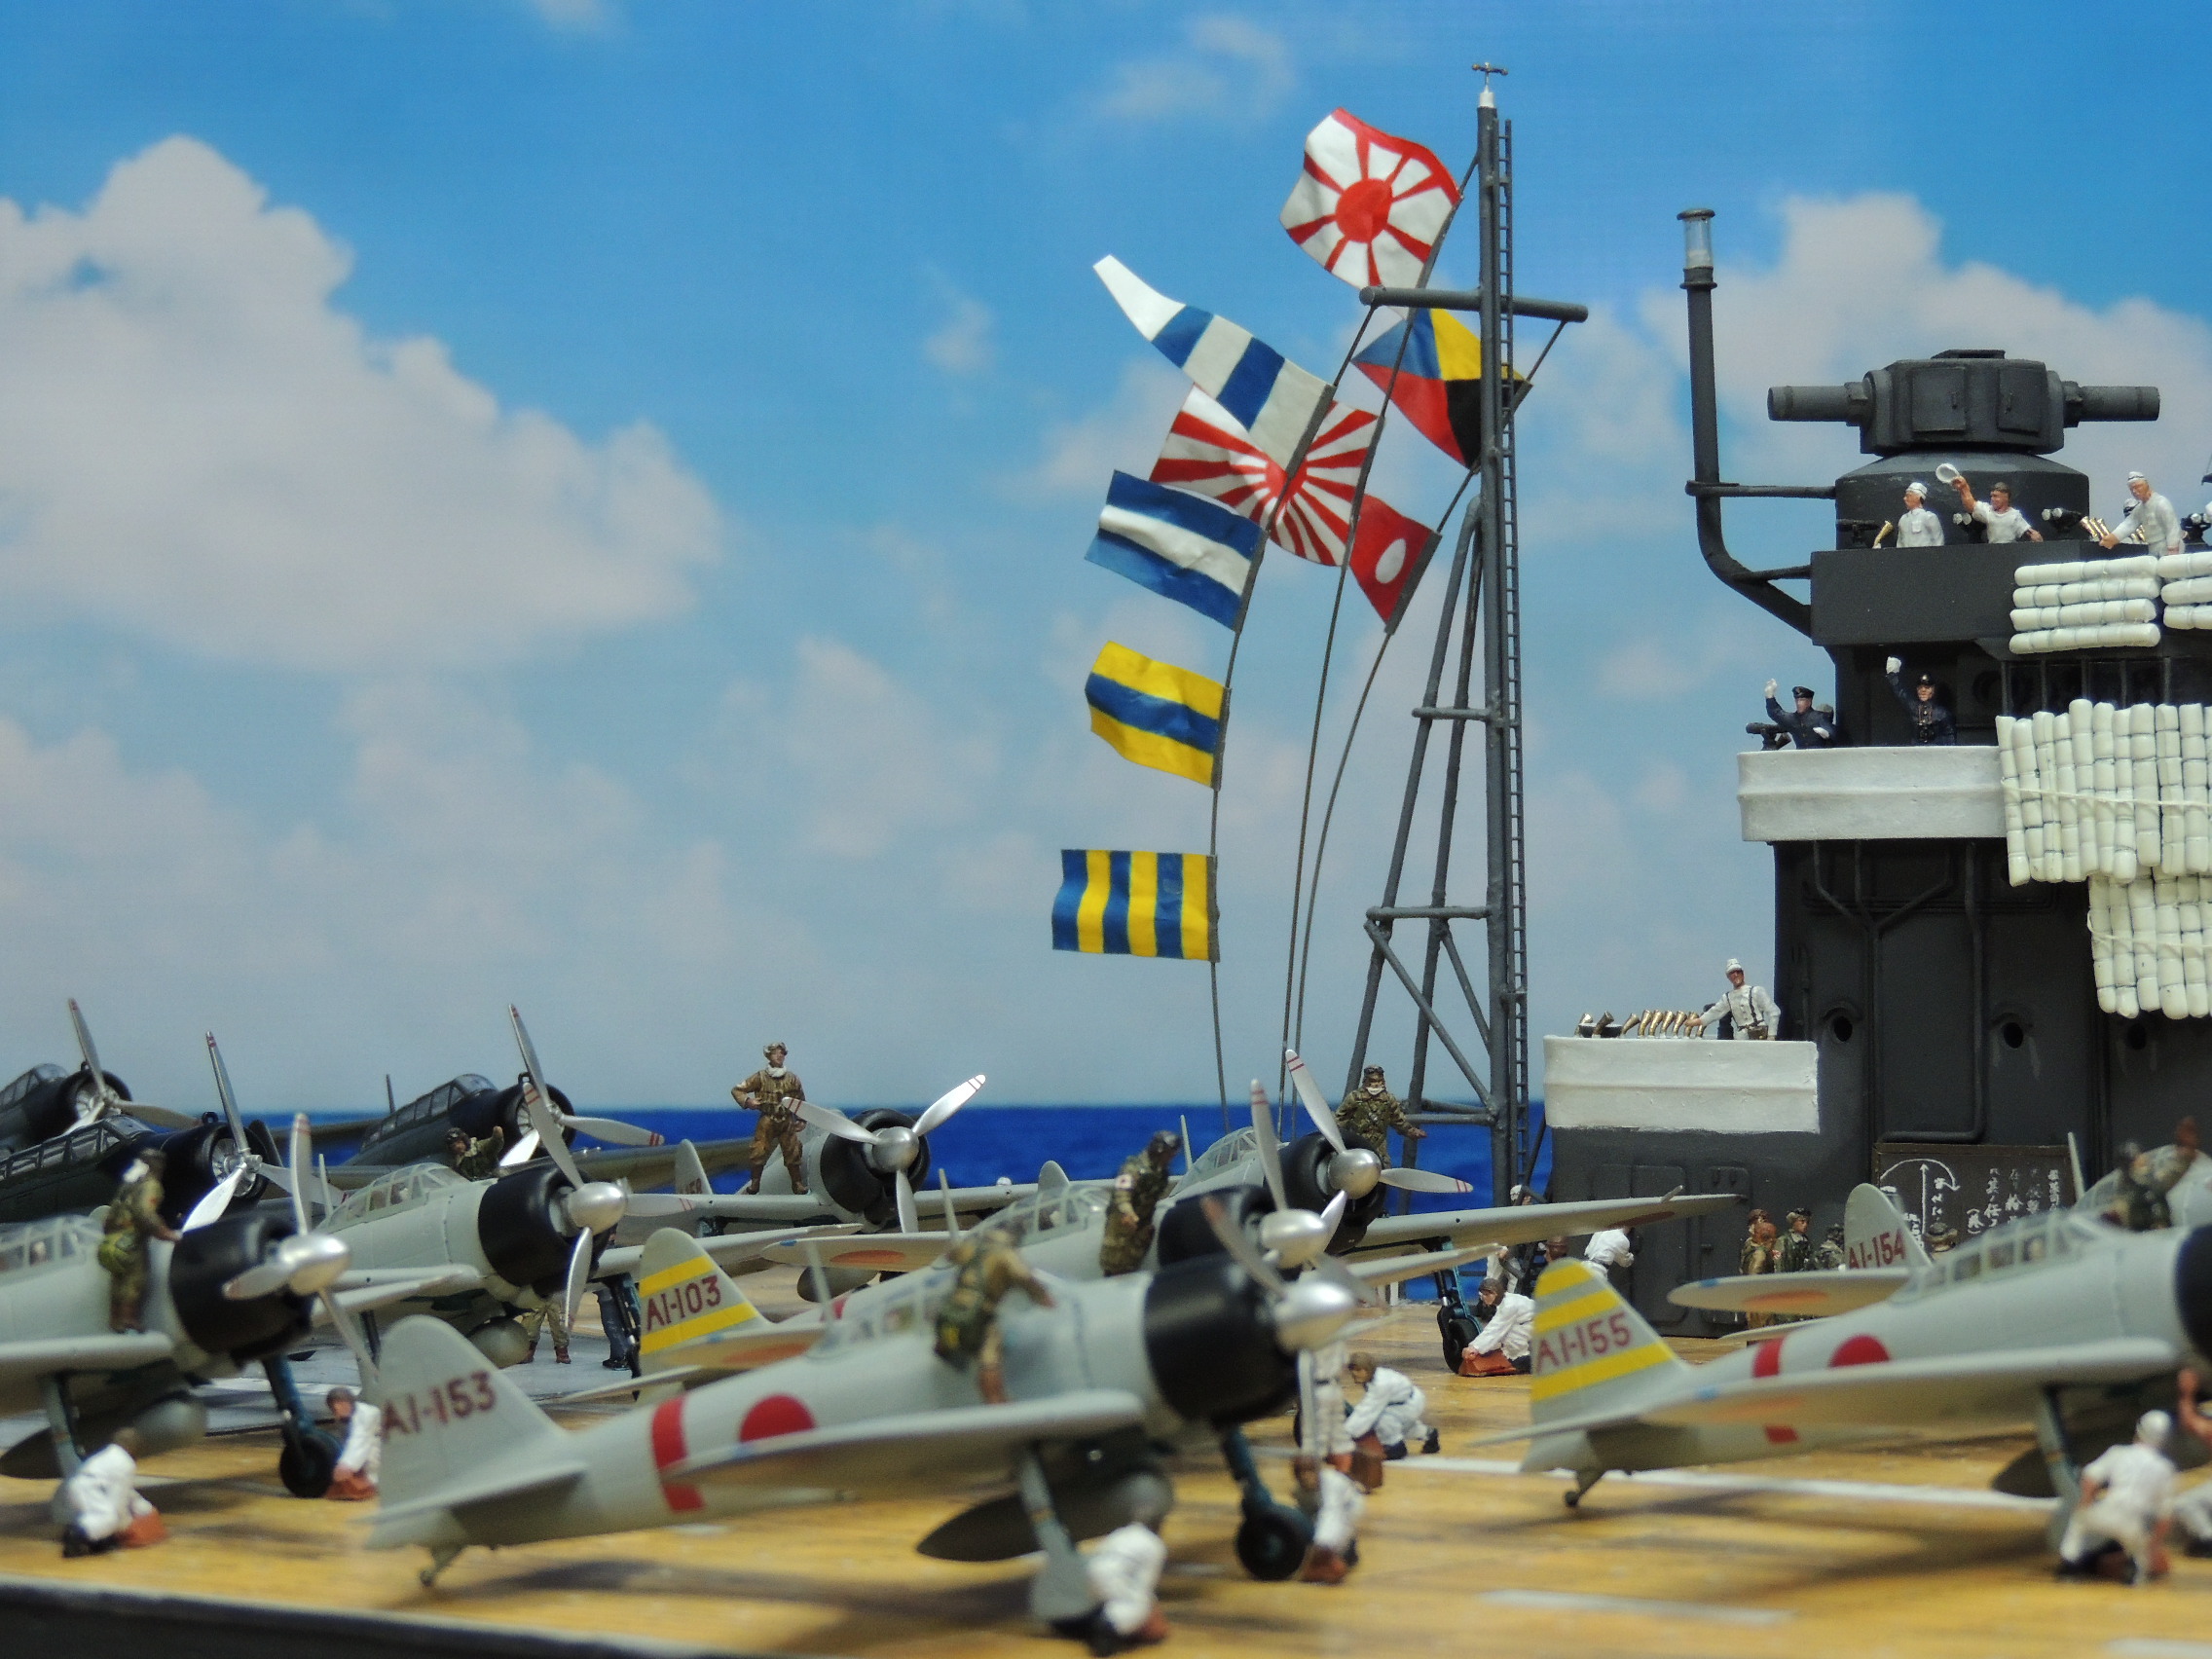
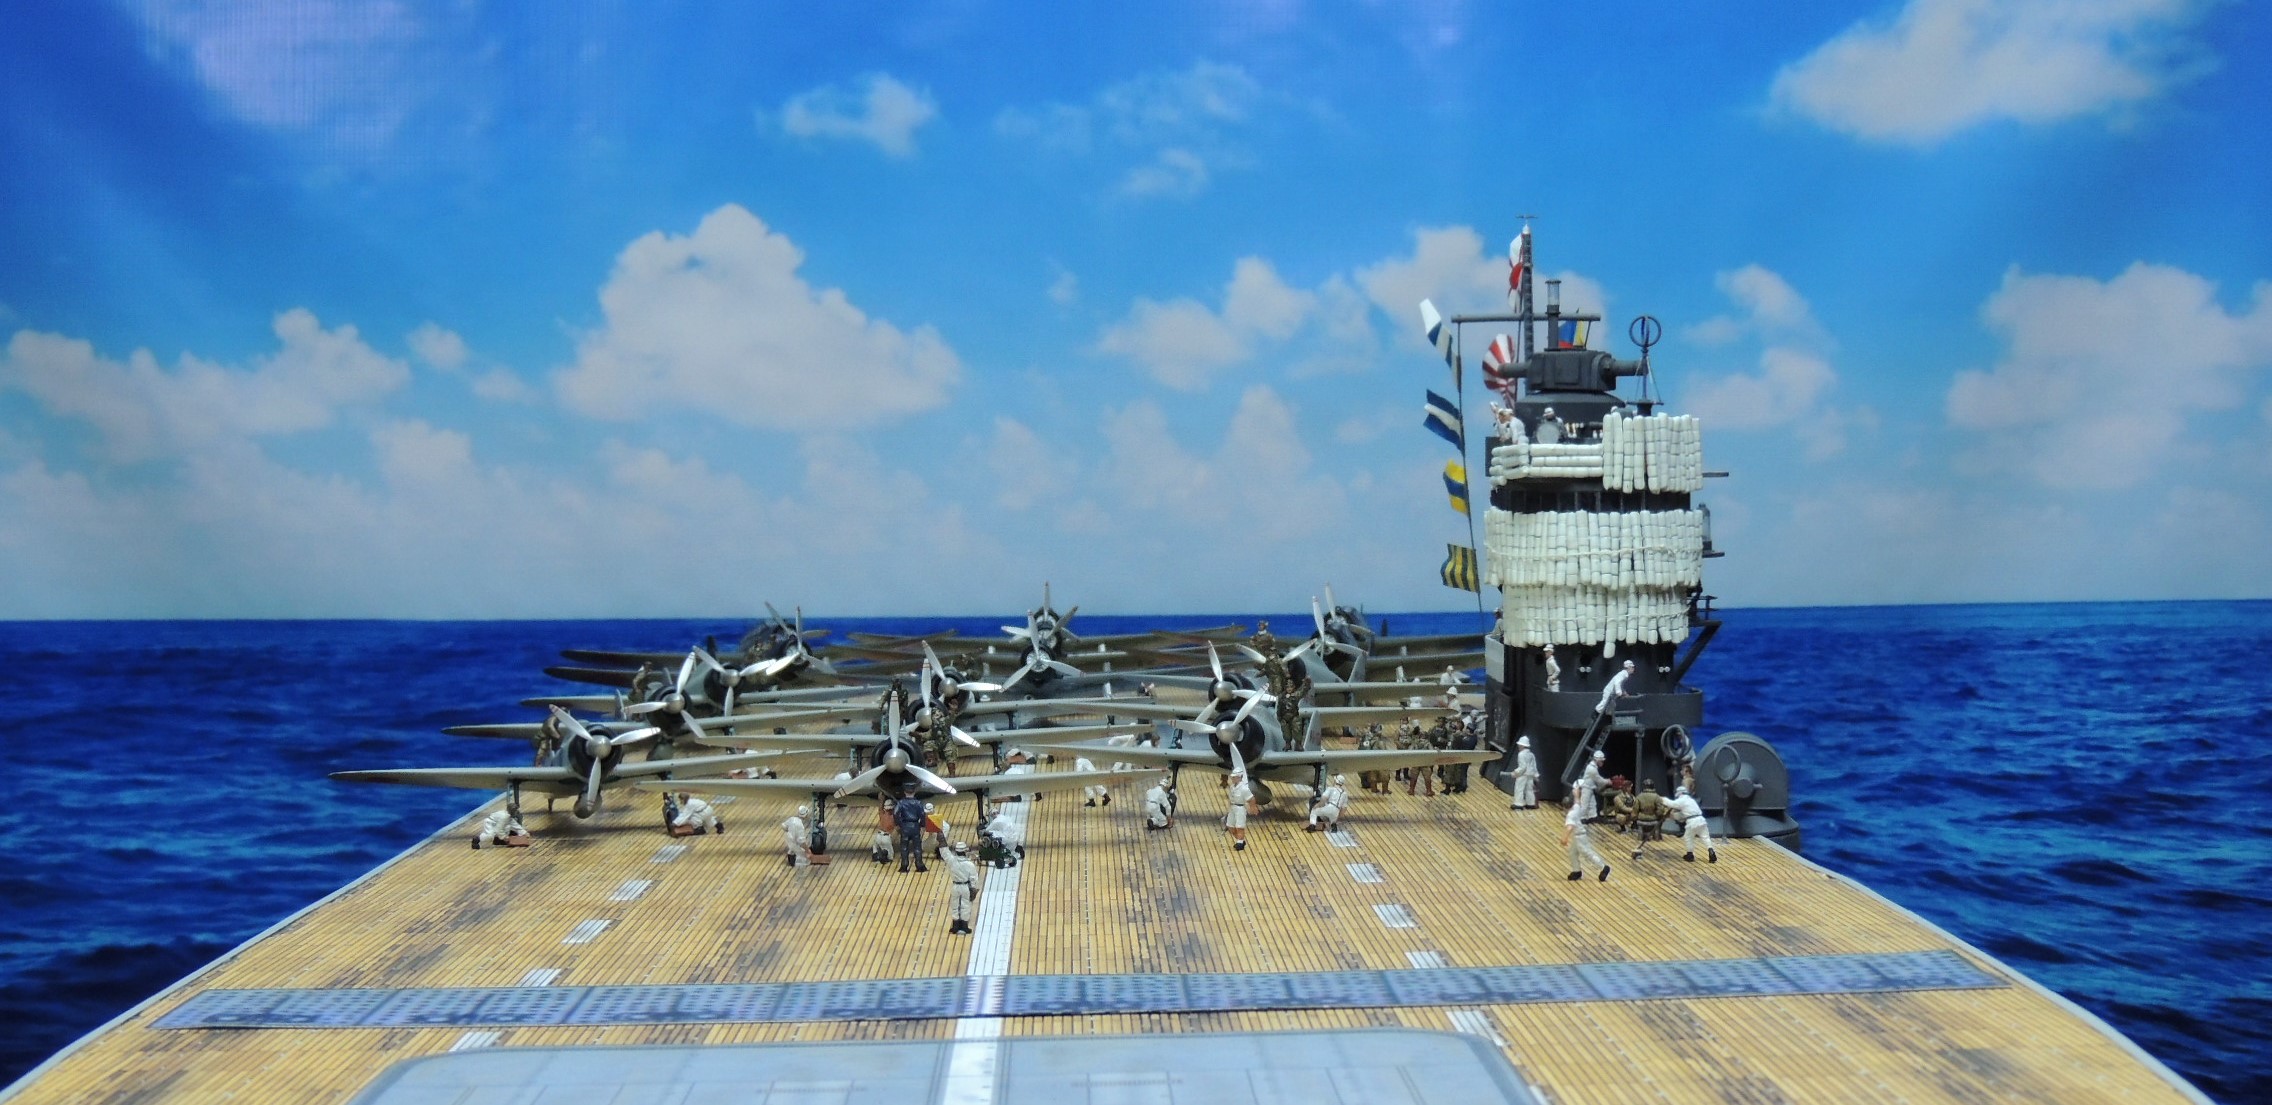
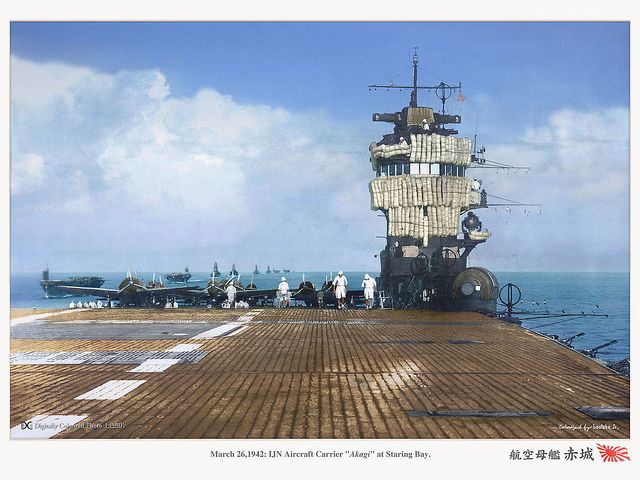
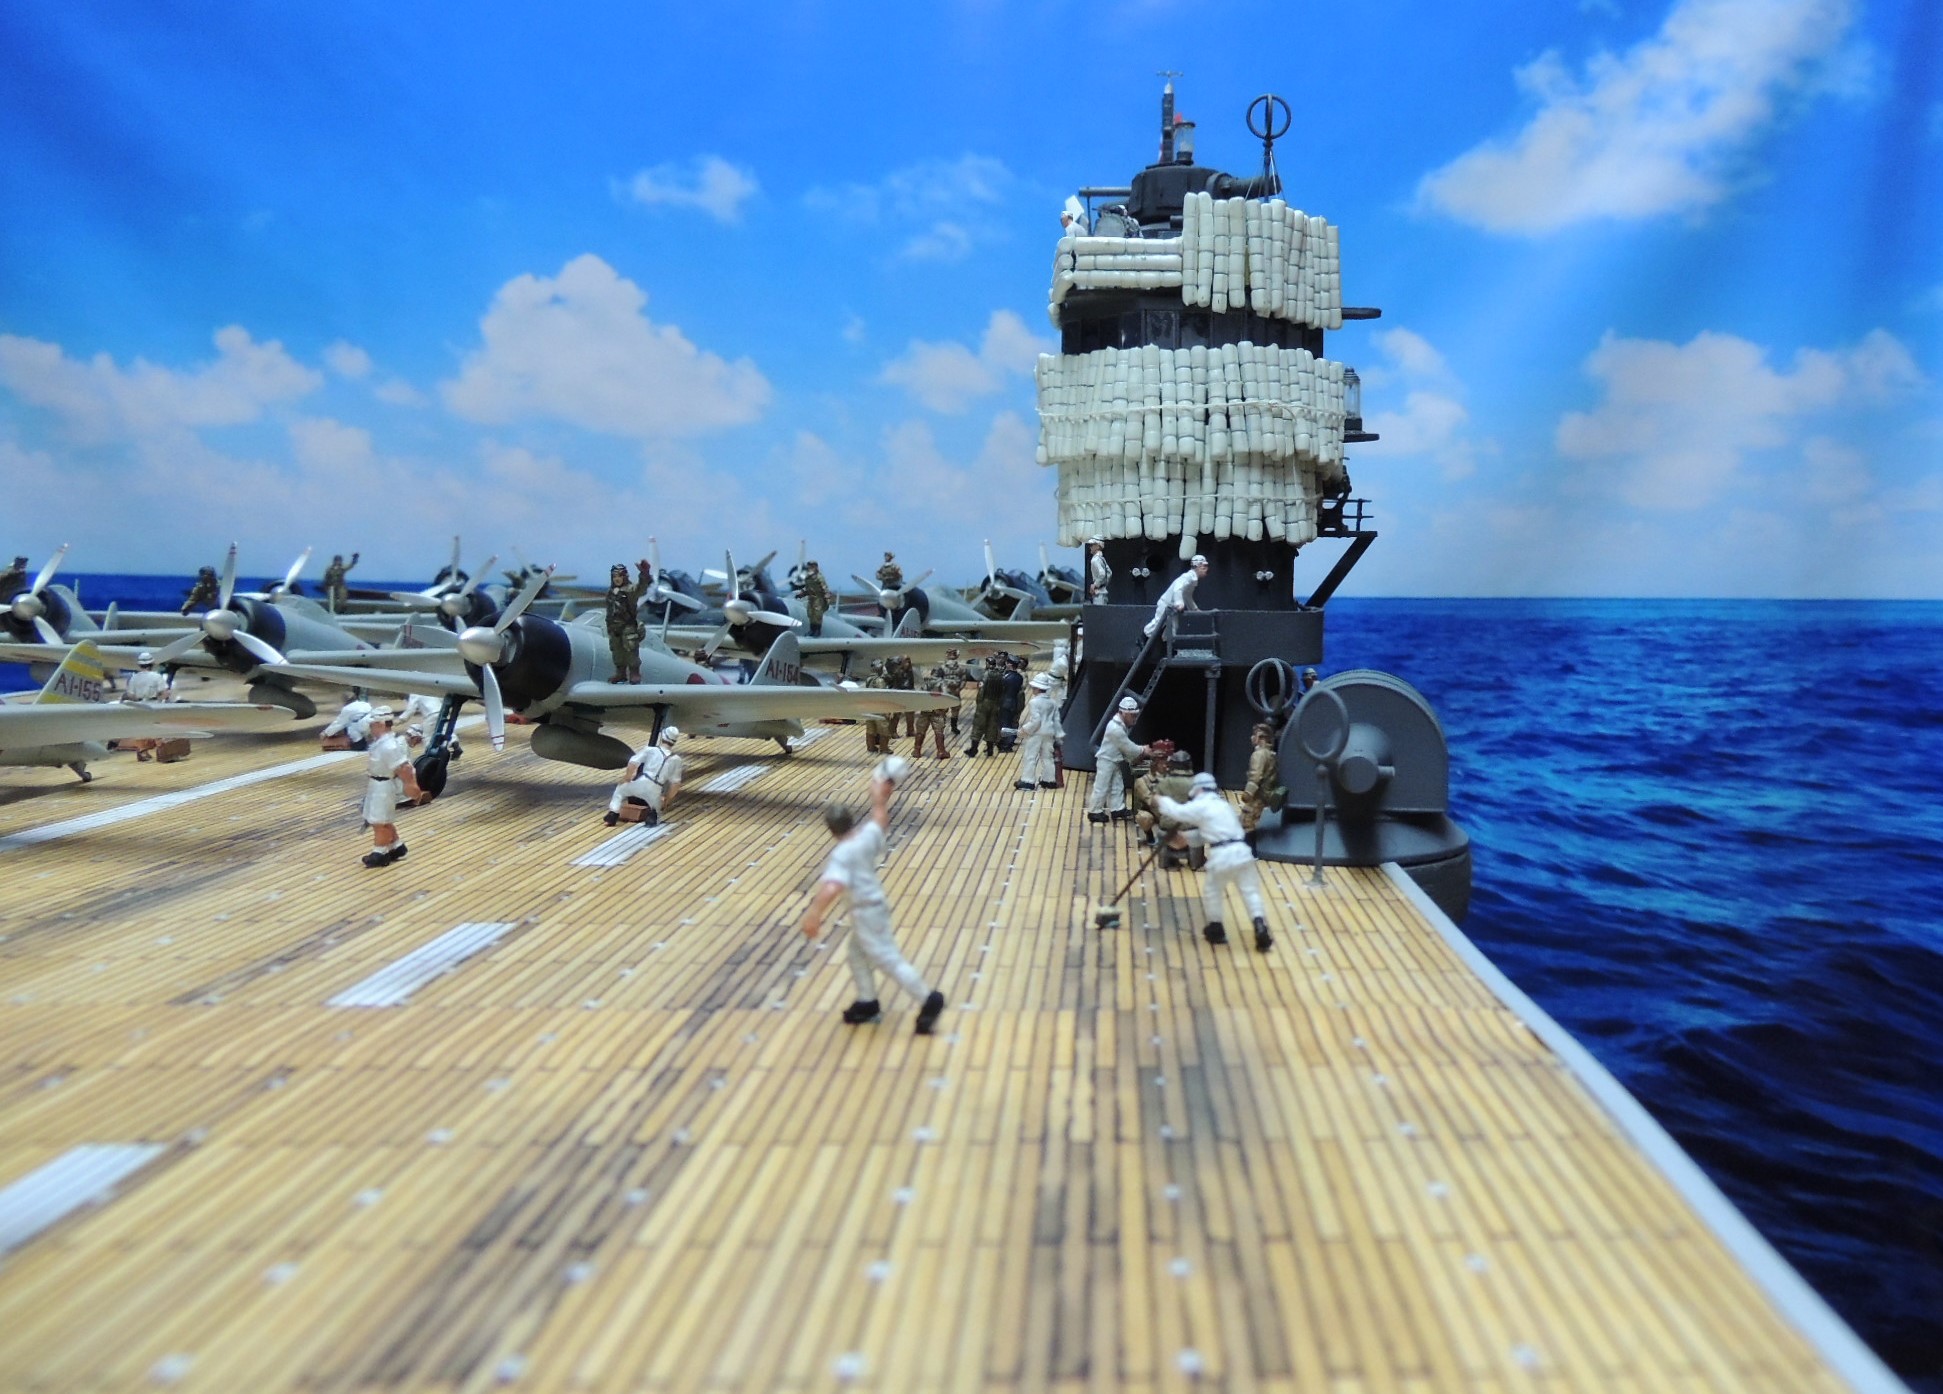
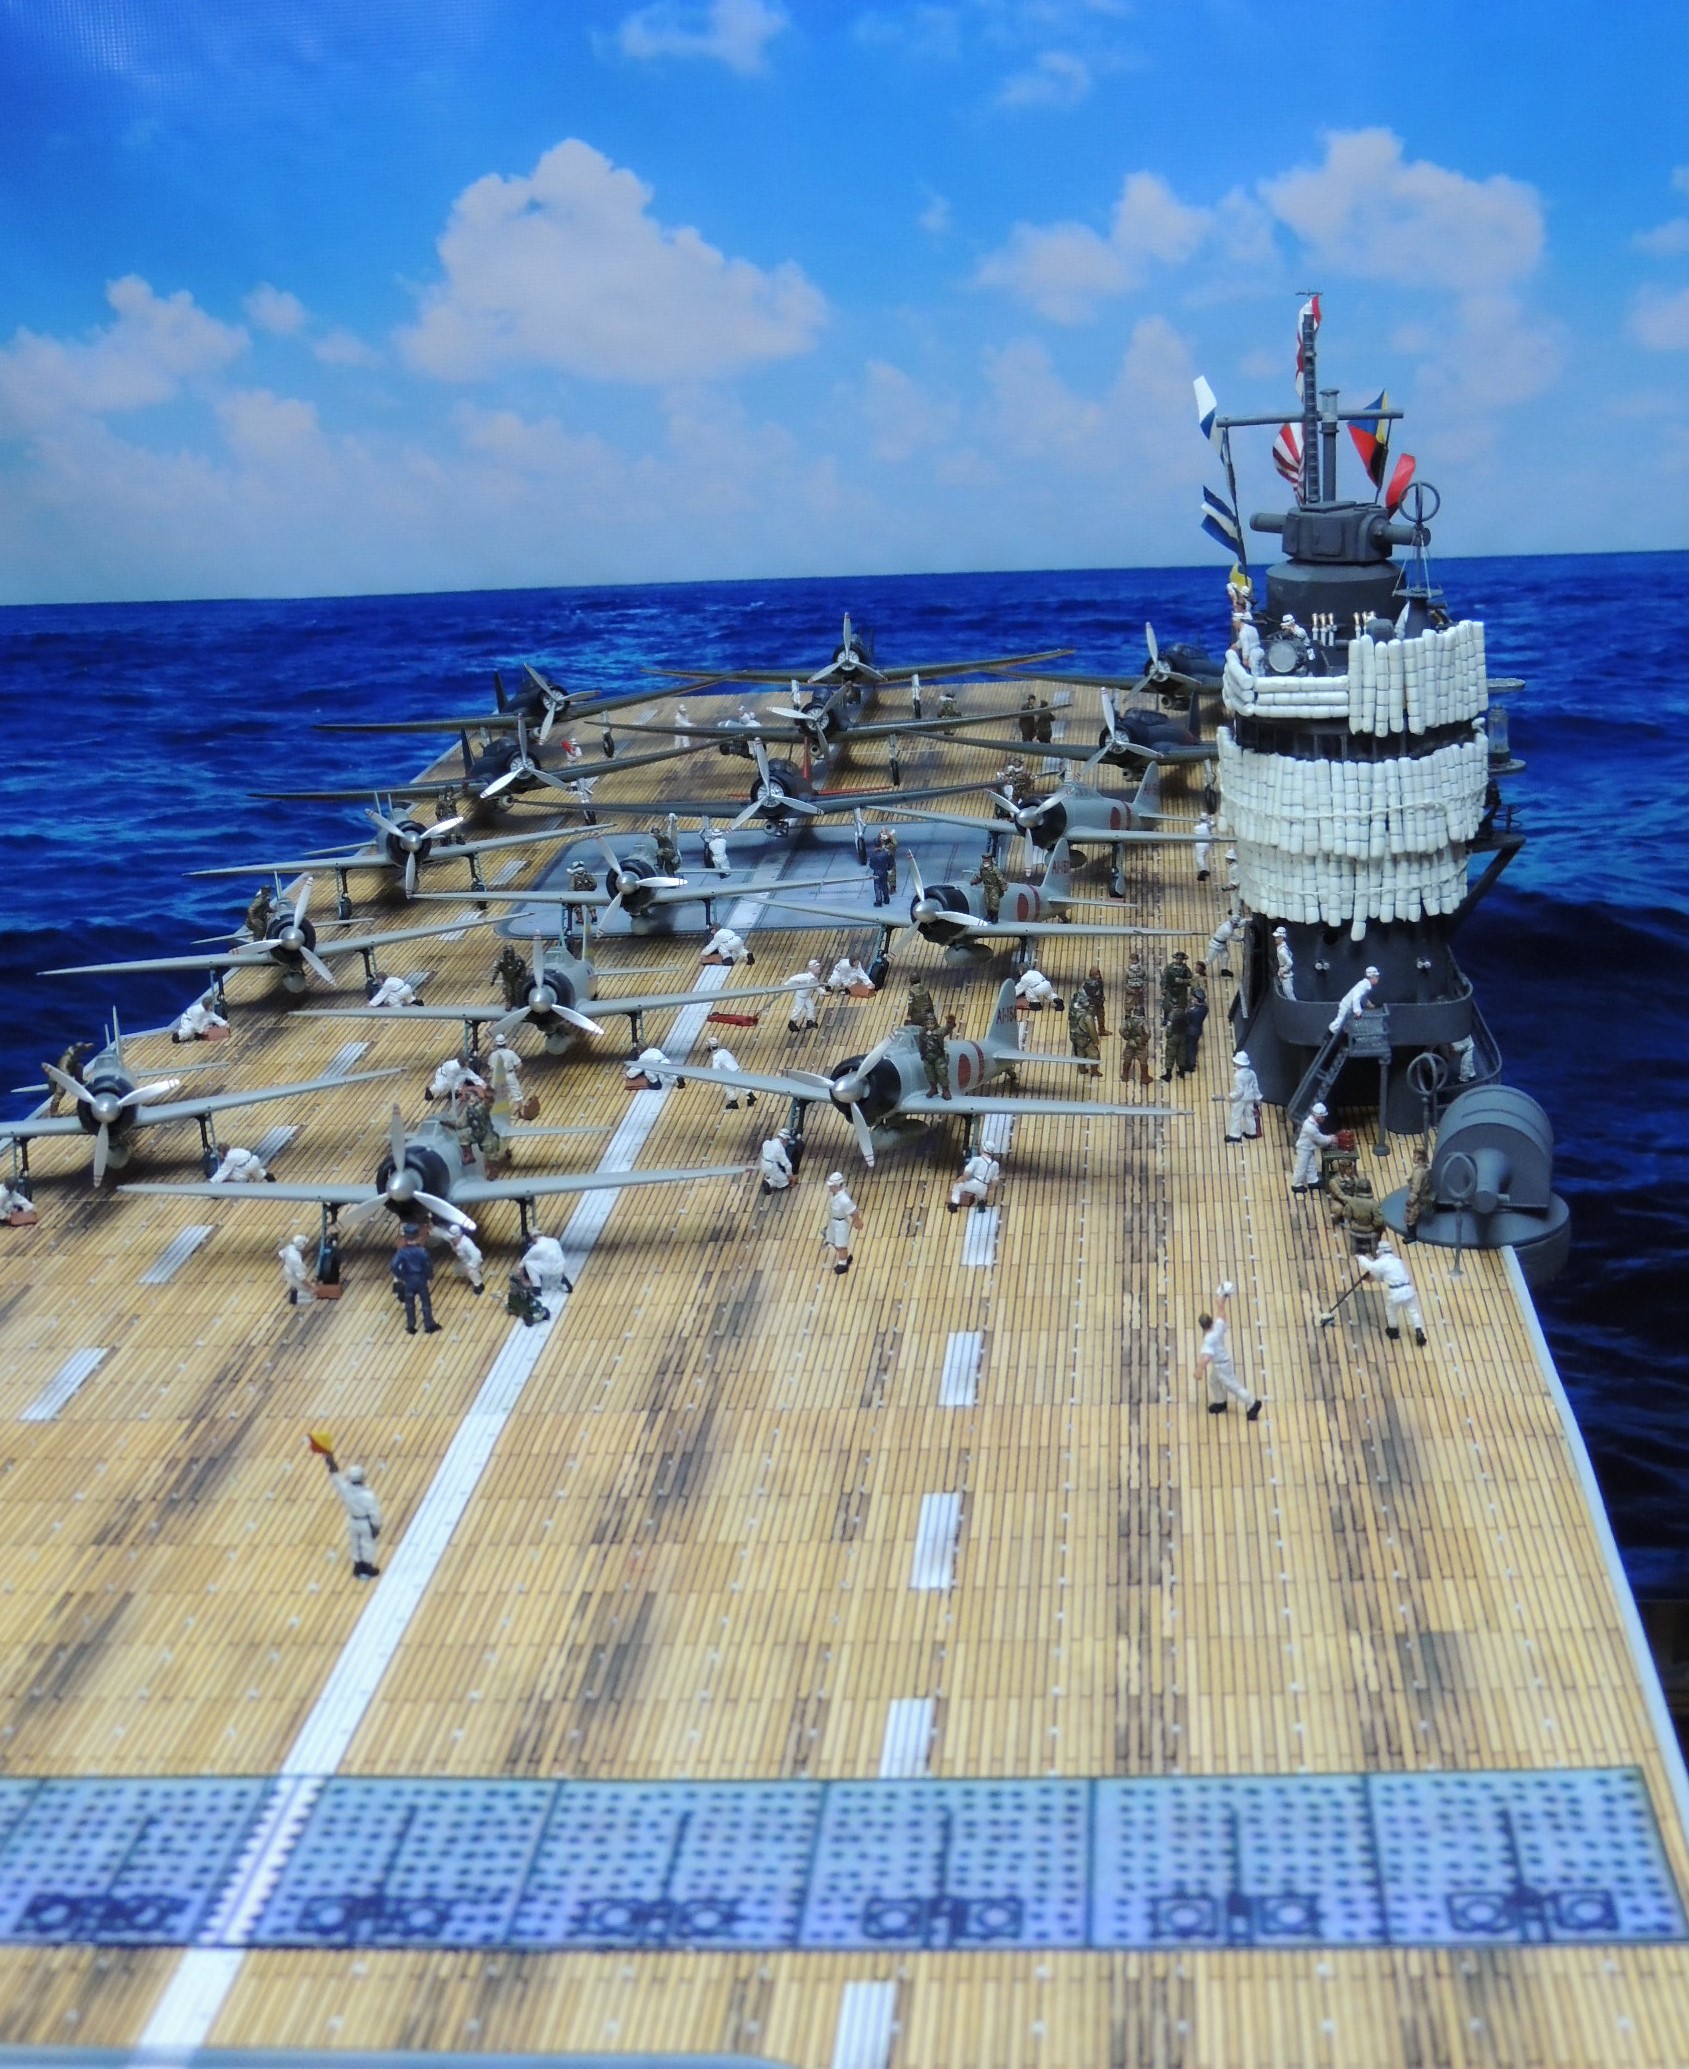
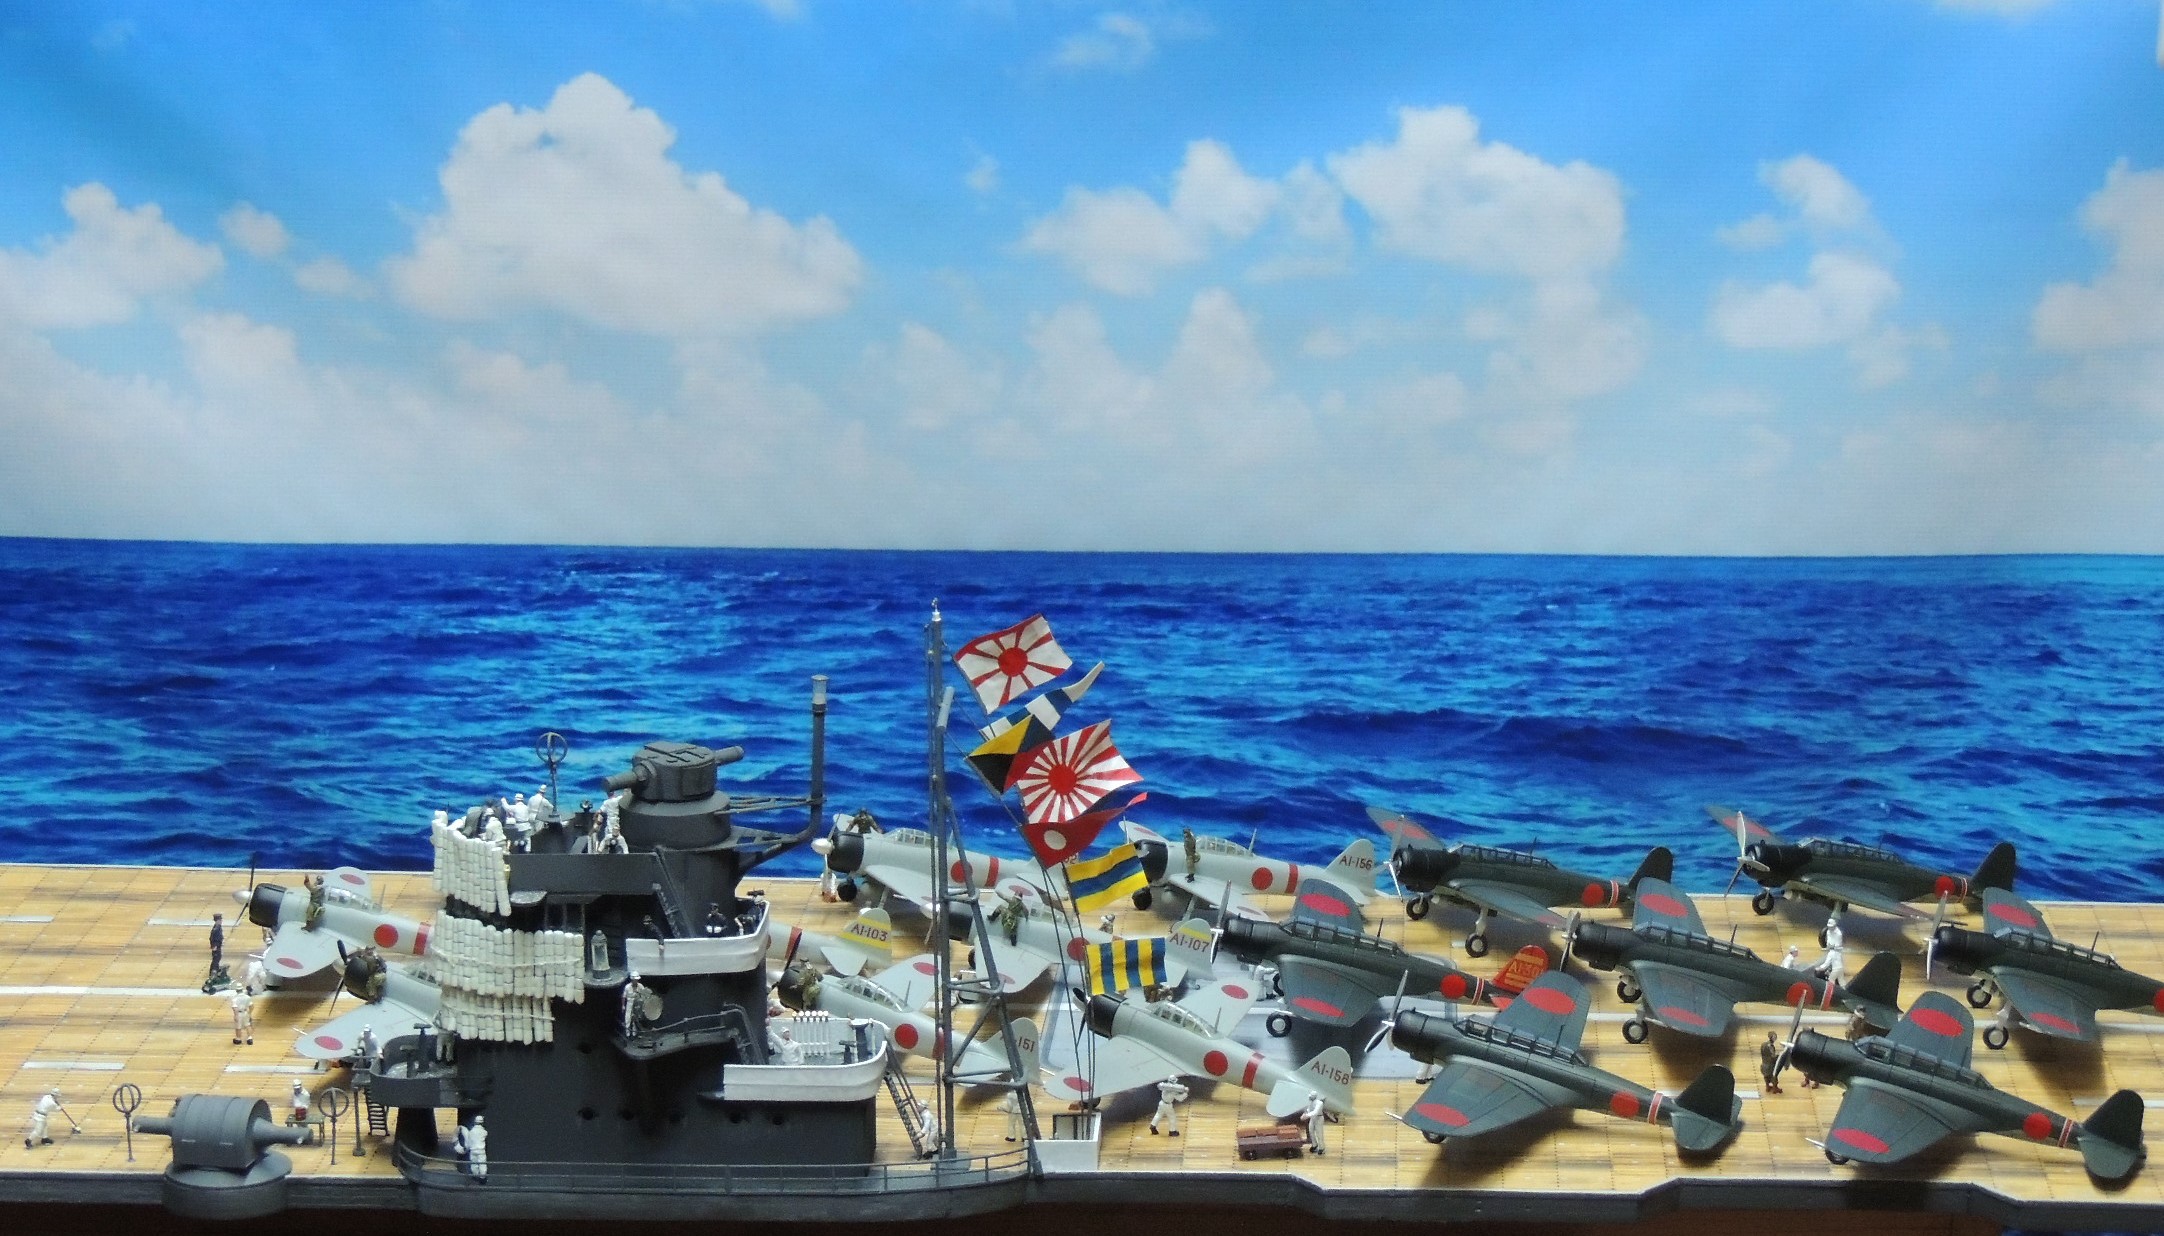
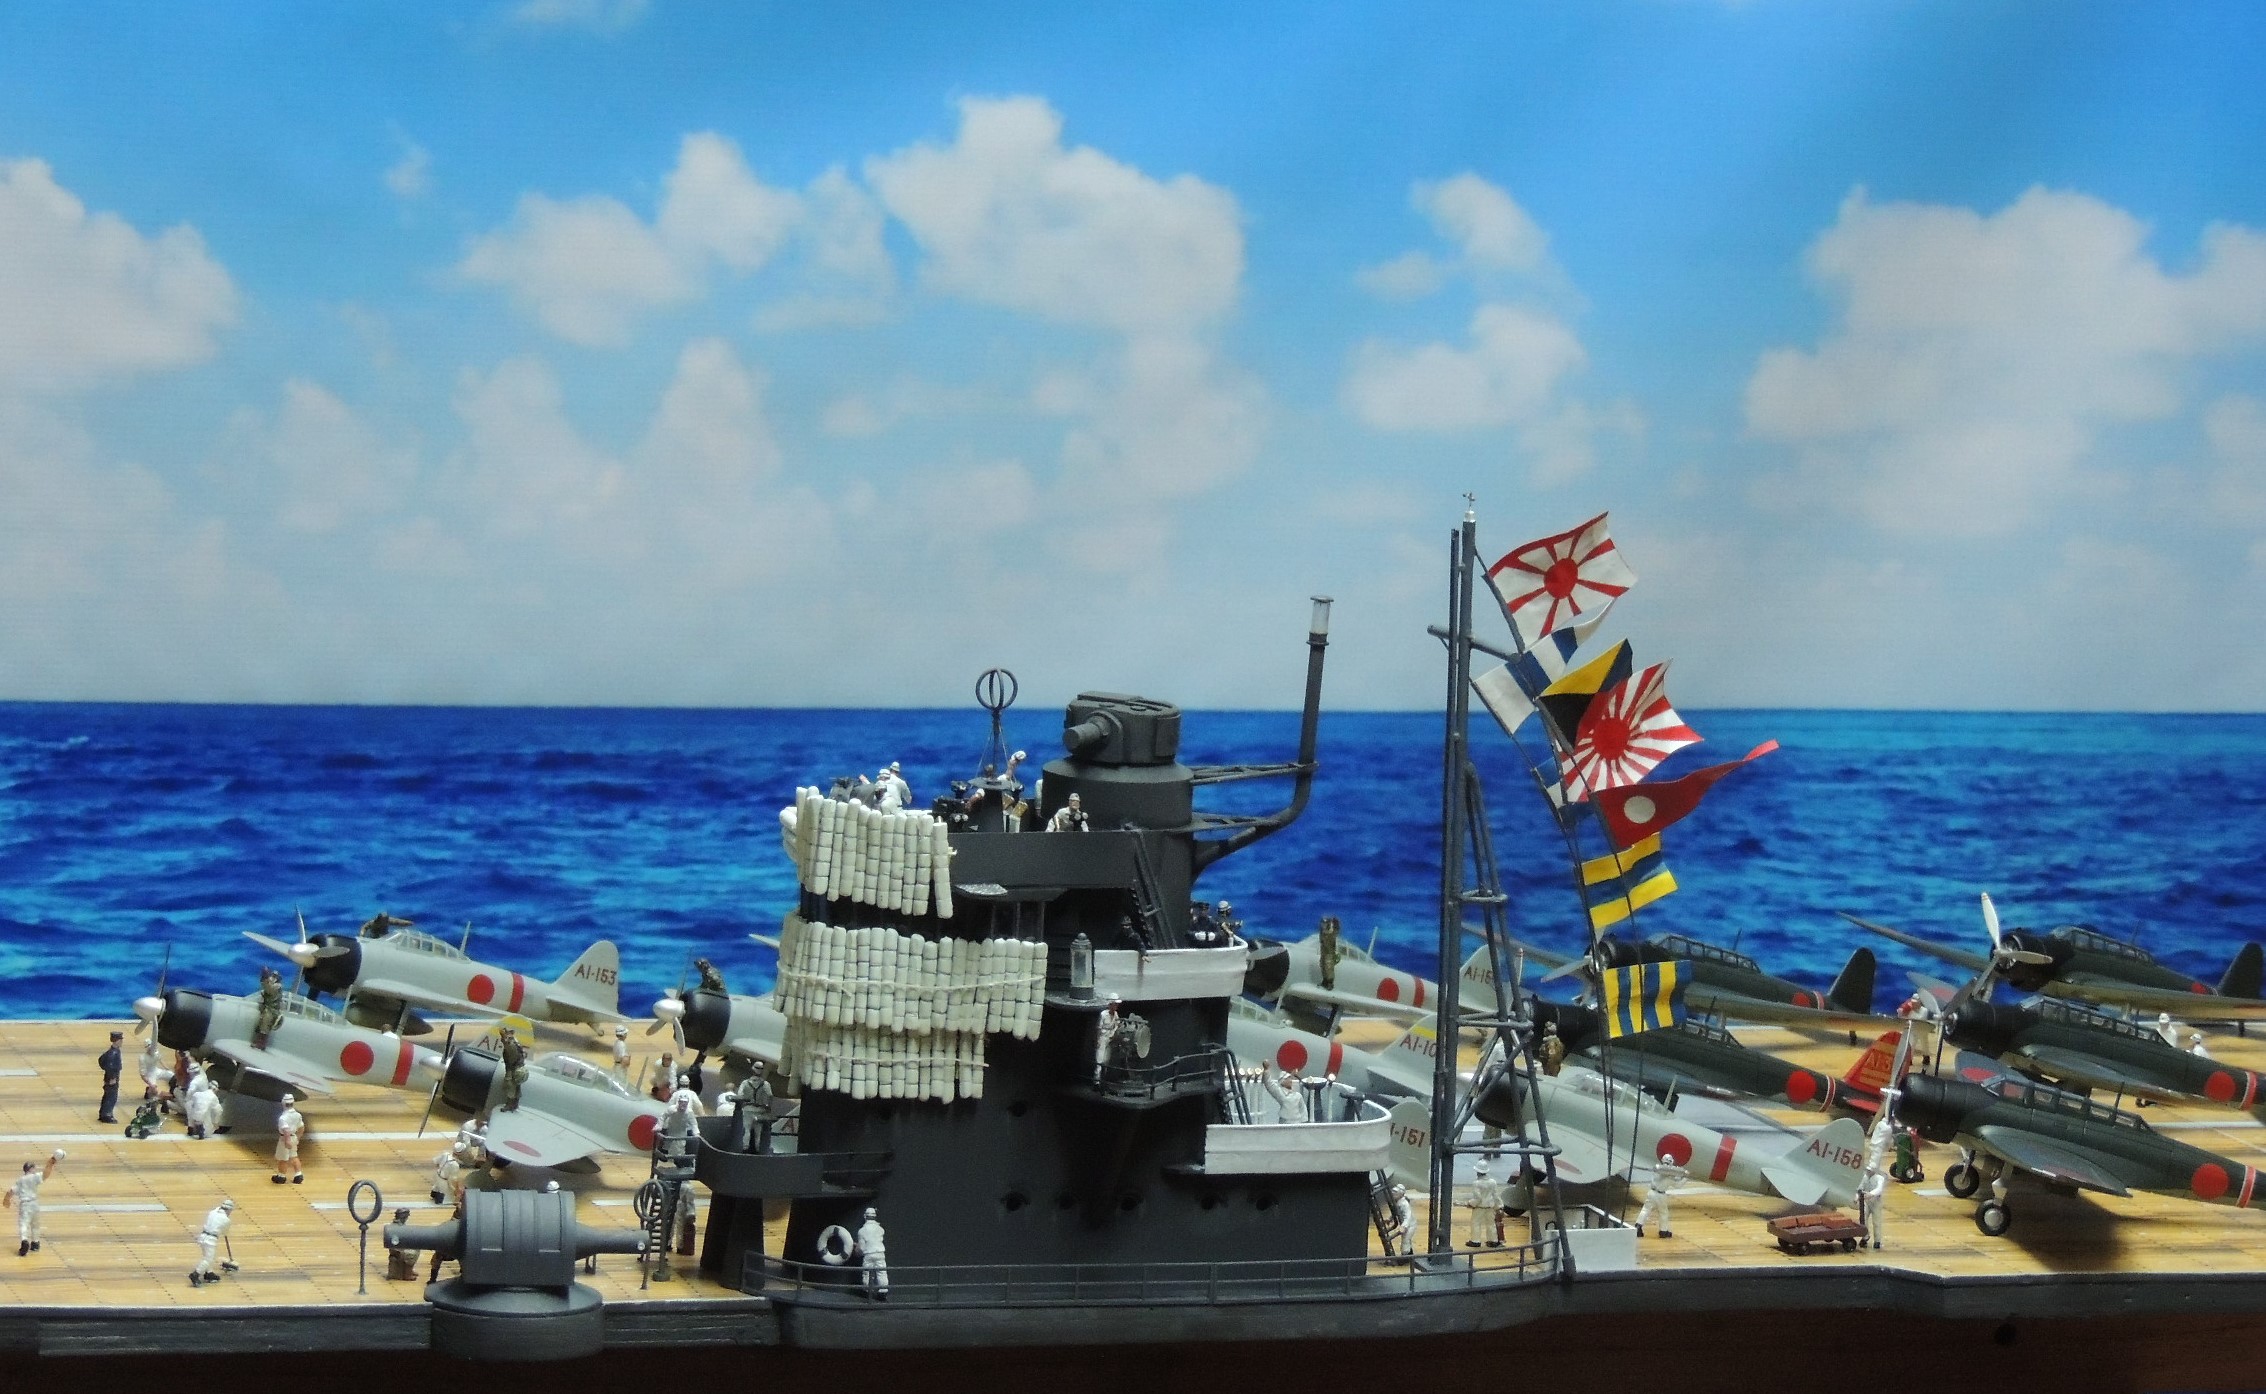
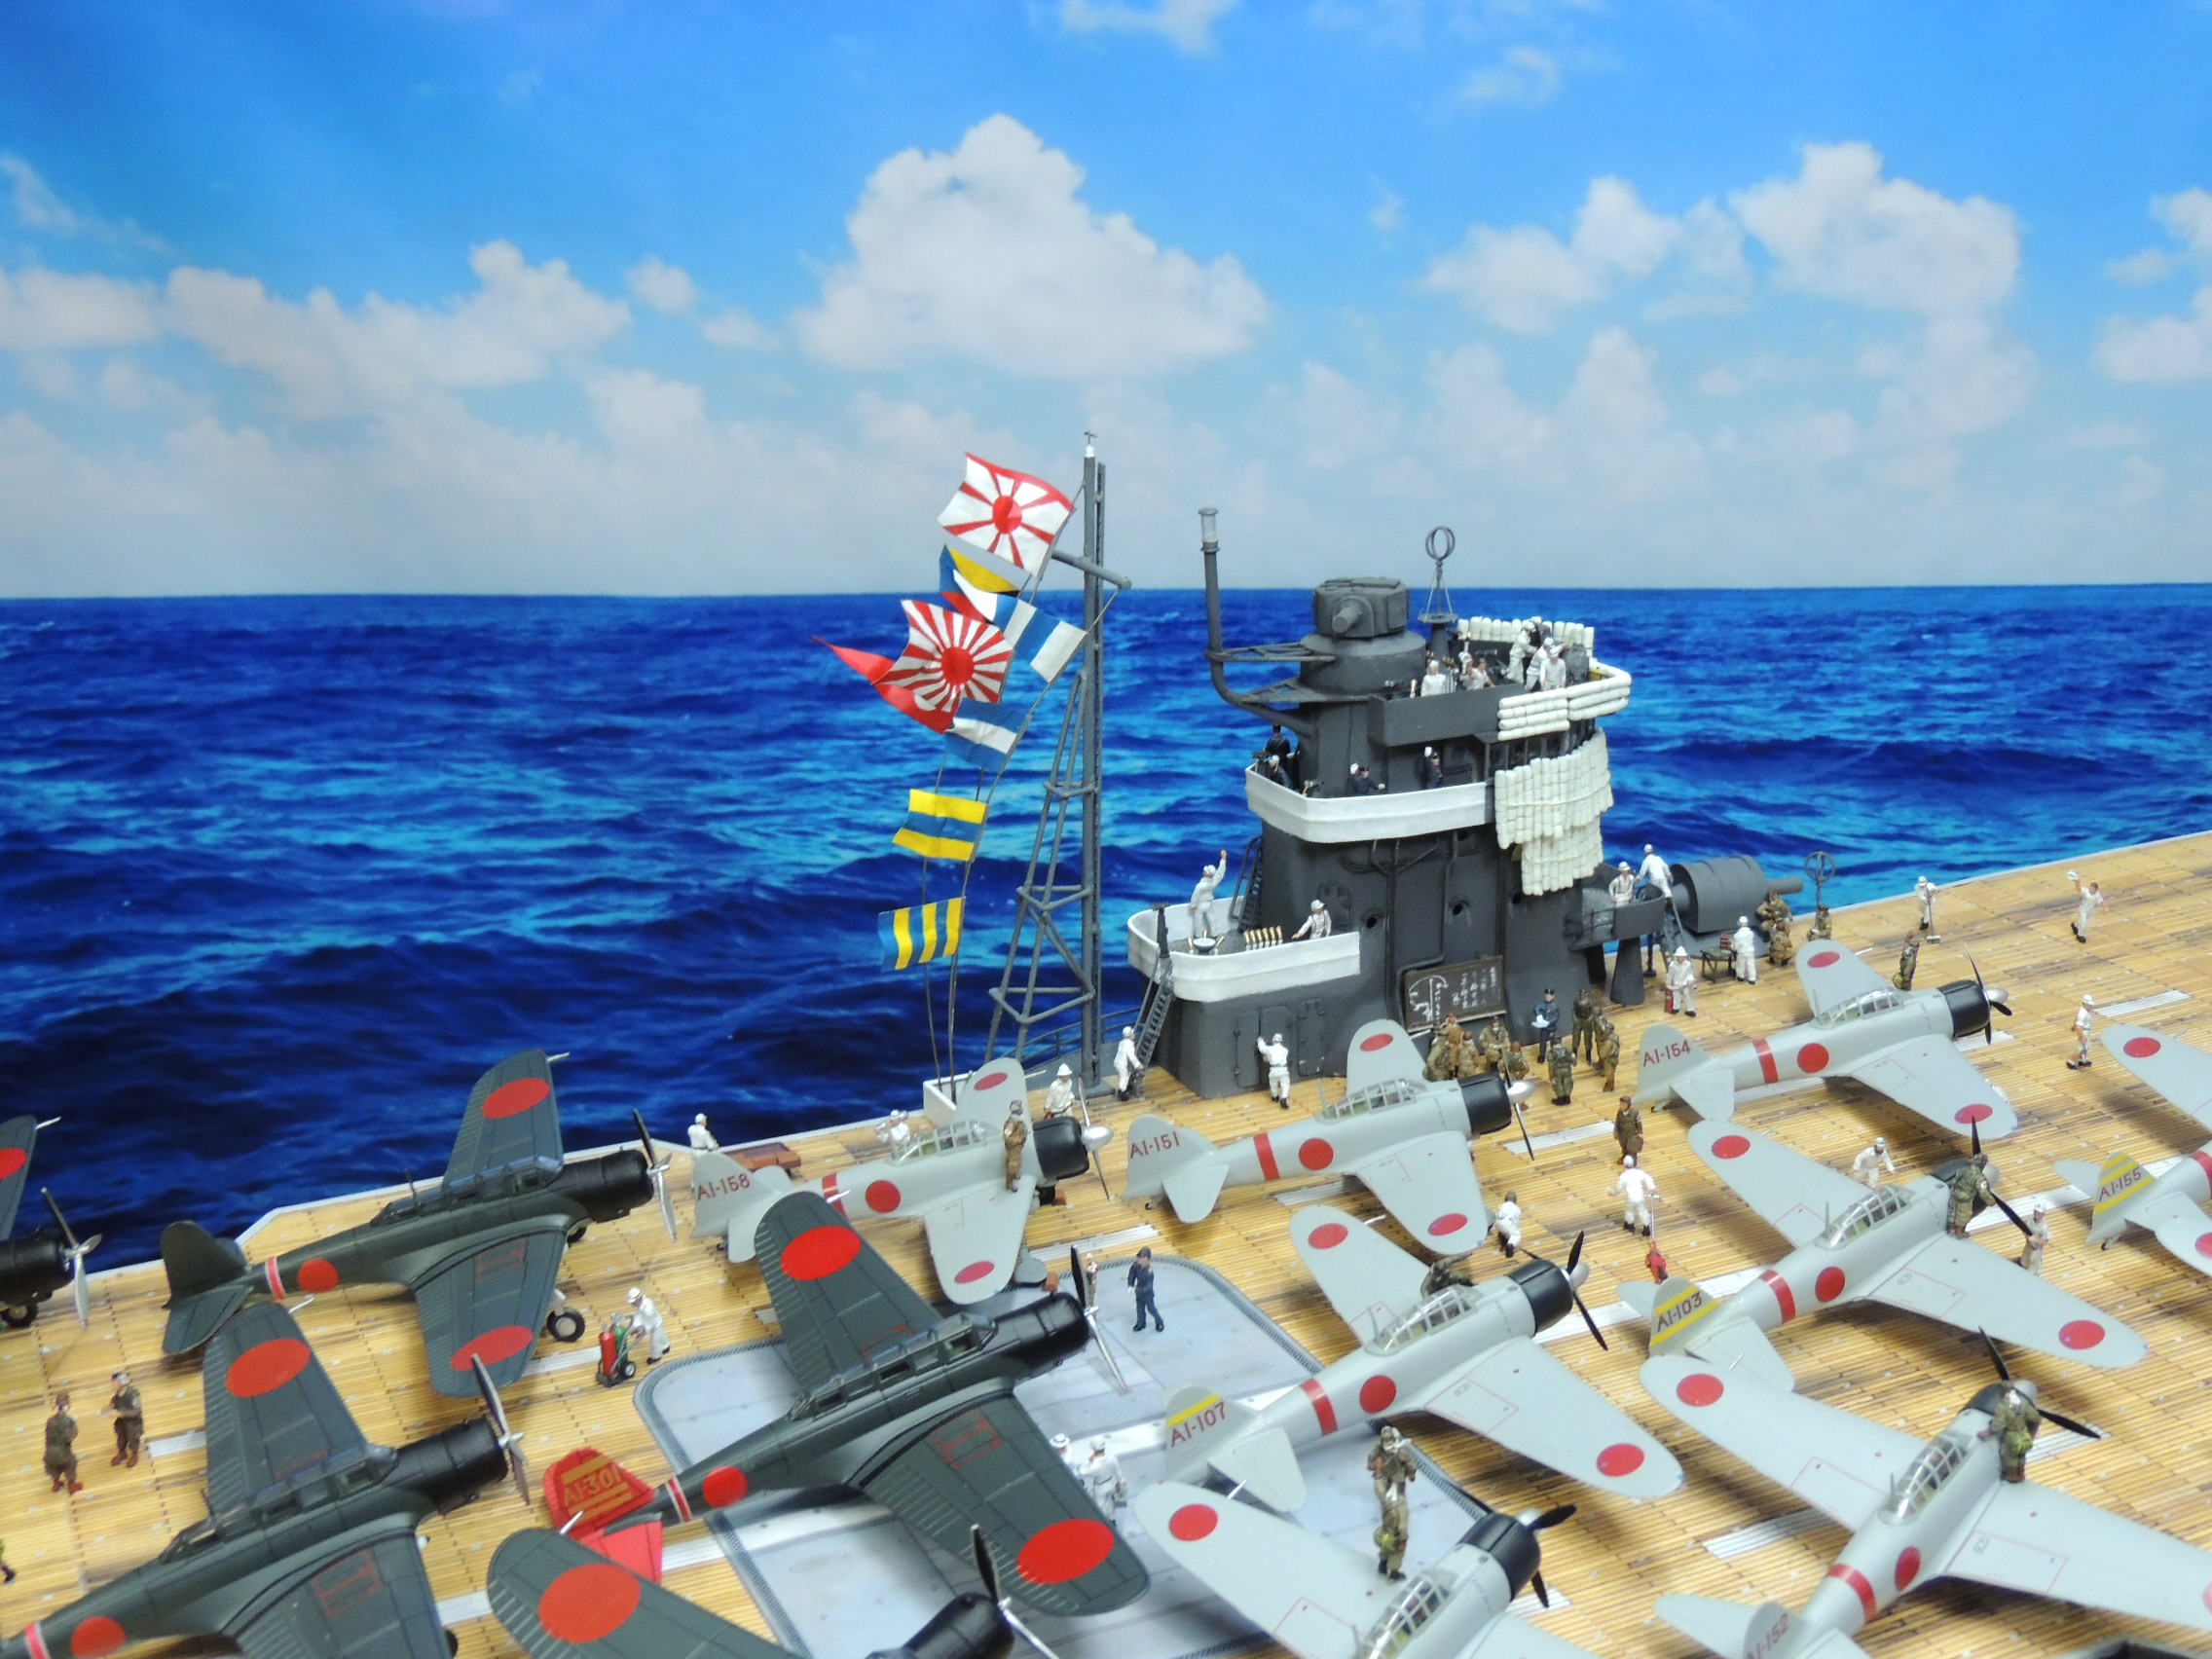
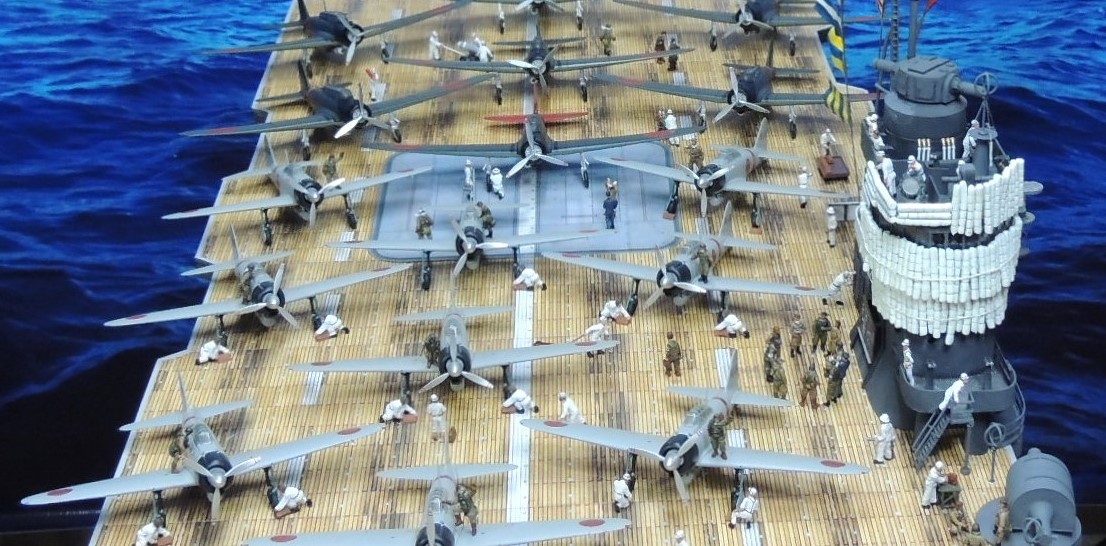
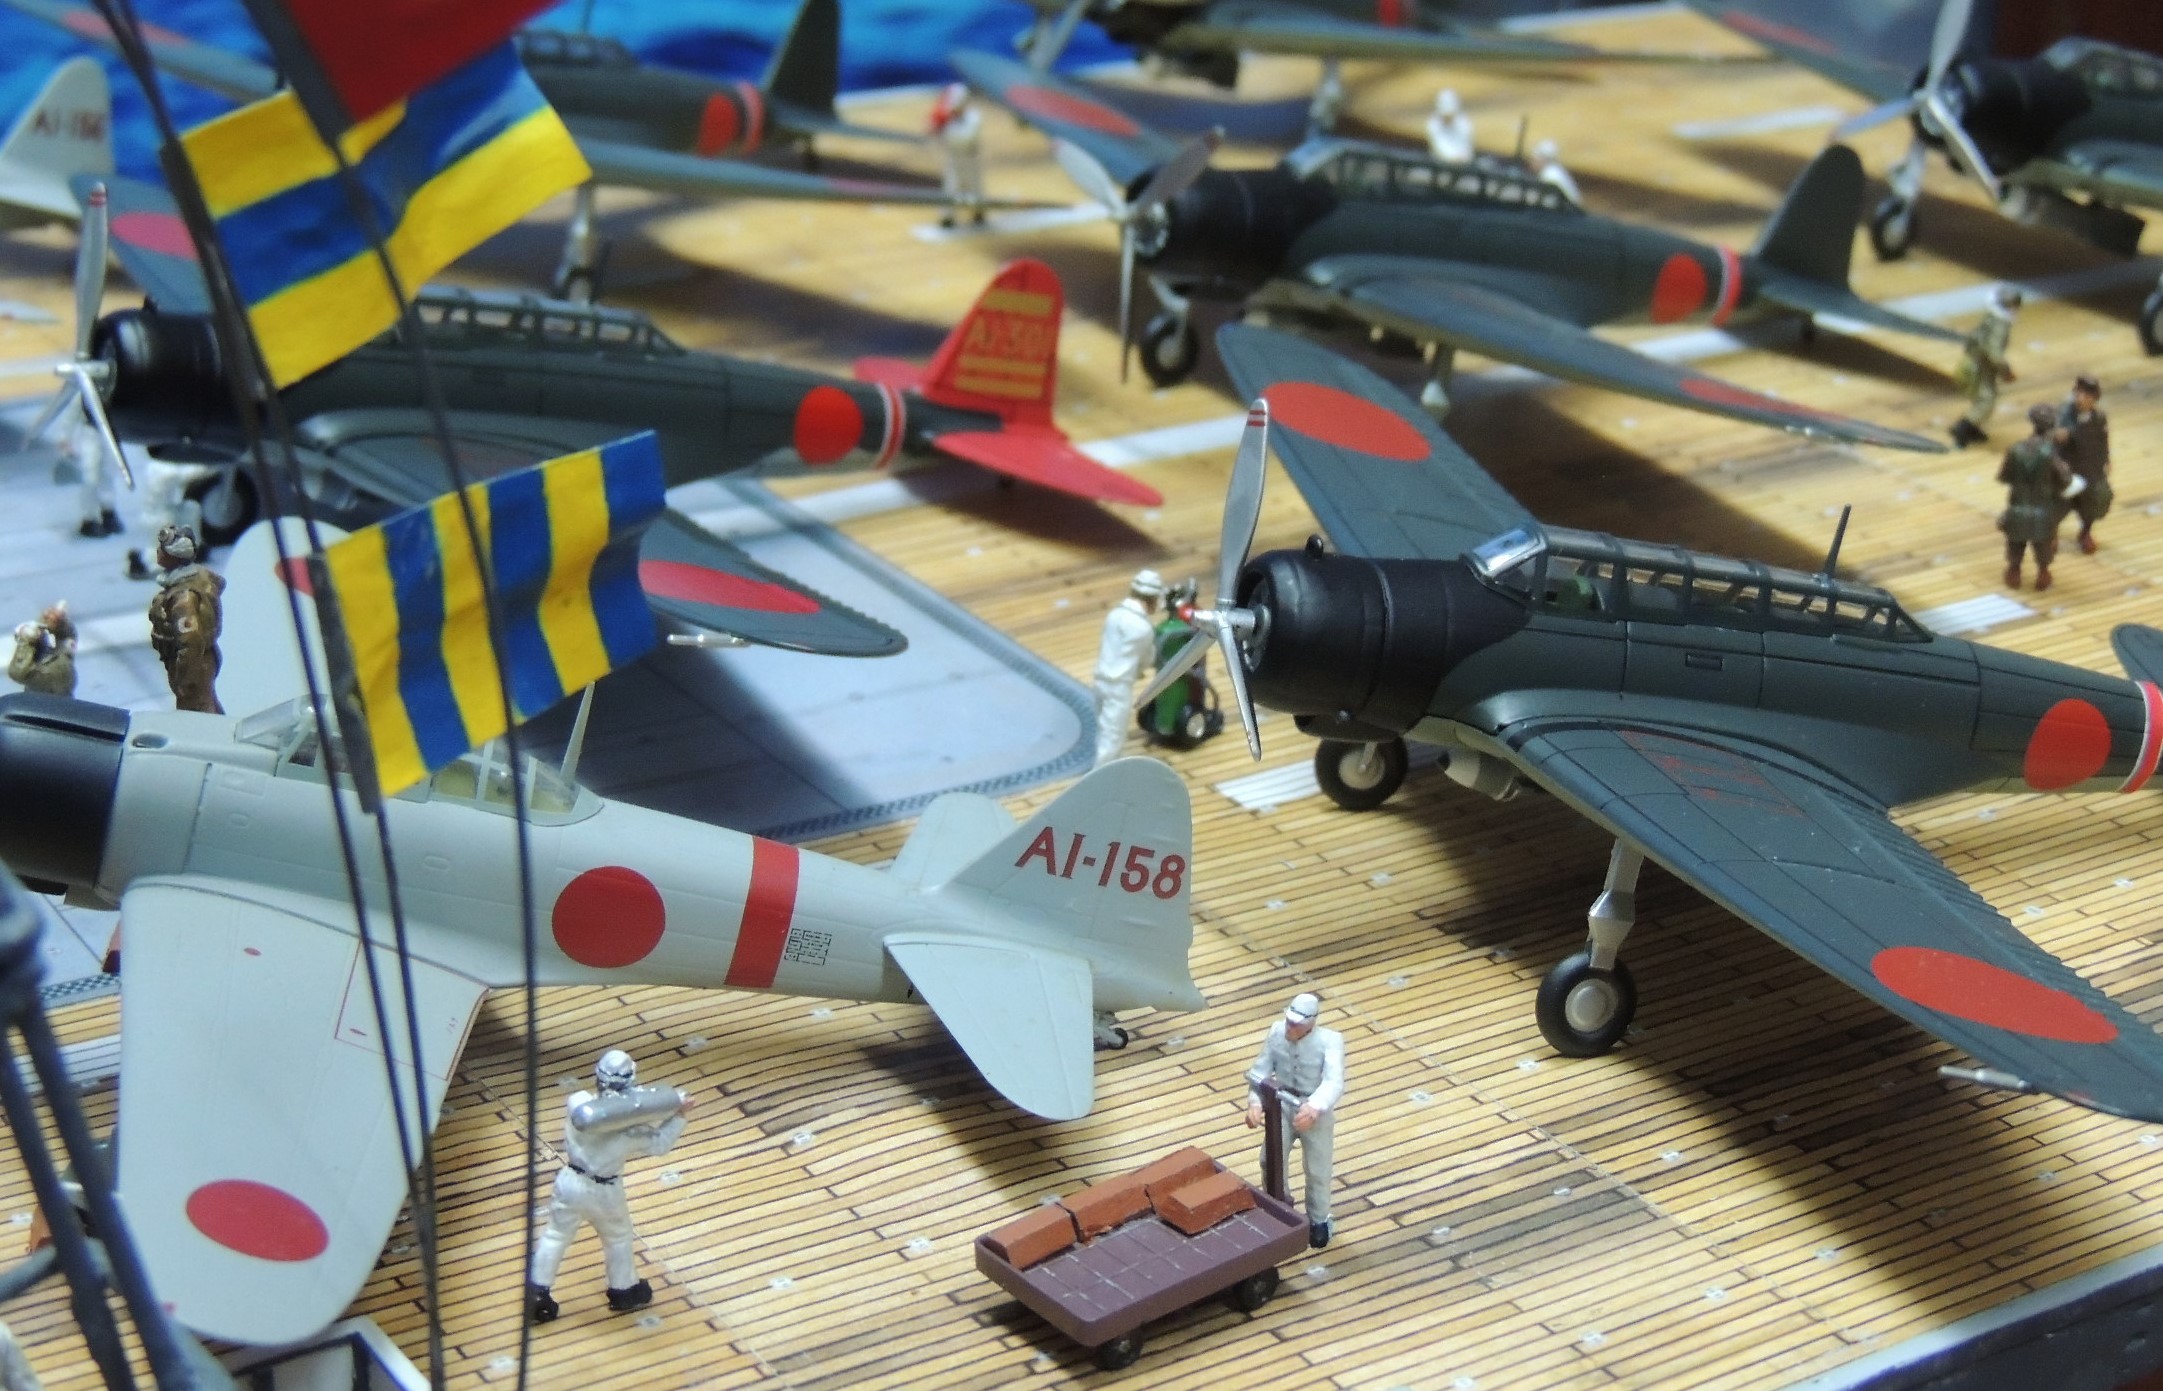
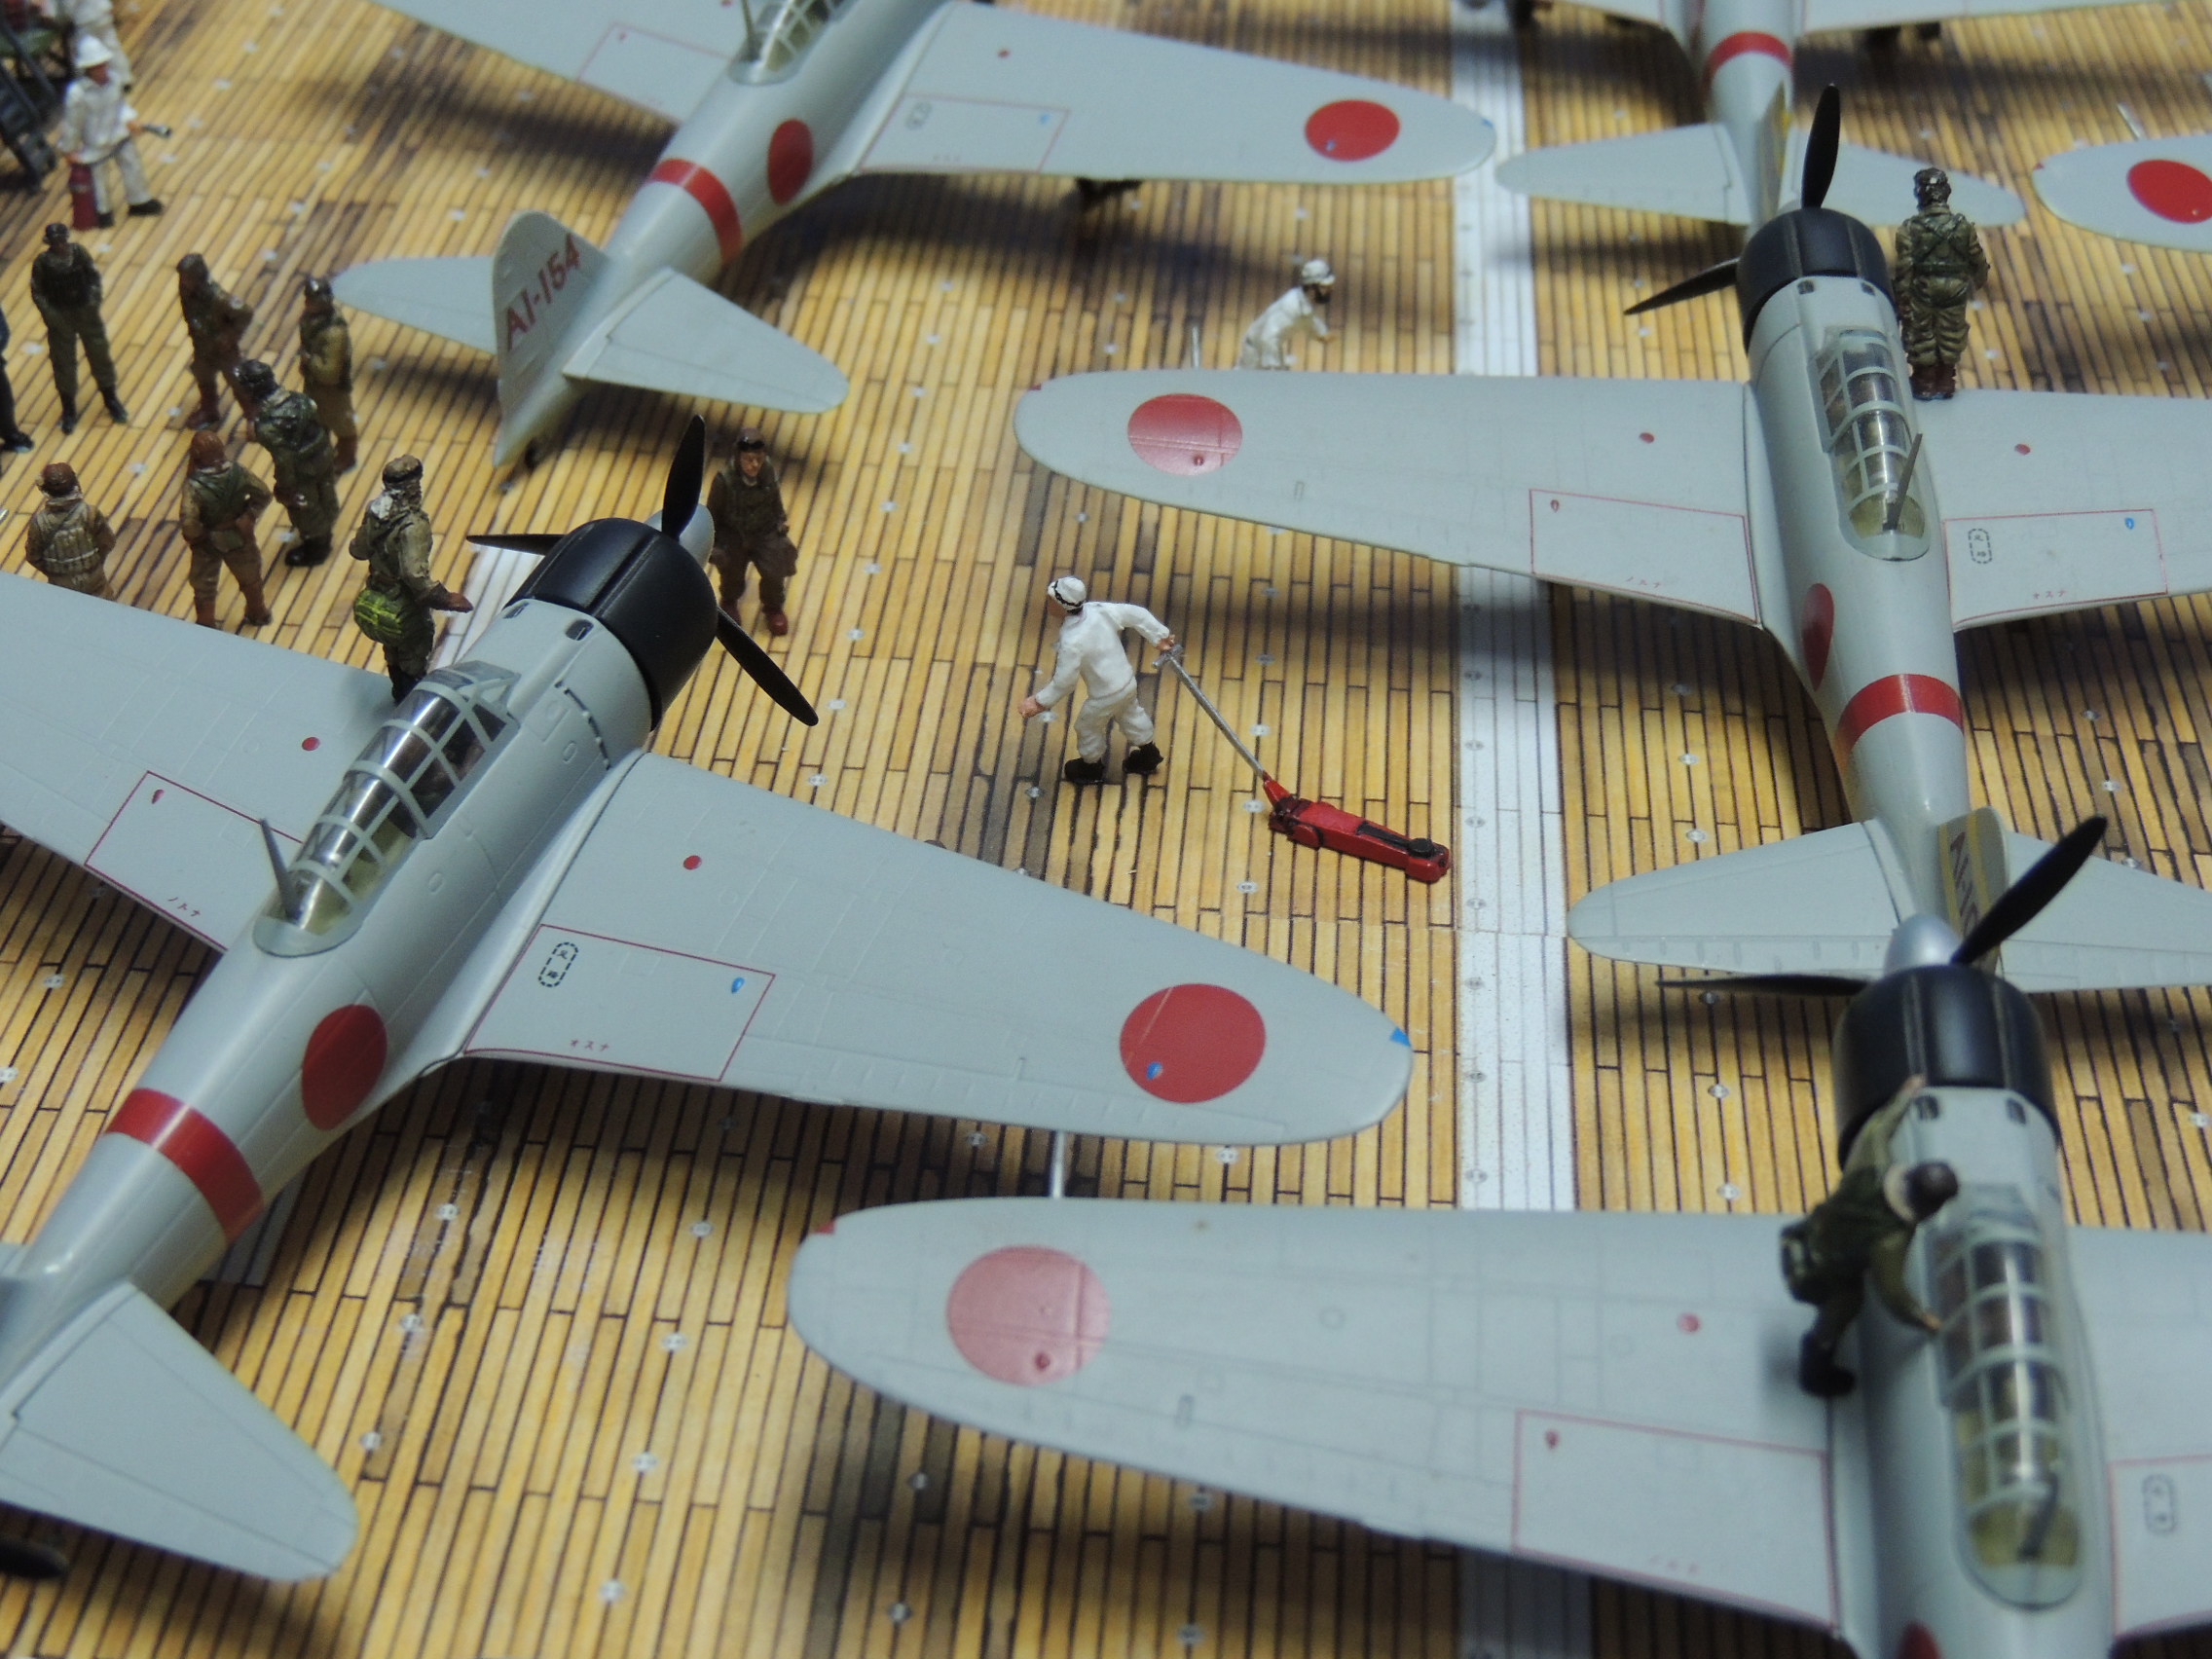
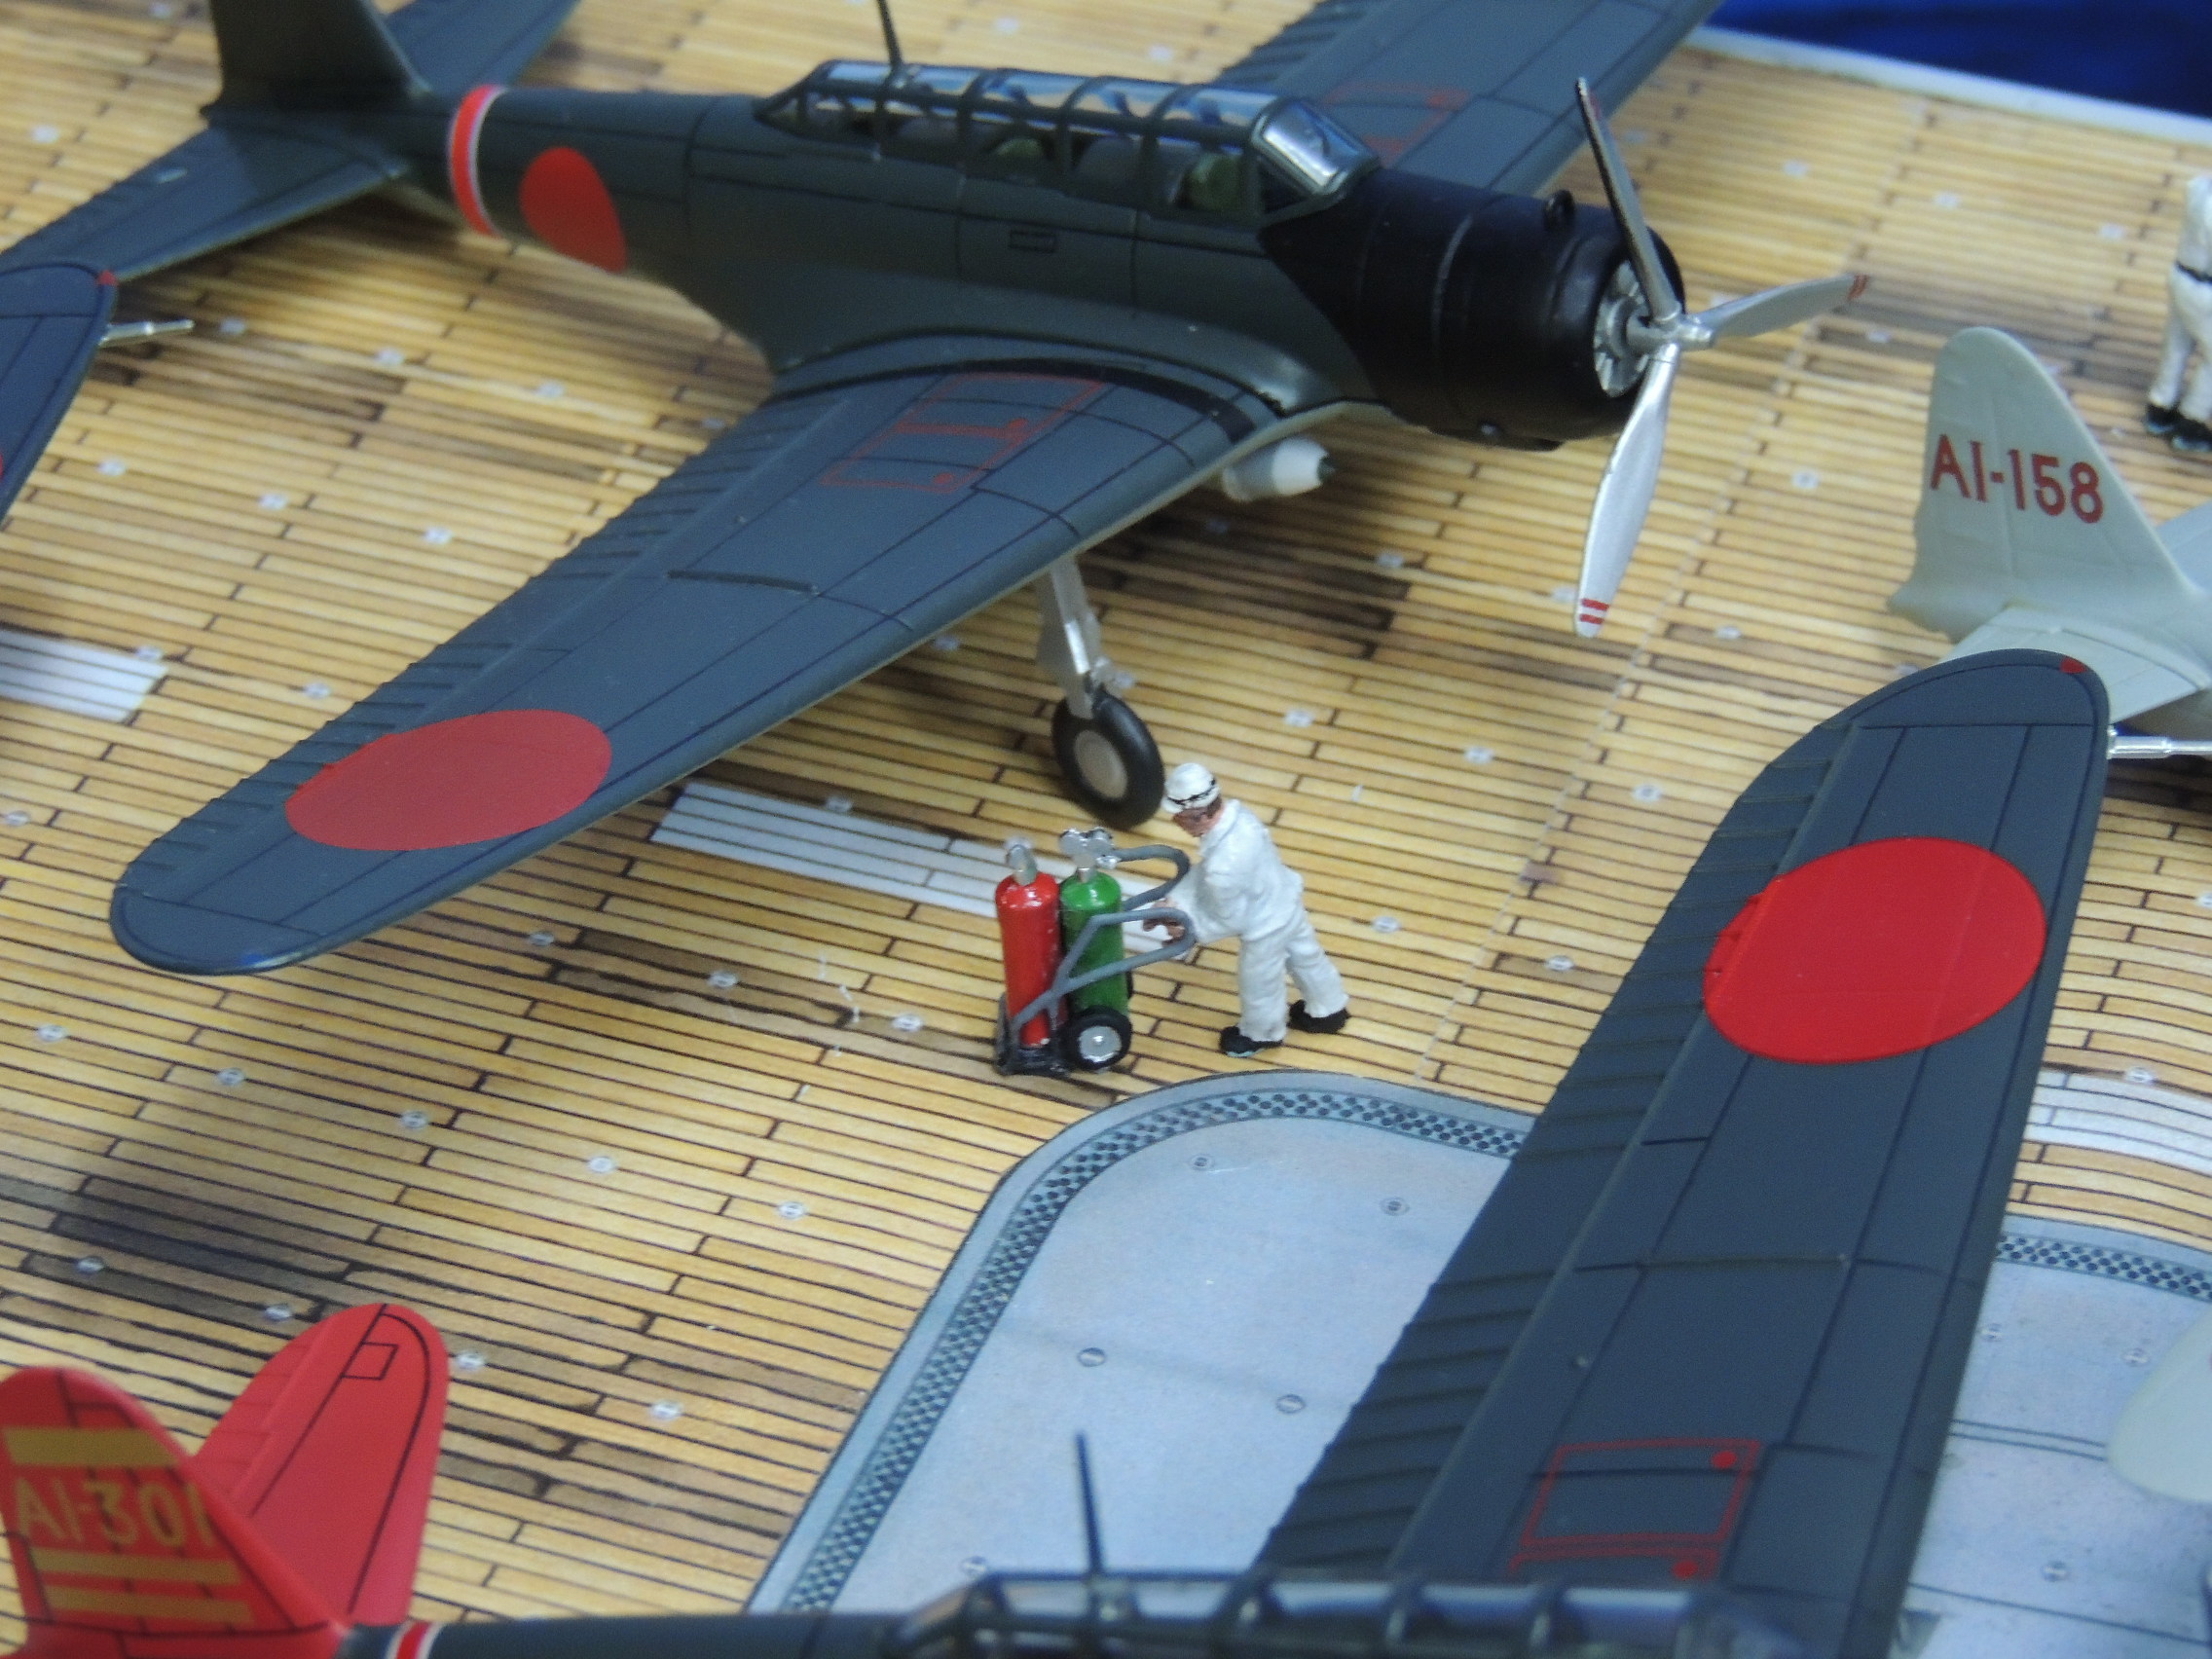
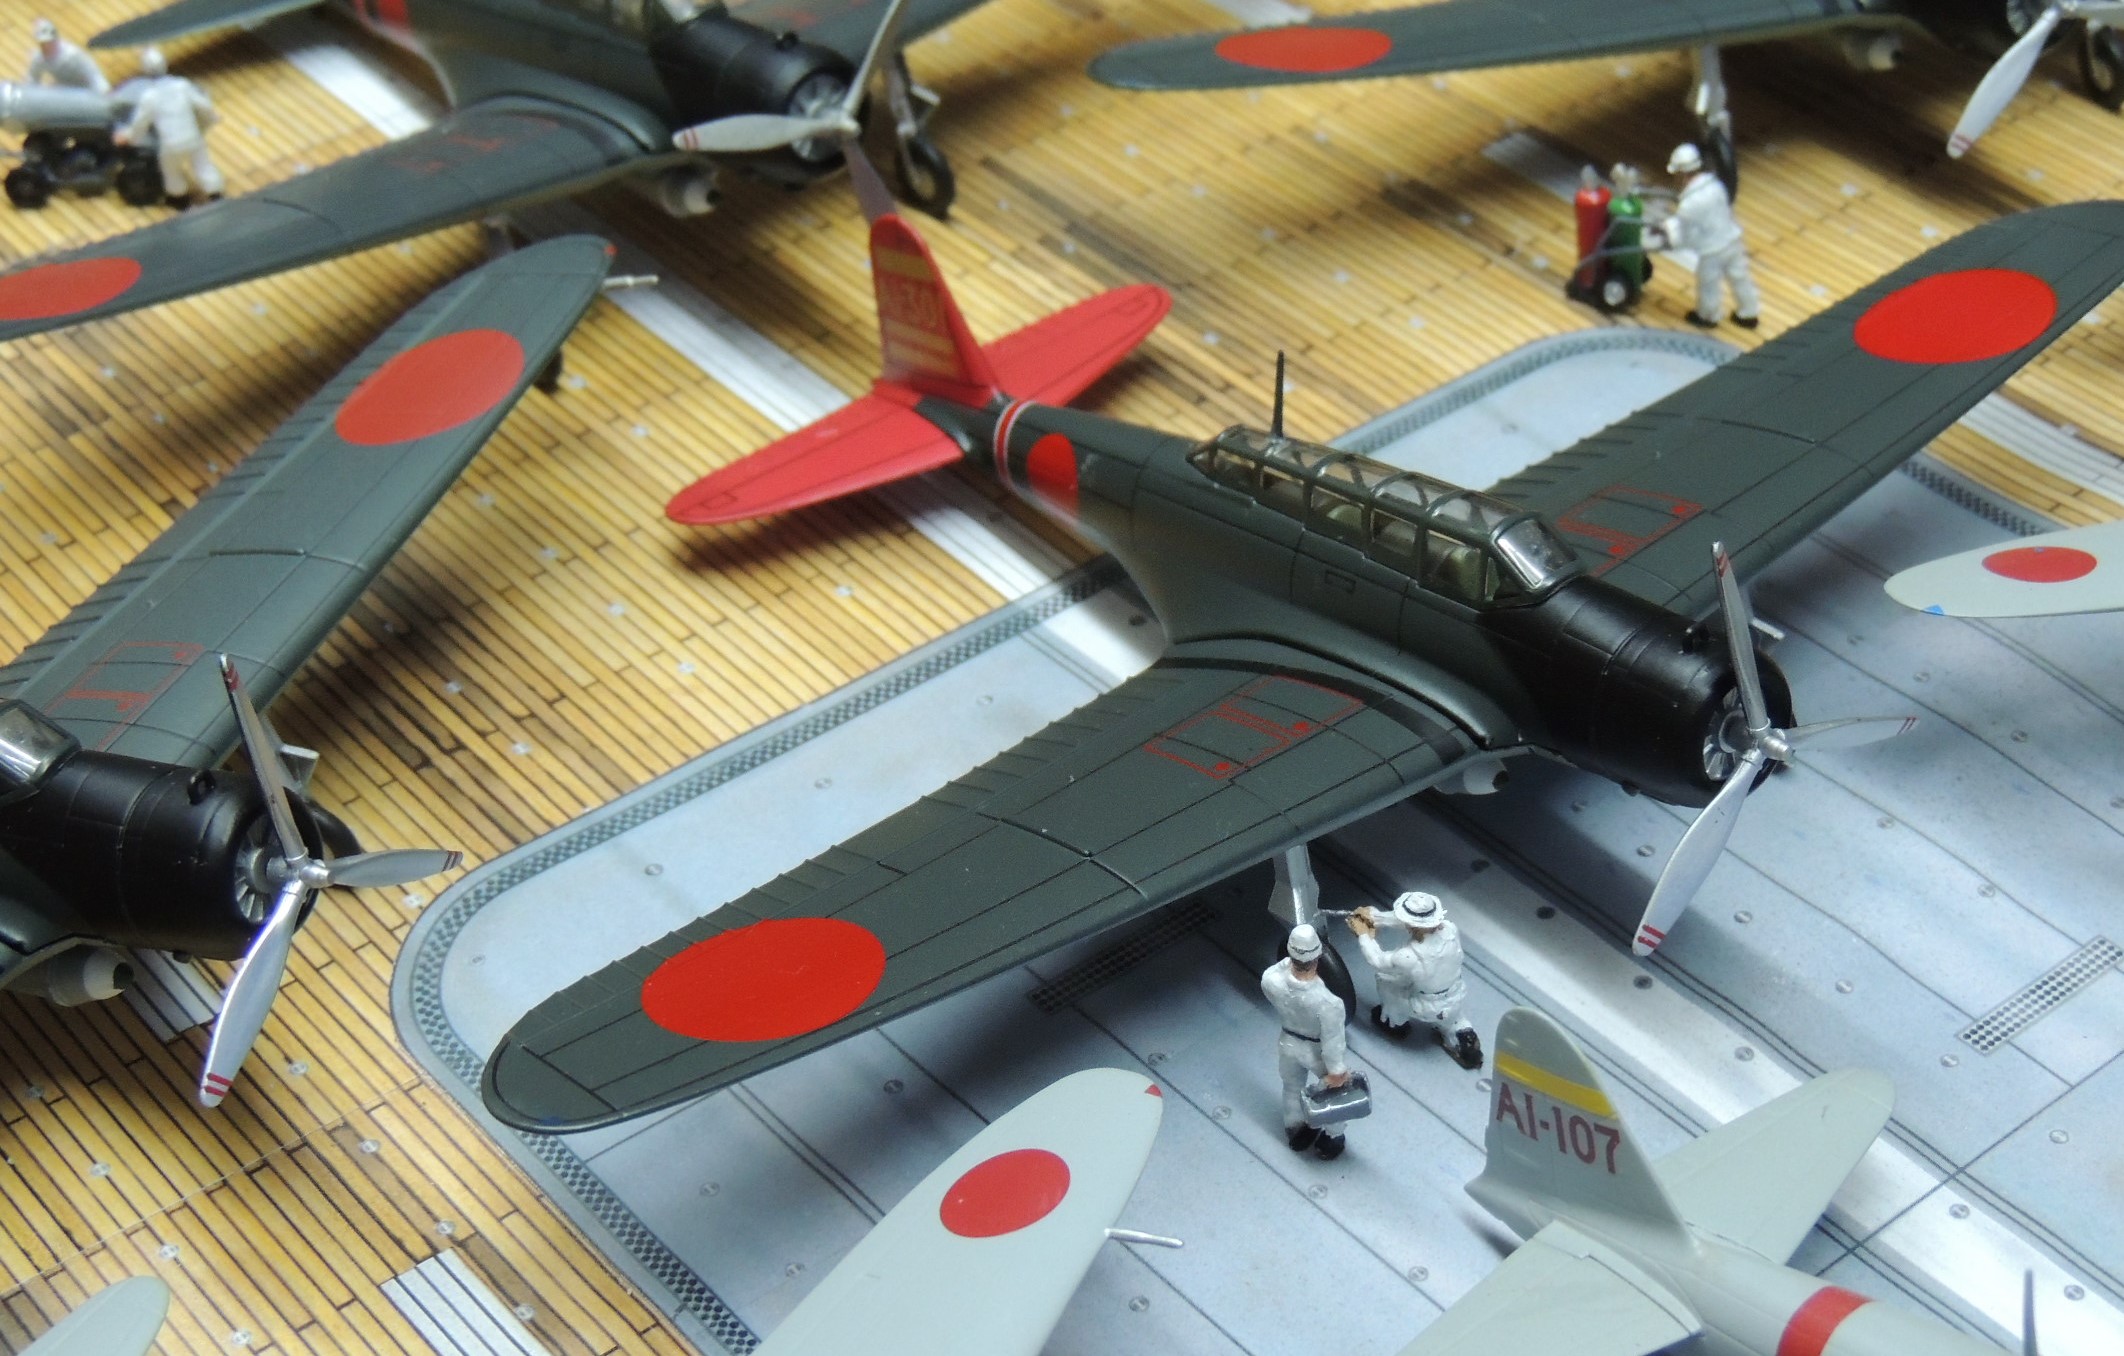
At long last, below are photos of the finished diorama depicting the Zeros of the Imperial Japanese Navy’s Akagi aircraft carrier preparing to take off as part of the first wave attack on Pearl Harbor on December 7, 1941. I finished this project back in June 2017 but, as often happens, life got in the way of the hobby and I never posted the finished piece.
Below is a photo of my first attempt at thisdiorama from 2017, taken by the side of the pool.
For a variety of reasons, I was not satisfied with it:
The diorama was too small to take good photos;
The Zeros came from different die-cast companies and looked odd as the shades were slightly different and the Akagi’s red recognition bands at the rear of the fuselage were different widths;
The tail numbers on three of the Zeros were not decaled and looked shoddy;
One Kate — even if that Kate was Fuchida’s famous AI-301 — seemed insufficient for the occasion since there were 27 Kates but only nine Zeros on the Akagi’s deck that day;
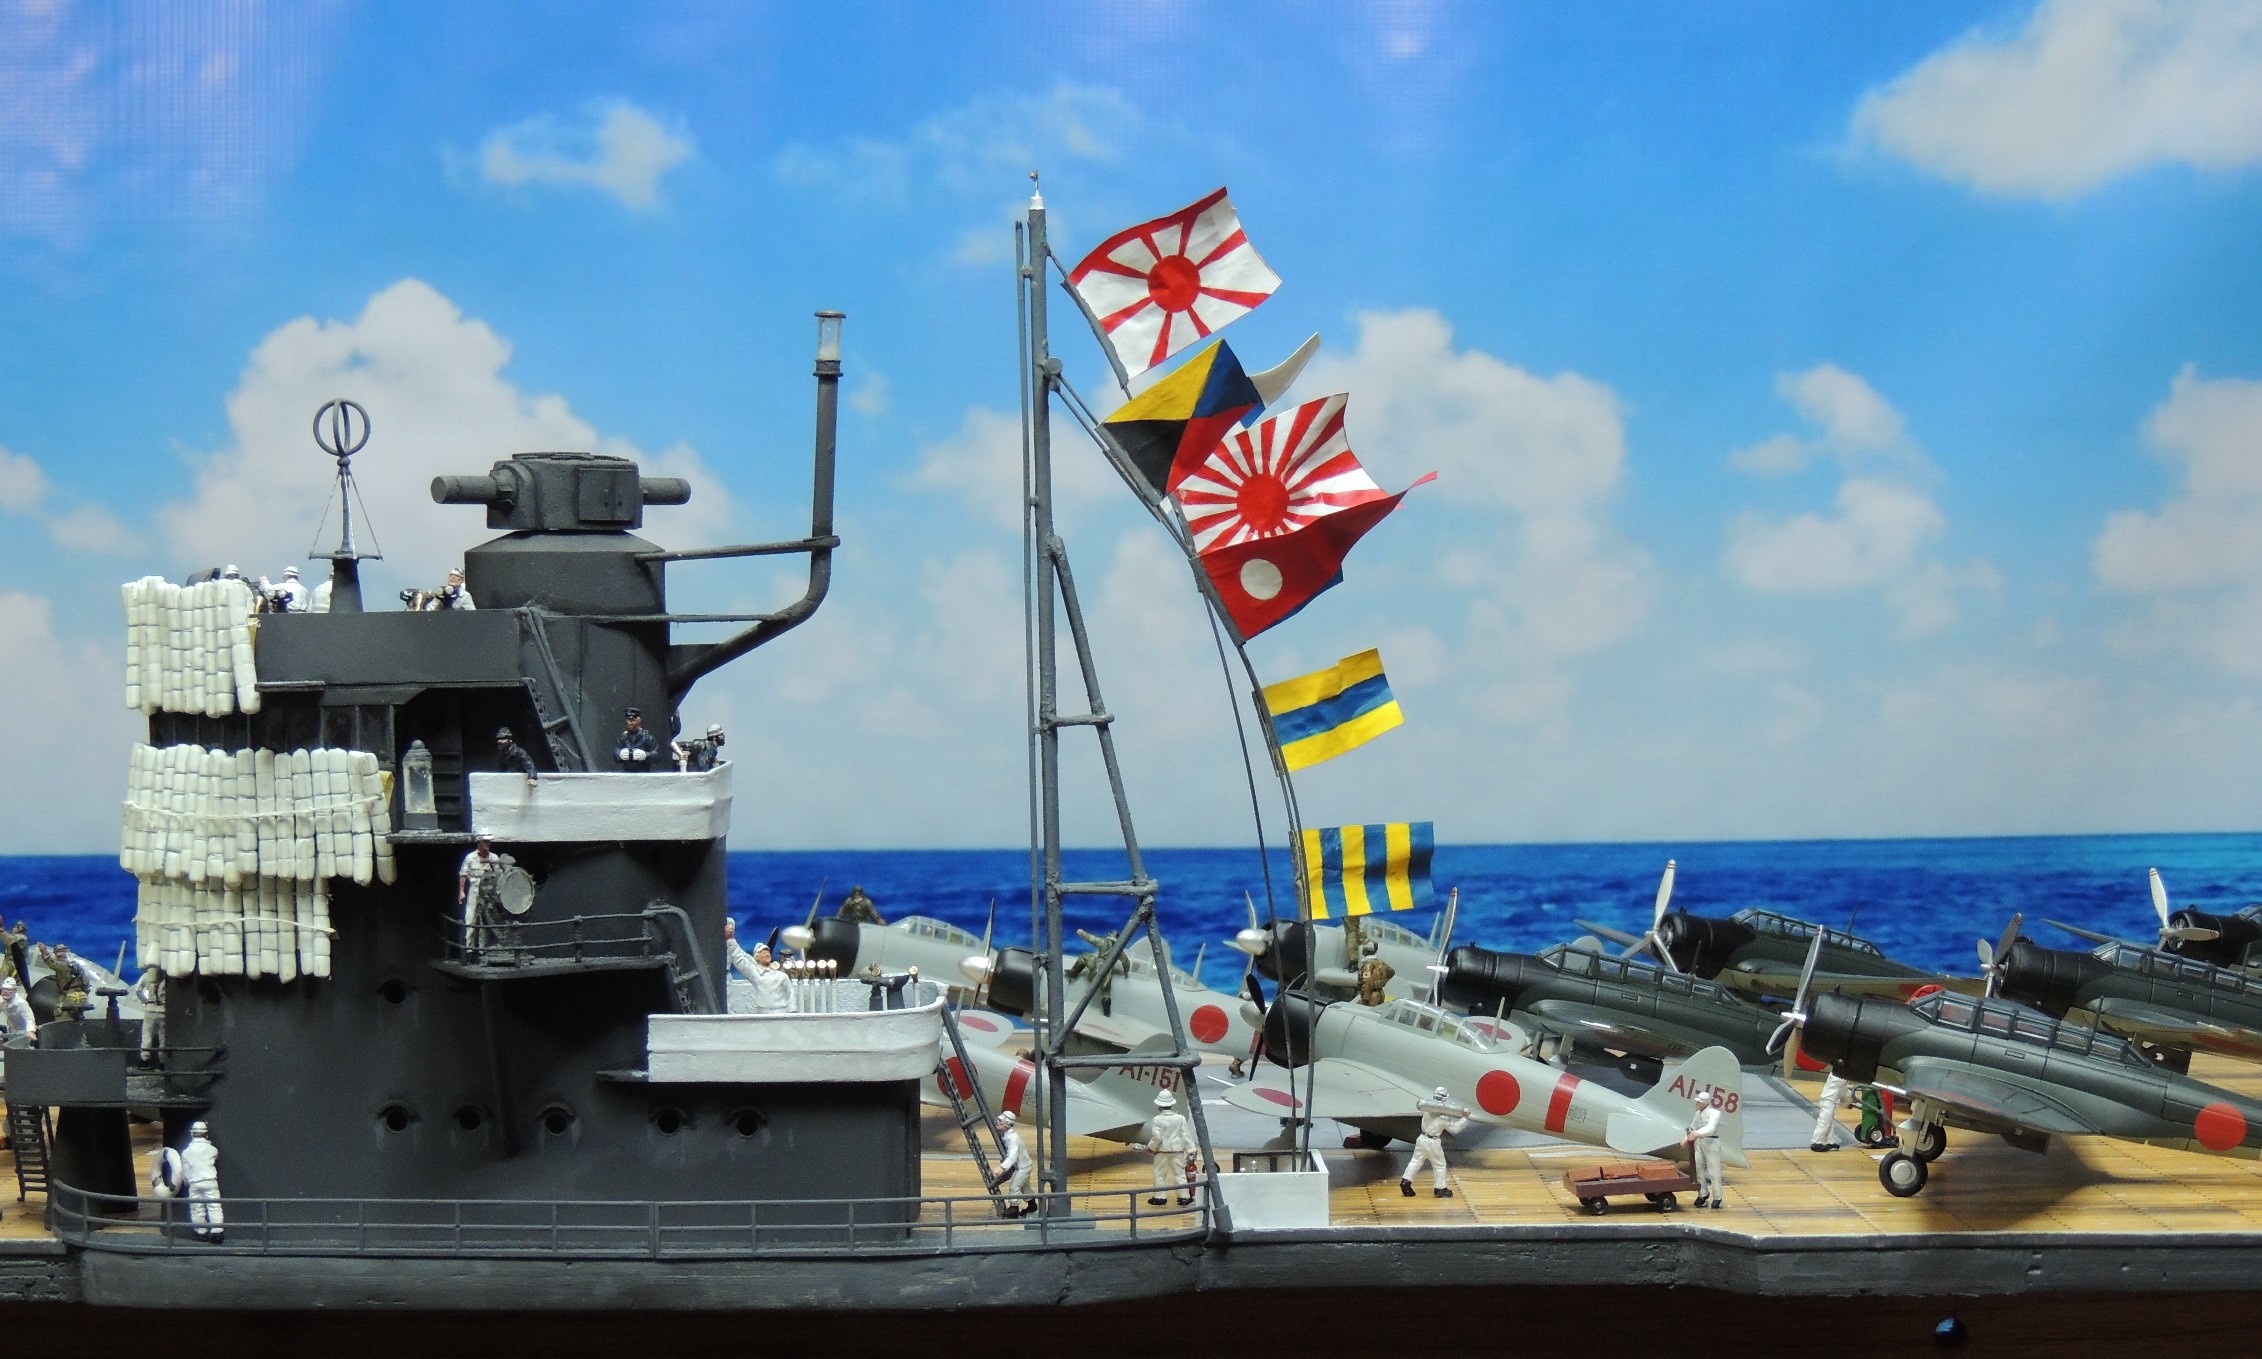
The flags were significantly underscaled and I had inadvertently switched the ones on the inside for the ones on the outside;
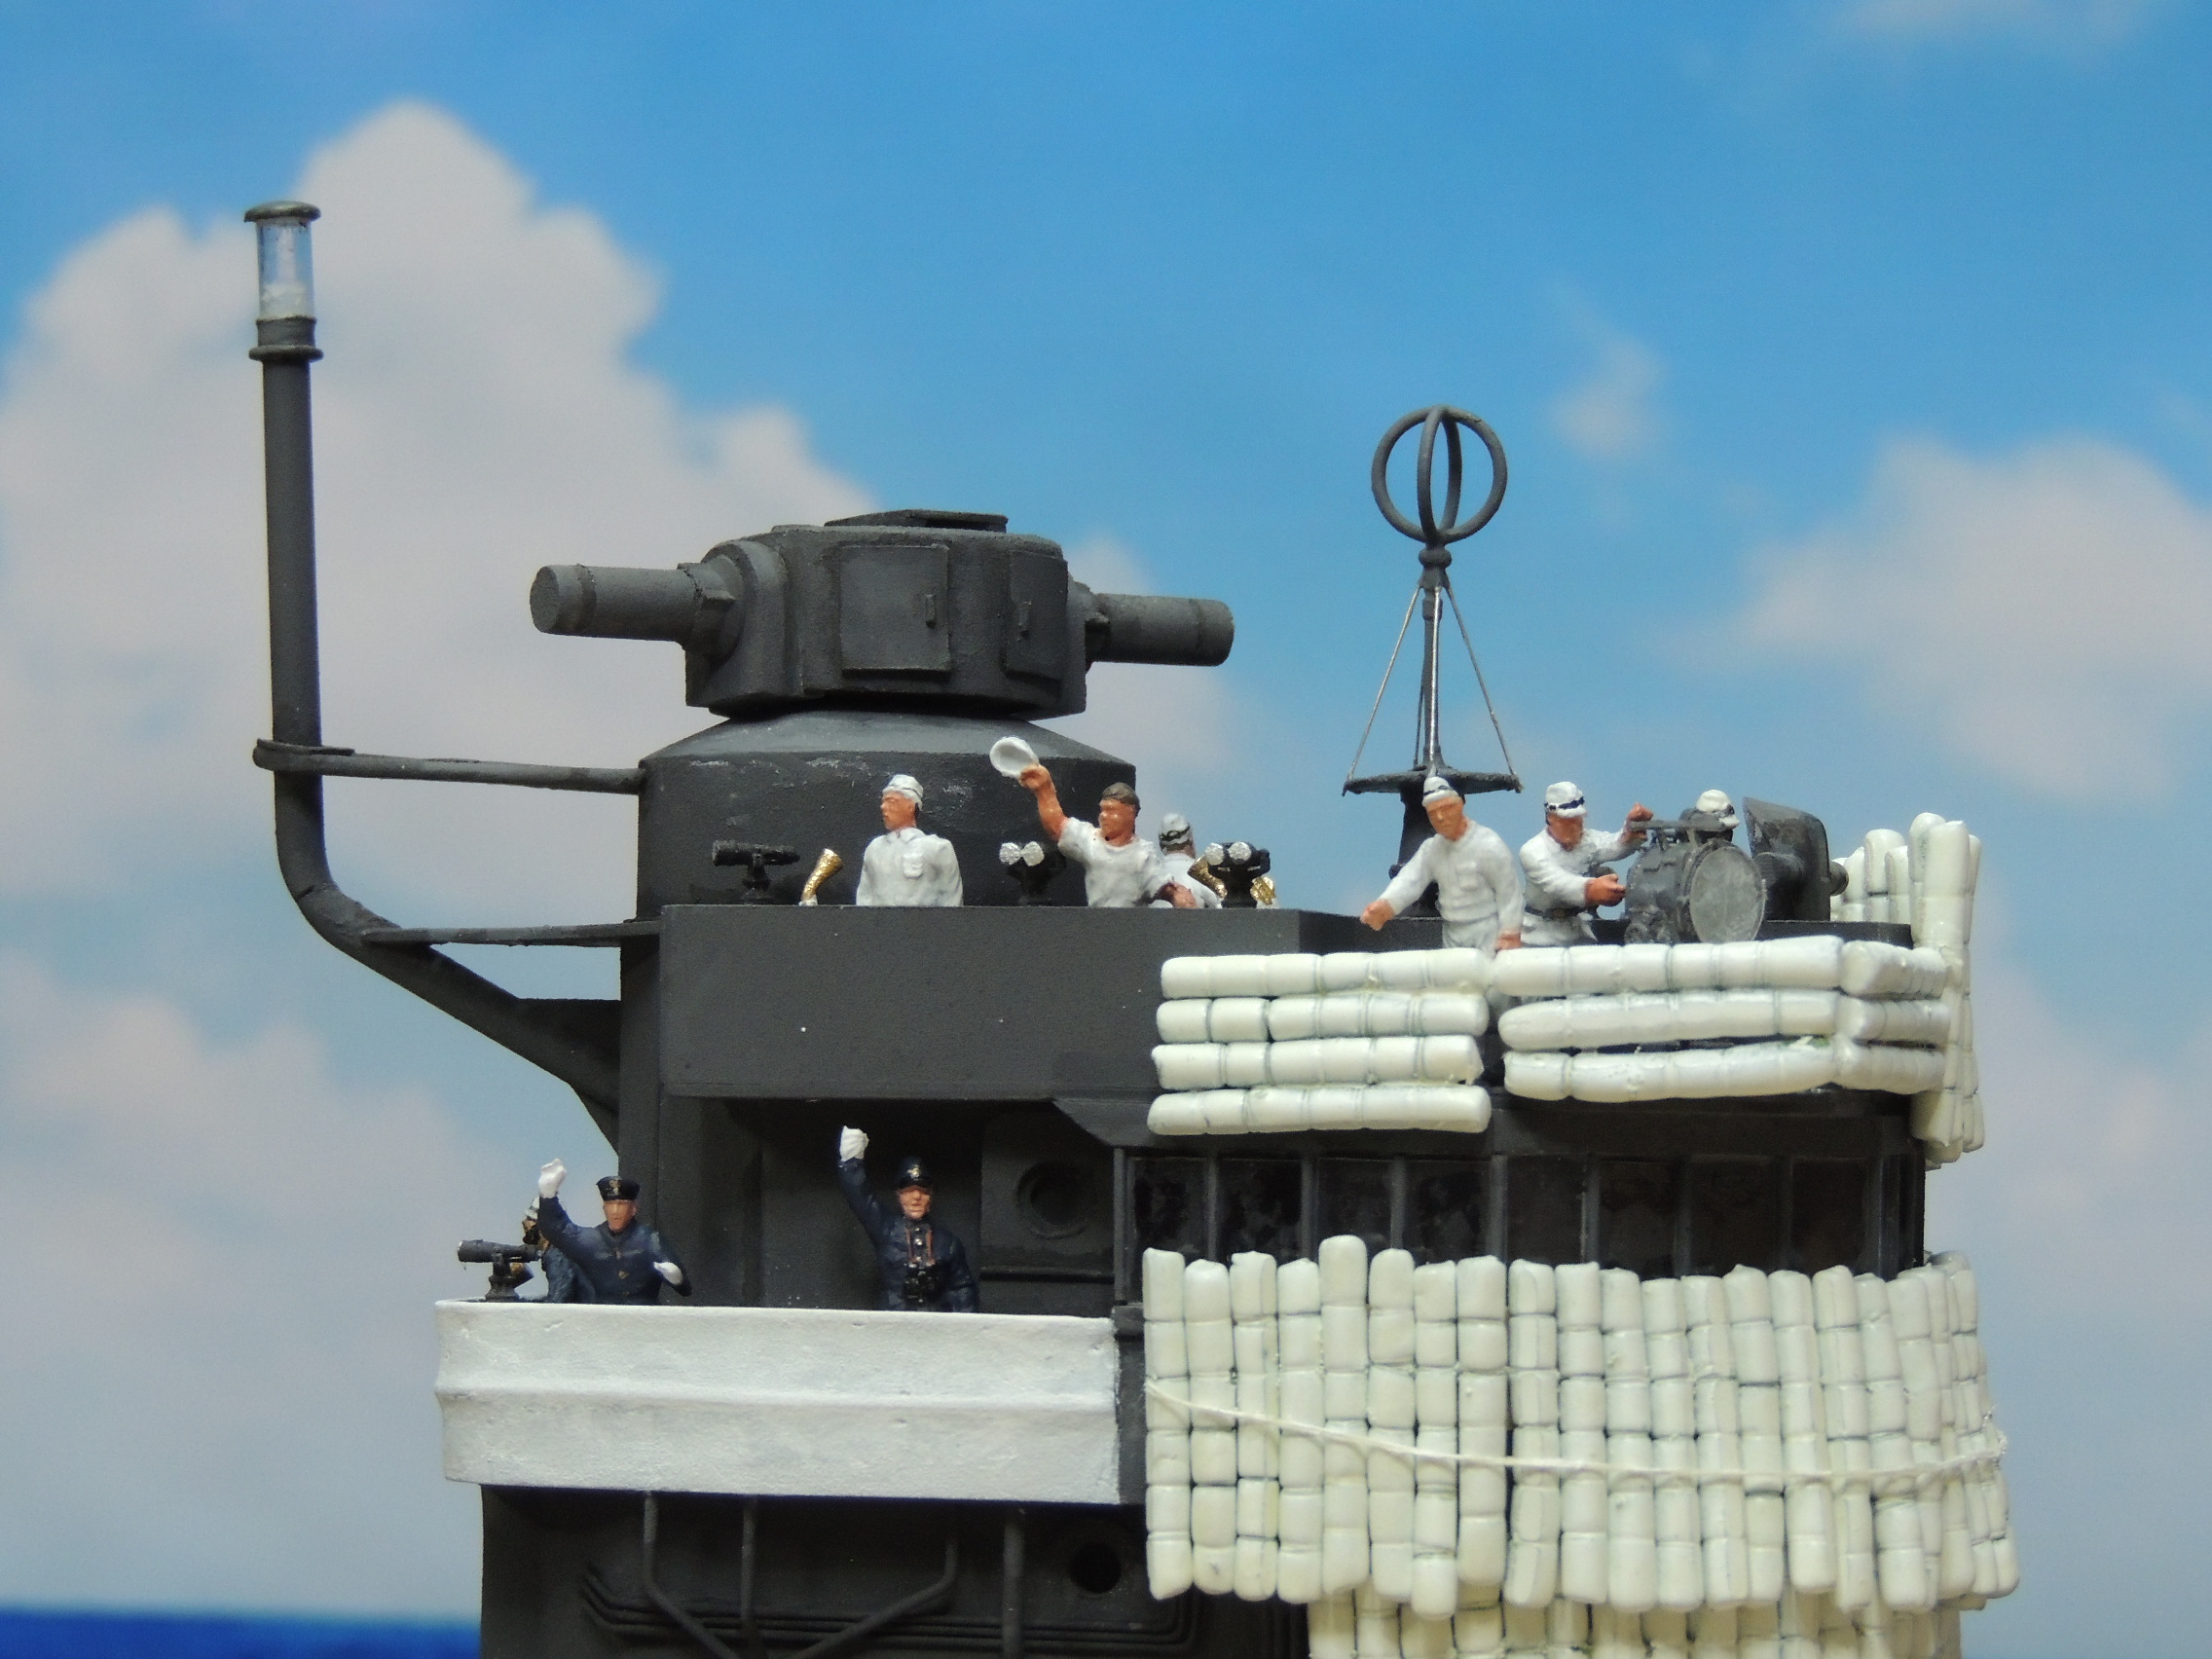
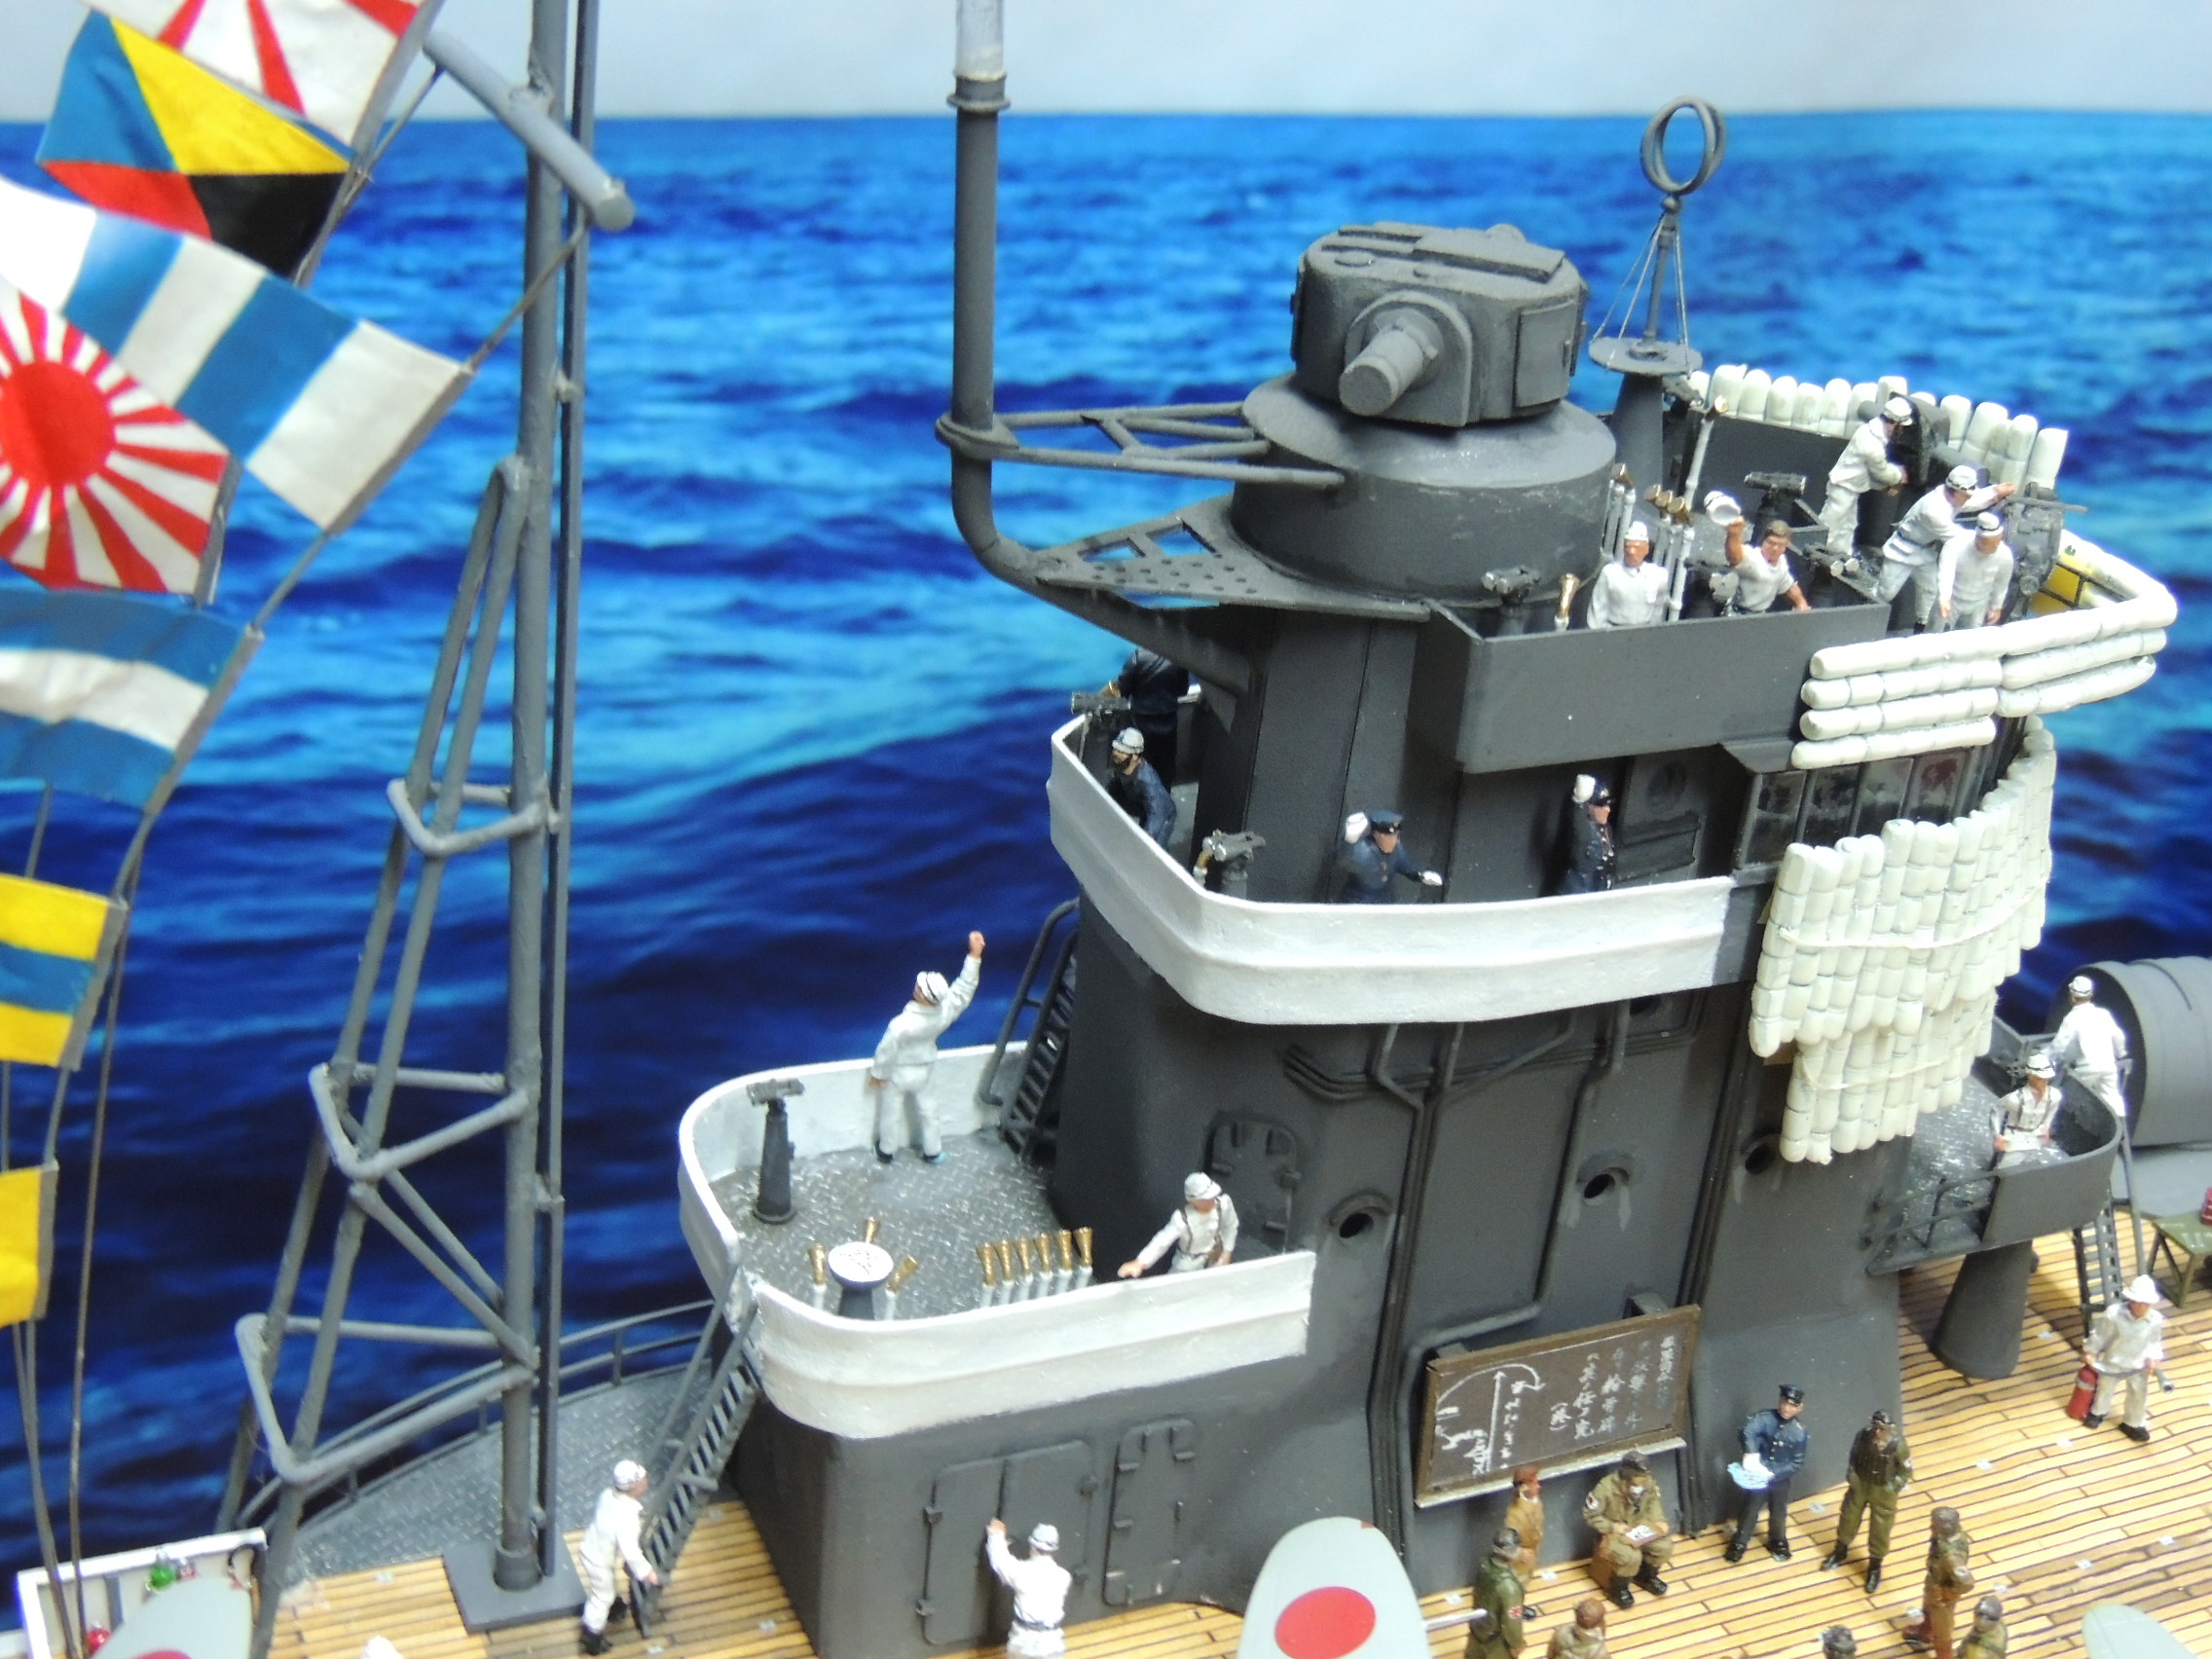
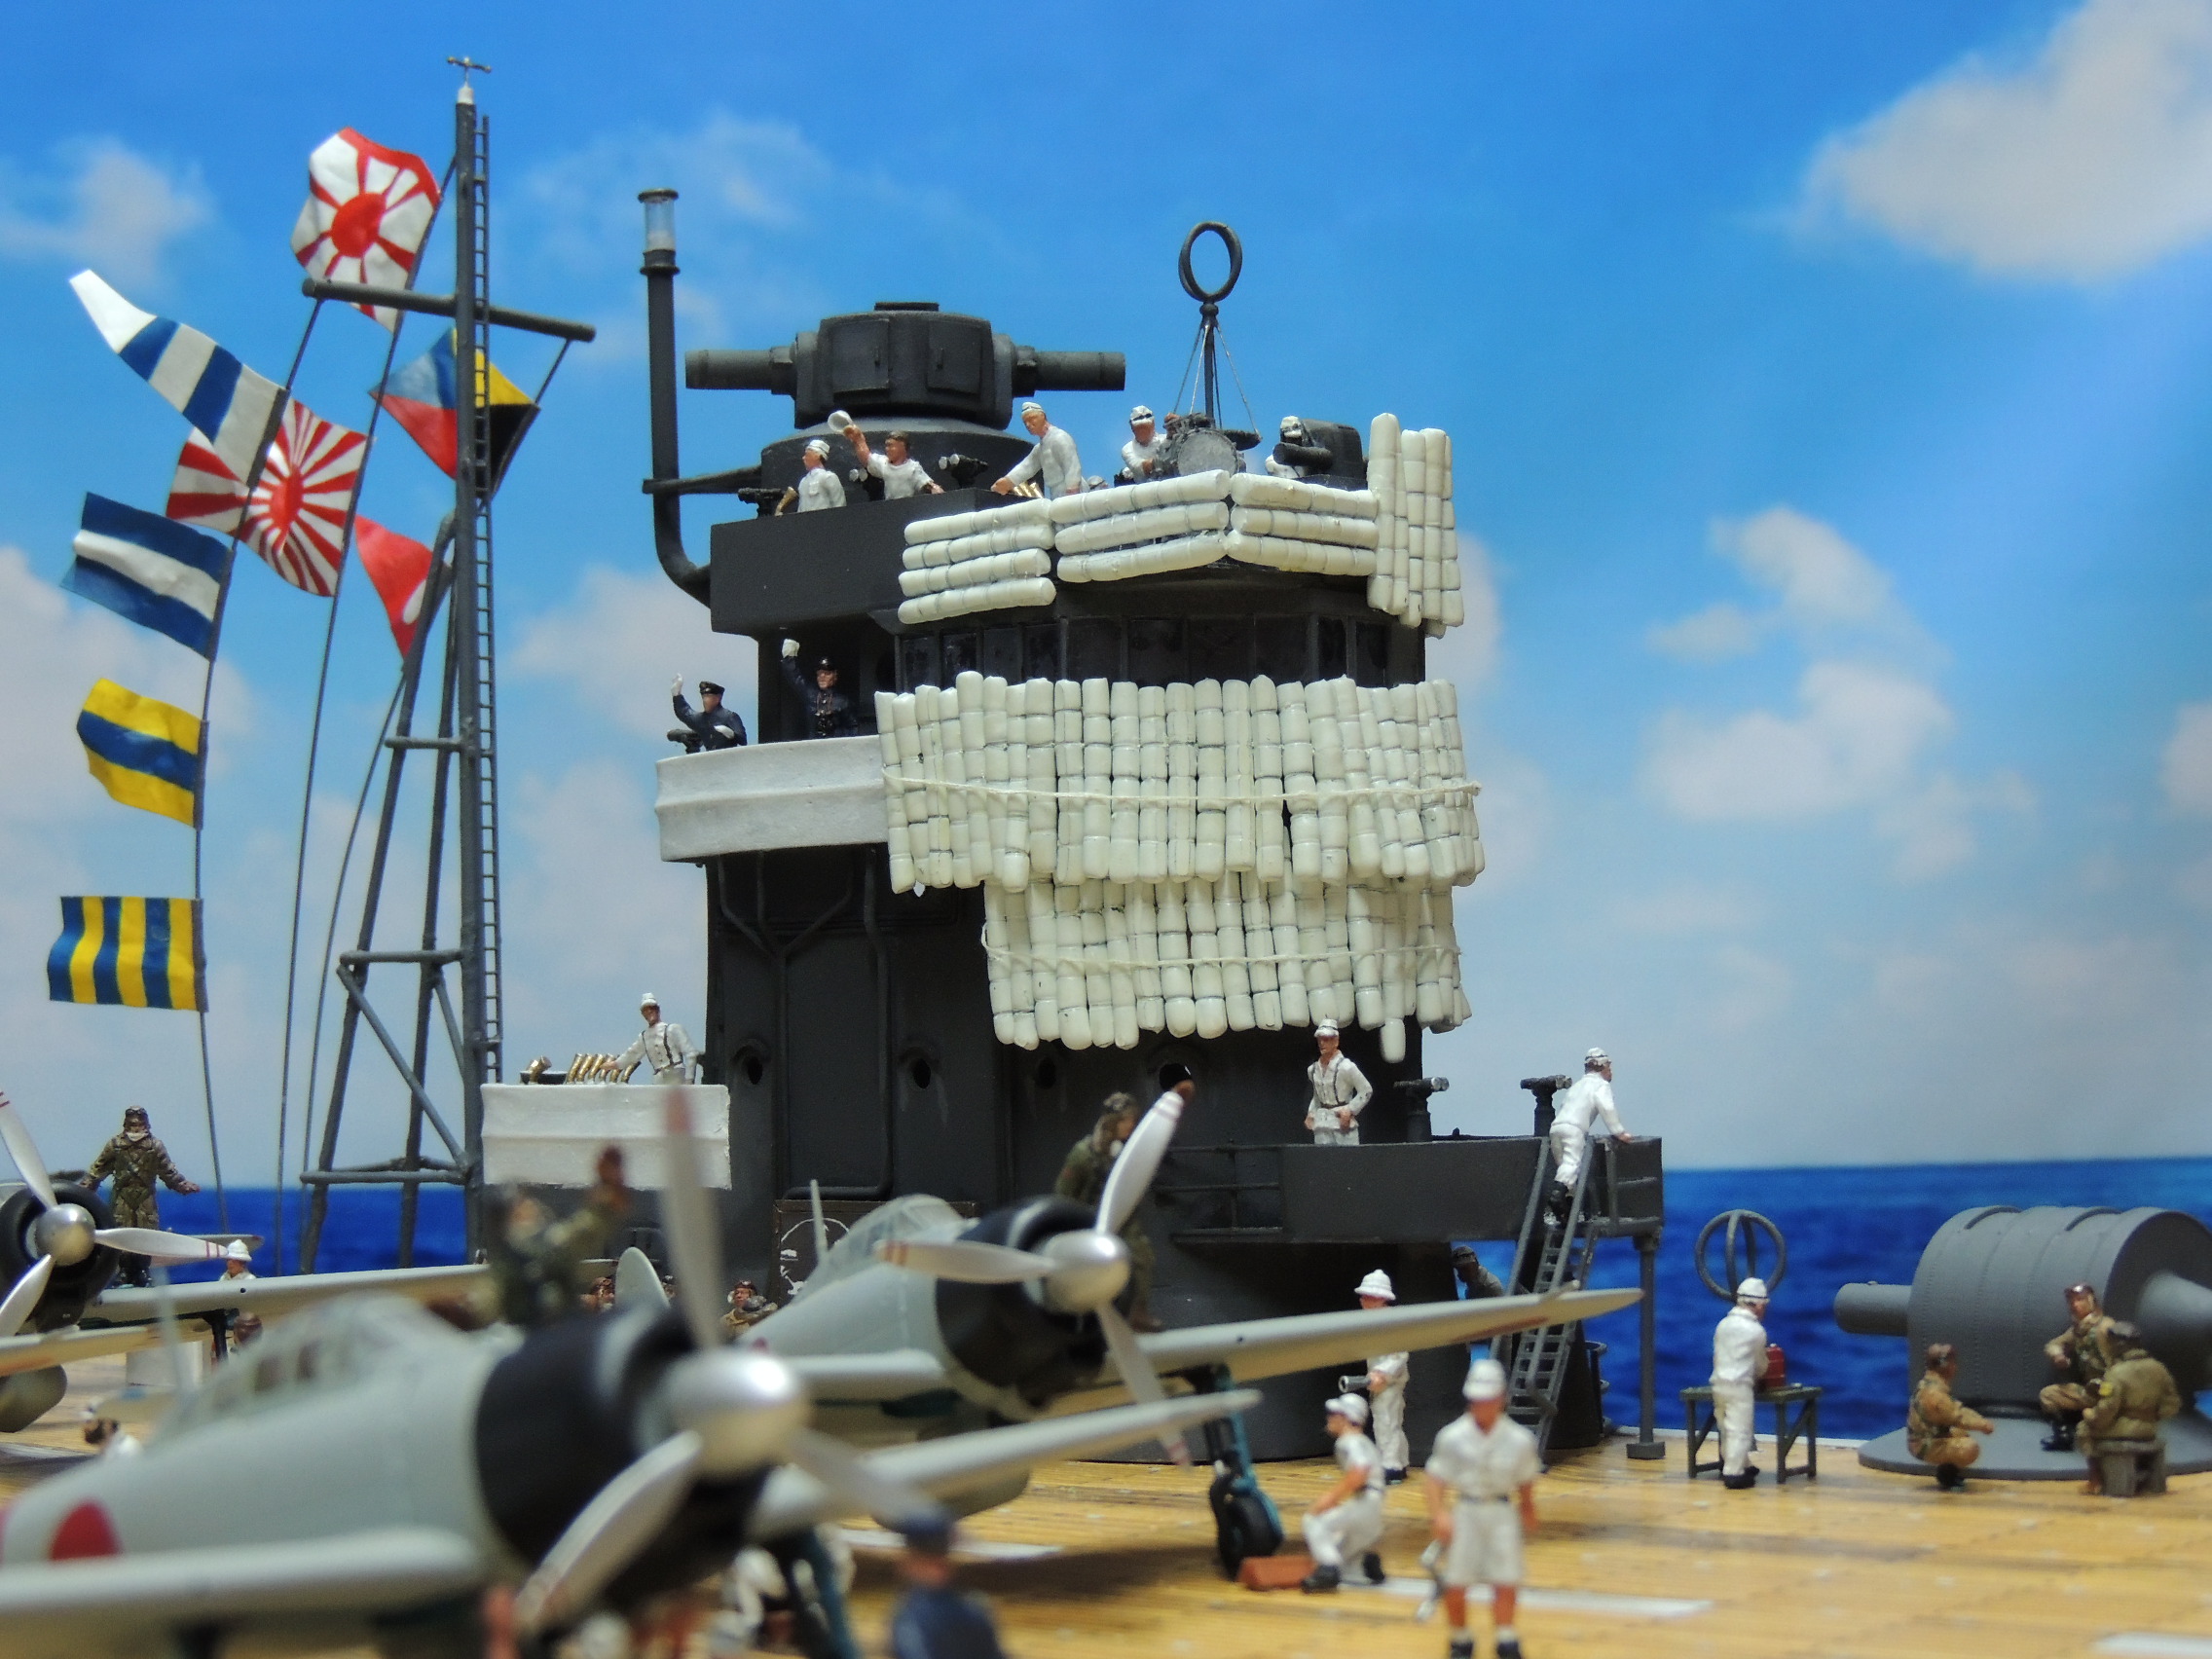
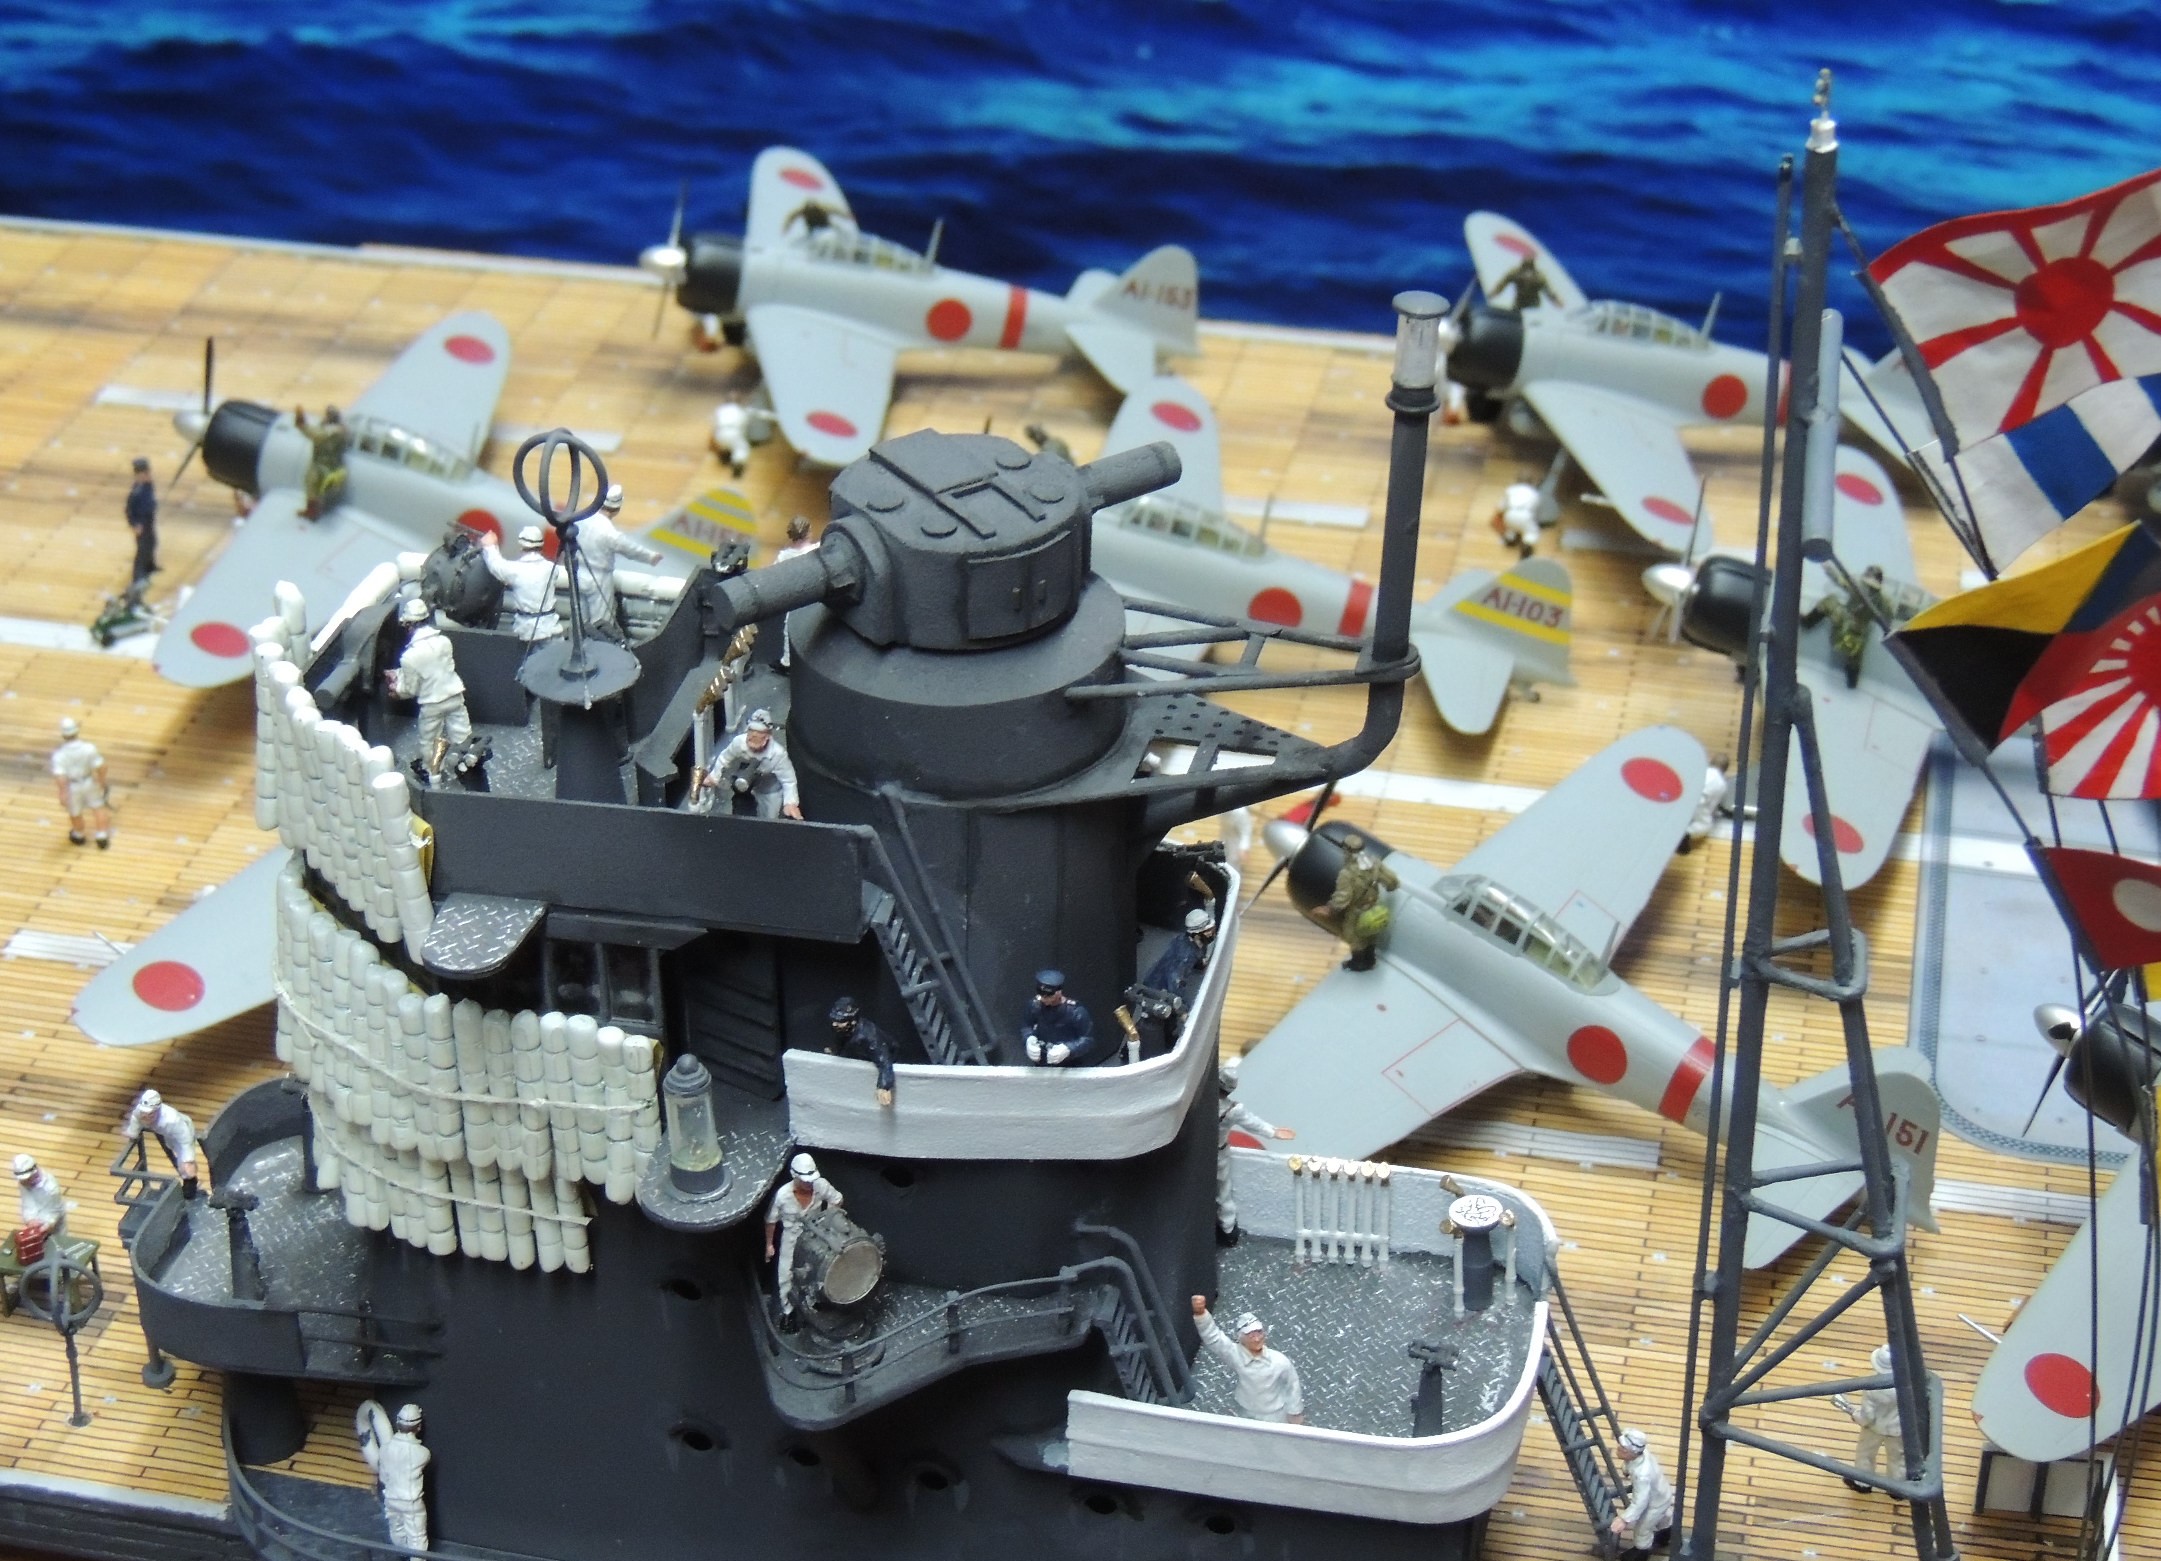
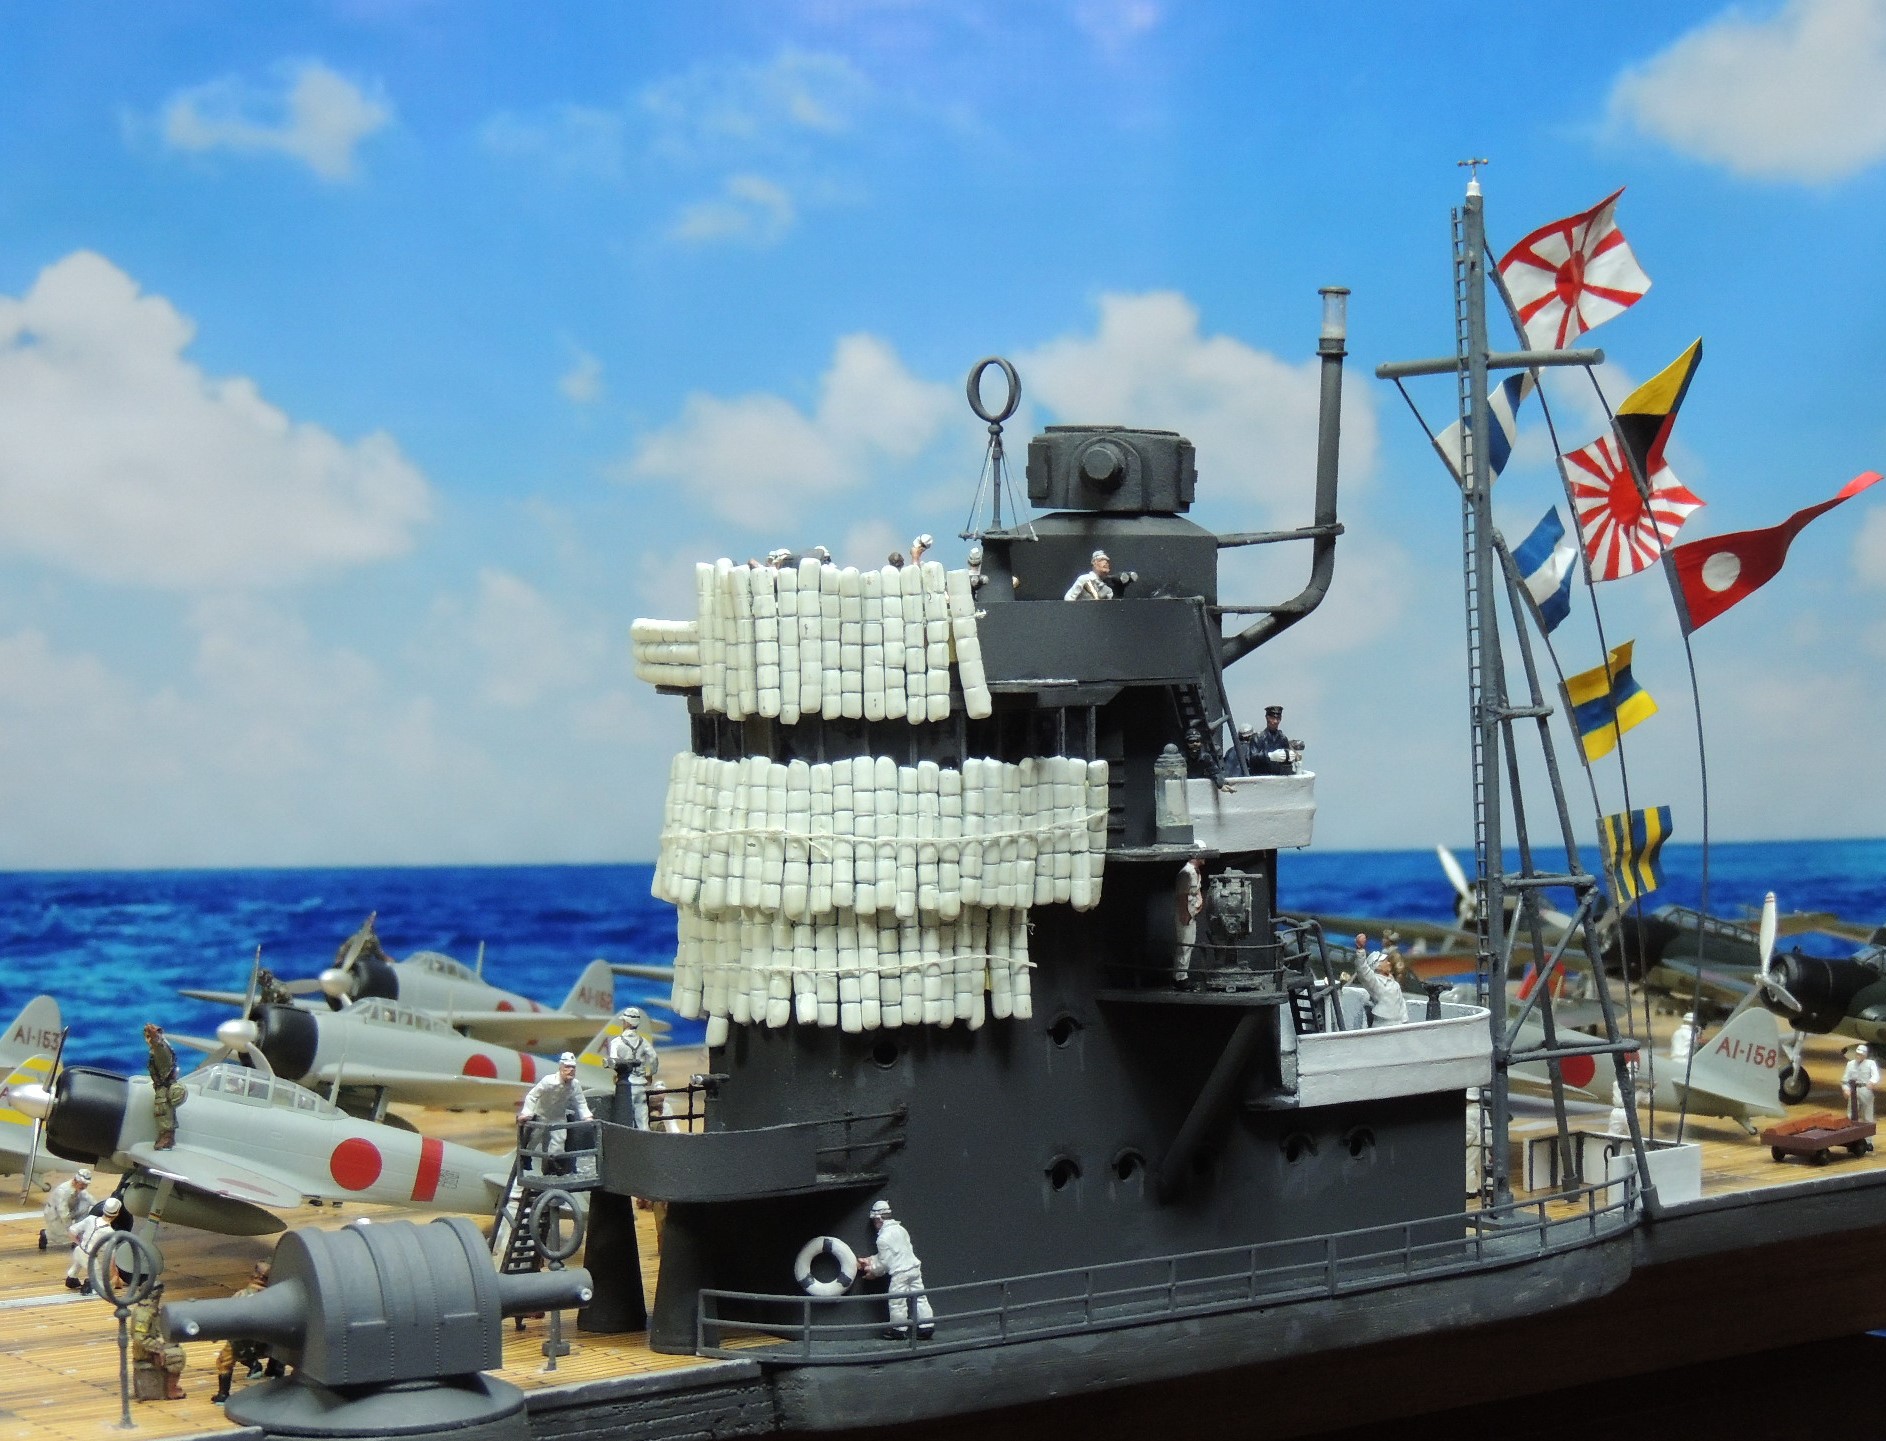
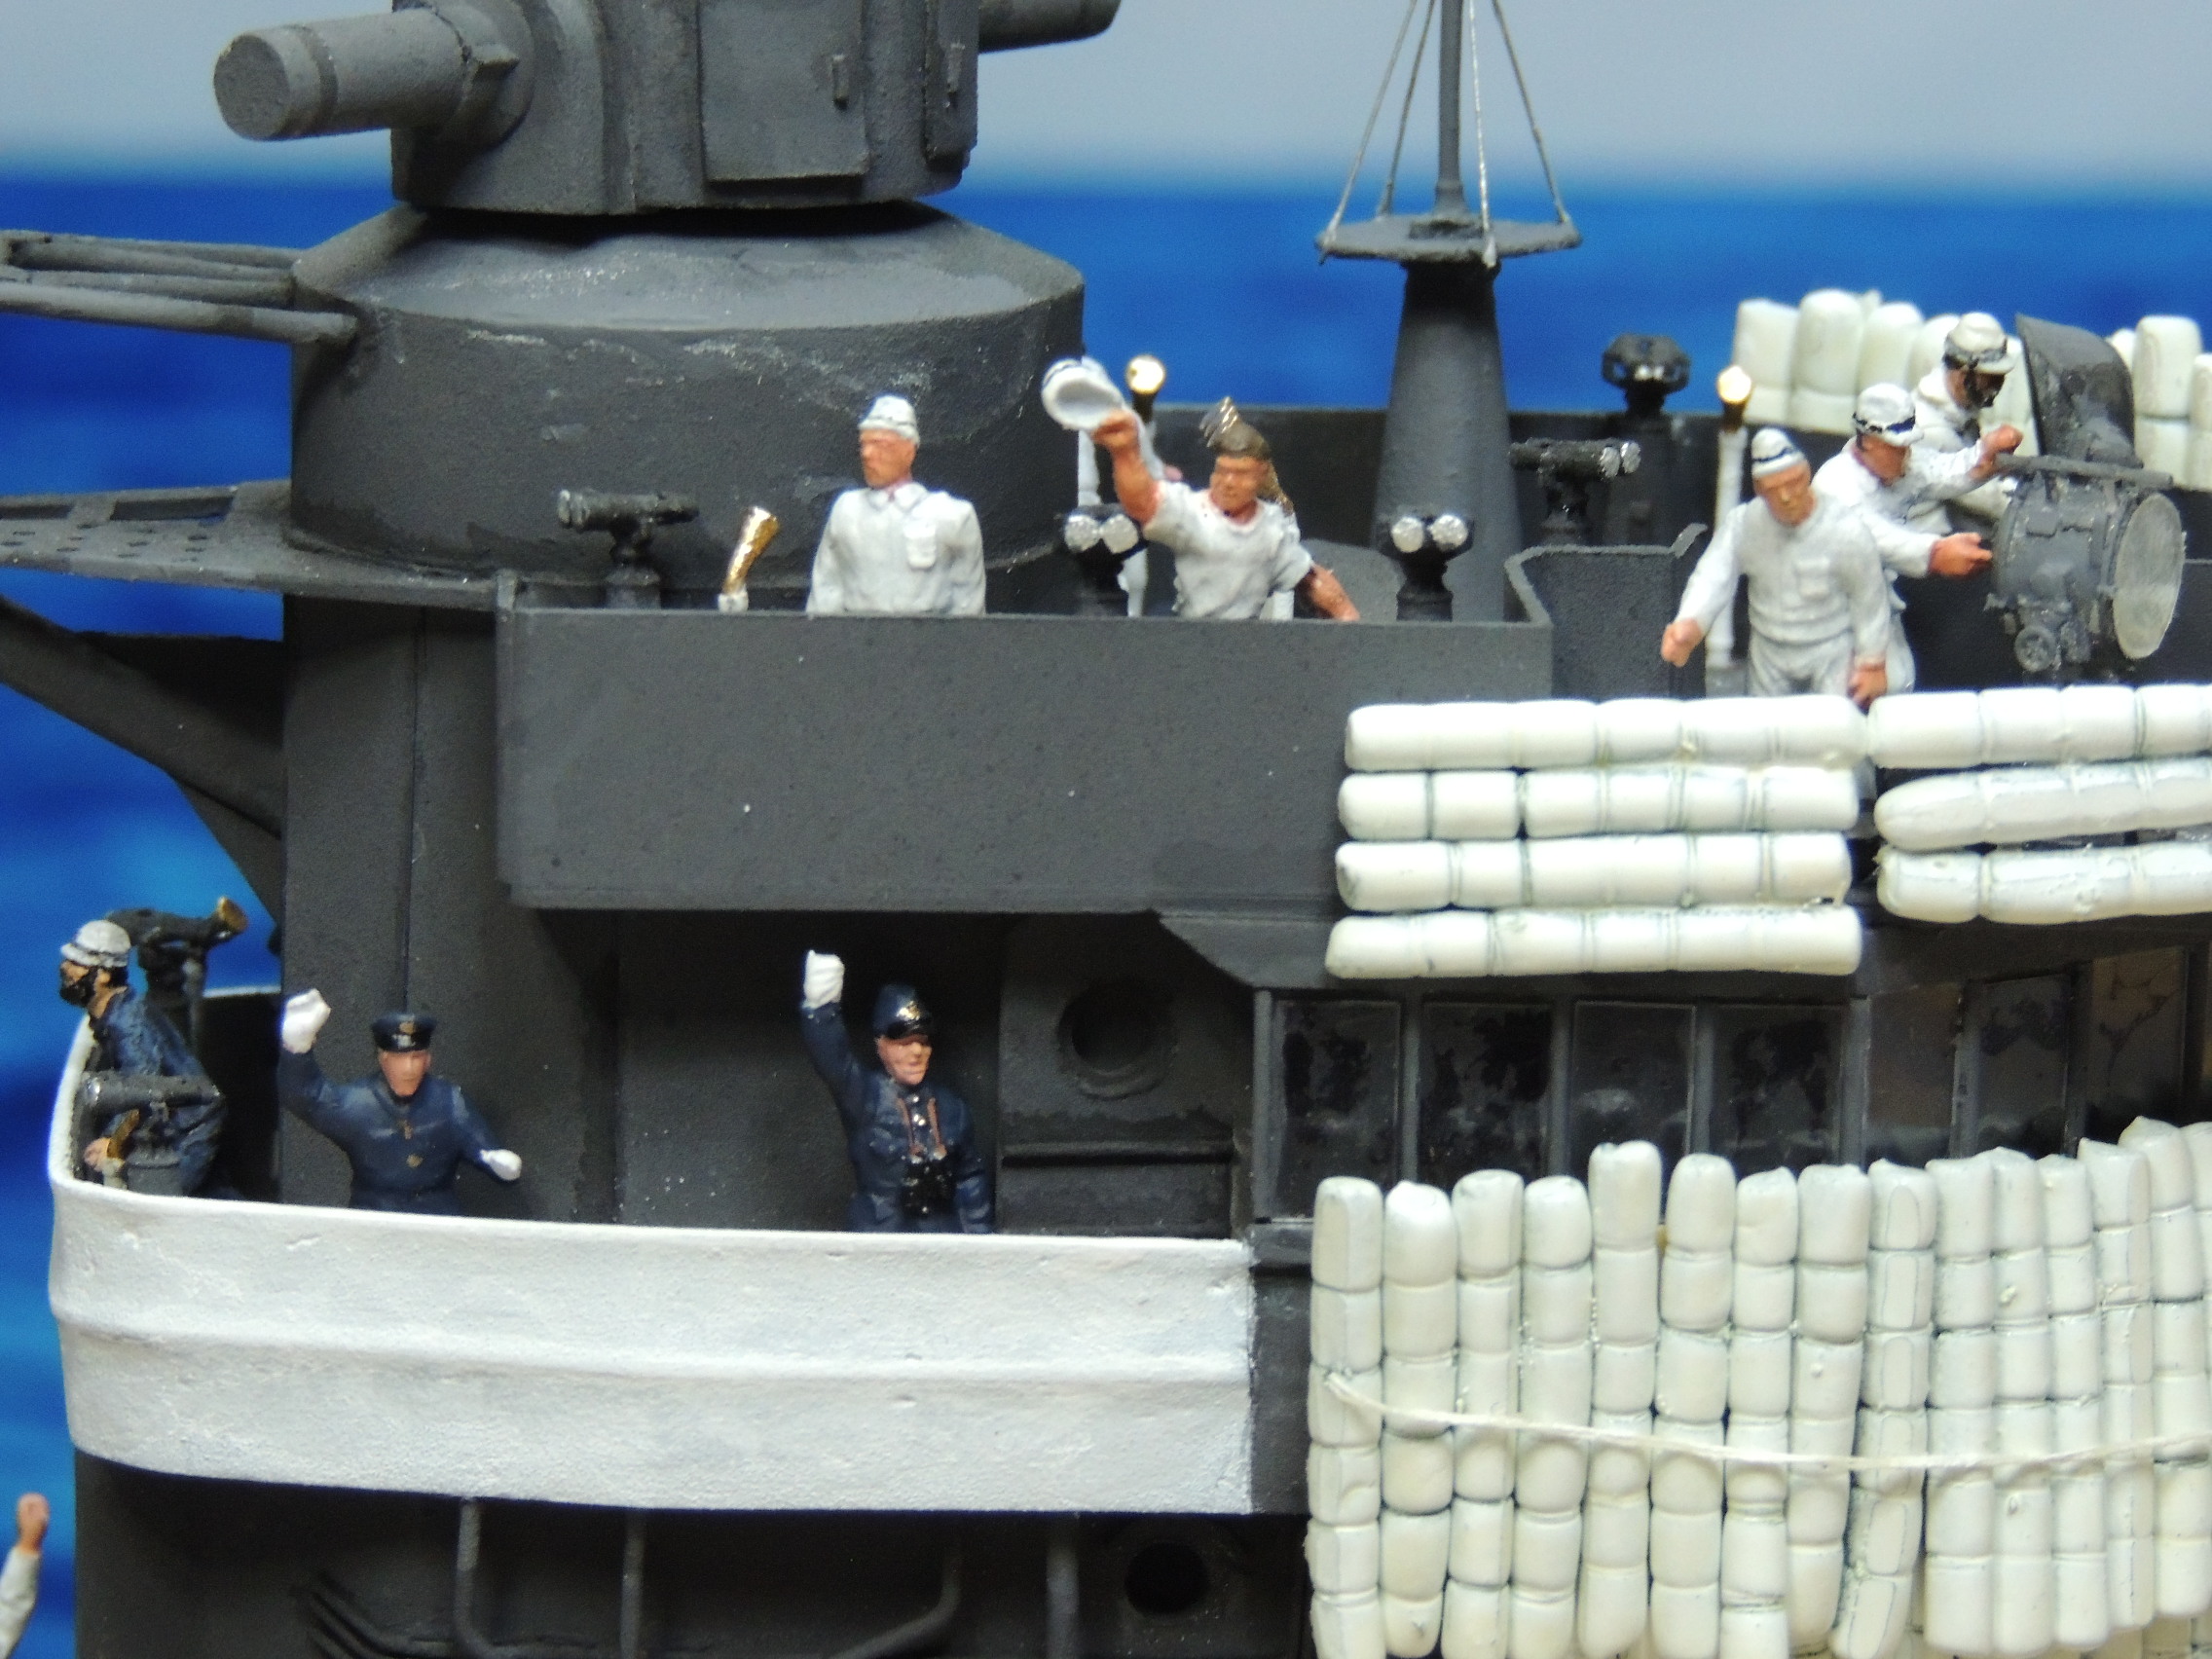
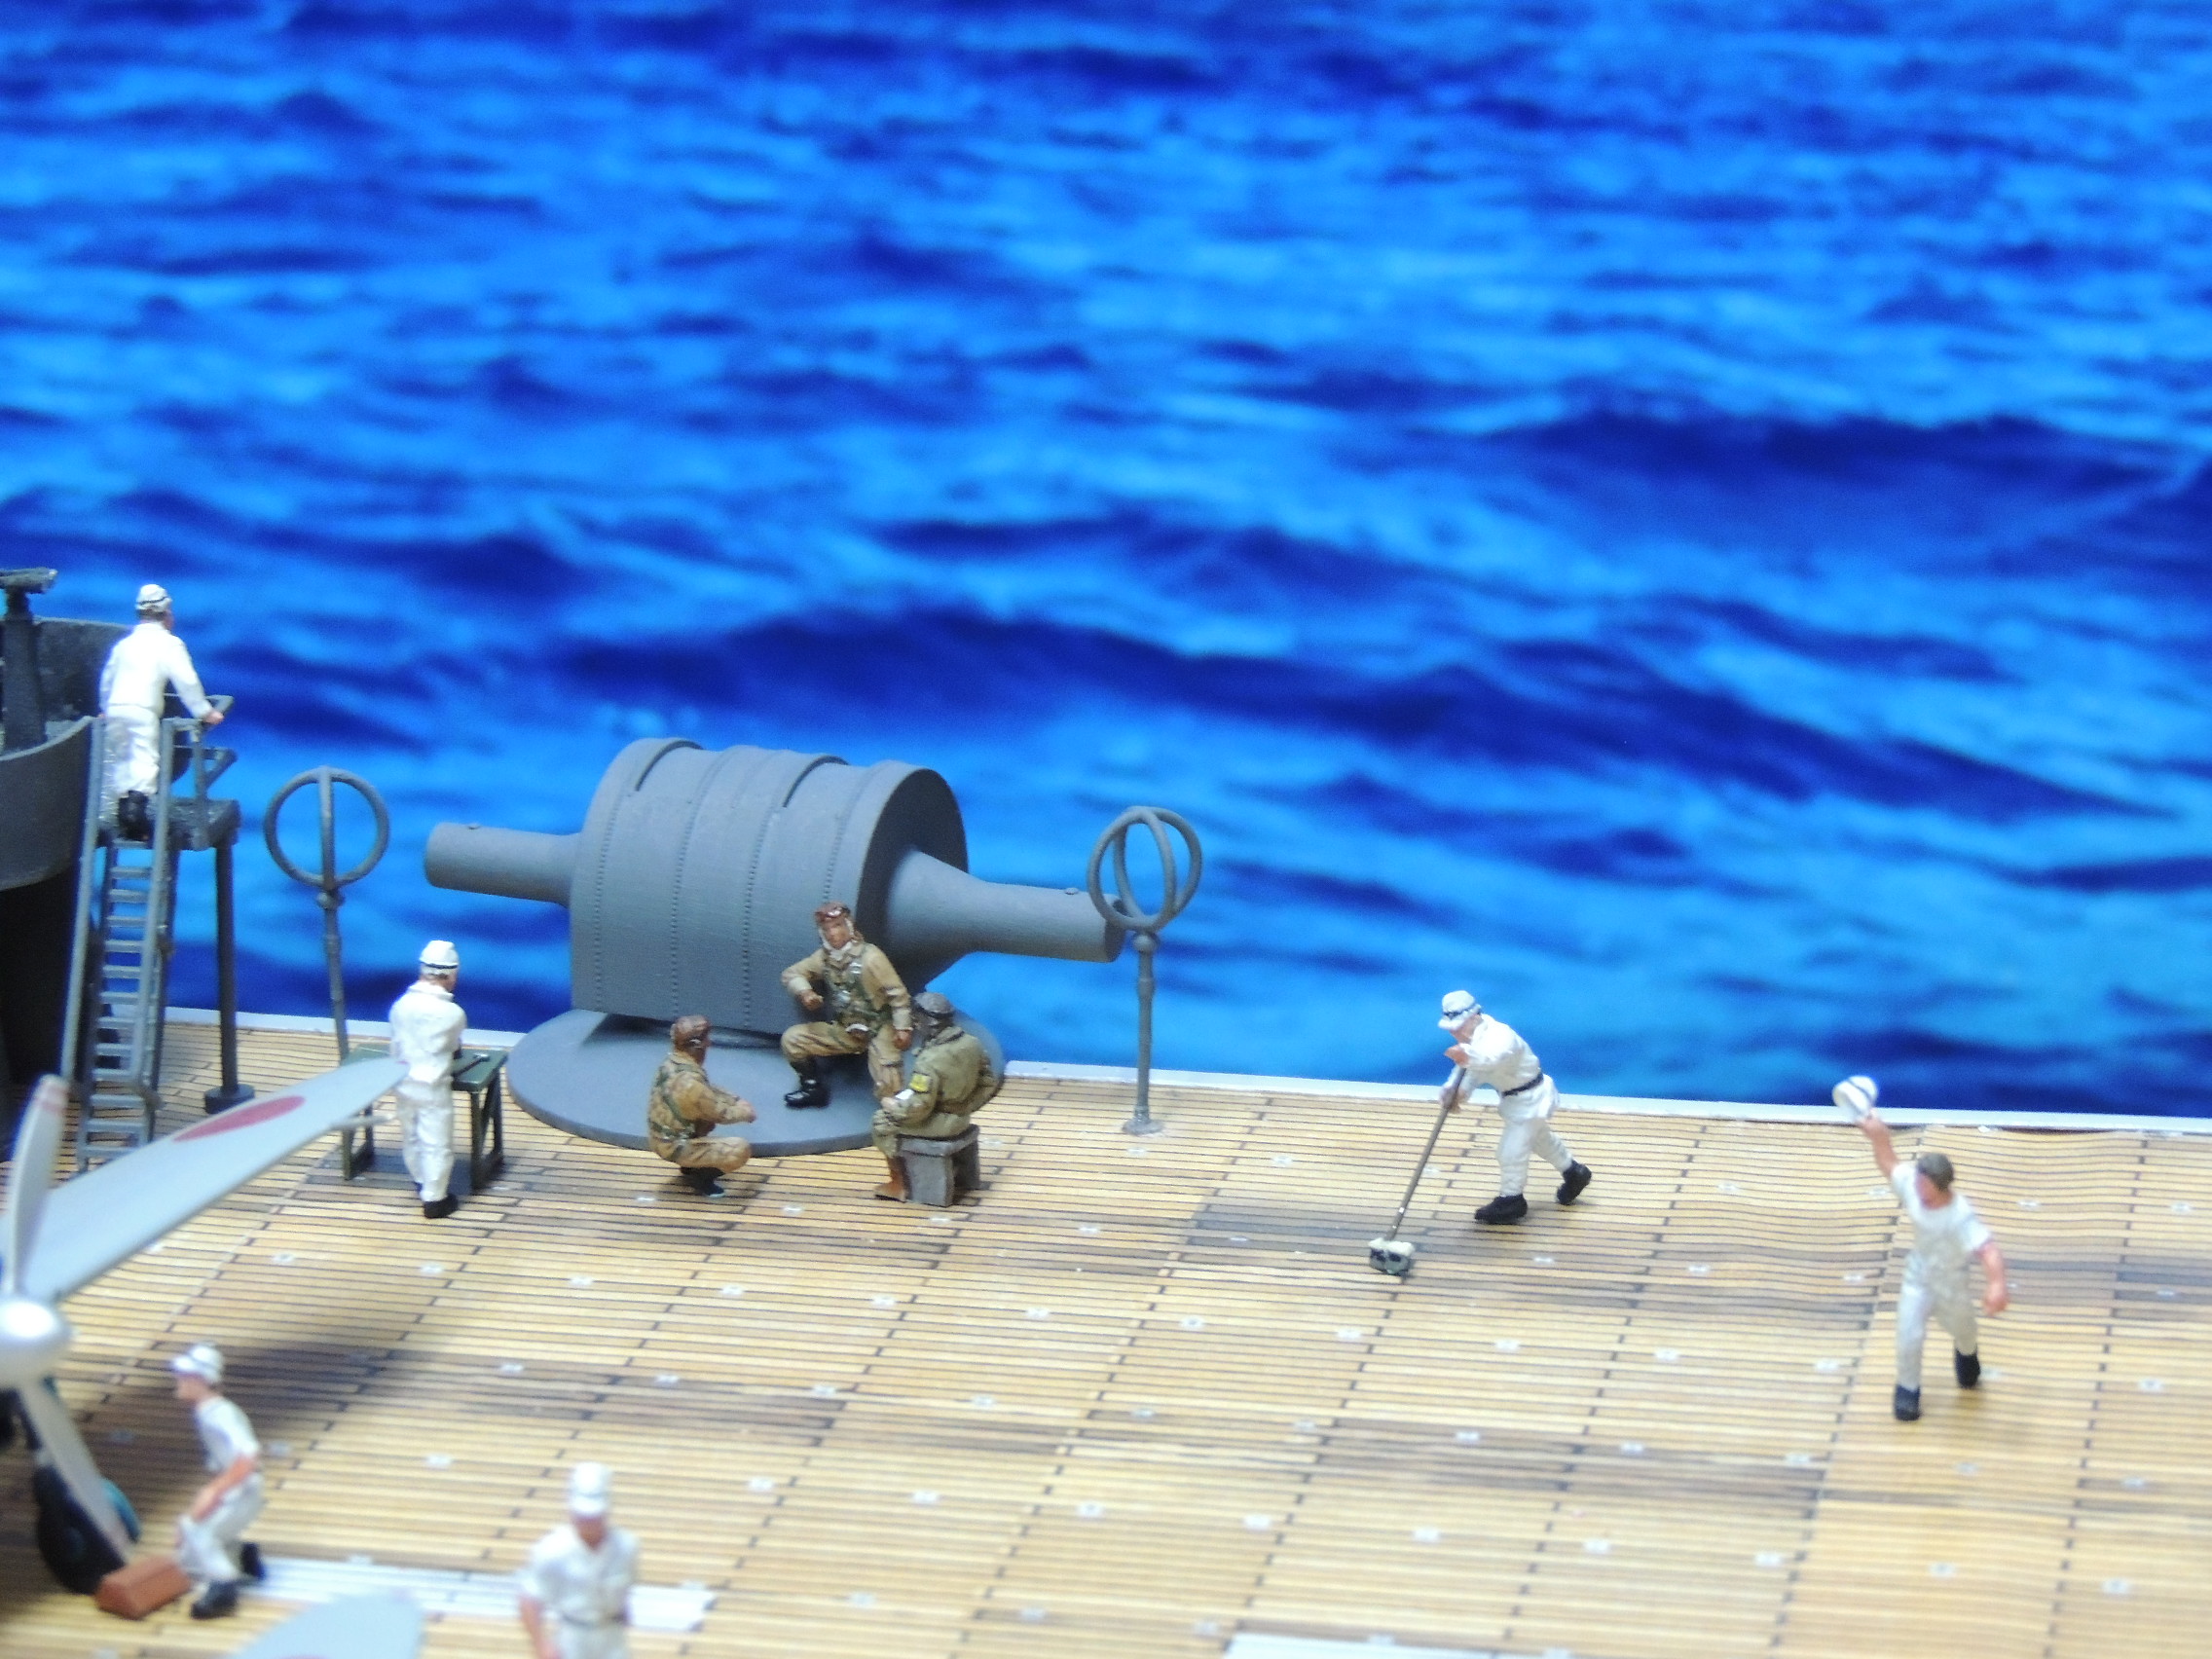
The island, which was scratchbuilt, lacked some details, including voice tubes, proper staircases, and, notably, the rolled futons used during the Pearl Harbor attack to guard against shrapnel from the expected counterattack that never came;
The 4.5 meter rangefinder on the deck just fore of the island was missing, as were the two antennas fore and aft of the rangefinder;
The deck needed more figures to simulate the beehive of activity seen in actual photos; and
The diorama needed a more appropriate backdrop.
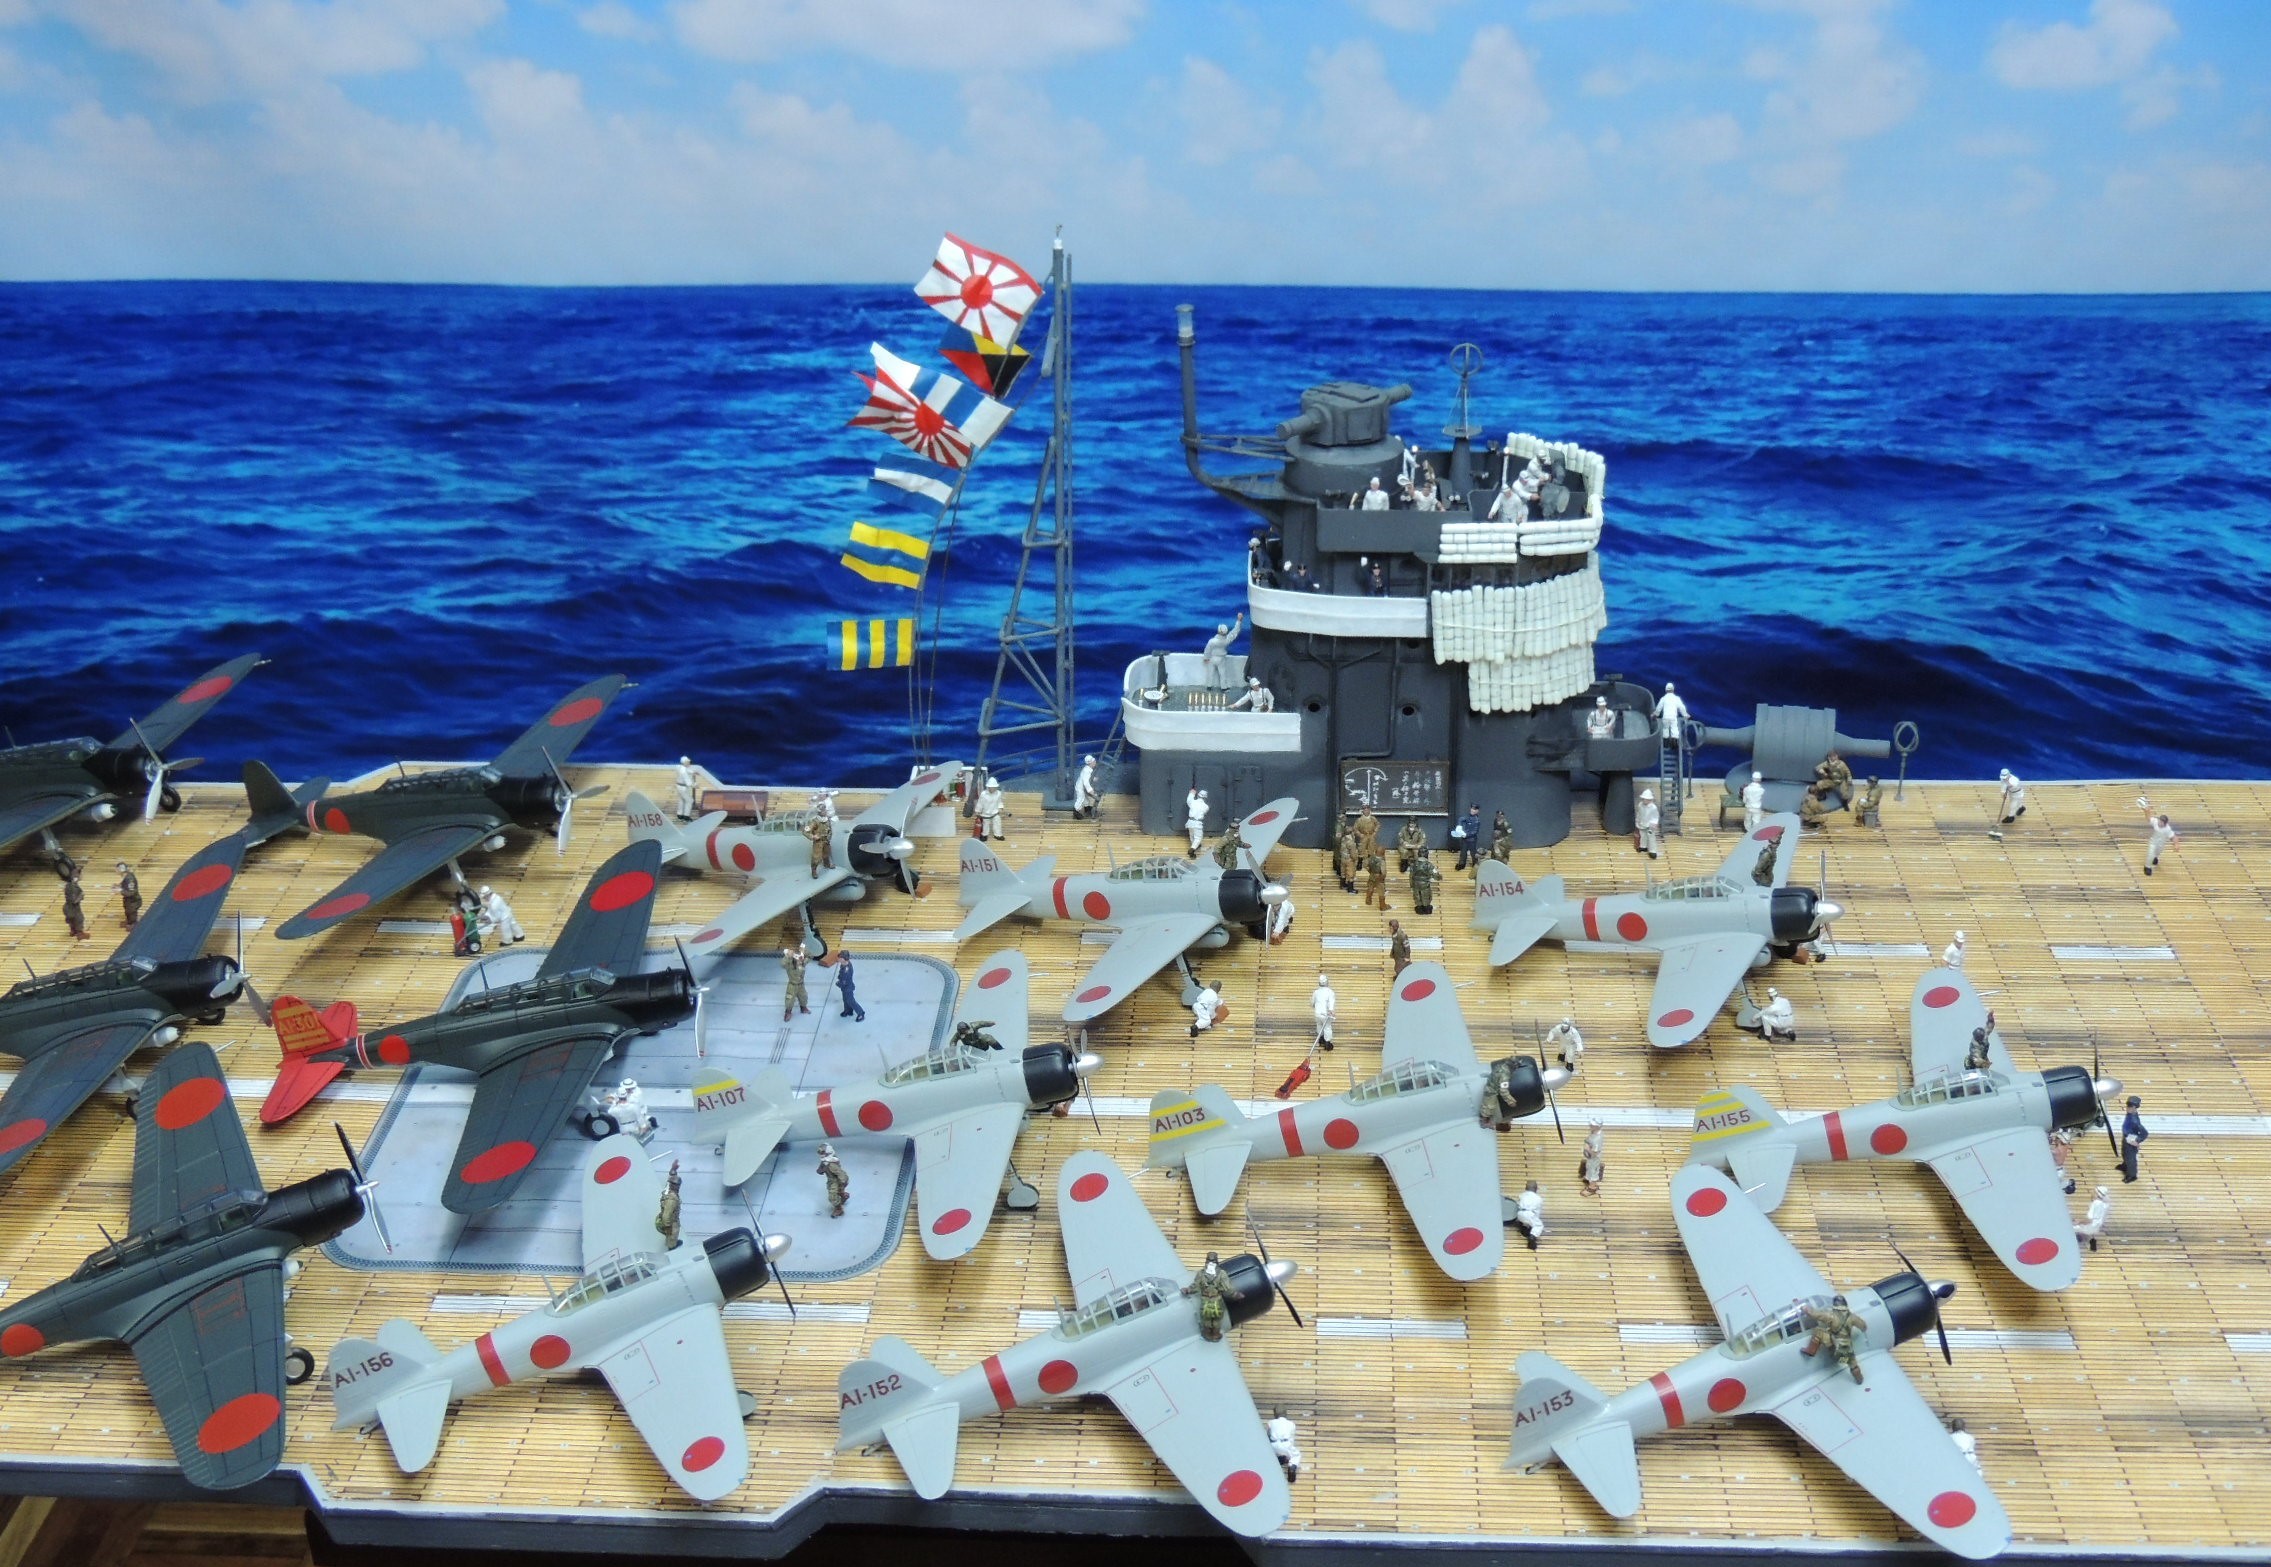
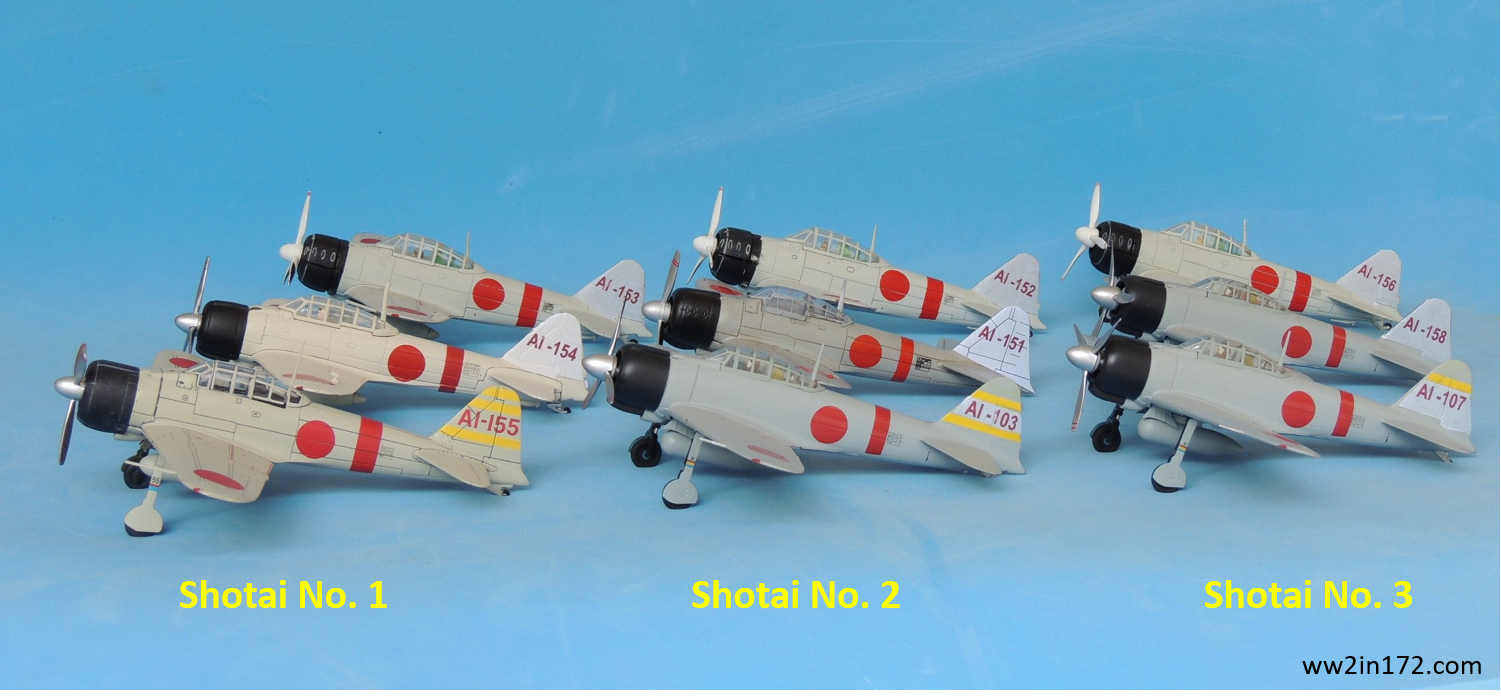
So I kept at it, as time permitted, slowly correcting all the aforementioned problems. I doubled the length of the deck, used nine identical Witty Zeros all with appropriately decaled tail numbers, included seven Kates, recreated the flags at the right scale and placed them on the proper side, added more details to the island, included the range finder just fore of the island, painted more figures (for a total of 85), and added a backdrop that showed the horizon at sea.
I finally finished the improved diorama this week, just in time to post these photos today, on the anniversary of the attack. Nonetheless, I will continue to detail how I constructed each piece of the diorama in future posts.
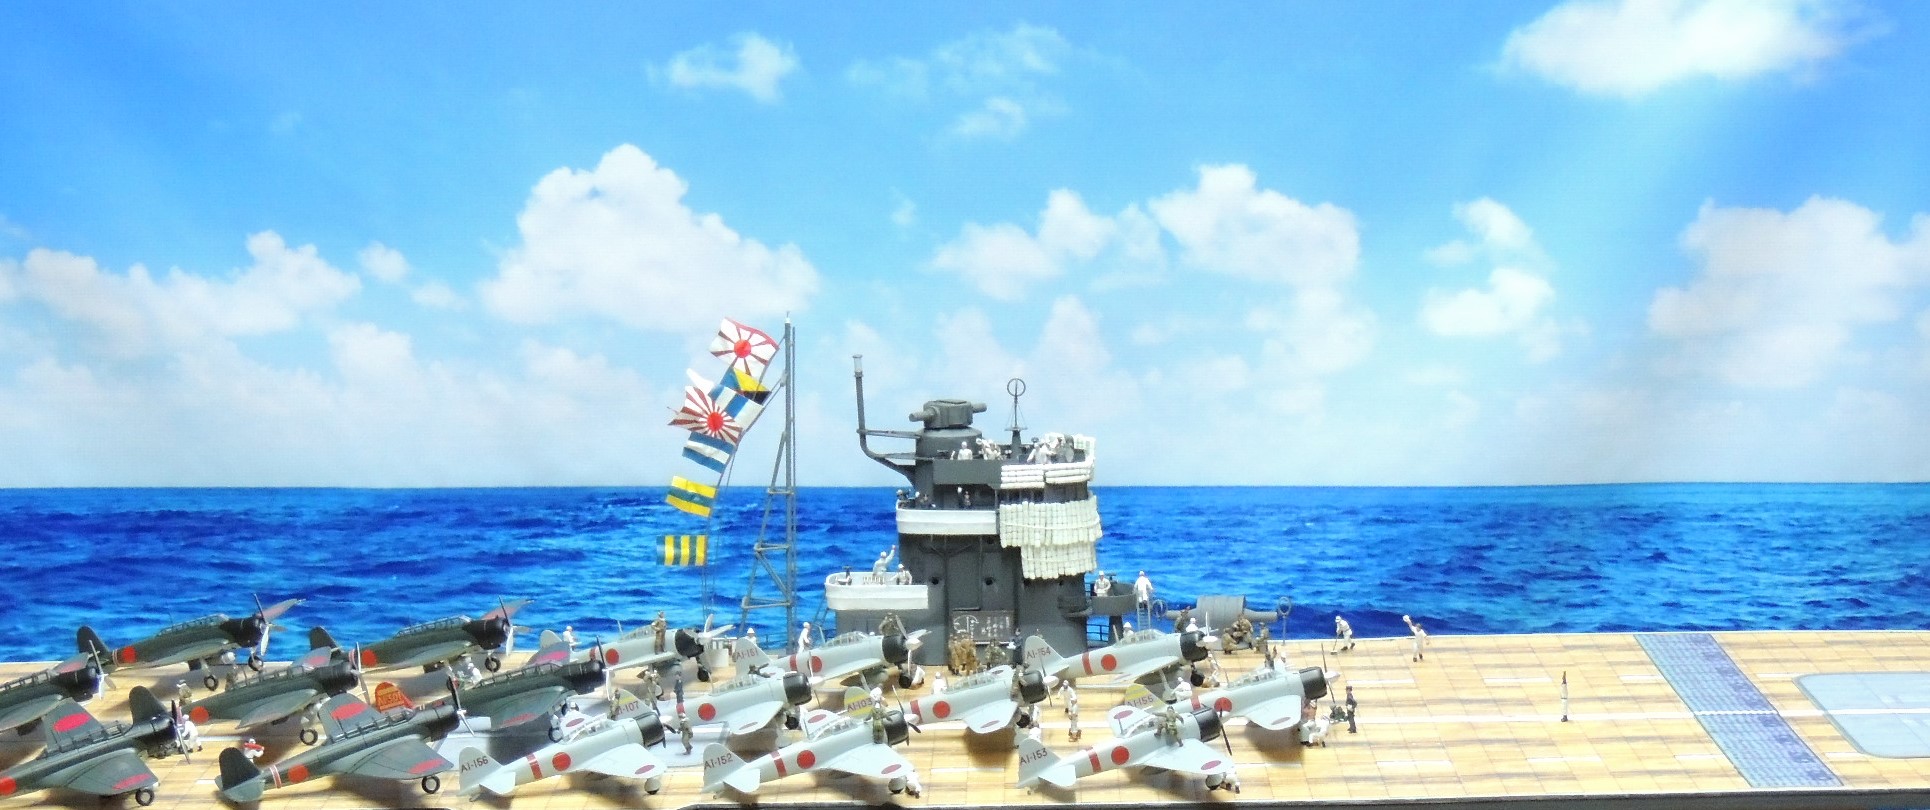
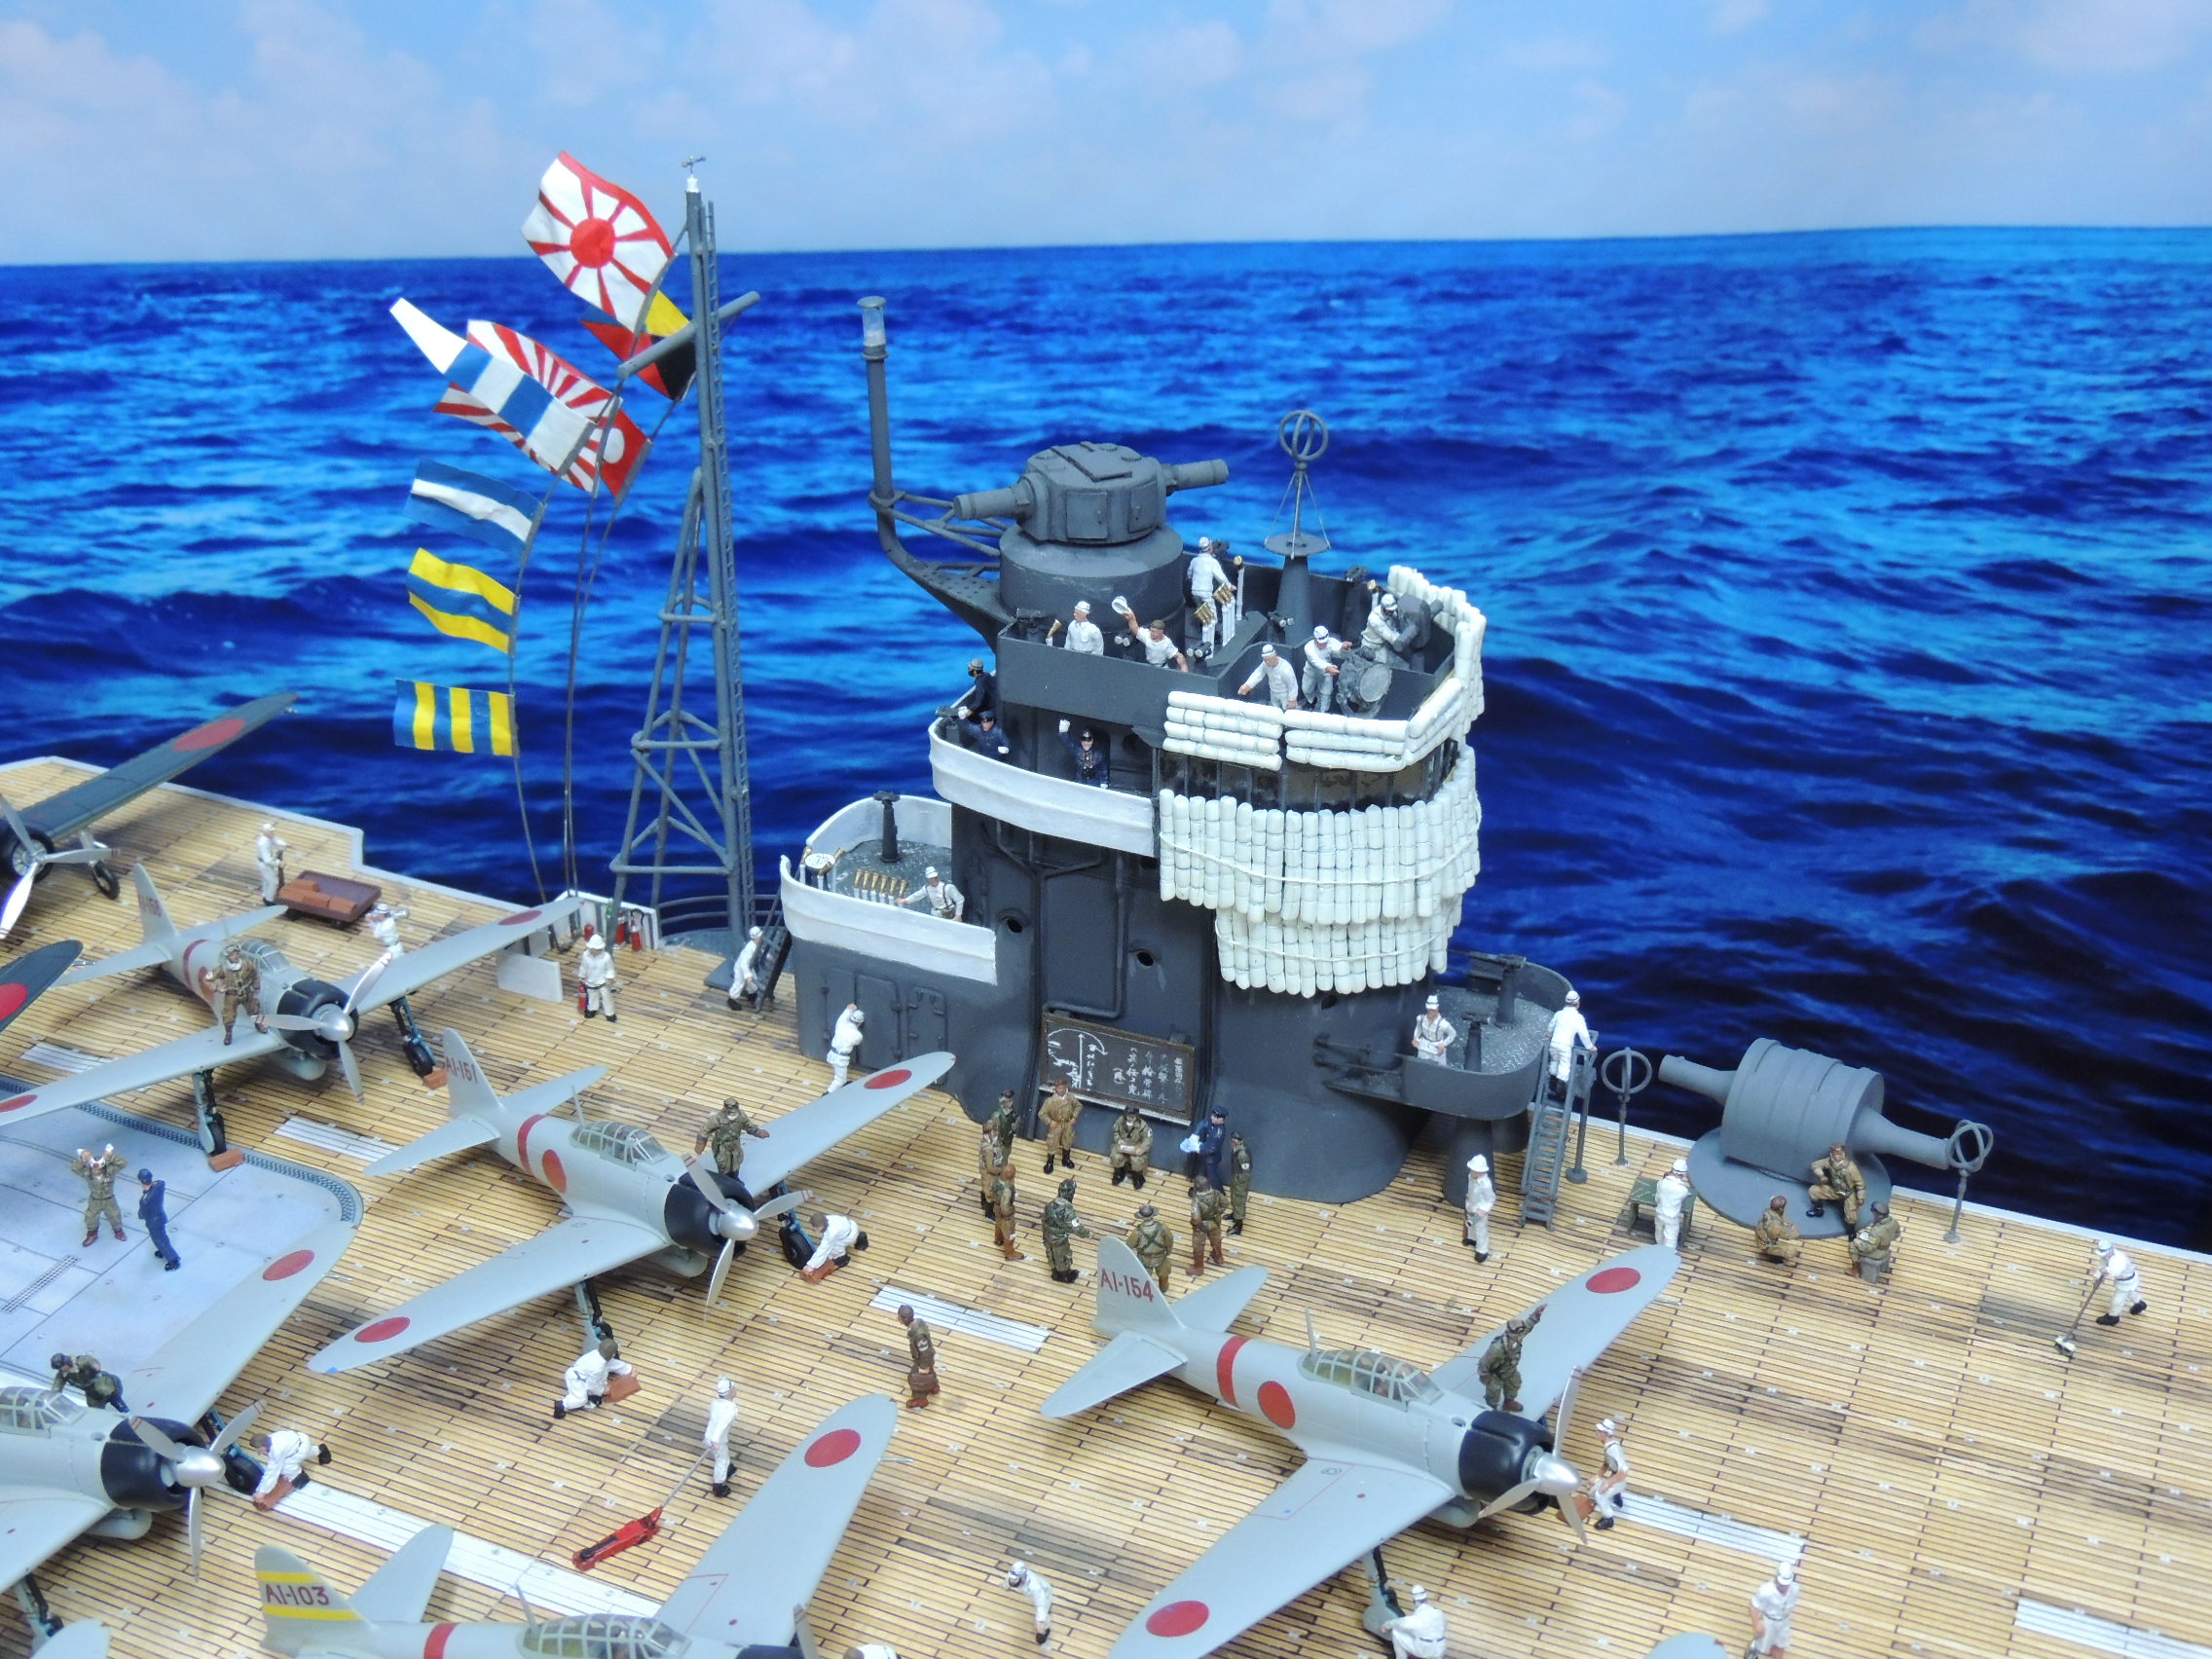
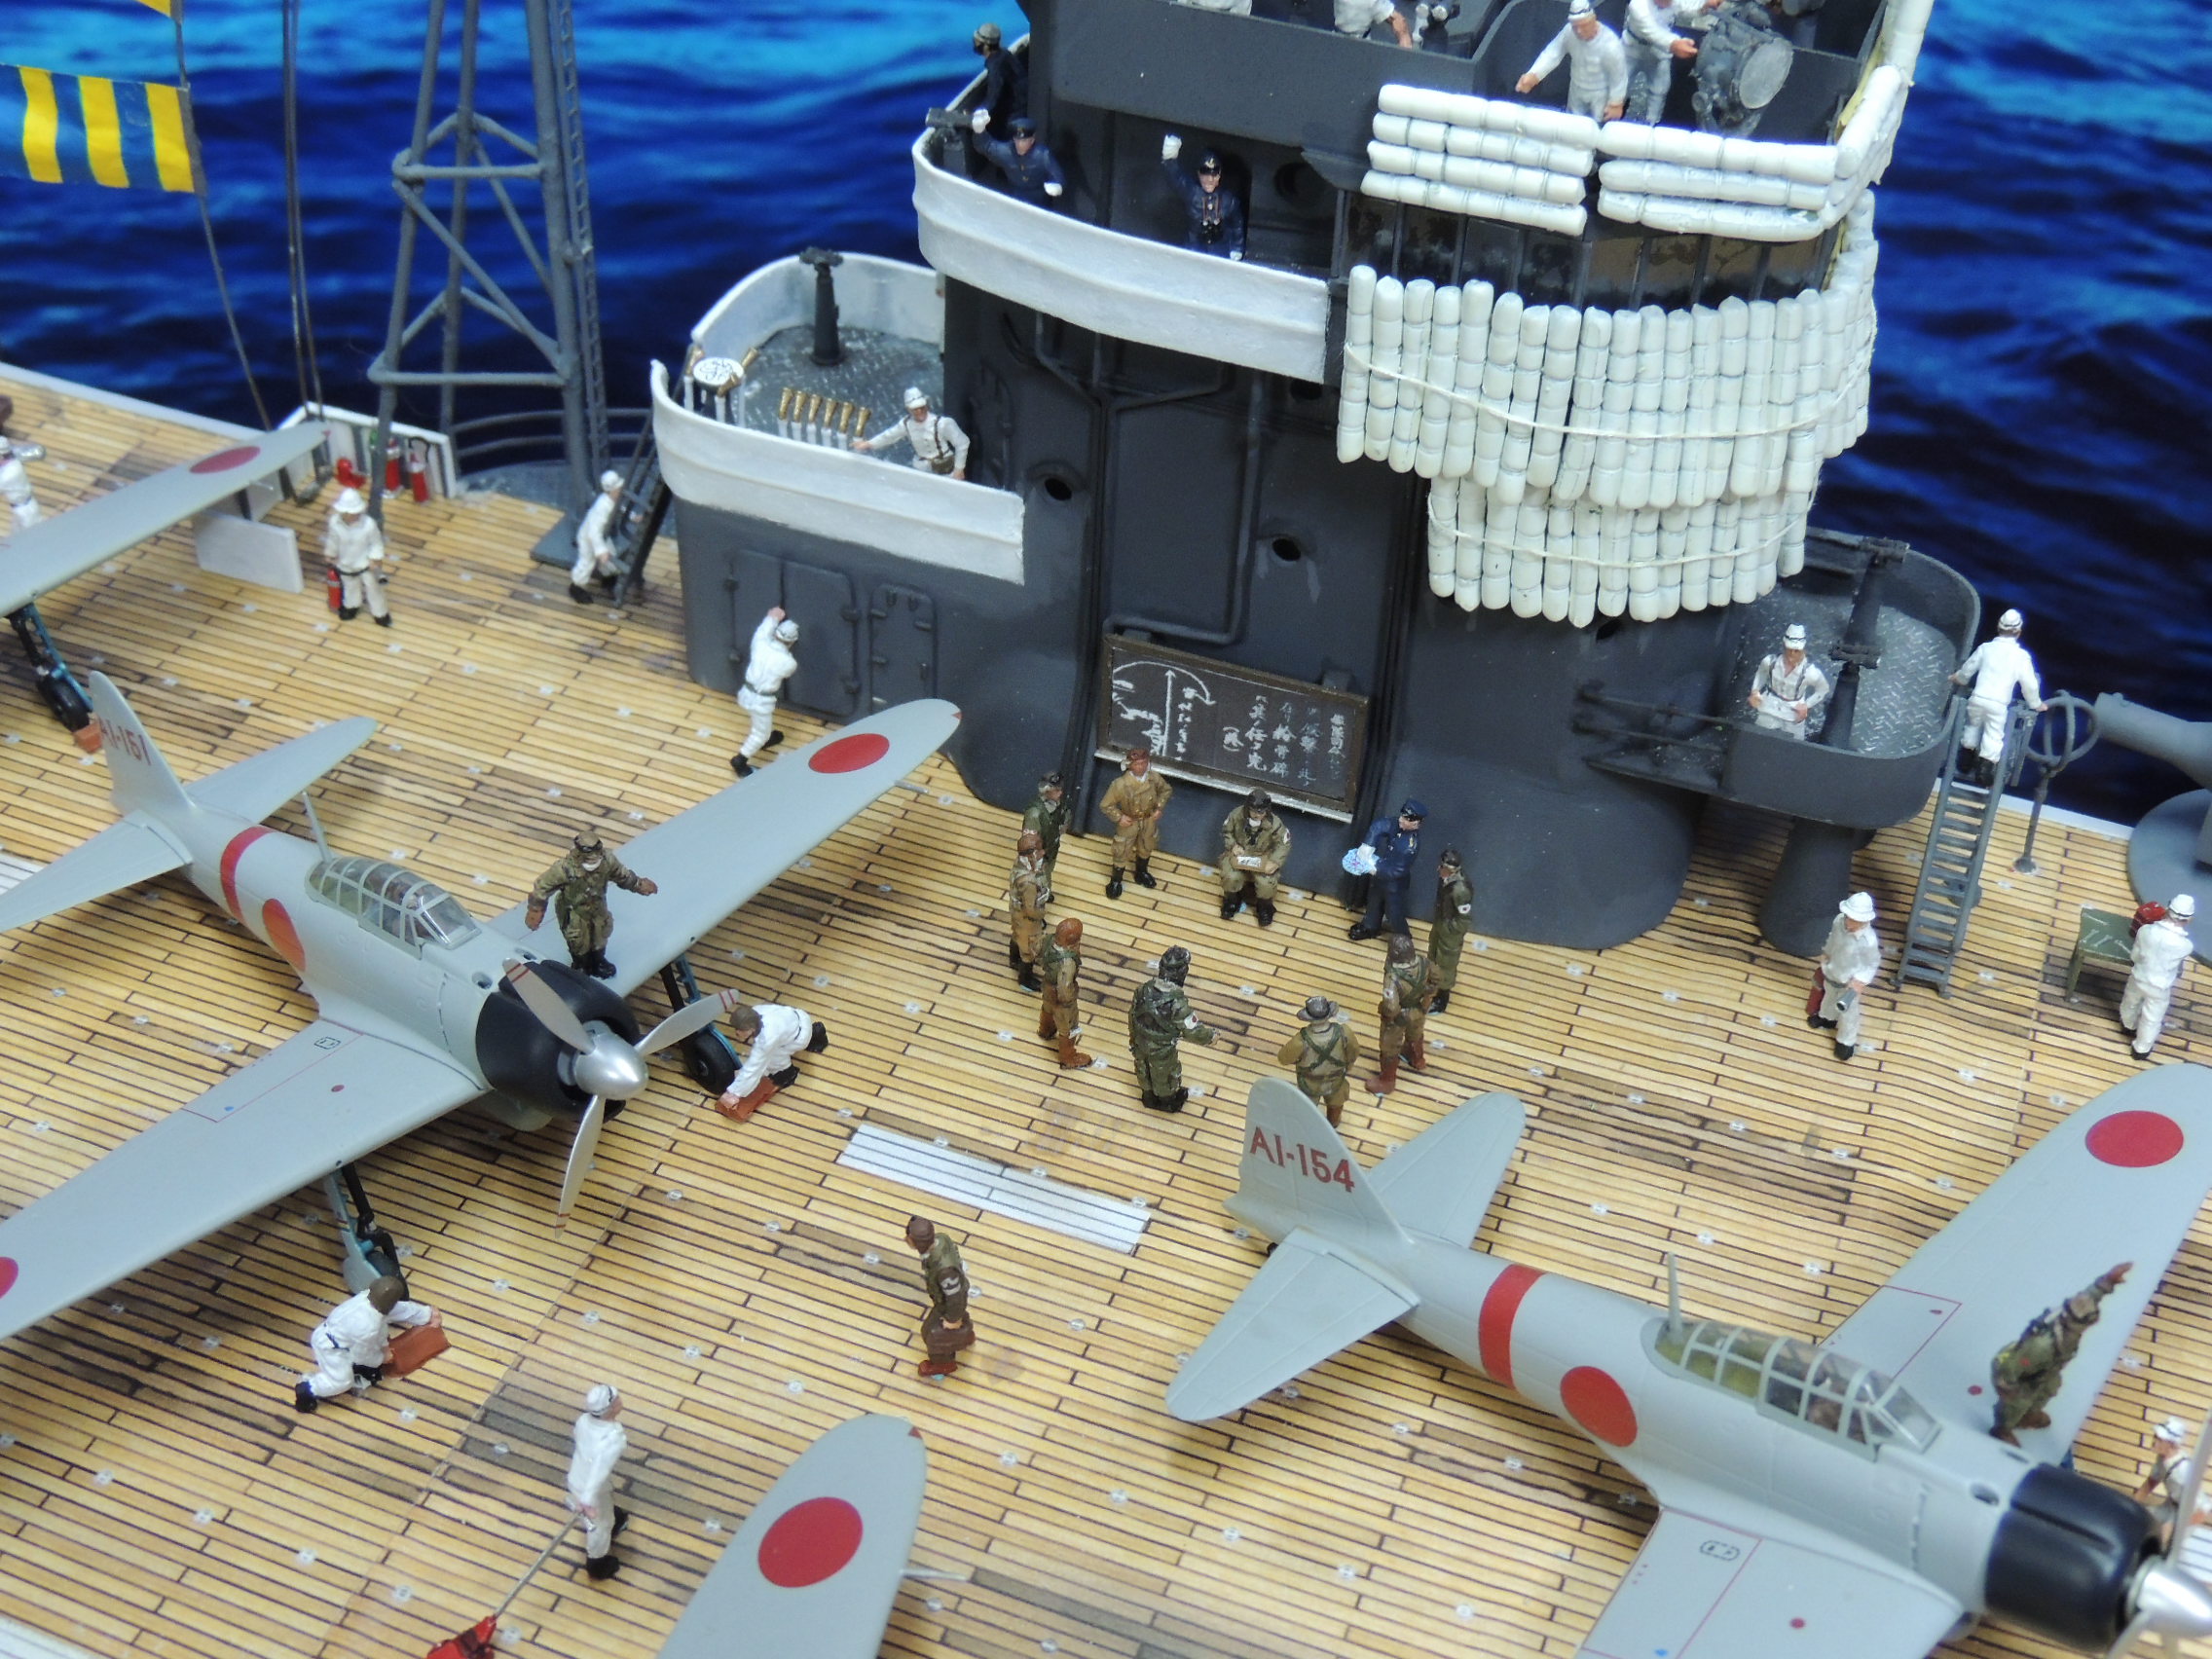
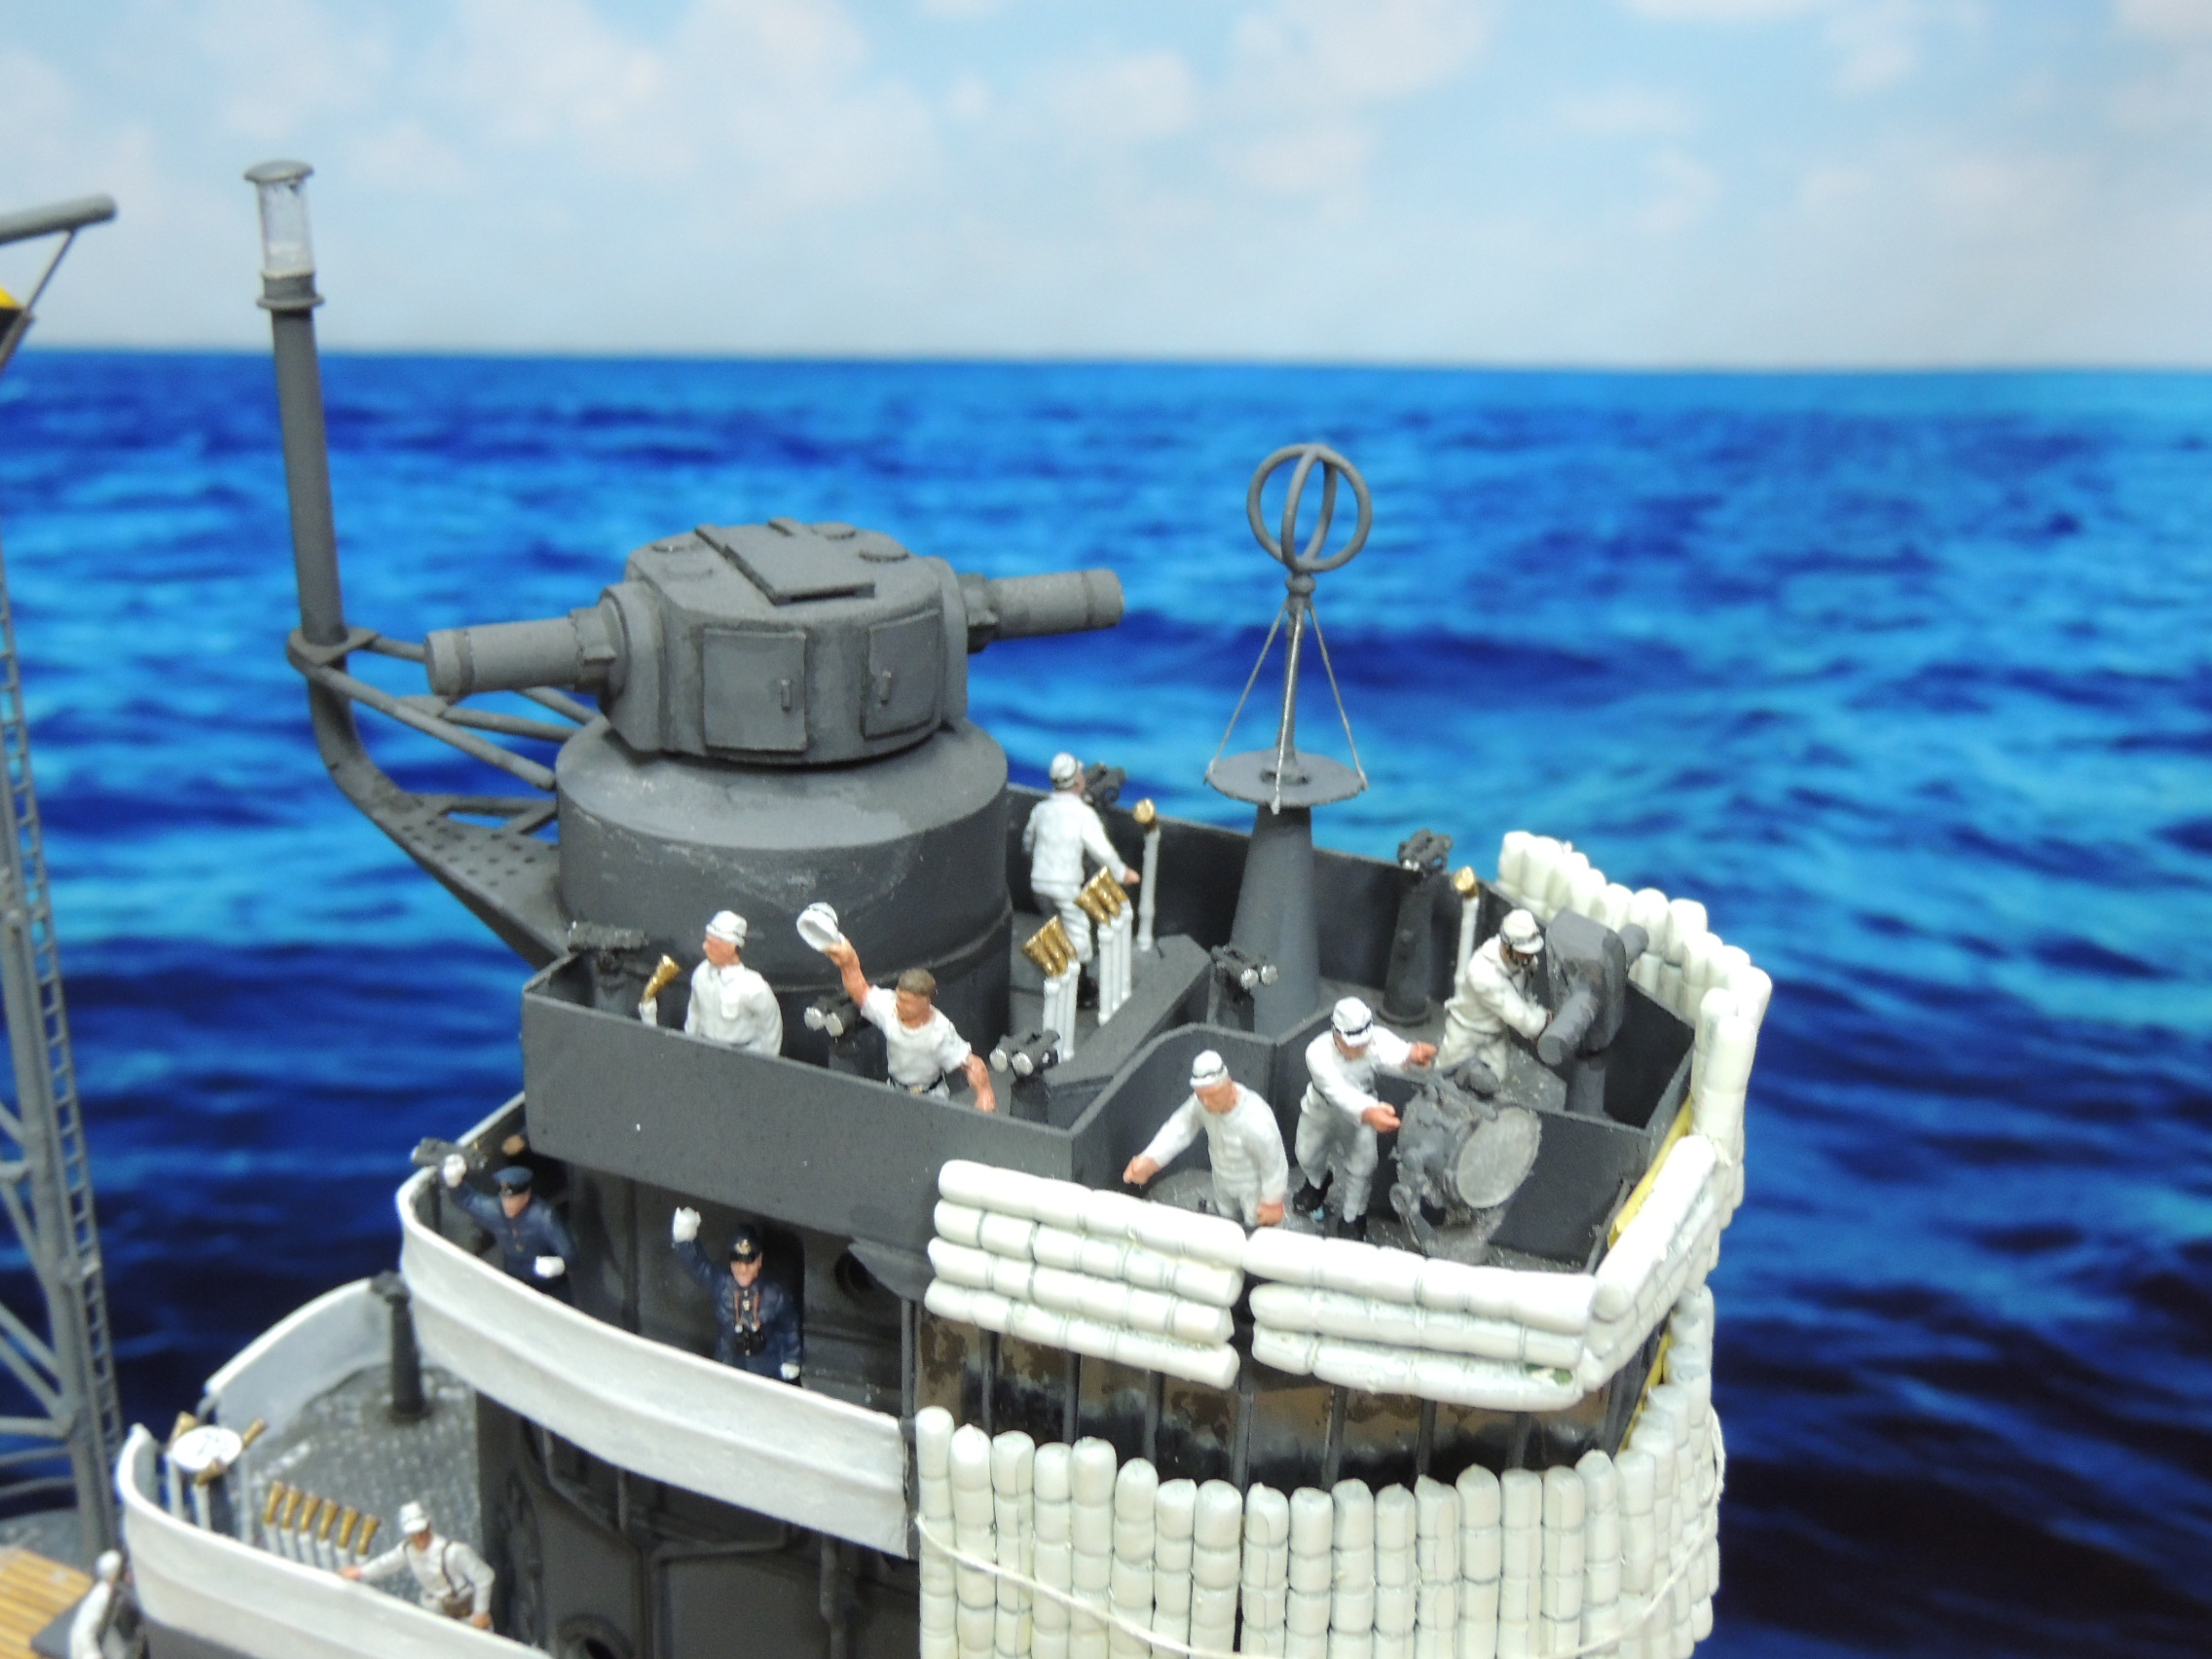
Starboard Shots
View from the Front
Portside Shots
View from the Rear
Overhead Views
Detail Shots
Lagniappe 360 Degree Video of Island
Below is a 360 degree video of the Akagi island without the futons used at Pearl Harbor to protect from shrapnel from the expected American counterattack that never materialized.
Thank you for your indulgence and I hope you enjoyed the photos and video. As always, comments, questions, corrections, and observations are welcome.
Once again I want to thank my friend and fellow collector Joe Buccellato, of NY, who painted all the best figures in this diorama. I also want to thank Tim Lau, of Maryland, who created the decals for the Zeros and gave me solid advice when I was stuck, and Chris Pflueger, of California, who gave me some great tips on photographing the diorama. I also want to acknowledge Sidnei Maneta, of Brazil, who took the time to provide great information on the Kate tail numbers, which will be covered in a future post. I’d also like to thank Sasa Drobac of Serbia, who designed the incredibly detailed 3D printed binoculars, searchlights, and rangefinders used on the island. Finally, I want to thank Ara Hagopian, of Massachusetts, whose constant encouragement provided the push I needed to actually turn my ideas into these 1/72 scale scenes.
This is Part 2.3 of a series of posts on the construction of a Pearl Harbor diorama. It will depict the Zeros of the Imperial Japanese Navy’s Akagi aircraft carrier preparing to take off during the first wave attack. This post is a follow-up to the previous post and concerns only the pre-built 1/72 scale Zeros to be used in the diorama with renumbered tail markings. To understand the concept of this diorama project, please refer to the previous posts.
The Actual Akagi Zeros
As previously mentioned, the Akagi contributed nine A6M2 Zeros to the first wave attack. As a refresher, below is a table from a previous post of the Zeros that participated in Akagi’s first wave. The Prebuilt 1/72 Scale Models
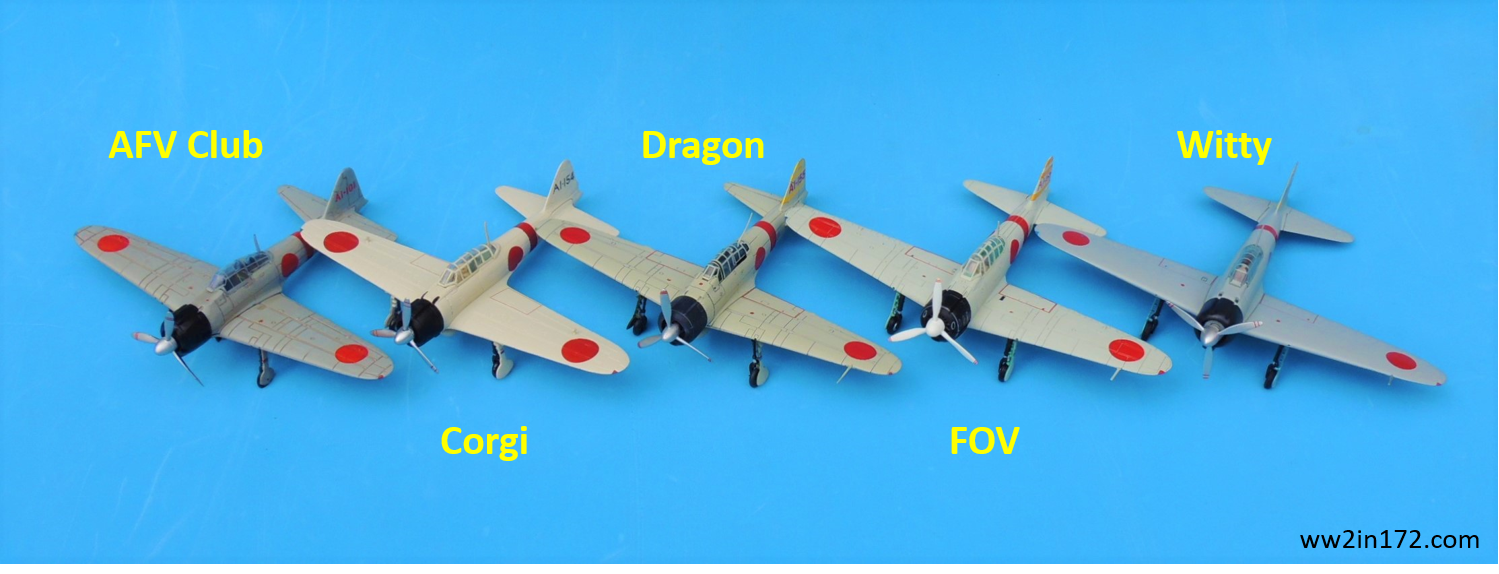
The photo below shows the prebuilt 1/72 scale Akagi Zeros currently available. It is immediately evident that of the nine actual Zeros that participated in Akagi’s first wave, only AI-155 and AI-154 have been produced in diecast. Unfortunately, the Corgi AI-154 is unusable as is, since Corgi used black, rather than red, tail numbers.The Diorama Zeros
For purposes of the diorama, the goal is to use the five models in the photo above plus four spares — two additional Wittys and two additional FOVs. Only the Dragon AI-155 will be used unmodified; the remaining eight will require new tail numbers as per the chart above. Below is a notional photo of the expected result once the decals are applied.
The Decaled Zeros
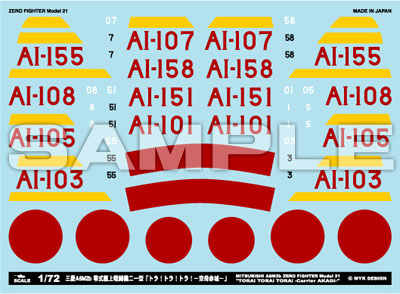
I searched extensively for MYK Design’s A-72009 Tora! Tora! Tora! Carrier Akagi 1/72 decal sheet (pictured below), since it includes five of the nine necessary tail numbers: AI-103, AI-107, AI-151, AI-155, and AI-158. (The AI-155 decal is unnecessary as I’ll be using the Dragon model that already carries that tail number.) Alas, I was unsuccessful as the sheet has been out of print for years.
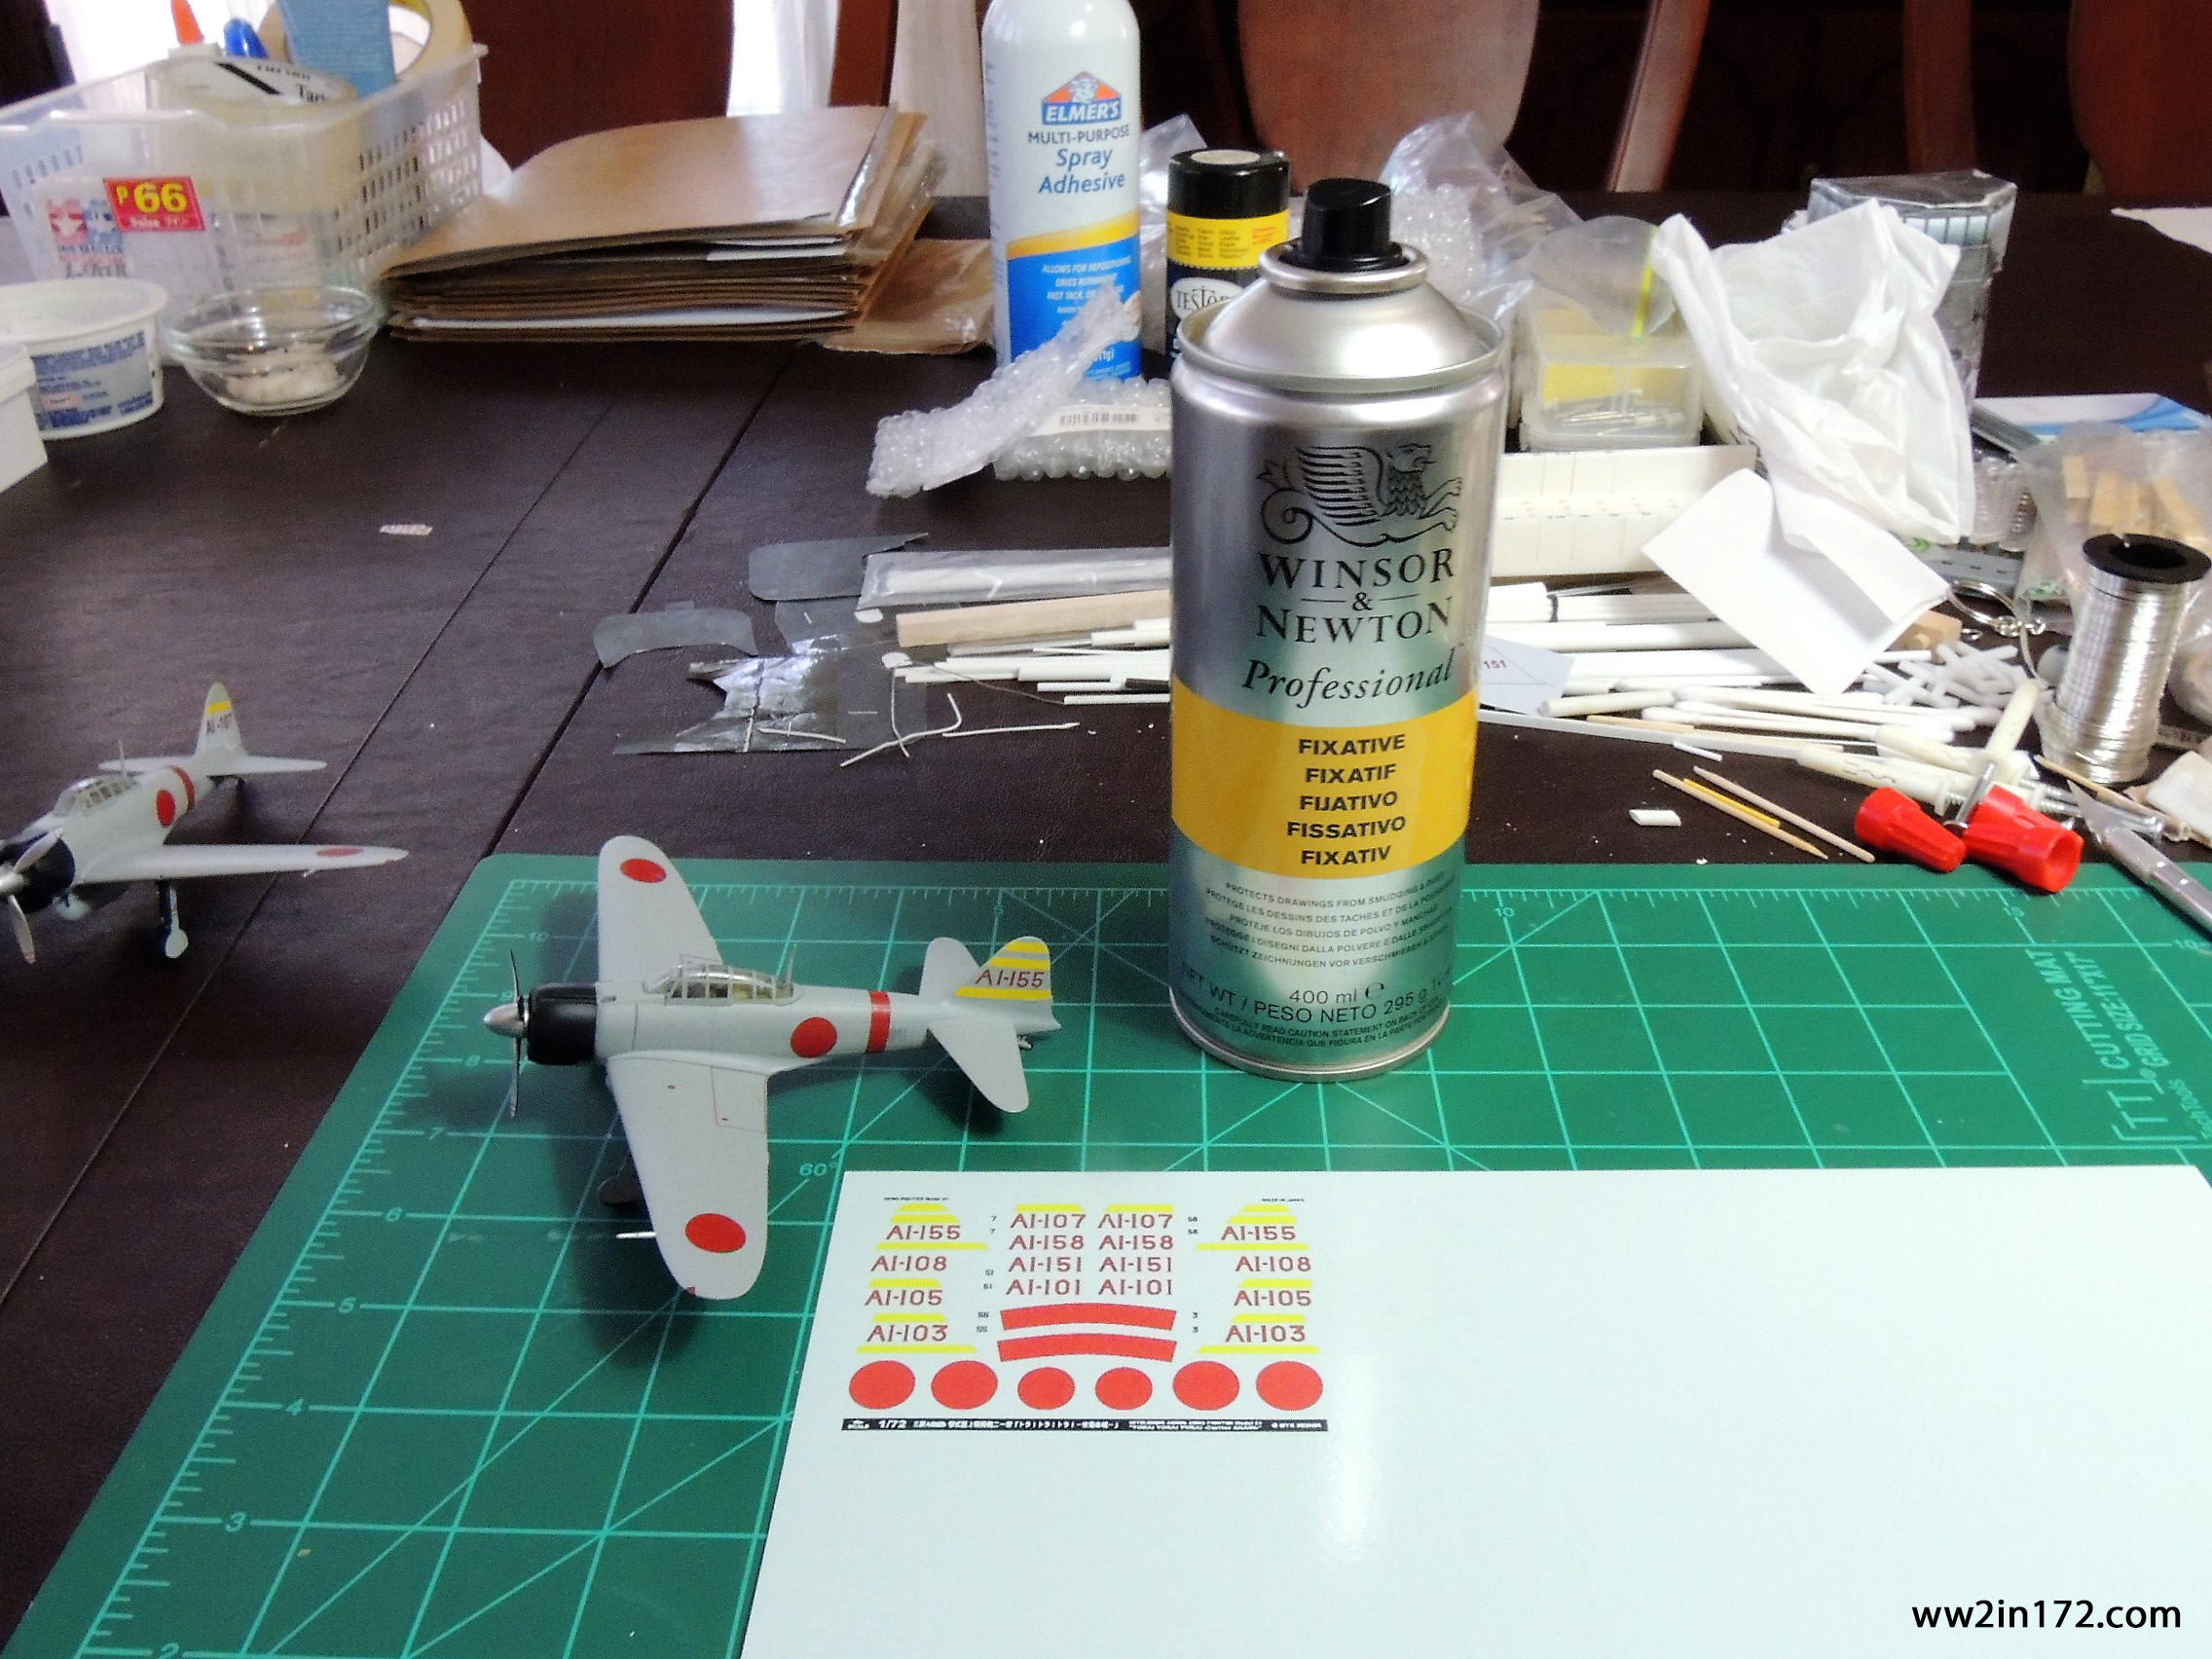
Ultimately, I had no choice but to make the decals myself. I enlarged the image at left, cleaned it up, enhanced the numbers as much as possible, and then reduced it back to 1/72 scale. I then printed the image on Micro-Mark decal paper.
To my dismay, I found that handling the decal sheet resulted in slight smudging. After rereading the decal paper directions, I reprinted the image and “fixed” it onto the sheet with Winsor & Newton fixative. Failure to apply a coat of fixative to protect the image willresult in the image smudging like lead on a pencil drawing when touched.
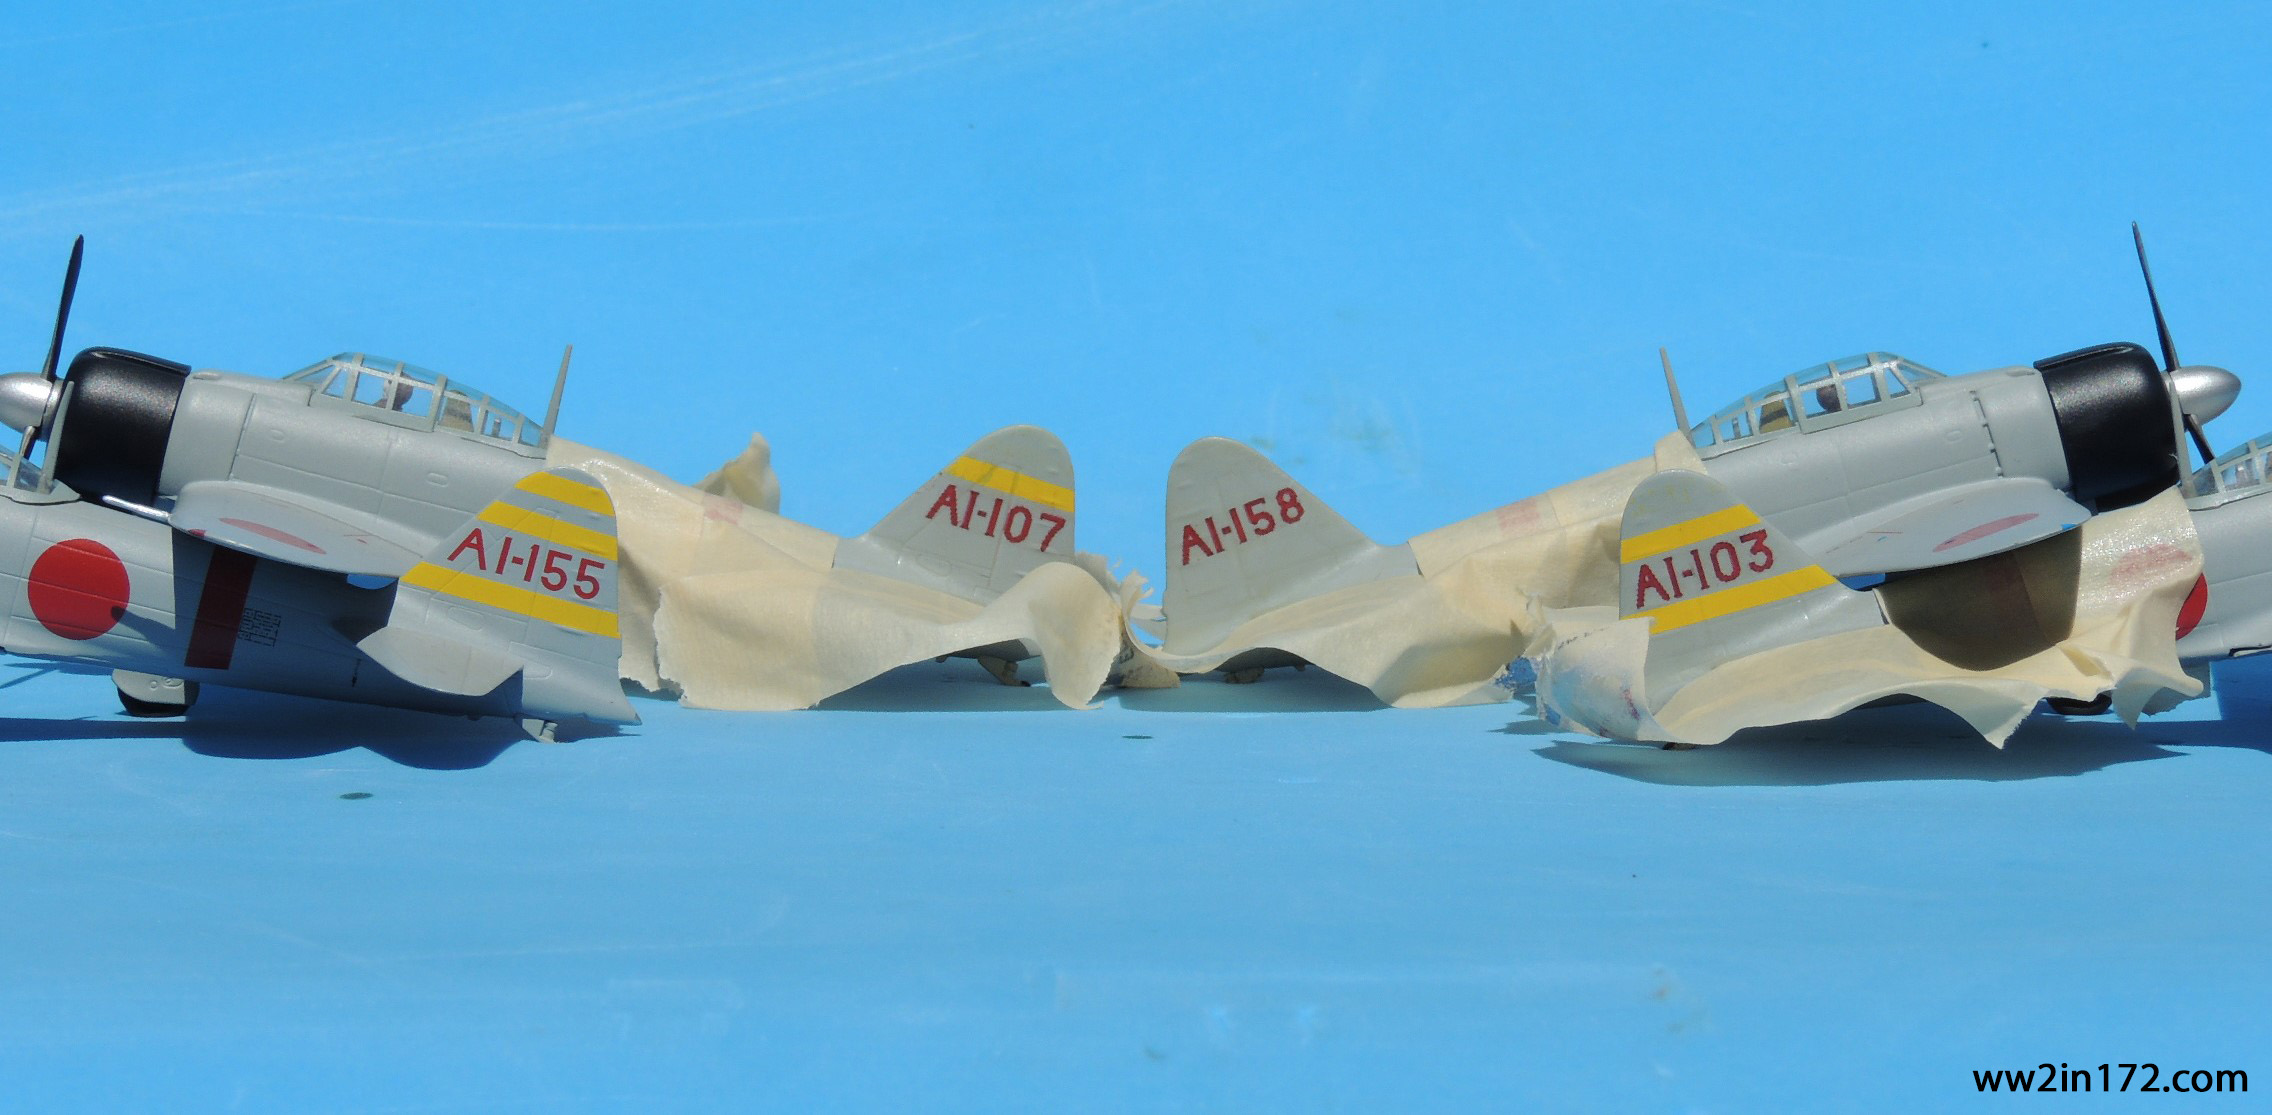
The photo below shows the decal sheet printed on the Micro-Mark decal paper after the fixative had been applied.With decals in hand, I prepared the three Witty models for application of the decals by removing the tail numbers and yellow stripes as necessary — leaving two stripes for the AI-103; one stripe for the AI-107; and no stripes for the AI-158. See photo below.
There are essentially two ways to remove the tampo markings on diecast models: 1) by scraping them off, preferably with an X-Acto #10 curved blade; or 2) by applying some sort of solvent, such as Testors 1148 thinner or standard acetone for nail polish removal. I found that a combination of the two methods worked best for me. (Note: Do not use enamel thinner on plastic models. It will ruin the plastic finish.) Once the original markings were totally removed, I applied a coat of Pledge (Future) floor finish to ensure that the decals found a glossy base that would prevent silvering. (Pledge’s self-leveling properties are amazing!) After waiting a day for the Pledge to cure, I used Micro Set and Micro Sol solutions to apply the decals.
Micro Set prepares the surface where the decal is to be applied by cutting the oils in the paint, thus allowing the decal to slide on the surface, making it easier to reposition the decal as necessary. Micro Sol softens the decal, allowing it to conform to the surface of the model, which is particularly useful on irregular surfaces such as the panel lines and ridges on the Zero tails. Using these two solutions will help make the decals look “painted-on.”
After waiting another day for the decals to dry, I again applied a coat of Pledge to completely seal the decals between two layers of Pledge. Of course, the Pledge application resulted in a glossy finish. After waiting yet another day, I sprayed the decals with Testors Dull Cote to give the tails a matte finish that matched the rest of the model. The photo below shows the results after the Dull Cote had dried.
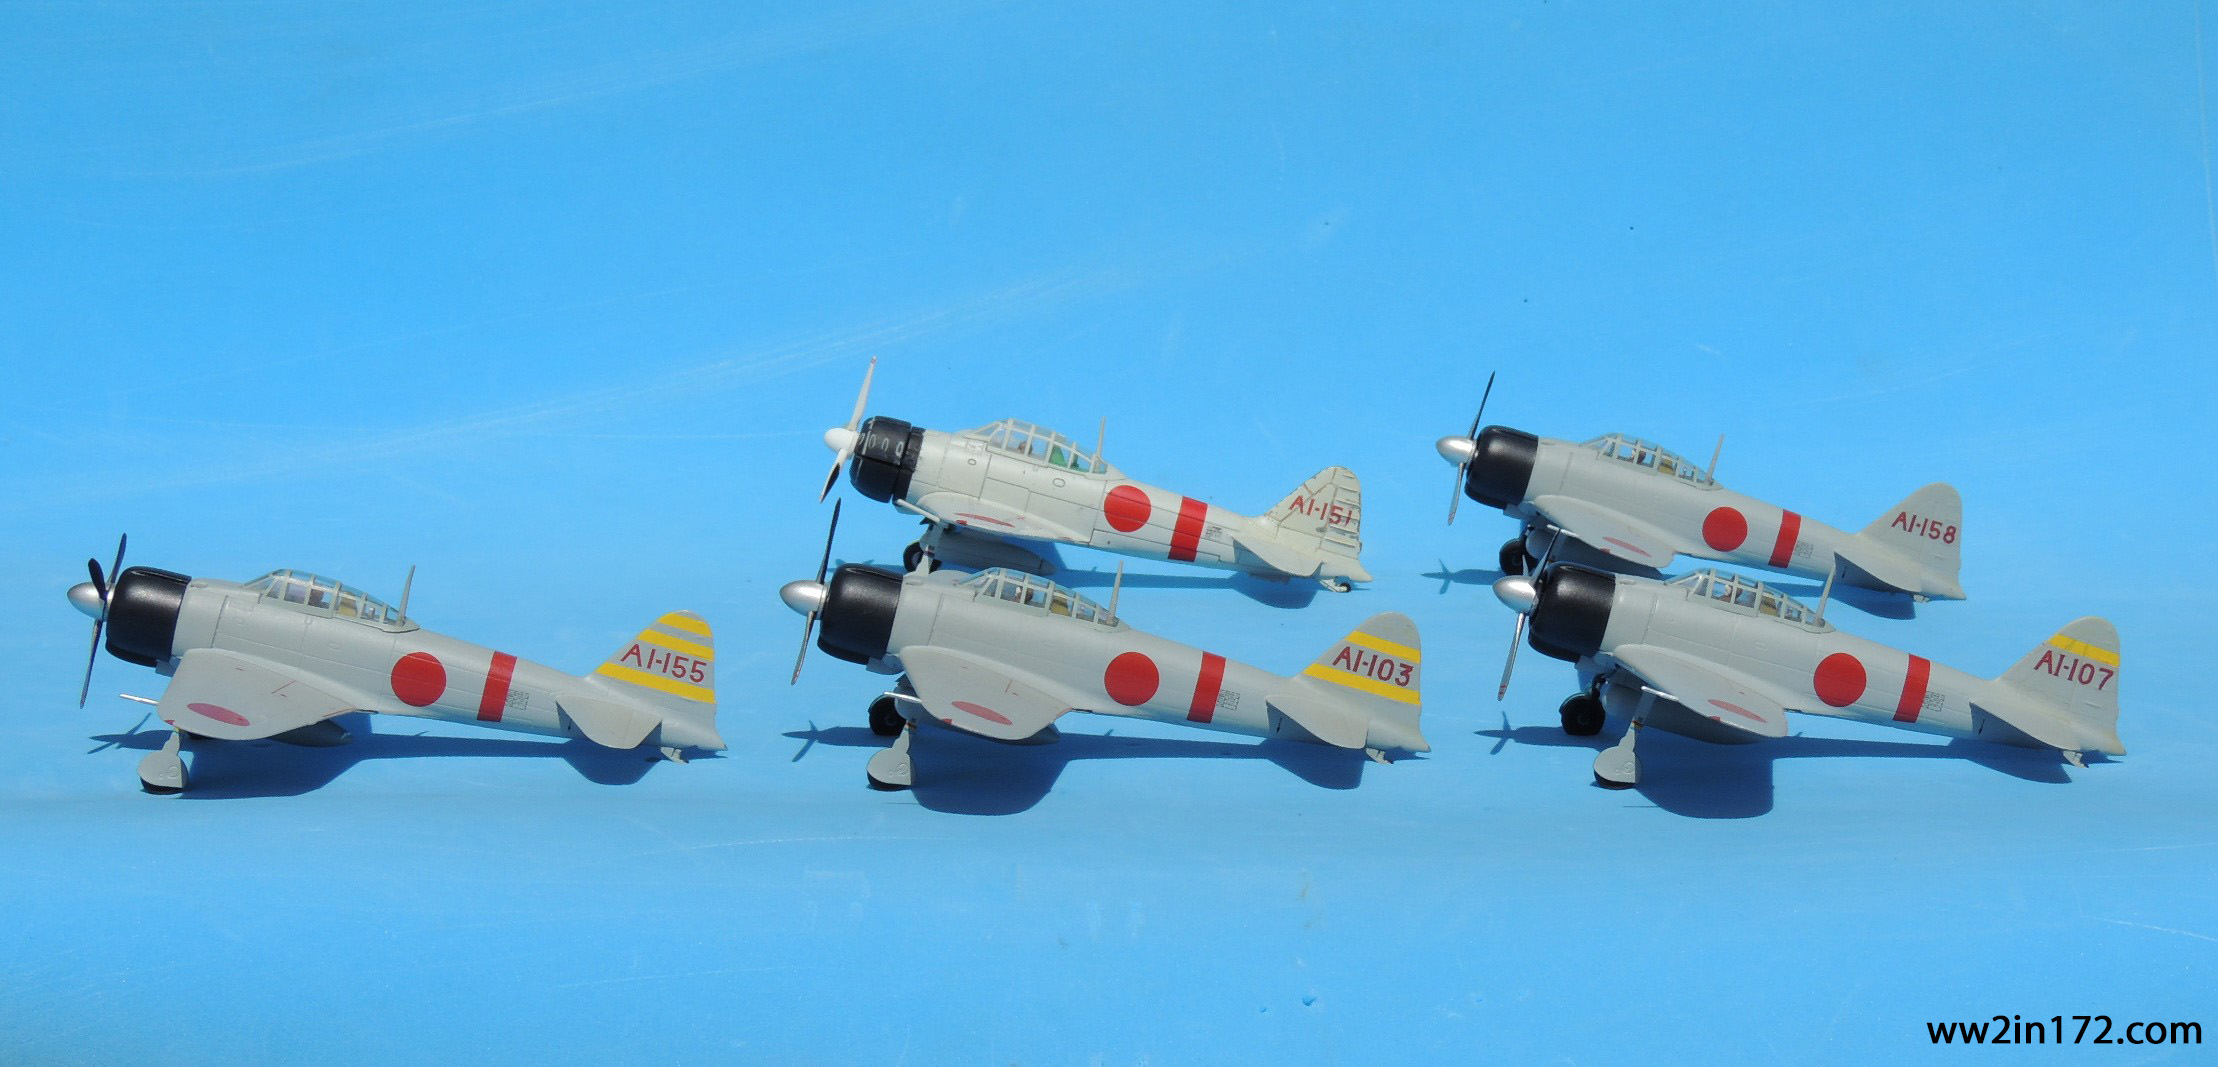
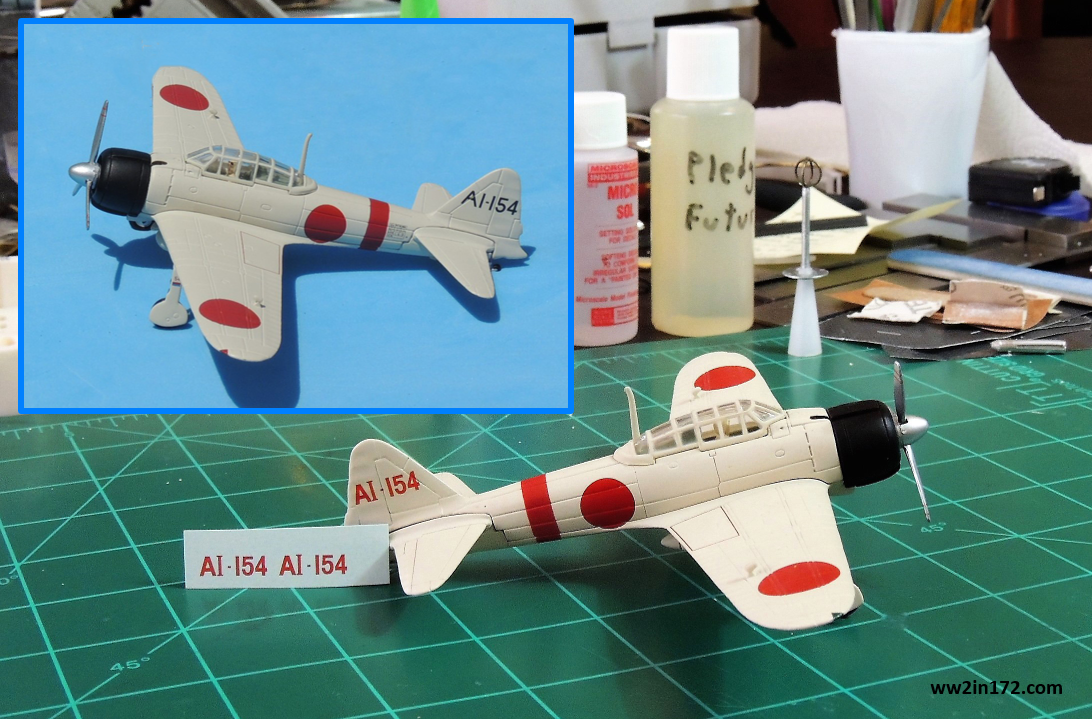
In addition to an unmodified Witty model (AI-155), the photo below shows the three decaled Witty models (AI-103, AI-107, and AI-158), plus one decaled FOV model (AI-151). Note that some paint came off the tail of the FOV when I removed the tampo markings, giving it an unintended — though not totally unwelcome — weathered look. (Yes, I’m accepting that which I cannot change. 🙂 )As previously mentioned, Corgi inexplicably applied black tail numbers to the AI-154 (see inset in the photo below), rather than the well-documented red numbers. I removed the black numbers with Testors thinner and applied a decal with correct red numbers following the process discussed above. Note that the MYK Design A-72009 decal sheet did not include the AI-154 so I made the decals using letters and numbers from different fonts to simulate the MYK Design numbers. The lagniappe photo below shows the result. I made the extra decals standing by the tail in case I botched the first application — a common occurrence, at least for me, when applying decals. To summarize, six models are now ready: the unmodified Dragon AI-155 plus five decaled planes — three Witty models (AI-103, AI-107, and AI-158), one FOV (AI-151), and one Corgi (AI-154). I’ve decided not to decal the last three (AI-152, AI-153, and AI-156) as the FOV model did not respond well to removal of the tampo markings. Instead, I’ll use paper covers using the stencil in the previous post.
I apologize for such a tedious post. I realize that except for diehard readers, discussion of the tail numbers can get repetitive and confusing. Still, I think the photos by themselves tell the story.
Again, thank you for your indulgence and I hope at least some of you enjoyed the post. If something looks amiss, please let me know. I would be delighted to correct inaccurate information so that this may be useful to other 1/72 scale collectors and wargamers. As always, comments, questions, corrections, and observations are welcome. Stay tuned for a brief discussion of the Zero pilots who participated in Akagi’s first wave attack in the next post.
This is Part 2.2 of a series of posts on the construction of a diorama depicting the Zeros of the Imperial Japanese Navy’s Akagi aircraft carrier preparing to take off as part of the first wave attack on Pearl Harbor. Providing the history of the Zero or its technical details is beyond the scope of this article. This post concerns only the prebuilt 1/72 scale Zeros to be used in the diorama. To understand the concept of this diorama project, please refer to the previous posts.
The Actual Akagi Zeros
As previously mentioned, the Akagi contributed nine A6M2 Zeros and 27 B5N2 Kates to the first wave attack. As a refresher, below is a table from a previous post of the Zeros that participated in Akagi’s first wave. As is readily apparent, the tail numbers are all in the AI-150’s except for AI-103 and AI-107. Up to this point, I had deliberately avoided discussing the tail numbers as creating the correct numbers will be one of the more difficult parts of this project, as discussed below. The Prebuilt 1/72 Scale Models
The photo below shows the prebuilt 1/72 scale Akagi Zeros currently available.* It is immediately evident that of the nine actual Zeros that participated in Akagi’s first wave, only AI-155 and AI-154 have been produced in diecast. AI-155 — Shigeru Itaya’s Zero — has been produced by Dragon, Forces of Valor, and Witty. A review of each can be found by clicking on the name of the manufacturer. A short biography of Itaya is also available by clicking on his name. AI-154 has been produced by Corgi. Unfortunately, despite all evidence to the contrary, Corgi inexplicably used black tail numbers rather than red numbers, for which there is abundant proof. AFV Club also produced an Akagi Zero — the AI-101 — that participated in the second wave. For the sake of completeness, it will be used in this project so collectors may compare models from all five manufacturers that have thus far produced an Akagi Zero. The Diorama Zeros
For purposes of the diorama, the goal is to use the five models in the photo above plus four duplicates. The challenge is to create models with all of Akagi first wave numbers other than AI-155. Even AI-154 will be required as the tail number must be in red. The idea is to scrape off the original painted numbers and replace them with appropriate decals so that they match the table above. As thus far I have been unsuccessful in finding the decals, I made a stencil of the tail to cover the tail numbers in the interim. I then scanned the color of each model and applied it to the tail stencil. Matching base colors proved more difficult than I had anticipated.
For those interested in how the colors of the five manufacturers compare, below is a plate showing a scan of each model’s base color. The color of the Corgi model is actually beige and the inset at left matches the model reasonably well. I’m perplexed, however, by the difference in the color of the Corgi model in the photos and conclude it’s due to the lighting. The FOV and Witty colors look very similar but that’s as close to the models as the scanner could make them. Once I made stencils for all five colors, I covered the tail of each model with a new number.The lagniappe photo below provides a notional idea of the intended result. At this point, the tail numbers appear to be a weak part of the project. That will change, however, once the decals are applied. Again, thank you for your indulgence and I hope you enjoyed the post. If something looks amiss, please let me know. I would be delighted to correct inaccurate information so that this may be useful to other 1/72 scale collectors and wargamers. As always, comments, questions, corrections, and observations are welcome. Stay tuned for photos of the models once the decals are applied.
* Witty also produced AI-101 and AI-102 but both were used in the second wave and, except for the tail numbers, are identical to the AI-155. While Atlas/Oxford (same casting) also produced aircraft carrier A6M2 Zeros, they did not make an Akagi Zero. Instead, Atlas produced a model from the Kaga while Oxford produced one from the Ryujo.
This is Part 2.1 of a series of posts on the construction of a diorama depicting the Zeros of the Imperial Japanese Navy’s Akagi aircraft carrier preparing to take off as part of the first wave attack on Pearl Harbor. This post concerns only prebuilt 1/72 scale models depicting Zeros from the Akagi. To understand the concept of this diorama project, please refer to the previous two posts.
Prebuilt 1/72 Scale Akagi Zeros
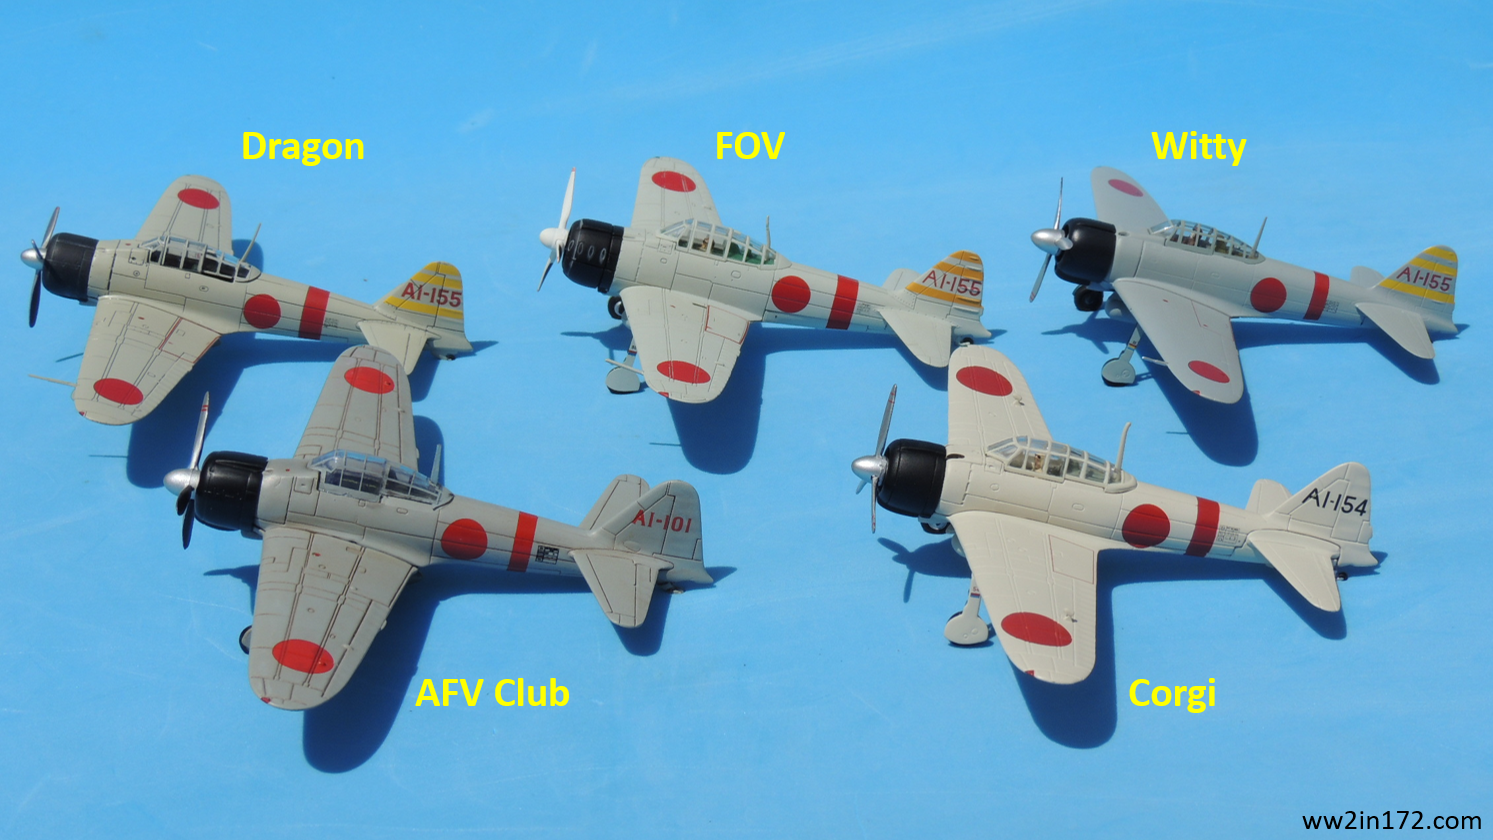
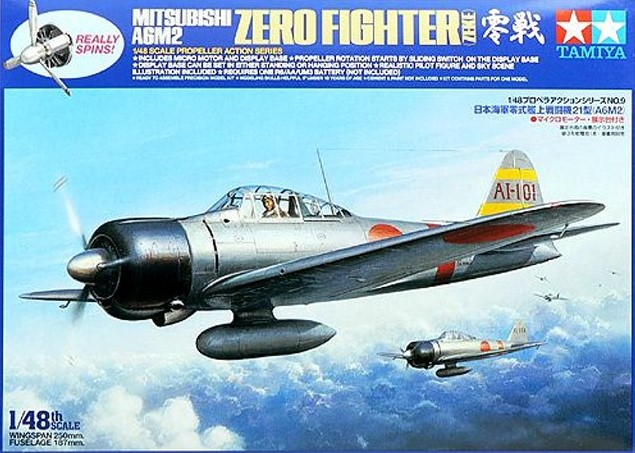
As I’ve indicated in the past, I lack the modeling skills to build the aircraft necessary for this diorama. Thus, I’ll be using nine prebuilt diecast 1/72 planes. To my knowledge, five manufacturers — AFV Club, Corgi, Dragon Wings, Forces of Valor, and Witty Wings — have tried their hand at producing models of the A6M2 Zero — the version of the Zero used at Pearl Harbor — specifically representing Zeros from the Akagi.*
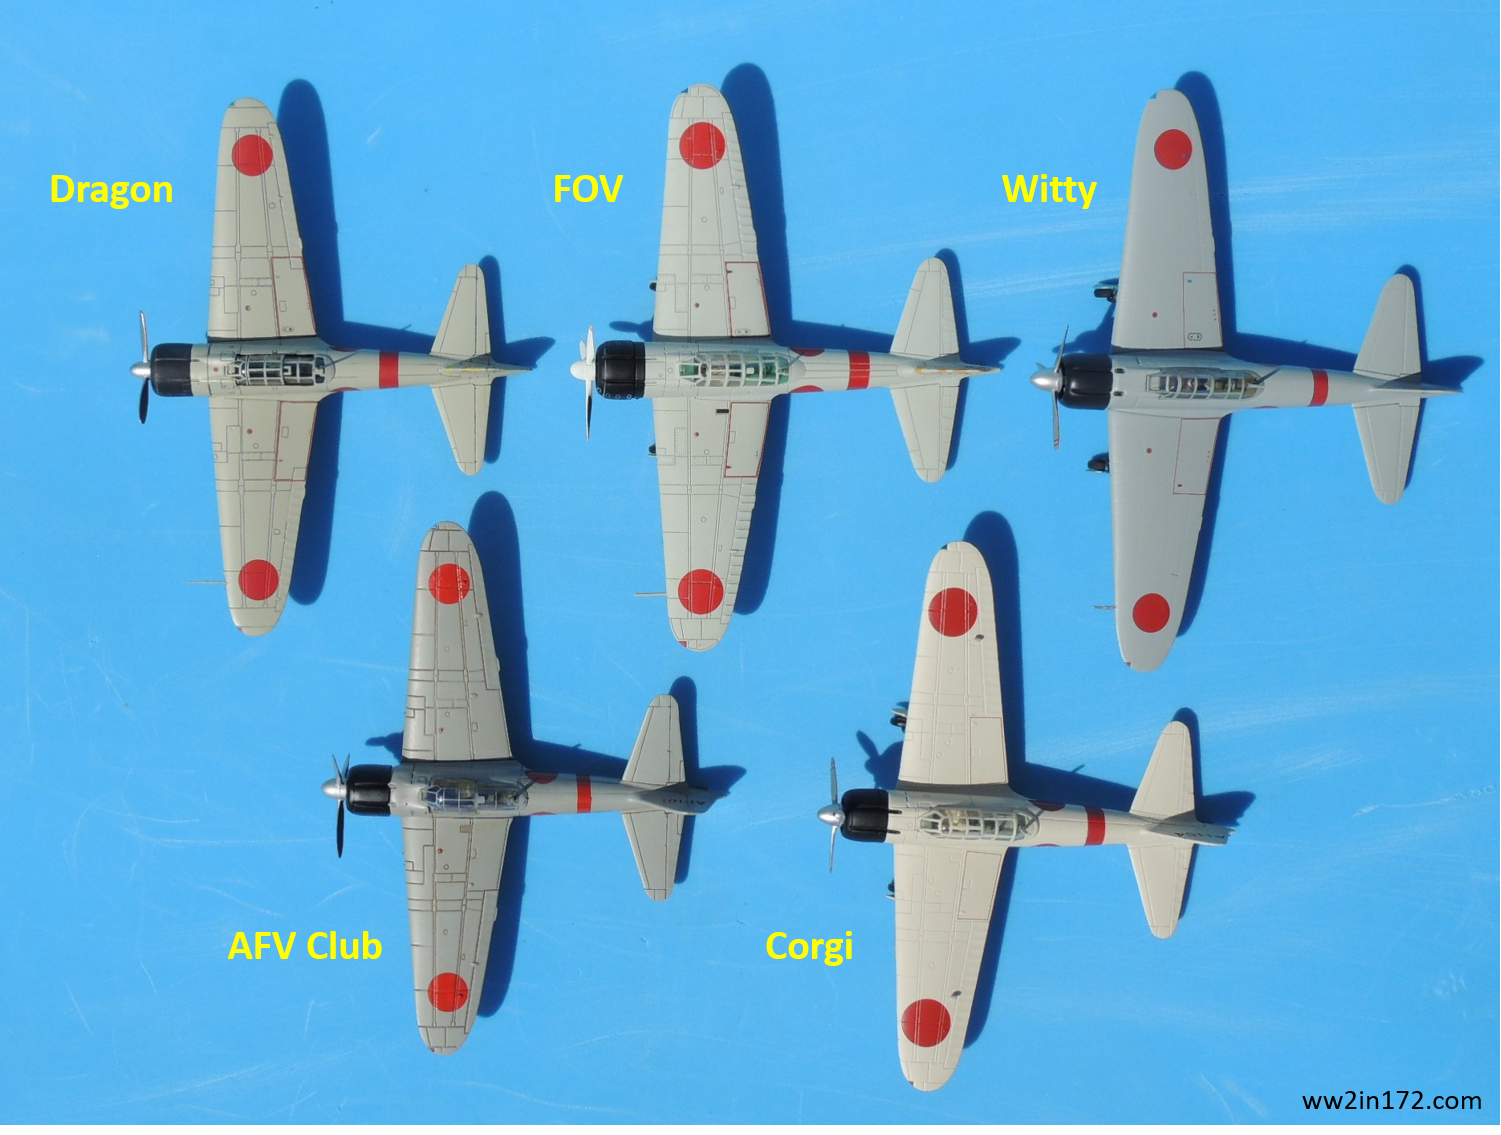
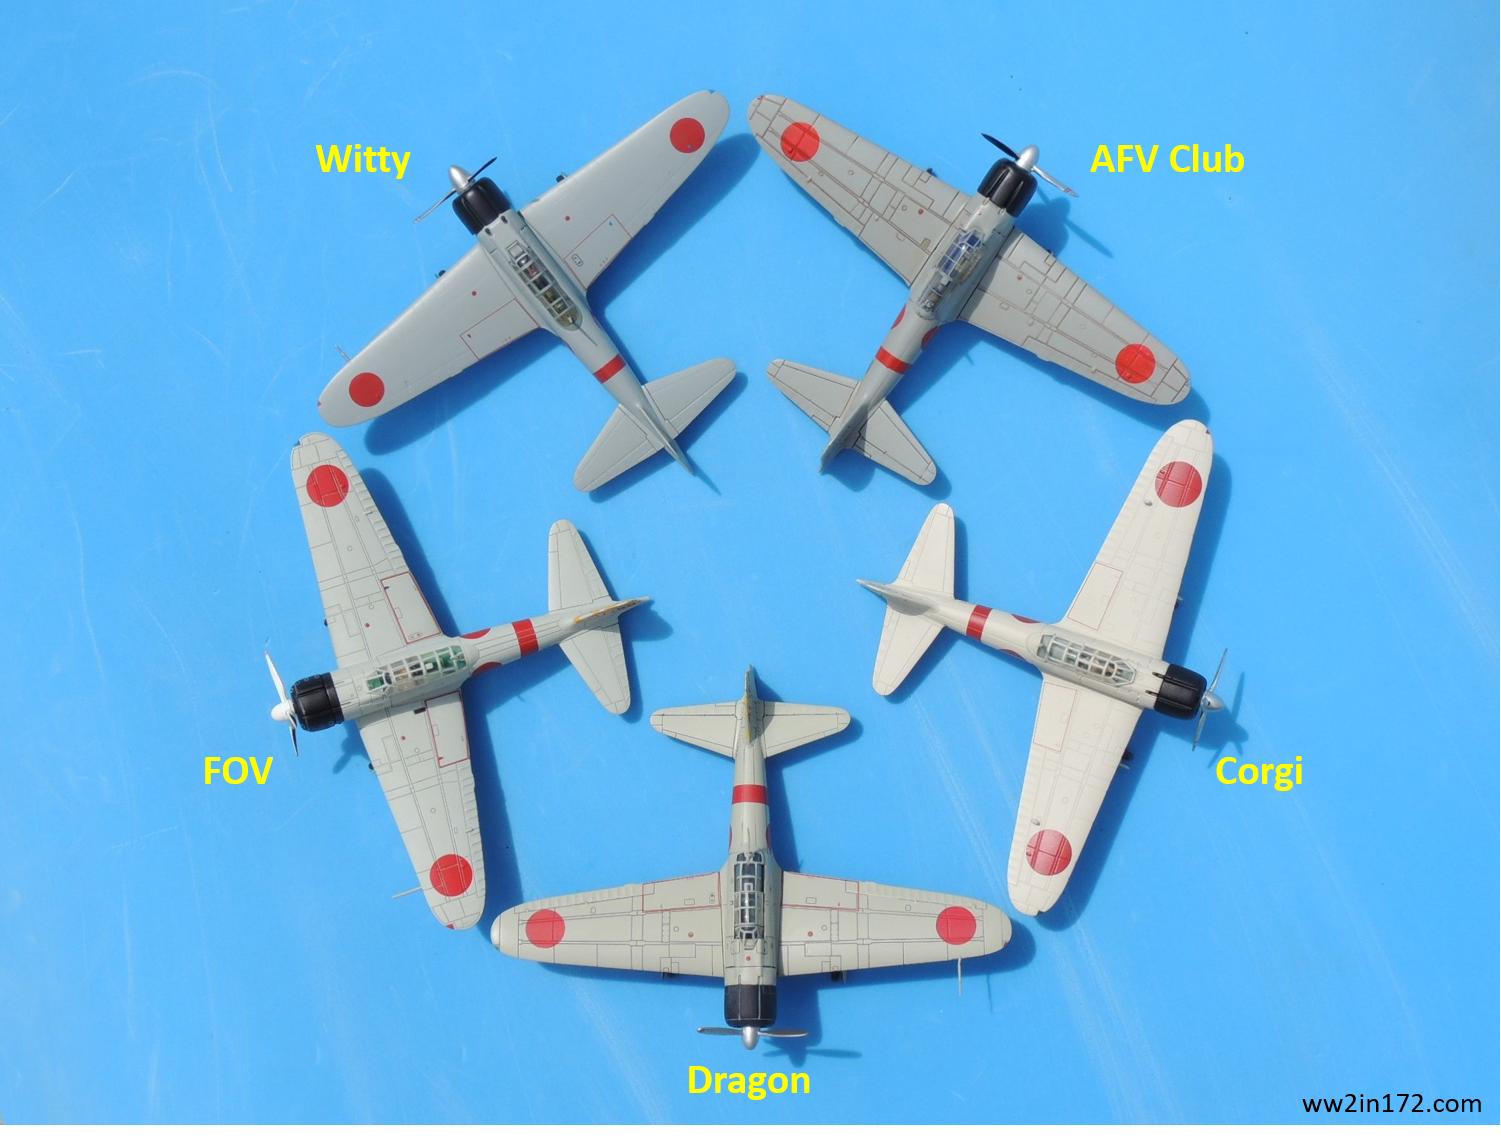
The photo below shows the Akagi Zero models from the five aforementioned manufacturers, in alphabetical order from left to right. Note the difference in the base color, which reflects the continuing debate over the true color of the actual Zeros.Below is an overhead shot of the five models. Note that the AFV Club and Dragon models have “inked” panel lines, burnt umber and black, respectively, which make the lines stand out. By contrast, the panel lines on the Witty, which are widely considered to be close to scale, are barely visible. My preference is the middle route taken by both Corgi and FOV — while their panel lines may be overscaled, the fact that they were not inked results in a Goldilocks look.Finally, the lagniappe overhead shot below allows better comparison of dimensions. As is apparent from the photo, the difference in dimensions is de minimis (couldn’t resist the alliterative flourish). Ultimately, however, the reader can make that judgment.For purposes of the diorama, the plan is to use these five prebuilt models plus four duplicates to complete the nine Zeros in Akagi’s first wave. Since these manufacturers combined have produced only the AI-154 and AI-155, the project will require disguising the tail numbers so that they match the nine tail numbers used on the Akagi (see table in previous post). That is the subject of the next post.
Again, thank you for your indulgence and I hope you enjoyed the post. If something looks amiss, please let me know. I would be delighted to correct inaccurate information so that this may be useful to other 1/72 scale collectors and wargamers. As always, comments, questions, corrections, and observations are welcome. As mentioned, stay tuned to see these Zeros with the nine new tail numbers in the next post.
* While Atlas Editions and Oxford Diecast also produced A6M2 Zeros for aircraft carriers, neither made an Akagi Zero. Atlas produced a model belonging to the Kaga aircraft carrier (AII-105). Using the same Atlas casting, Oxford Diecast later produced an A6M2 Zero model belonging to the Ryujo aircraft carrier (DI-108). In any case, the Atlas/Oxford models are wheels-up only (wheels are molded retracted into the lower fuselage), requiring a stand and making it difficult to pose them next to other models.
This is Part 2 of a series of posts on the construction of a diorama depicting the Zeros of the Imperial Japanese Navy’s Akagi aircraft carrier preparing to take off as part of the first wave attack on Pearl Harbor. Providing the history of the Zero or its technical details is beyond the scope of this article. This post concerns only the tail numbers of the Zeros of Akagi’s first wave. To understand the concept of this diorama project, please refer to the previous post.
The Akagi Zeros and Their Tail Numbers
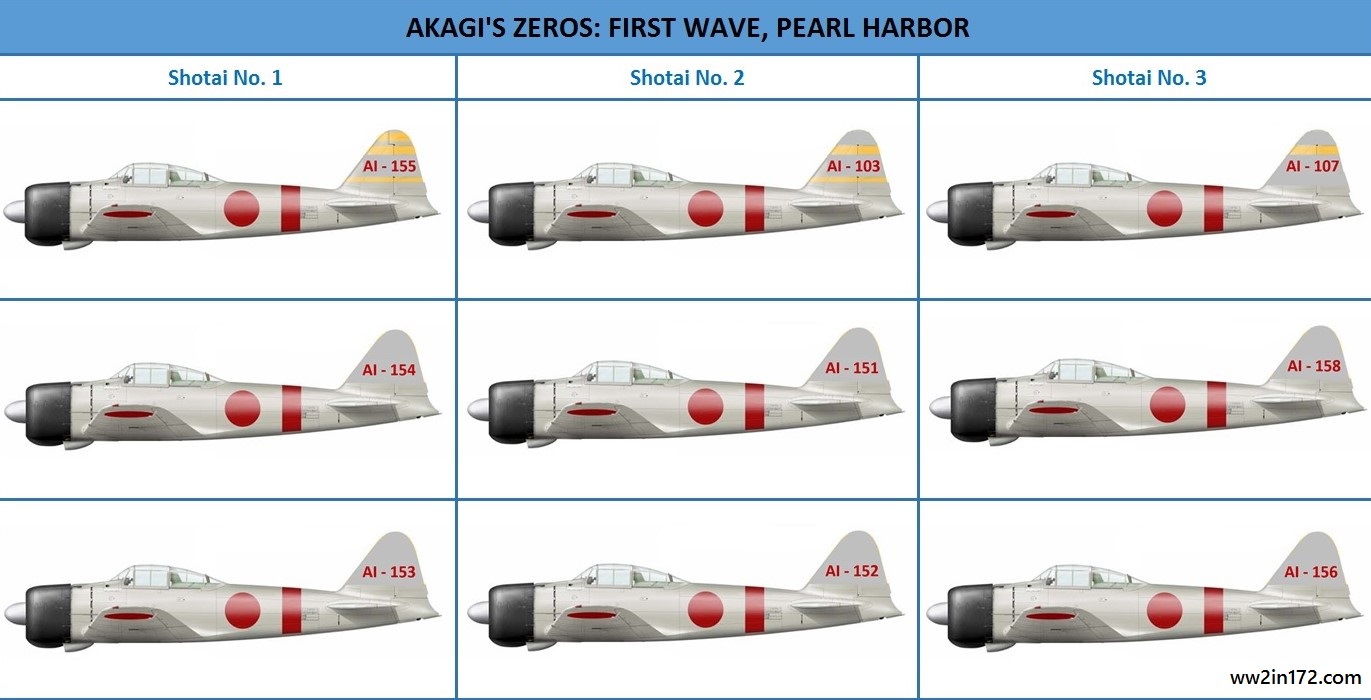
As previously mentioned, the Akagi contributed nine Zeros and 27 Kates to the first wave attack. Below is a photo of the Zeros on the deck of the Akagi just prior to take-off.To create the diorama, it is necessary to determine what tail numbers were used in the first wave. In the aftermath of WWII, there was some controversy and confusion concerning the tail numbers of the various aircraft that participated in the attack and whether they were in the first or second wave. Plastic model manufacturers, including Tamiya, even issued models of the AI-101 Zero with yellow command stripes. Photos later proved conclusively that the AI-101 did not carry the horizontal yellow command stripes on the tail and, in fact had participated in the second wave, not the first. Further research shed more light on the tail numbers and at this point the issue is mostly settled.
The table below provides context regarding where each of the Zeros fit within the organizational framework of Akagi’s aircraft. As in the past, I created the table for learners like me who want to visualize where a small piece fits into a larger whole. As I’ve previously made clear, I’m just an amateur enthusiast (redundancy intended) so please use the table at your own risk. I relied on a number of sources, particularly Peter Smith’s Mitsubishi Zero, photos of an Akagi display at the USS Arizona Memorial Museum, and bits and pieces from the internet. Note that the squadron was made up of three flights (shotai) of three aircraft each. The Zeros with horizontal yellow stripes led each three-plane flight. The two Zeros below each yellow-striped Zero belonged to the shotai’s wingmen, in order of rank. For purposes of the diorama, I will be using nine prebuilt models made by AFV Club, Corgi, Dragon Wings, Forces of Valor, and Witty Wings.
Again, thank you for your indulgence and I hope you enjoyed the post. If something looks amiss, please let me know. I would be delighted to correct inaccurate information so that this may be useful to other 1/72 scale collectors and wargamers. As always, comments, questions, corrections, and observations are welcome. Stay tuned for a photo overview of prebuilt 1/72 scale Zero models made specifically for the Akagi to be used in the diorama.
I derive more pleasure from my models when they’re combined with appropriate figures and placed in historically accurate settings — obviously within the limitations posed by 1/72 scale. Thus, I was eager to place the Zeros in my collection in a diorama recreating the scene on the Akagi aircraft carrier as its first wave prepared to take off for the attack on Pearl Harbor. This series of posts concerns the construction of such a diorama.
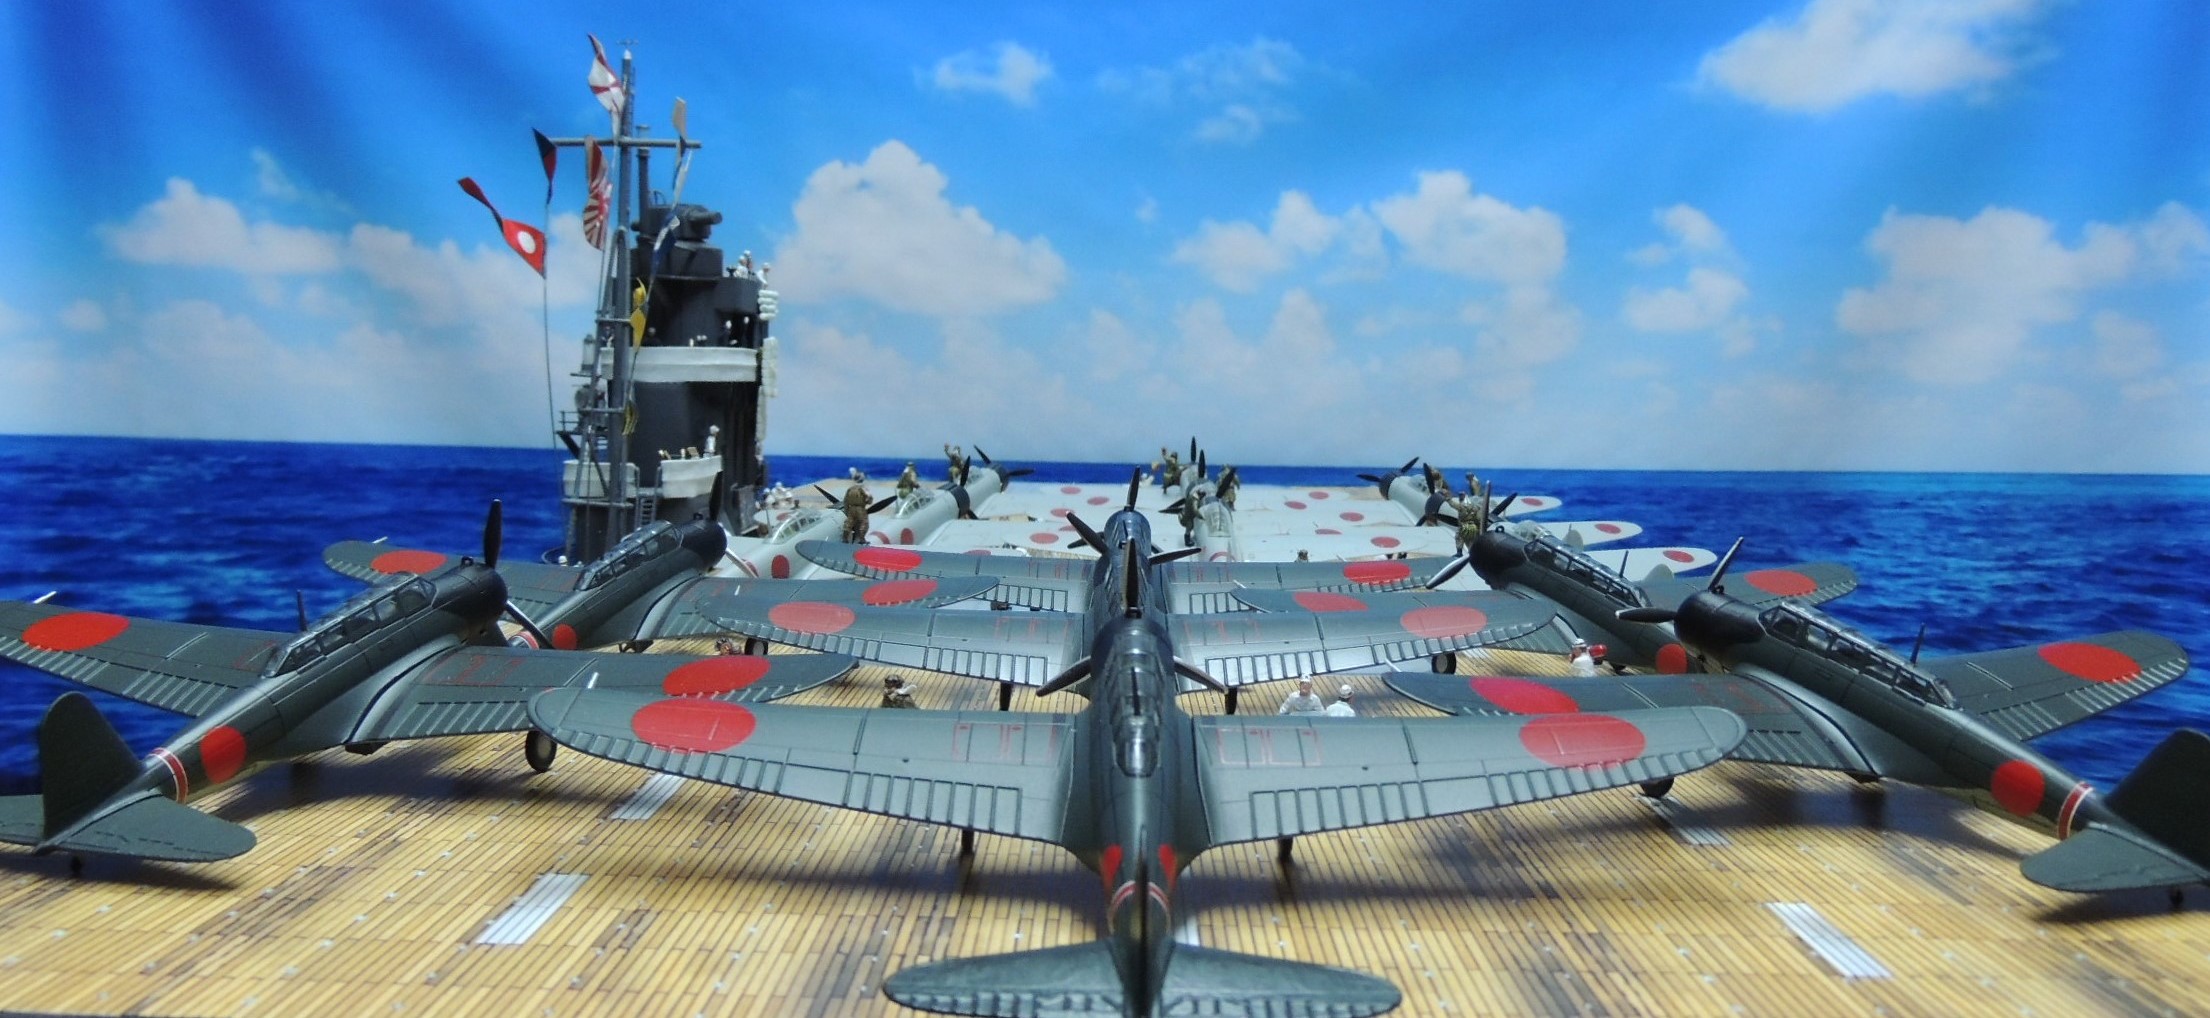
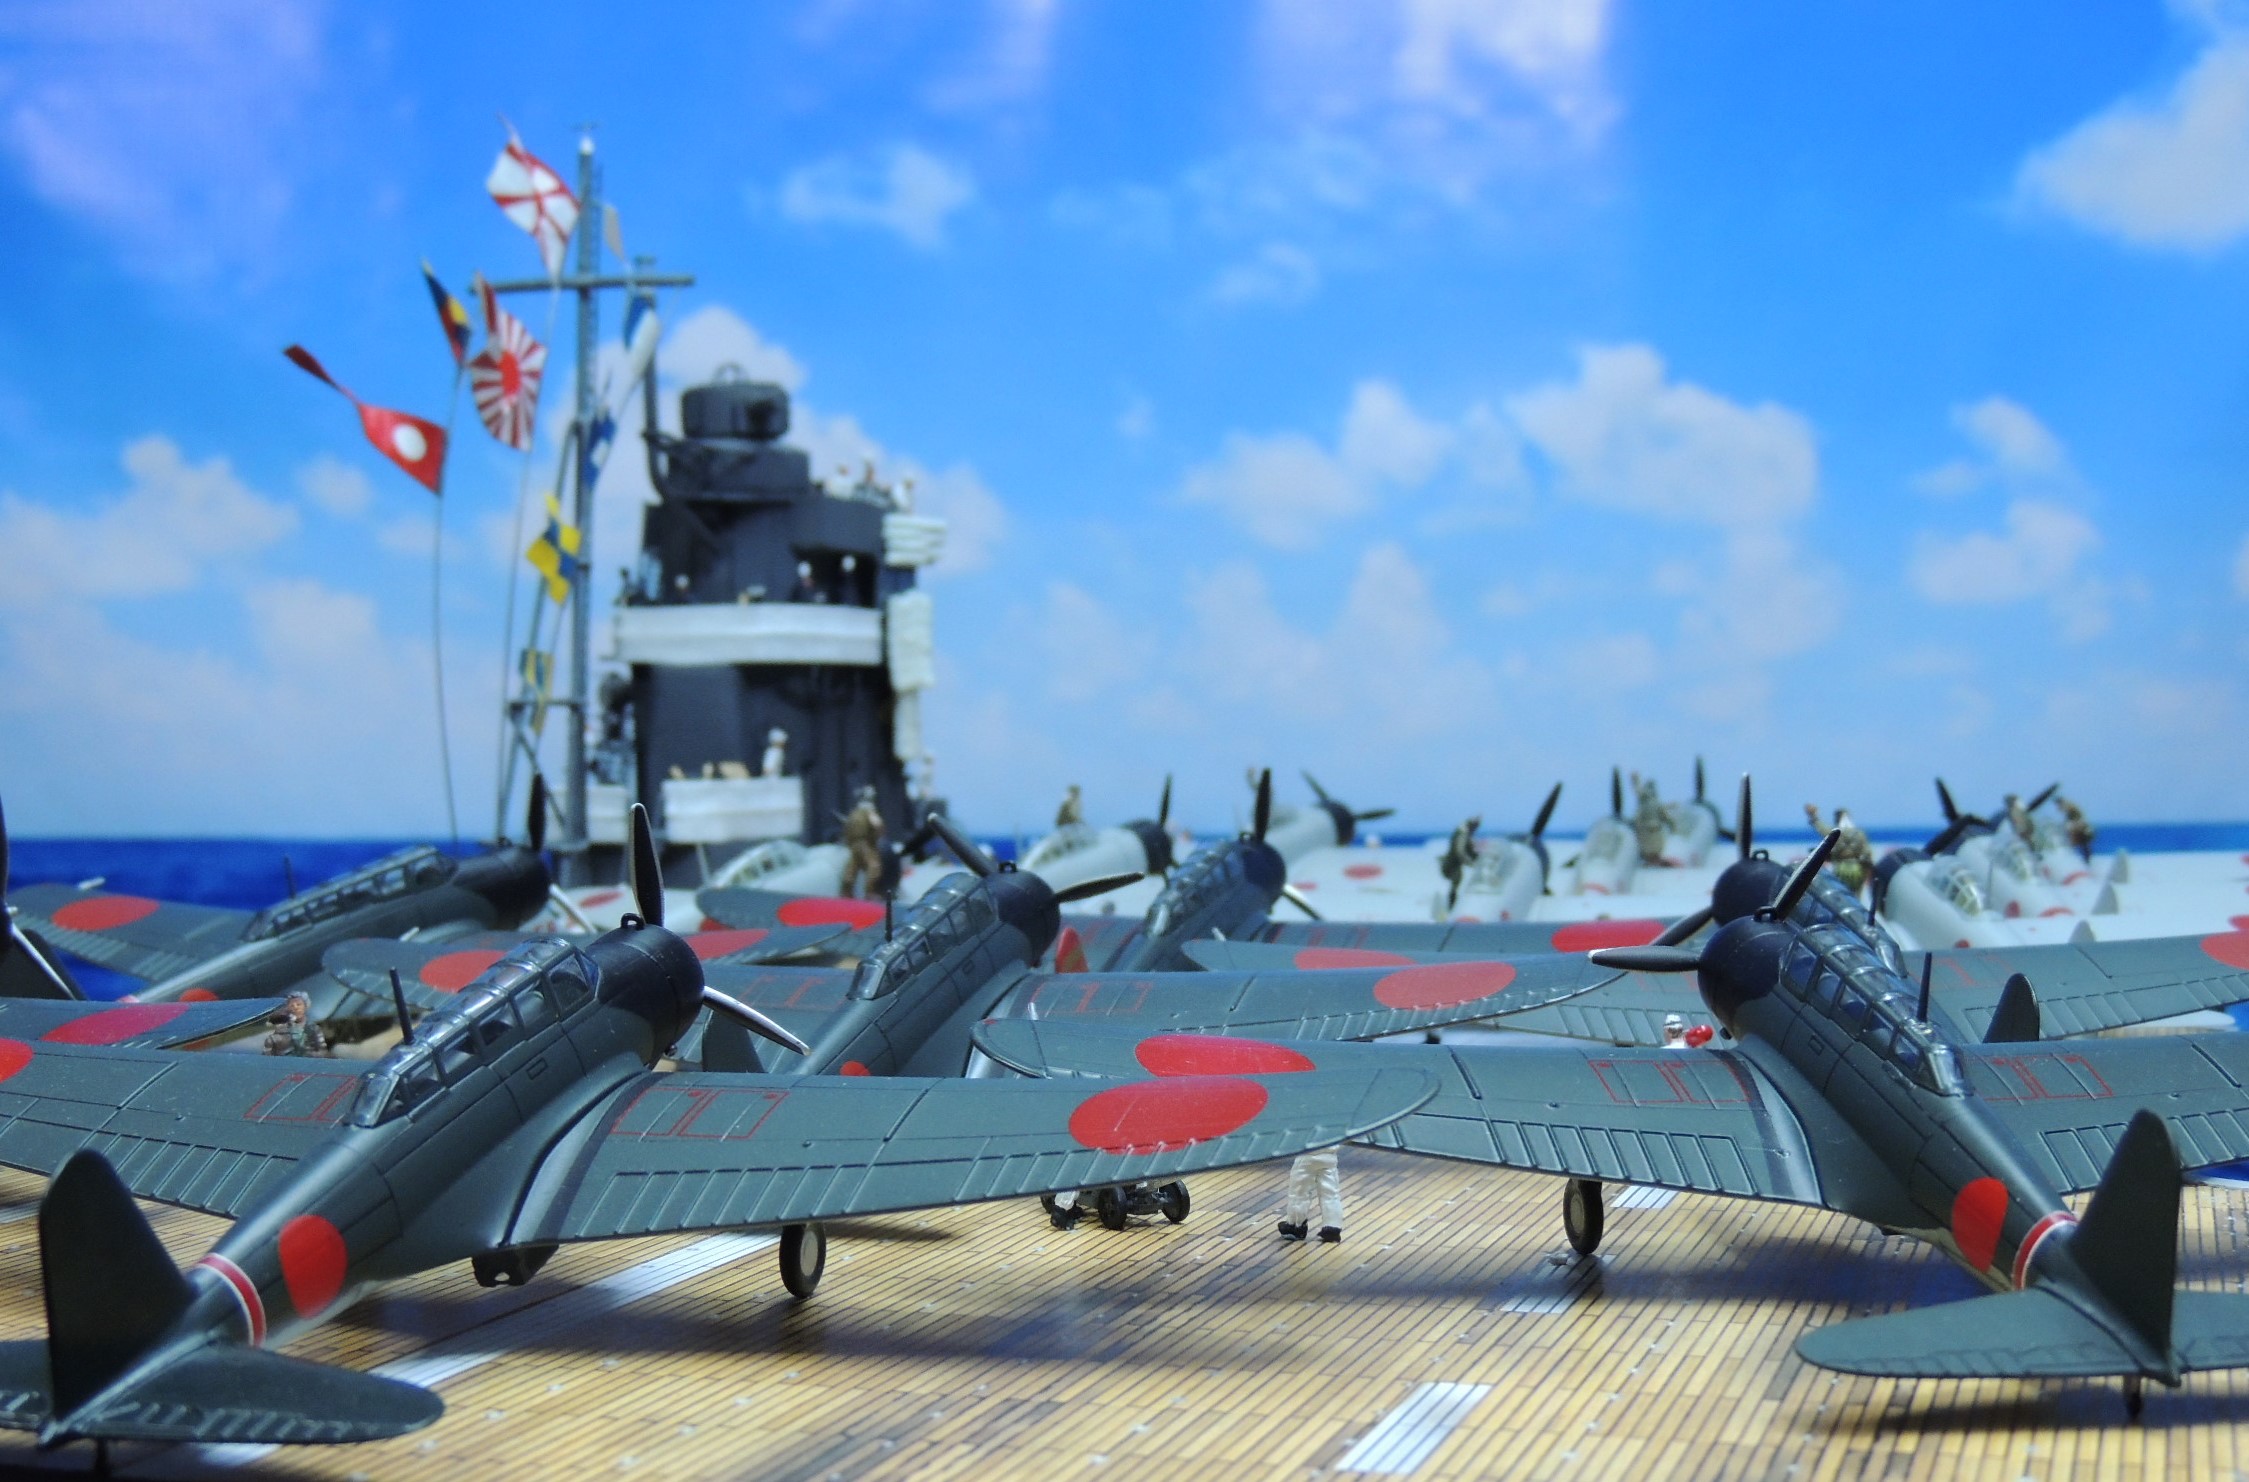
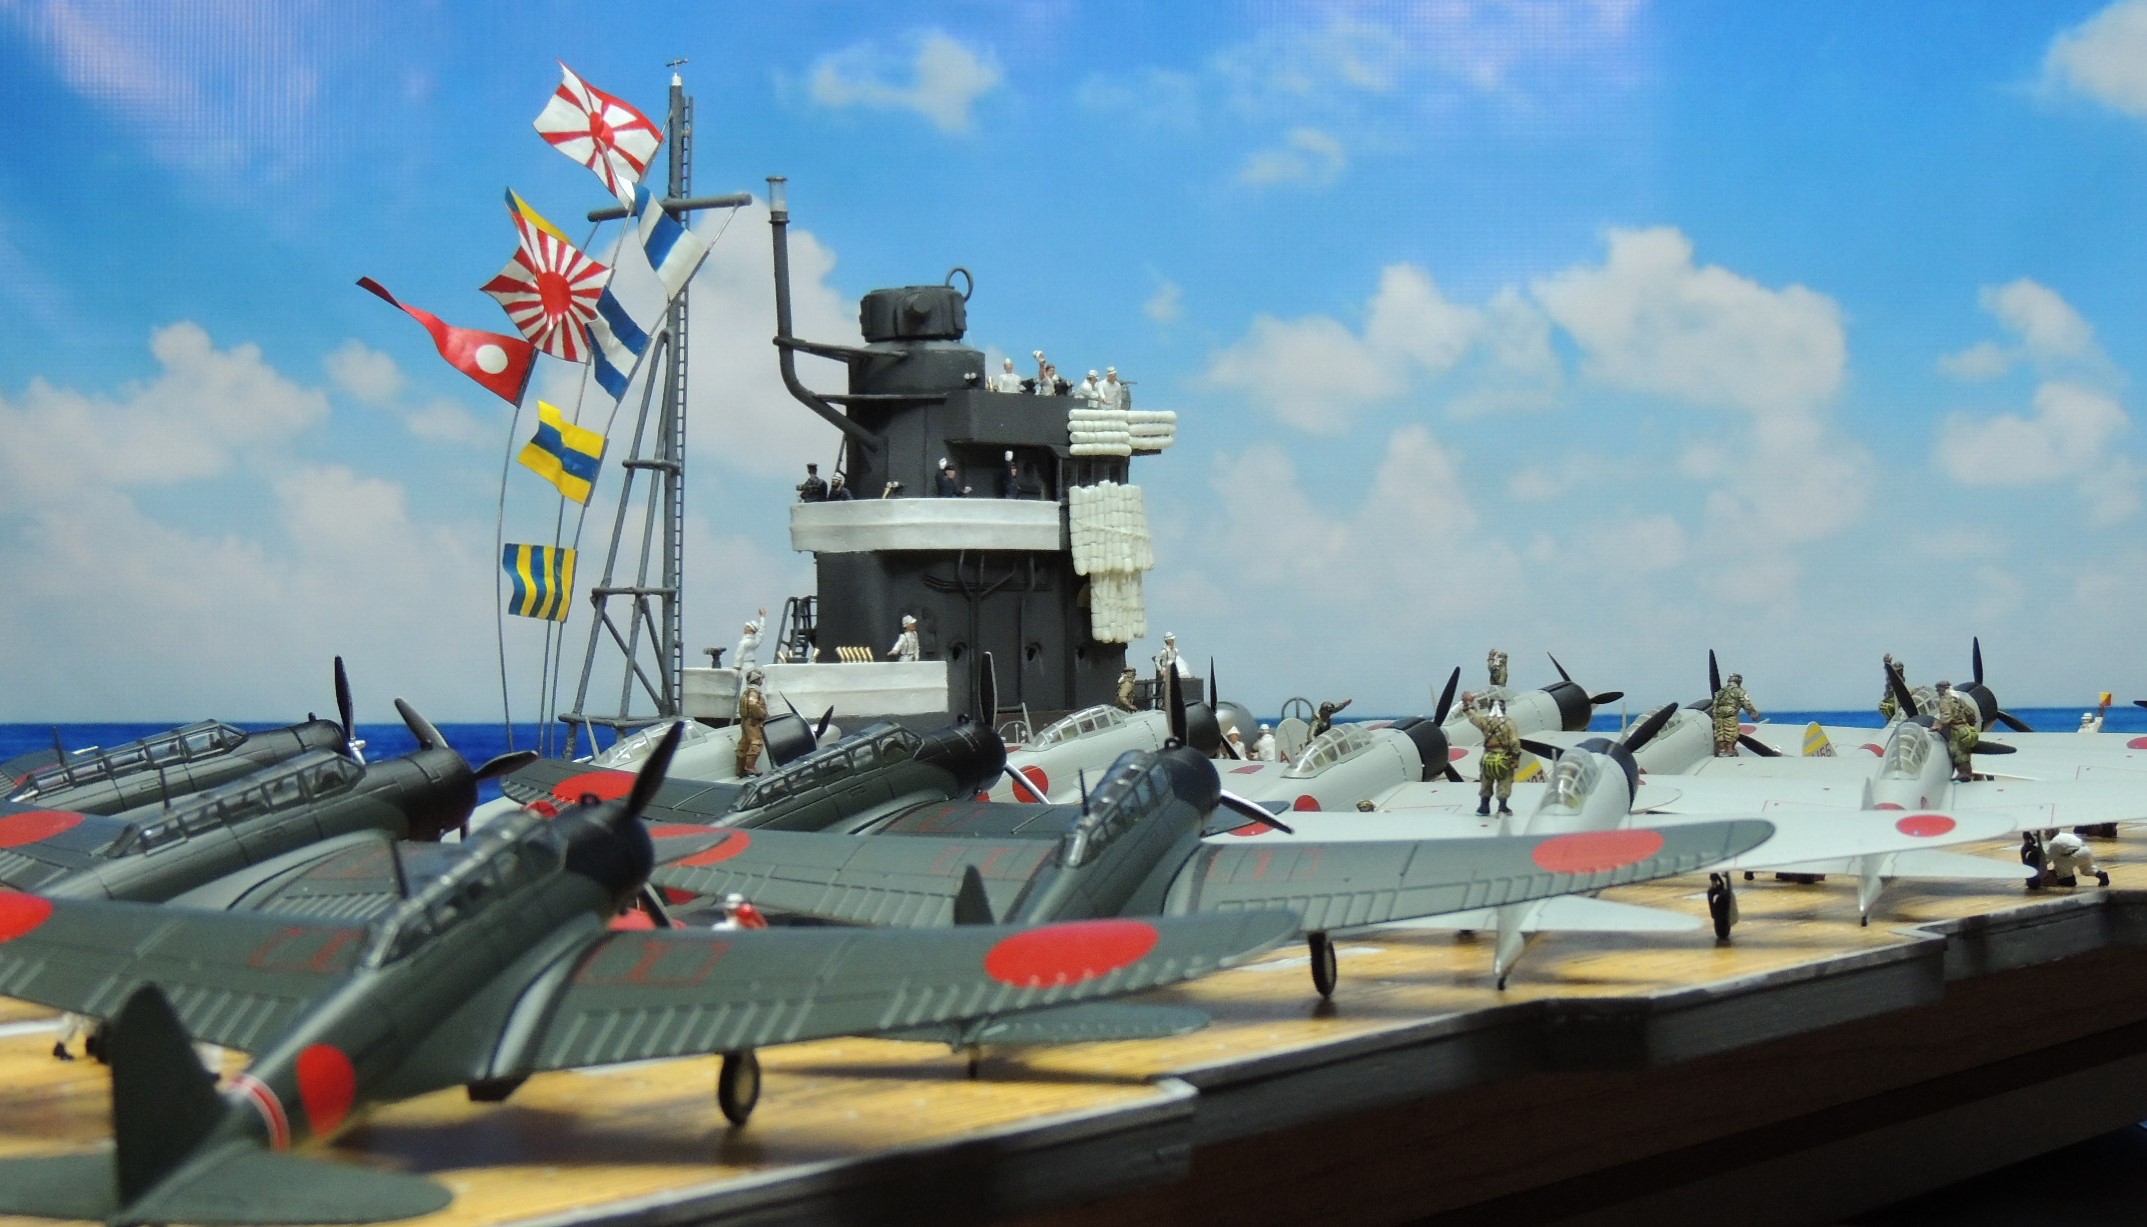
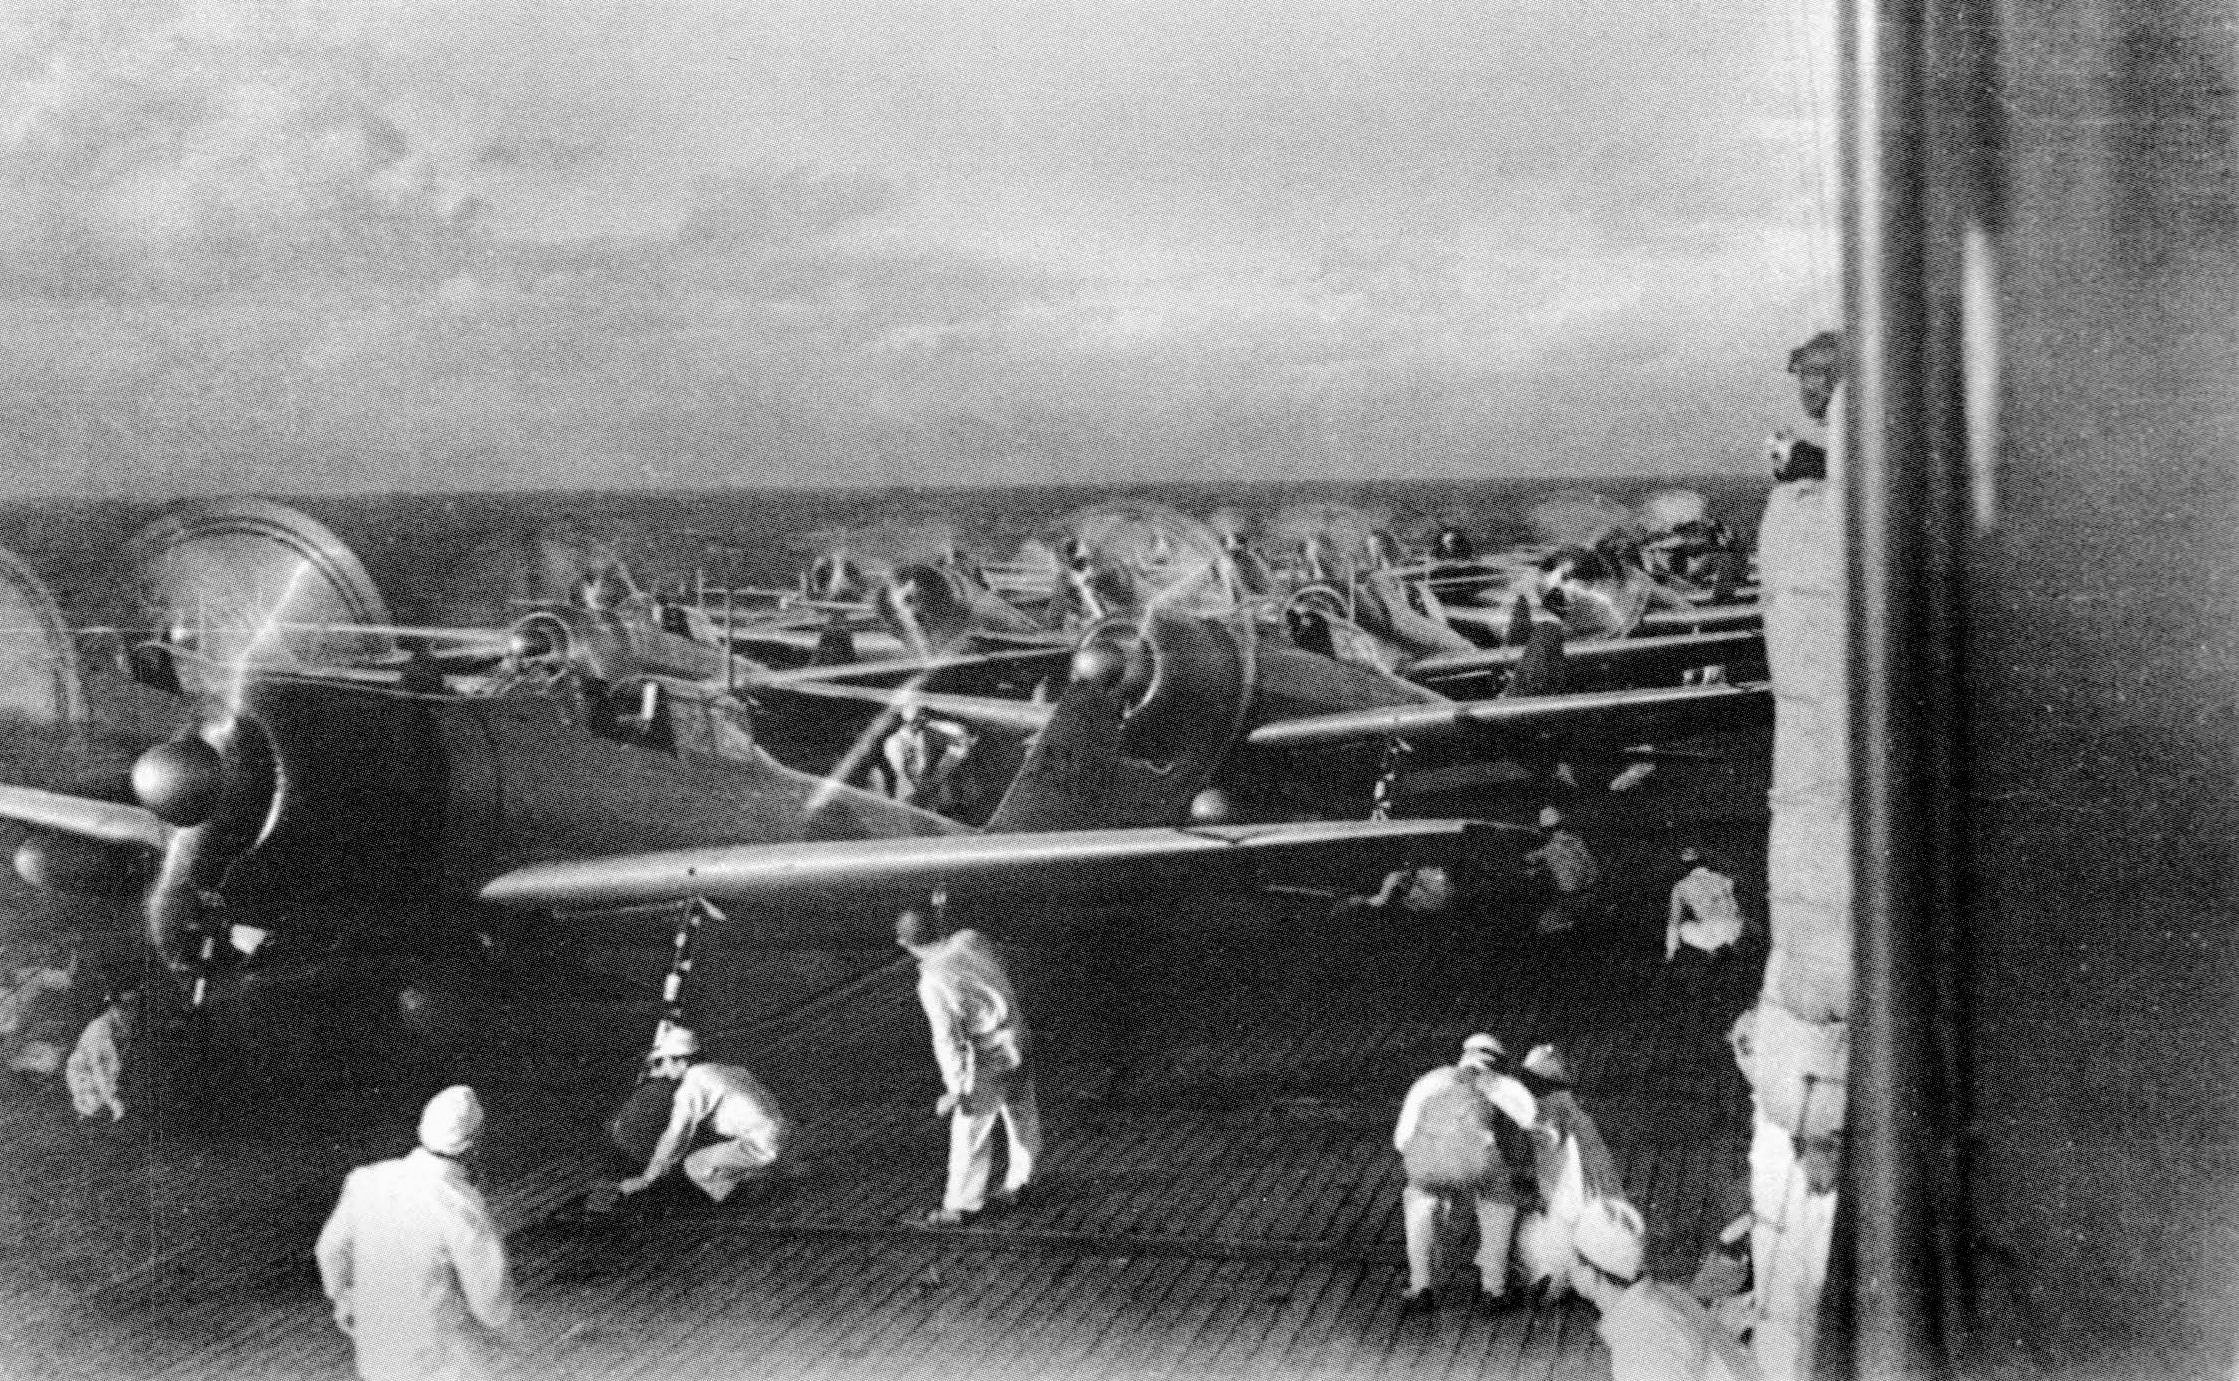
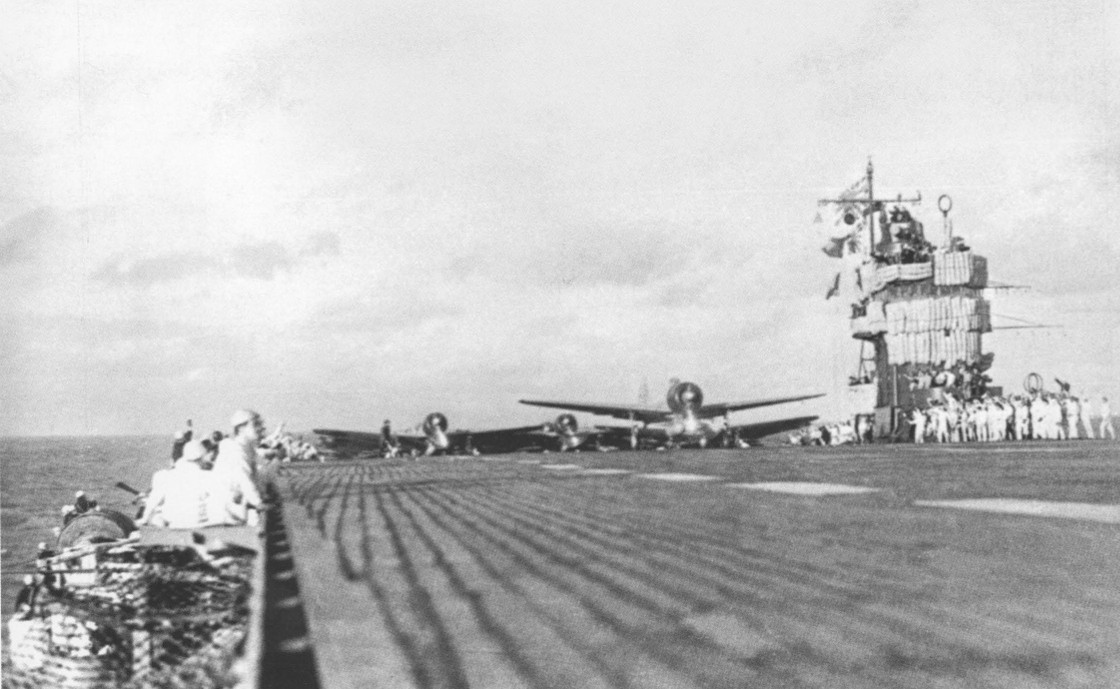
As mentioned in previous posts, the Akagi was the flagship — and one of six aircraft carriers — of the Imperial Japanese Navy’s Kido Butai — the strike force that carried out the attack on Pearl Harbor. The attack was carried out in two waves, each comprising Mitsubishi A6M Zero fighters, Nakajima B5N Kate torpedo and level bombers, and Aichi D3A Val dive bombers. The Akagi contributed nine Zeros and 27 Kate bombers to that first wave. (Akagi’s Val dive bombers participated in the second wave.)
The superb illustration below depicts the Akagi as it prepared to launch its aircraft at Pearl Harbor. Note the nine Zero fighters amidships, parallel to the island, followed by the 27 Kate bombers aft of the midships elevator reaching all the way back to the stern.(NB: I found the unsourced illustration above on the internet. While sourced illustrations of the Akagi abound, this particular one actually depicts the formation of the Zeros and Kates of the first wave as they prepared to take off for Pearl Harbor. I would appreciate information on its source, both so I may provide proper attribution to the artist and perhaps acquire the plate at higher resolution. If you know the source, please contact me.)
The Akagi measured 855 feet from bow to stern but its wooden flight deck was 817 feet. The goal is to represent the 140 feet of the flight deck delimited by the yellow rectangle shown in the illustration below (roughly 1/6 of the entire flight deck). The project will require nine A6M2 Zero fighters plus one B5N2 Kate — the lone representative of the 27 Kates of the Akagi in the first wave. That leading Kate is significant, however, as it belonged to Commander Mitsuo Fuchida, who was in overall command of all aircraft participating in the attack on Pearl Harbor. For those of us who grew up watching Tora! Tora! Tora! each year, who could forget Fuchida barking the codeword three times into his radio to indicate the Japanese had achieved complete surprise?
The diorama will also require construction of the flight deck, the midships elevator, and the island superstructure. The enormous exhaust funnel on the starboard side, as well as the antiaircraft guns on either side of the carrier, are beyond the scope of this project as they’re located below the flight deck. (Forgive the funky orange outlined text. It was necessary to make the text stand out.)
This series of posts will cover the aircraft, pilots, deck crew, flight deck, and island superstructure. With any luck, the last post will bring all these elements together in a fairly straightforward diorama. Here’s the plan:
The lagniappe photo below of aircraft preparing to take off from the Akagi provides a good idea of the project.While I intend to complete this project in the next three months, please remember the following stanza from Robert Burns’ immortal Scottish poem Tae a Moose, later popularized in English by John Steinbeck’s novel Of Mice and Men:
“But, Mousie, thou art no thy lane, In proving foresight may be vain; The best-laid schemes o’ mice an’ men Gang aft agley, An’ lea’e us nought but grief an’ pain, For promis’d joy!”
Again, thank you for your indulgence and I hope you enjoyed the post. If something looks amiss, please let me know. I would be delighted to correct inaccurate information so that this may be useful to other 1/72 scale collectors and wargamers. As always, comments, questions, corrections, and observations are welcome. Please do contact me if you know the source of the illustration. Stay tuned for a synopsis of the Akagi’s first wave Zeros in the next post.
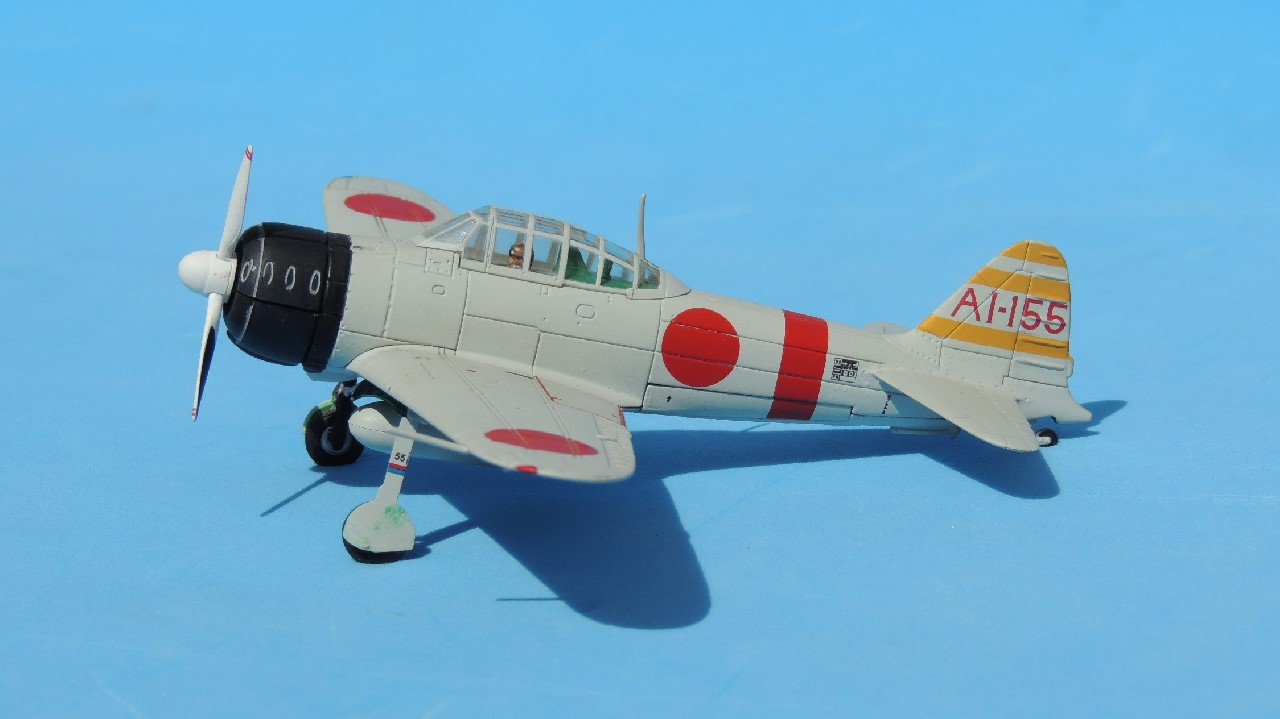
This is Part 4 of Shigeru Itaya Leads the Zeros at Pearl Harbor. It is a review of the Witty Wings 72-012-001 1/72 scale model of Itaya’s Zero at Pearl Harbor. For a brief biographical note on Shigeru Itaya and reviews of the Dragon Wings and Forces of Valor models of the same aircraft, please refer to the previous three posts. Relevant information on Itaya’s aircraft from those posts is repeated below to make this review self-contained. The reader may want to skip directly to the review of the Witty Wings model.
Itaya’s A6M2 Zero, Tail No. AI-155
As discussed in Part 1, Itaya led the 43 Zeros from all carriers in the first wave of the attack on Pearl Harbor. In each wave the Zero planes were the first airborne, both because they needed the least runway to take off and in order to protect the slower, less maneuverable torpedo and dive bombers that followed. As the leader of the first wave of Zeros, Itaya was the first Japanese pilot airborne during the attack.
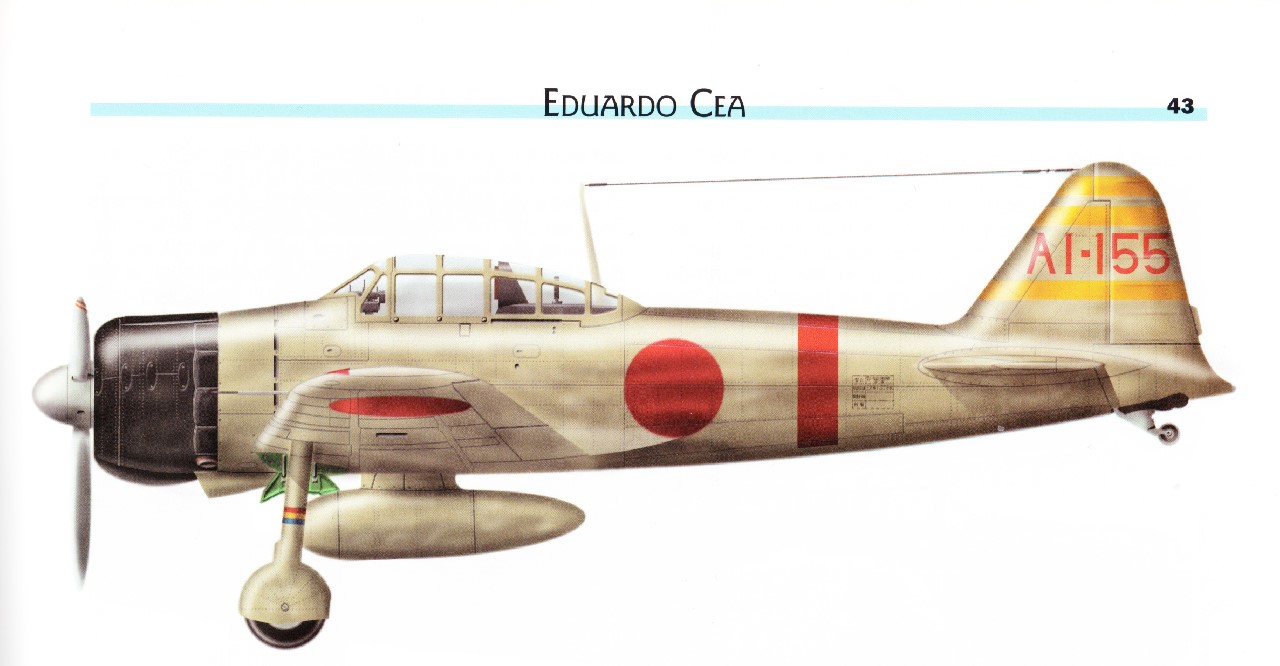
As noted previously, there is precious little information available on Itaya. This dearth of information extends to Itaya’s plane at Pearl Harbor, a Mitsubishi A6M2 Zero, tail no. AI-155. Although there are some references on the internet that Itaya’s Zero’s tail no. may have been something other than AI-155, the books I consulted consistently use that number. To my knowledge, there are no existing photos of the AI-155, though there are enough photos of other planes from the Akagi aircraft carrier to give us a reasonably accurate understanding of its colors and markings.
Below is a color profile from what is probably the most comprehensive source of information on the colors and markings of WWII Japanese aircraft, Eduardo Cea’s eight-volume treatise entitled Japanese Military Aircraft. I scanned this particular profile from Volume 2, The Air Force of the Japanese Imperial Navy: Carrier-Based Aircraft, 1922-1945 (I). While I’m aware that there are a number of errors in the English translation of the Spanish text that are somewhat distracting, the series is beautifully illustrated, incredibly informative, and inarguably comprehensive, and, being fluent in Spanish, I blithely overlooked the errors. 🙂 The profile is reproduced here for discussion purposes under the fair use exception to the copyright laws.Itaya’s Zero at Pearl Harbor has been released in 1/72 scale by three different manufacturers: Dragon Wings 50017; Forces of Valor 85032; and Witty Wings 72-012-001. This post concerns the Witty Wings model. The Dragon Wings and Forces of Valor models were reviewed in the previous two posts.
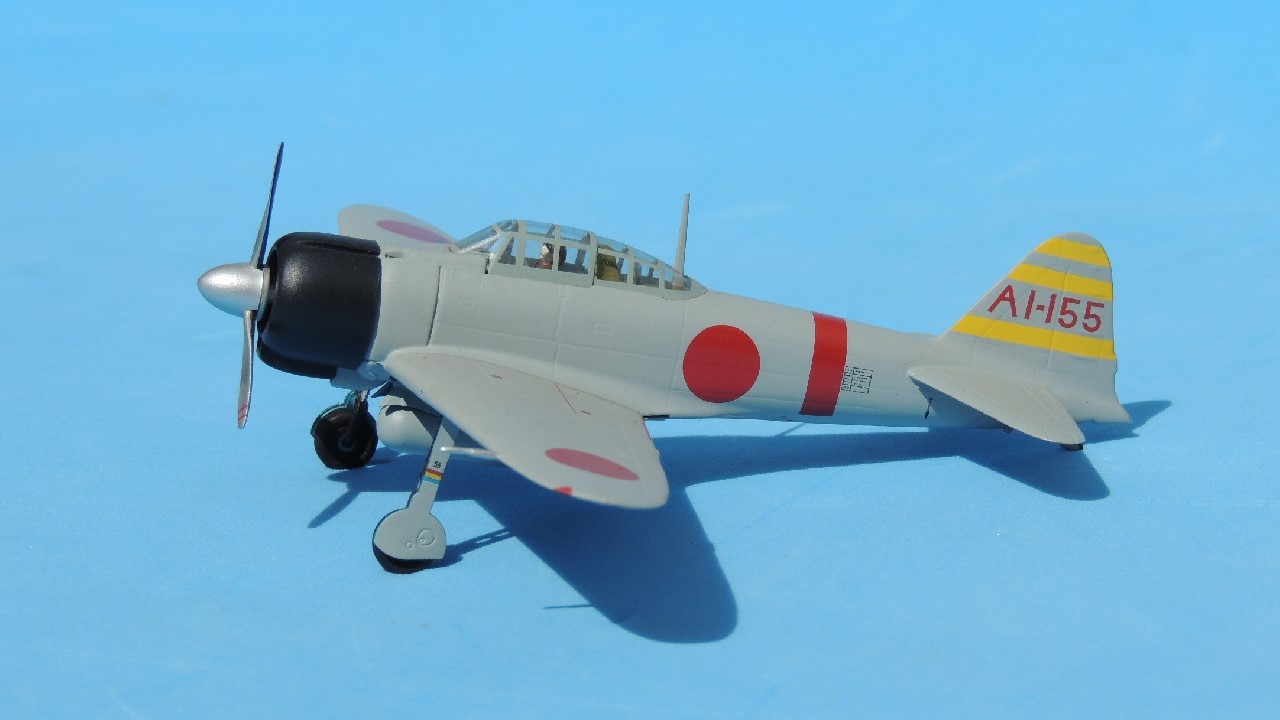
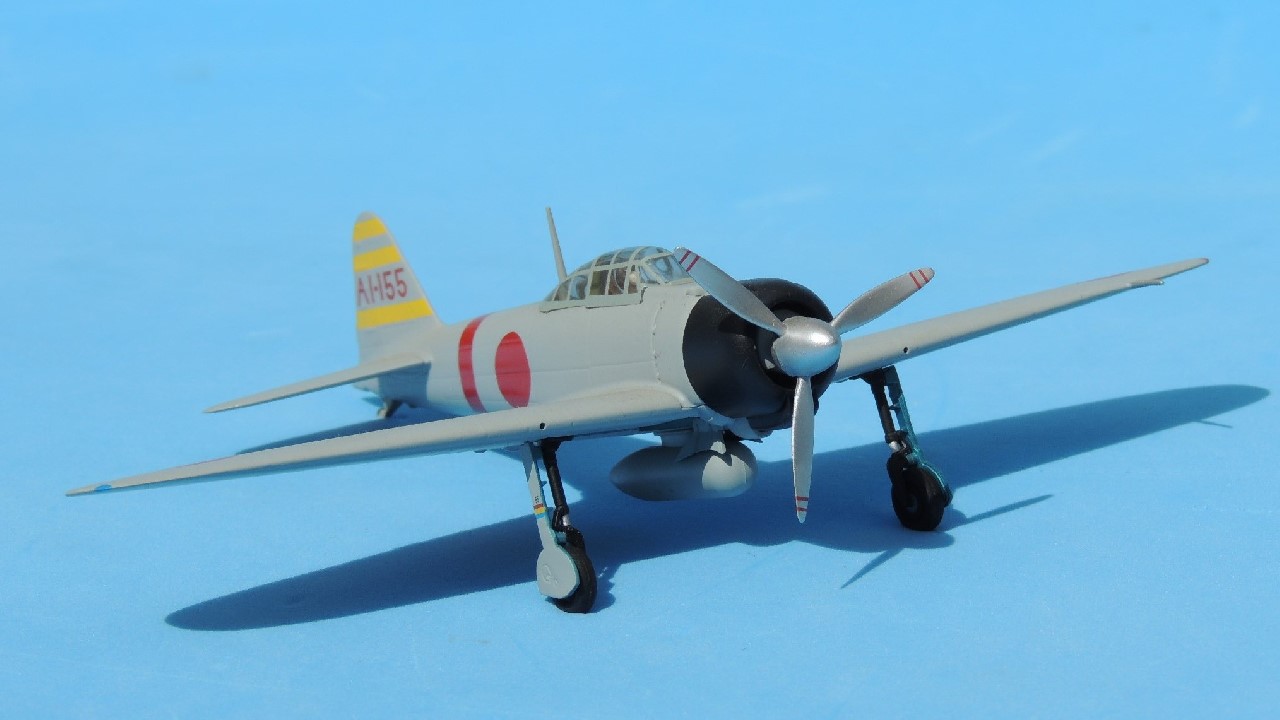
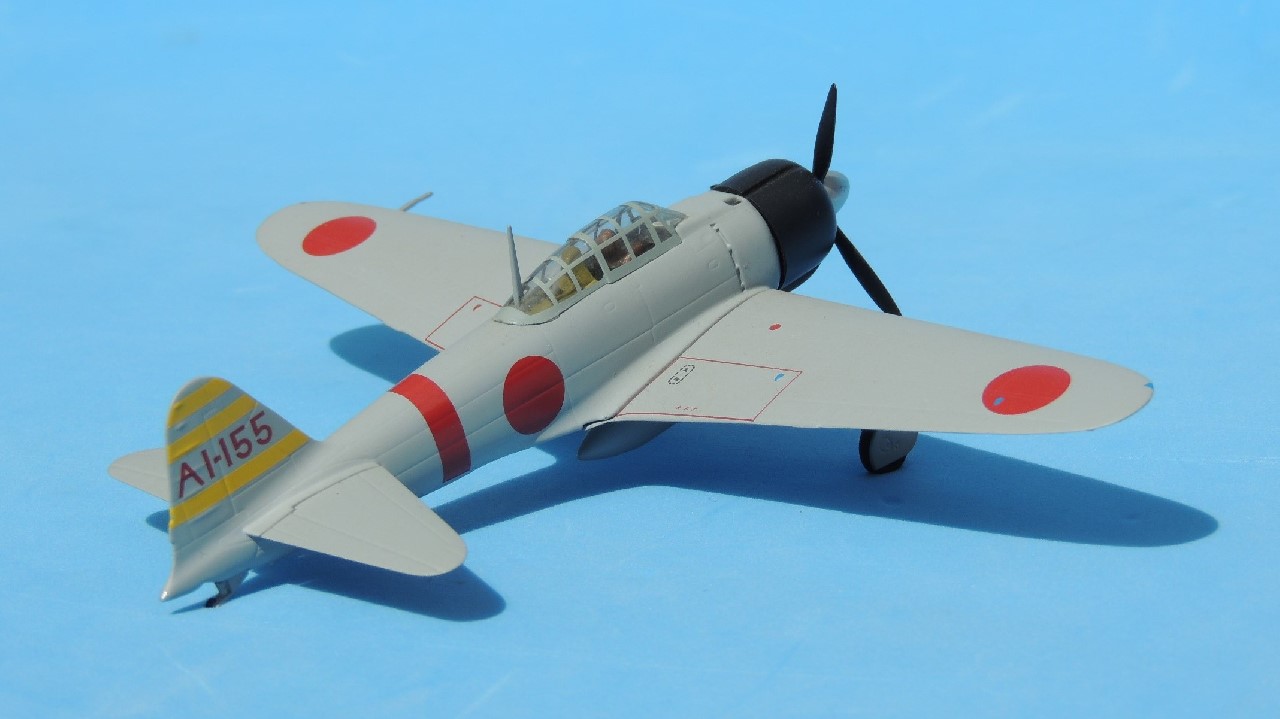
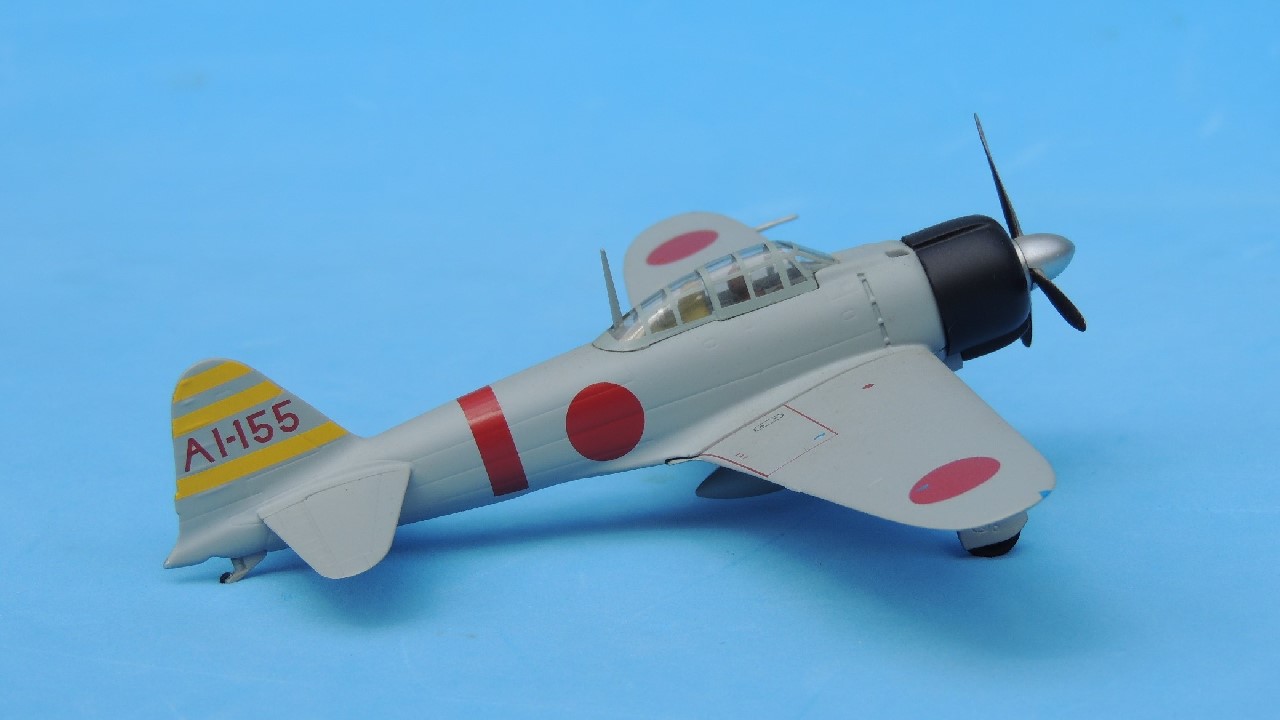
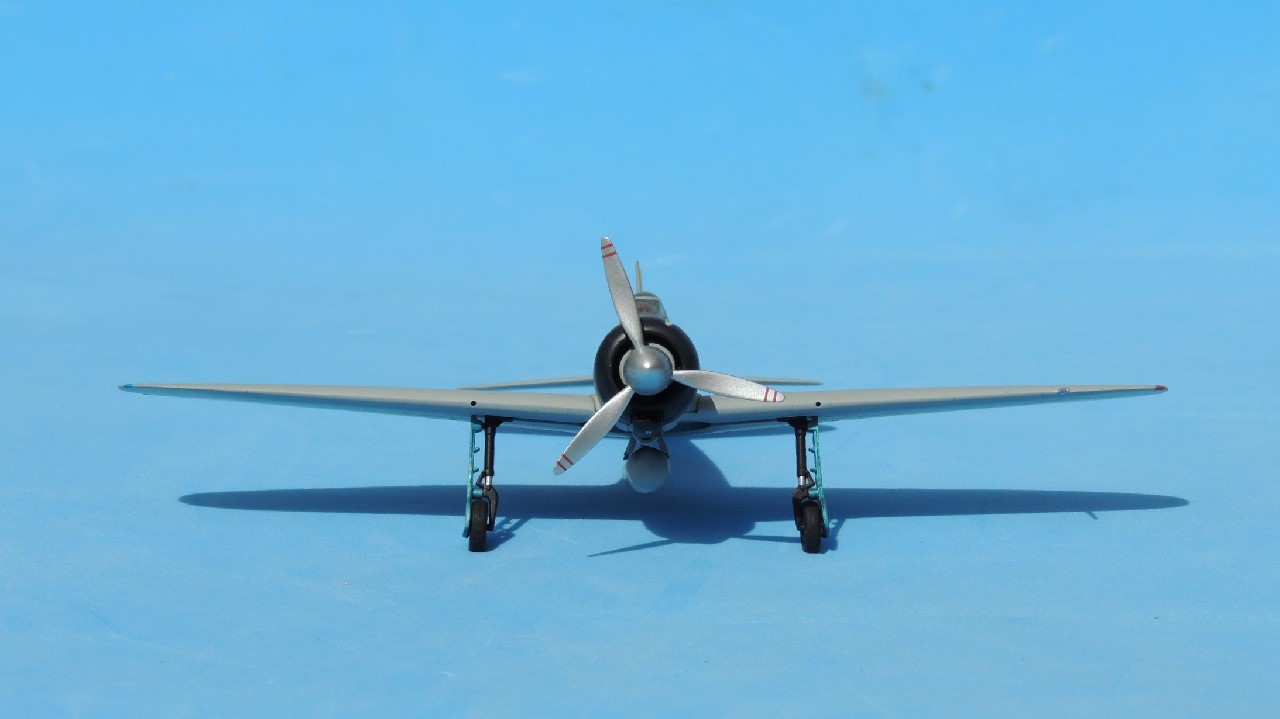
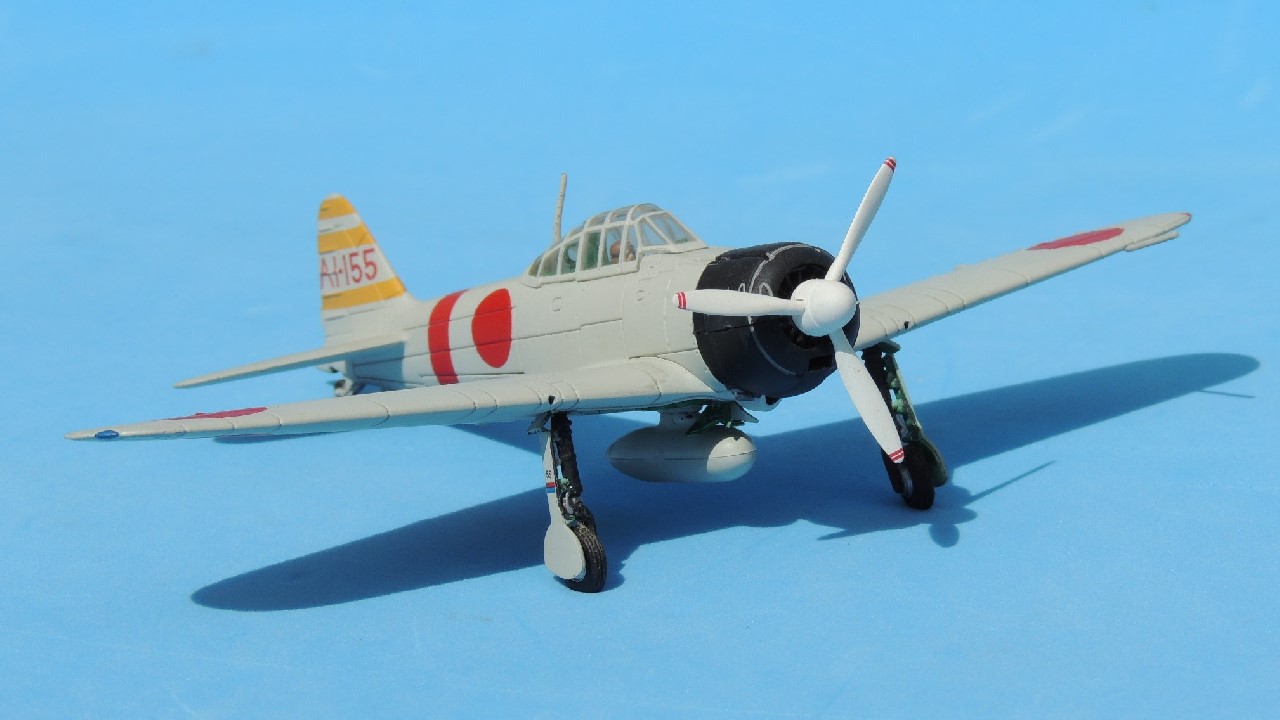
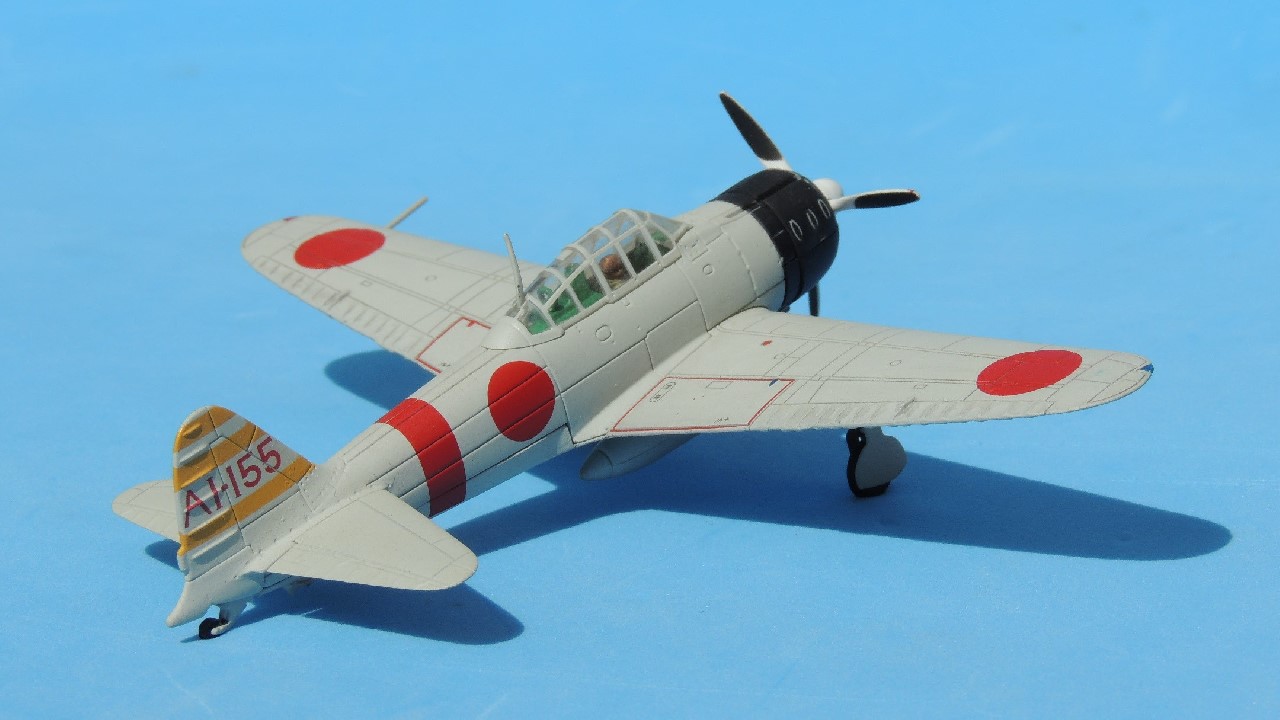
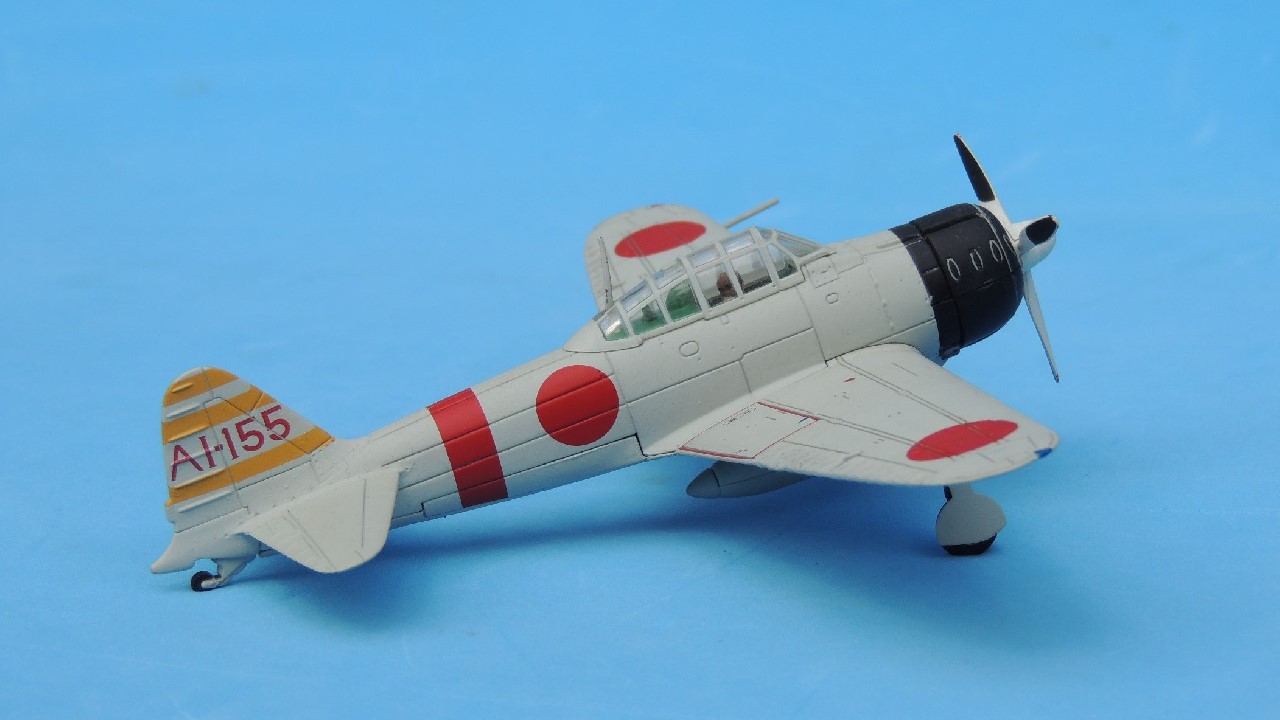
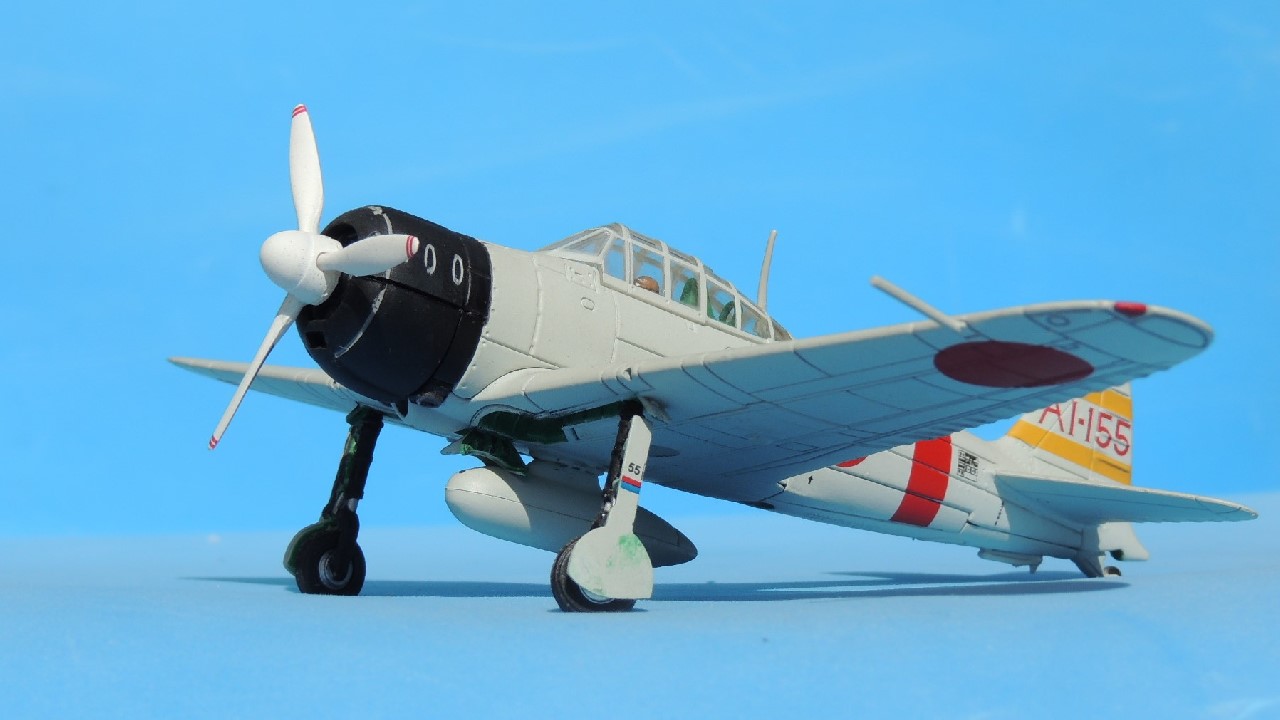
The Witty Wings 72-012-001 Zero
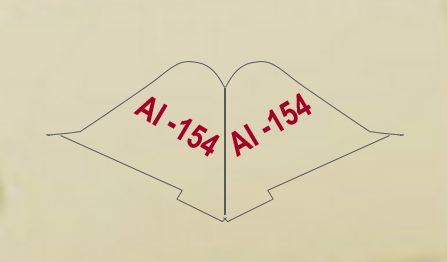
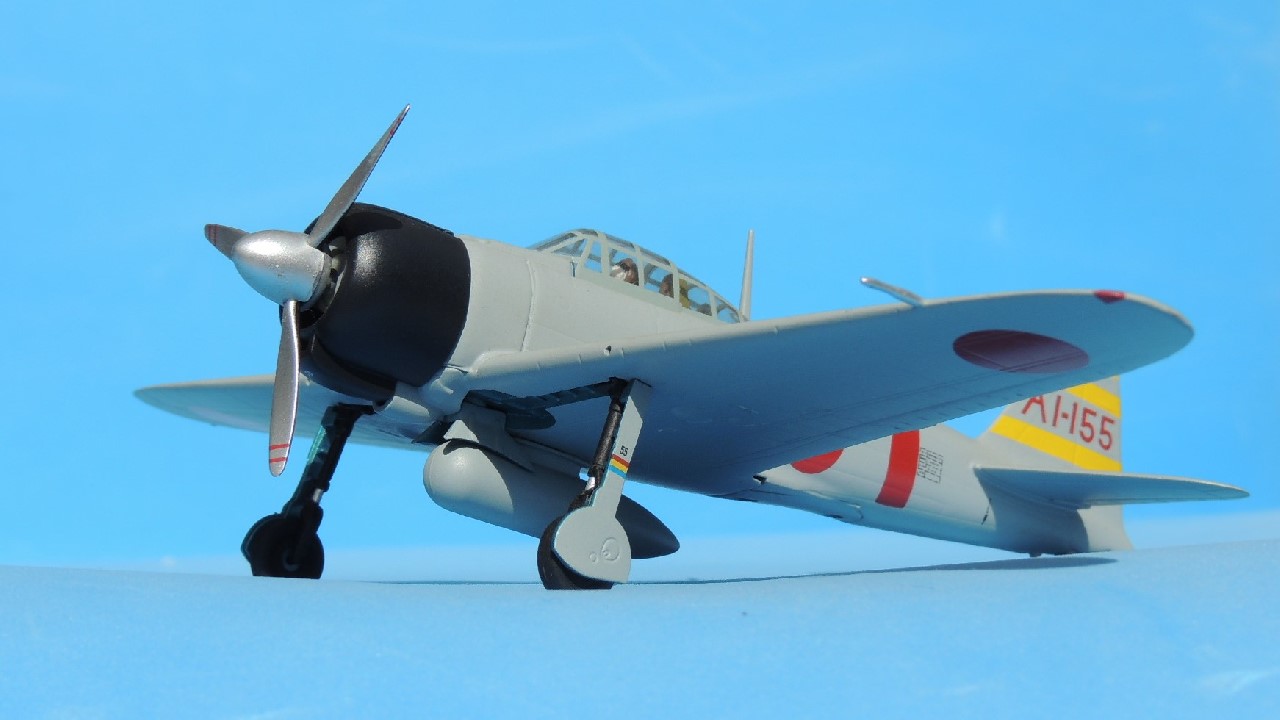
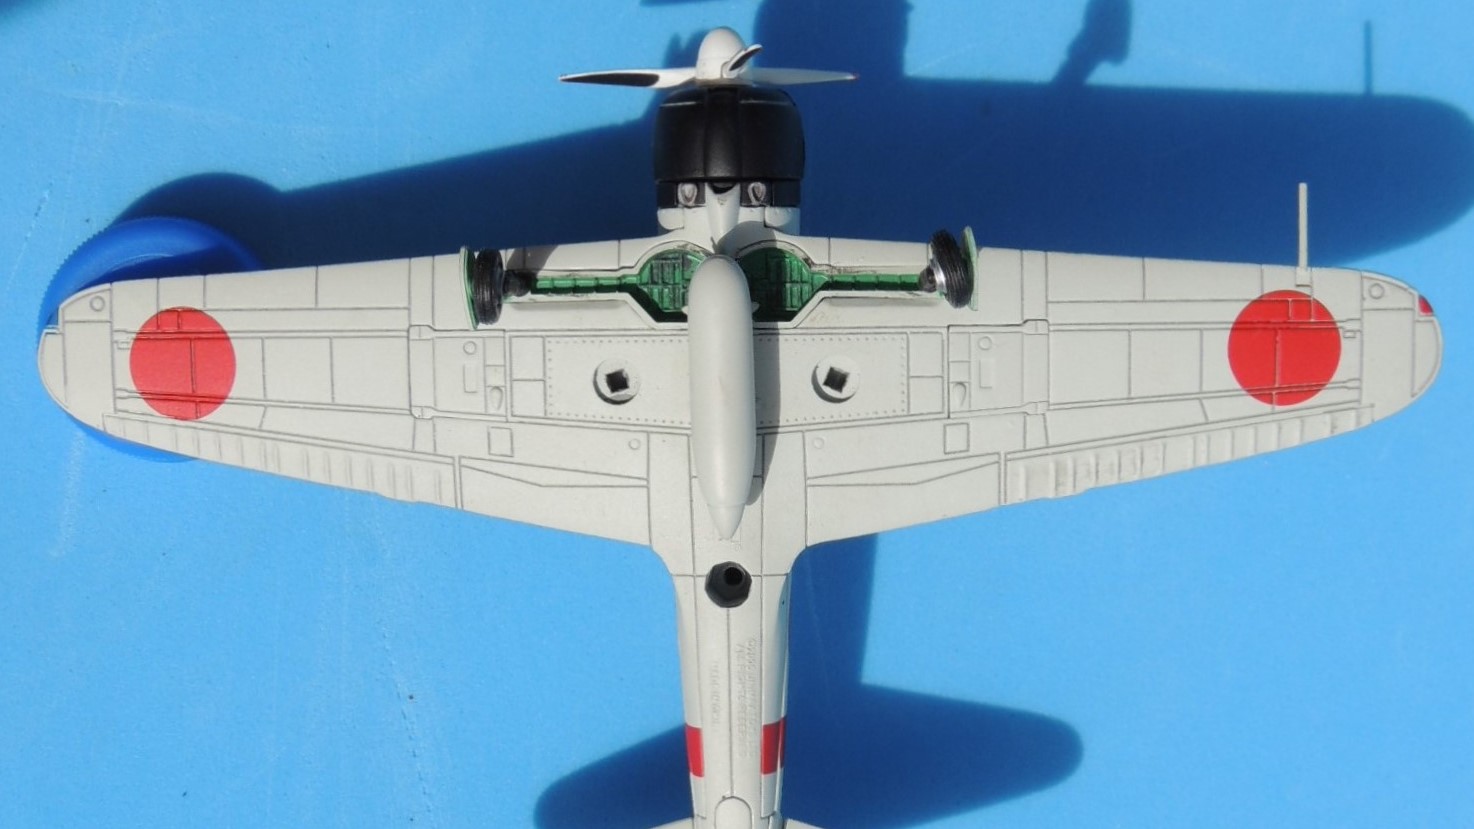
Below is a portside view of the Witty model. Unlike the Dragon and FOV models, which are caramel and ivory, respectively, the Witty model is a pale gray that tends towards white. The photos below are equivalent to those of the Dragon and FOV model. I took them photos at the same time, alternating the model for each different shot, so as to control for lighting and angle. As is clear from the photos, the pale color of the Witty model does not photograph well or, more accurately, I lacked the skills to photograph the Witty model well.Note that the panel lines are faintly visible. The diminutive width of the lines is a feature of the Witty that pleased many collectors, as they appear to be more to scale than those of other manufacturers. In addition, unlike Dragon, Witty did not apply any type of wash to highlight the lines, making them appear even fainter. It is this combination of smaller size and lack of a wash that gives the impression that the panel lines are close to scale. While I understand the desire for accuracy in scale and respect the point of view, I find the Witty lines too faint. The Dragon panel lines may be too pronounced; the Witty lines, however, are not pronounced enough. Still, I suspect a very light inking of the Witty lines would result in Goldilocks panel lines.The photo below provides an excellent view of the tail number “AI-155.” As mentioned in the Dragon and FOV reviews, the “AI” code was the designation for the Akagi aircraft carrier. In the three-digit number after “AI”, the first digit (“1”) indicates that it is a fighter plane. The last two digits (“55”) are simply the aircraft number within the unit. The tail numbers on Japanese carrier aircraft were usually red.
Note also the three horizontal yellow stripes on the tail that indicated command: three stripes for the group leader; two stripes for a squadron leader (9 aircraft); and one stripe for a flight leader (3 aircraft). Note also the “no step” rectangular area outlined in red at the rear of each wing next to the wing root.The photo below provides an excellent view of the Hinomaru, which was carried on both sides of the fuselage aft of the wing and on both the upper surface and underside of each wing — six “circles of the sun” in total. The vertical red stripe on the fuselage is the identification mark for the aircraft carrier Akagi.
Note also the manufacturing plate stenciled just aft of the red stripe. The inset shows that the plate bears the number 1575, meaning it was the 1,575th Zero built. The “2-2-9” means it was built in the Japanese year 2602, second month, ninth day = February 9, 1942. (Yes, two months after Pearl Harbor. 🙂 Like FOV, Witty “borrowed” this particular stencil from a Zero recovered at Port Moresby in April 1942.) Incidentally, the A6M is called the “Zero” because it first entered service in the Japanese year 2600 (1940), the zero year of the new Japanese century. Please bear in mind that the entire plate is just 4mm wide (just over 1/8 inch). Though the manufacturing plate on the Witty is not as crisp as those on the Dragon and FOV models, Witty should still be commended for the effort.Below is a shot of the starboard side. Note the absence of the manufacturing plate, which was only stenciled on the port side.In the photo below, note the polished natural metal propeller. Note also the two red warning stripes on the tips of the blades that created two neat red circles when the propeller was spinning. As is the case with the vast majority of 1/72 scale prebuilt models, the propeller spins freely.
Note the outlets for the 20mm cannons on the leading edges of the wings just above the landing struts. Also on the leading edge of the portside wing, note the pitot tube (shadow on floor), which cannot be taken for granted. The Corgi Zeros, for example, do not have one.As with the Dragon and FOV models, the photo below shows that the landing strut covers on the Witty also have the “55” that matches the last two digits of the tail number. Note that unlike Dragon and FOV, Witty omitted the oval-shaped fasteners on the cowling. Note also the metal drop tank that gave the Zero an extra 73 imperial gallons of fuel (87 US gallons), significantly increasing its range. Later drop tanks were made of wood and had a slightly different shape. Note also that, like FOV, Witty included a pilot.
The Rub
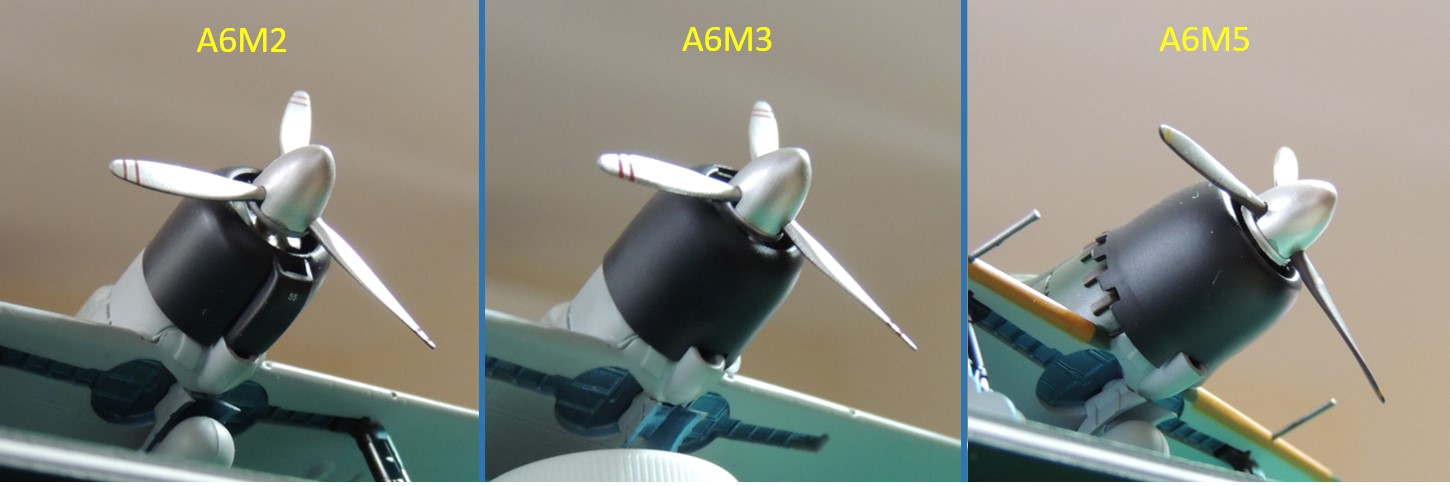
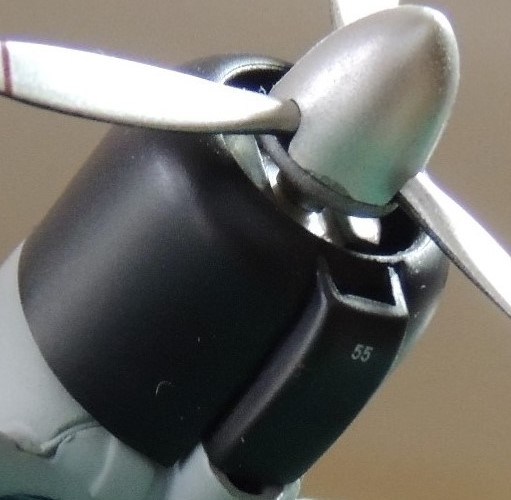
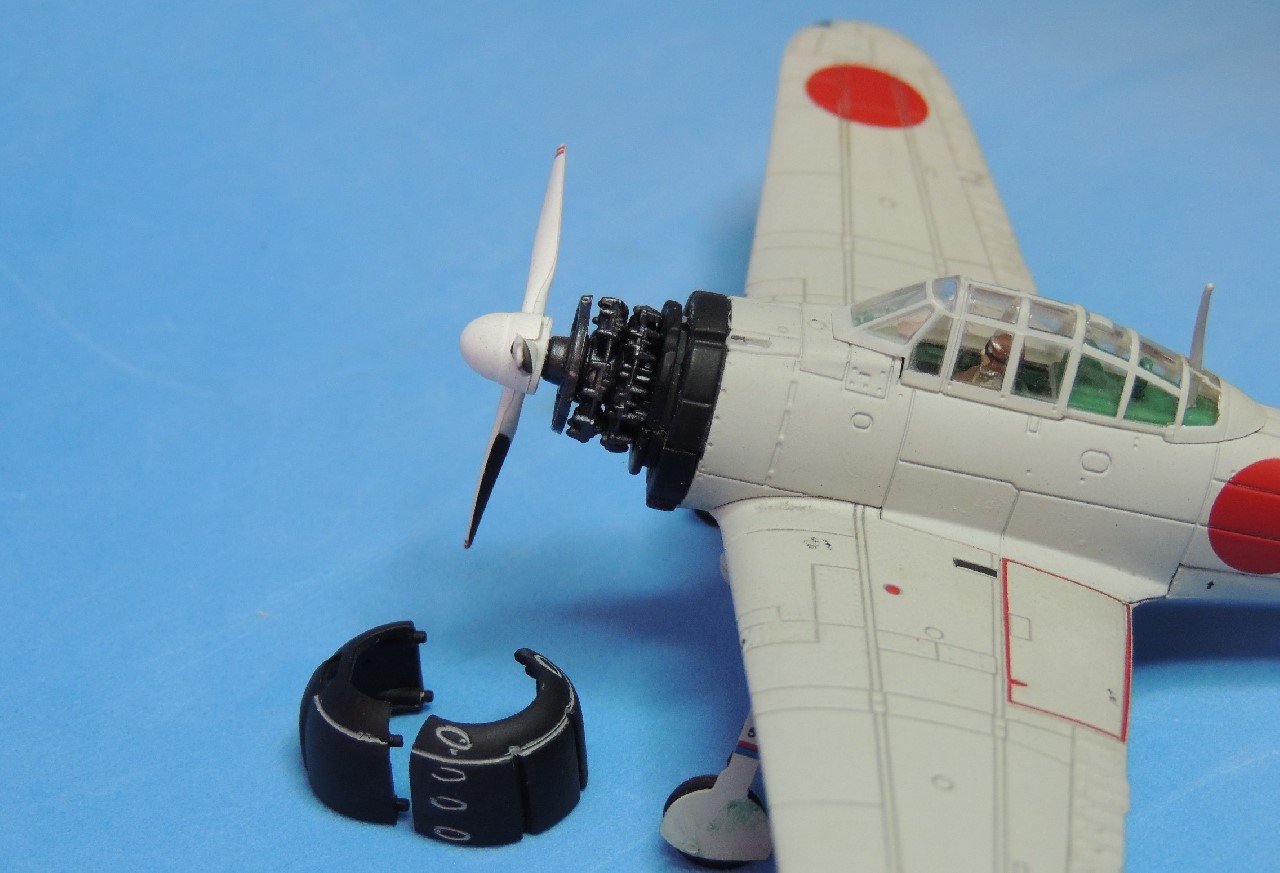
Well, no, not really a rub — more of a quibble. As previously mentioned, Witty inexplicably omitted the oval-shaped fasteners on the cowling, resulting in a generic-looking cowling. I initially assumed that Witty intentionally omitted the fasteners in order to use the same cowling on its three different Zero models (A6M2, A6M3, and A6M5). However, upon taking a closer look, I realized that the cowling was indeed that for an A6M2 — sans fasteners.
The photo triptych below of three different Witty Zero models demonstrates that Witty crafted a different cowling for each of their three models. The cowling on the A6M2 is wider and shorter than that on the A6M3, reflecting the different engines used on each, and has a scoop that runs the length of the cowling. The A6M2 cowling also lacks the individual exhaust pipes that protrude from the cowling flaps on the A6M5.
The lagniappe photo below shows that while Witty neglected the fasteners, it offset the lapse somewhat by including the aircraft number “55” on the underside of the cowling as was done on the strut covers — a trivial detail perhaps, but pleasing nonetheless. While other manufacturers included the number on the landing strut covers, Witty alone included the number on the cowling.
The Upshot
The Witty 72-012-001 Mitsubishi A6M2 Zero is a beautiful model that closely resembles the original. The excellent casting shows no perceptible problems in its proportions. The panel lines, though faint, are the closest to scale. The cowling, propeller, and undercarriage are all well executed, with no apparent issues other than the missing cowling fasteners. The markings are accurate and crisp and the aircraft number on the underside of the cowling is a neat detail. All Witty Zeros come in wheels down version only, which, although not ideal, still gives the collector the option to display the models on their stands or use them without the stands in dioramas. Matchbox, for example, made its Zeros in wheels up mode only, making it nearly impossible to use in dioramas. While Witty included no features such as a sliding canopy like Dragon or a removable cowling like FOV, their absence does not detract from the model. In short, the Witty A6M2 Zero is a terrific little model — a proud replica of the real thing — and even a cursory review of model aircraft forums reveals that it is a favorite among Zero collectors.
Again, thank you for your indulgence and I hope you enjoyed the post. If something looks amiss, please let me know. I would be delighted to correct inaccurate information so that this may be useful for other 1/72 scale collectors and wargamers. As always, comments, questions, corrections, and observations are welcome. Stay tuned for a simple diorama of Itaya’s aircraft preparing to take off from the Akagi aircraft carrier at Pearl Harbor in the next post.
This is Part 3 of Shigeru Itaya Leads the Zeros at Pearl Harbor. It is a review of the Forces of Valor 85032 1/72 scale model of Itaya’s Zero at Pearl Harbor. For a brief biographical note on Shigeru Itaya and a review of the Dragon Wings model of the same aircraft, please refer to the previous two posts. Relevant information on Itaya’s aircraft from those posts is repeated below to make this review self-contained. The reader may want to skip directly to the review of the FOV model.
Itaya’s A6M2 Zero, Tail No. AI-155
As discussed in Part 1, Itaya led the 43 Zeros from all carriers in the first wave of the attack on Pearl Harbor. In each wave the Zero planes were the first airborne, both because they needed the least runway to take off and in order to protect the slower, less maneuverable torpedo and dive bombers that followed. As the leader of the first wave of Zeros, Itaya was the first Japanese pilot airborne during the attack.
As noted previously, there is precious little information available on Itaya. This dearth of information extends to Itaya’s plane at Pearl Harbor, a Mitsubishi A6M2 Zero, tail no. AI-155. Although there are some references on the internet that Itaya’s Zero’s tail no. may have been something other than AI-155, the books I consulted consistently use that number. To my knowledge, there are no existing photos of the AI-155, though there are enough photos of other planes from the Akagi aircraft carrier to give us a reasonably accurate understanding of its colors and markings.
Below is a color profile from what is probably the most comprehensive source of information on the colors and markings of WWII Japanese aircraft, Eduardo Cea’s eight-volume treatise entitled Japanese Military Aircraft. I scanned this particular profile from Volume 2, The Air Force of the Japanese Imperial Navy: Carrier-Based Aircraft, 1922-1945 (I). While I’m aware that there are a number of errors in the English translation of the Spanish text that are somewhat distracting, the series is beautifully illustrated, incredibly informative, and inarguably comprehensive, and, being fluent in Spanish, I blithely overlooked the errors. 🙂 The profile is reproduced here for discussion purposes under the fair use exception to the copyright laws.Itaya’s Zero at Pearl Harbor has been released in 1/72 scale by three different manufacturers: Dragon Wings 50017; Forces of Valor 85032; and Witty Wings 72-012-001. This post concerns the Forces of Valor (FOV) model. The Dragon Wings model was reviewed in the previous post. A review of the Witty Wings model will follow shortly in a separate post, with equivalent photos to the other two for ease of comparison.
The Forces of Valor 85032 Zero
Below is a portside view of the FOV model. Unlike the Dragon model, the FOV model does not have the caramel “ameiro” finish. Its tone is not gray, either; instead, it’s more of a light ivory.In the photo below, note the somewhat deep panel lines throughout the model. Though they are clearly overscaled — about as pronounced as Dragon’s — they do not necessarily detract from the model because, unlike Dragon, FOV did not highlight them with a black wash.The photo below provides an excellent view of the tail no. “AI-155.” As mentioned in the Dragon review, the “AI” code was the designation for the Akagi aircraft carrier. In the three-digit number after “AI”, the first digit (“1”) indicates that it is a fighter plane. The last two digits (“55”) are simply the aircraft number within the unit. The tail numbers on Japanese carrier aircraft were usually red.
Note also the three horizontal yellow stripes on the tail that indicated command: three stripes for the group leader; two stripes for a squadron leader (9 aircraft); and one stripe for a flight leader (3 aircraft). Note also the “no step” rectangular area outlined in red at the rear of each wing next to the wing root.The photo below provides an excellent view of the Hinomaru, which was carried on both sides of the fuselage aft of the wing and on both the upper surface and underside of each wing — six “circles of the sun” in total. The vertical red stripe is the identification mark for the aircraft carrier Akagi.
Note also the manufacturing plate stenciled just aft of the red stripe. The inset shows that the plate bears the number 1575, meaning it was the 1,575th Zero built. The “2-2-9” means it was built in the Japanese year 2602, second month, ninth day = February 9, 1942. (Yes, two months after Pearl Harbor. 🙂 Forces of Valor “borrowed” this particular stencil from a Zero recovered at Port Moresby in April 1942.) Incidentally, the A6M is called the “Zero” because it first entered service in the Japanese year 2600 (1940), the zero year of the new Japanese century. Please bear in mind that the entire plate is just 4mm wide (just over 1/8 inch). Though the manufacturing plate is not as crisp as Dragon’s, FOV should still be commended for the effort.Below is a shot of the starboard side. Note the absence of the manufacturing plate, which was only stenciled on the port side.In the photo below, note that FOV incorrectly painted the propeller white. The propeller should have been polished natural metal, like the Dragon’s. Note also the two red warning stripes on the tips of the blades that created two neat red circles when the propeller was spinning. As is the case with the vast majority of 1/72 scale prebuilt models, the propeller spins freely.
Note the outlets for the 20mm cannons on the leading edges of the wings just above the landing struts. Also on the leading edge of the portside wing, note the pitot tube, which cannot be taken for granted. The Corgi Zeros, for example, do not have one.The photo below shows that the landing strut covers on the FOV model, like the Dragon’s, also have the “55” that matches the last two digits of the tail number. The FOV also has the correct A6M2 cowling, which had four oval-shaped fasteners on each side of the matte black cowling, one on the front part of the cowling and three on the sides. Note also the metal drop tank that gave the Zero an extra 73 imperial gallons of fuel (87 US gallons), significantly increasing its range. Later drop tanks were made of wood and had a slightly different shape.The Feature
It was a welcome surprise that the cowling on the FOV Zero is a separate, removable piece that reveals a Sakae two-row 14-cylinder radial engine. The basic motor is unlikely to make any collector salivate, as it lacks detail, but it looks the part, particularly without magnification. As I’ve pointed out in the past, special features often come at the expense of accuracy, as with the opening canopy on the Dragon model. However, the removable cowling on the FOV is a simple feature accomplished without loss of accuracy that opens up diorama possibilities. The one quibble would be the white wash to highlight the fasteners, which can be easily remedied with a simple black wash. Note also that, unlike Dragon, FOV included a pilot.The Rub
Some collectors were critical of the unsightly screw holes on the underside of the wings and fuselage, as can be seen in the lagniappe photo below, used to secure the model to the packaging. While they’re noticeable and unattractive when you flip the model on its back, it is somewhat of a consolation that they’re on the underside of the model and, at least for me, were not a deal-breaker. Still, it may be a consideration for more serious collectors.The Upshot
The Forces of Valor 85032 Mitsubishi A6M2 Zero is an attractive model that resembles the original fairly well. The excellent casting shows no perceptible problems in its proportions. The cowling, propeller, and undercarriage are all well executed, with no apparent accuracy issues. The markings are accurate, though not as crisp as those on the Dragon. The removable cowling is a welcome feature for those who build dioramas. The FOV 85032 Zero, released under the enthusiast series, was also released as a 95032 regular issue. The only difference between the two releases is that the 85032 has both wheels up and wheels down options, while the less expensive 95032 only has a wheels down option. I have both versions and there appears to be no difference in the finish or weathering. In my opinion, the FOV Zero is a great little model that compares favorably with Zero models of most other manufacturers.
Again, thank you for your indulgence and I hope you enjoyed the post. If something looks amiss, please let me know. I would be delighted to correct inaccurate information so that this may be useful for other 1/72 scale collectors and wargamers. As always, comments, questions, corrections, and observations are welcome. Stay tuned for a review of the Witty Wings model of the very same aircraft in the next post.