The Sherman in 1/72: A Firefly Named “Carole” in Normandy, Part 2 – “Brewing Up”

This is Part 2 of A Firefly Named “Carole” in Normandy. For a description of the actual tank and a review of the Dragon model, please refer to the previous post here.

The Crew of the “Carole” in Normandy

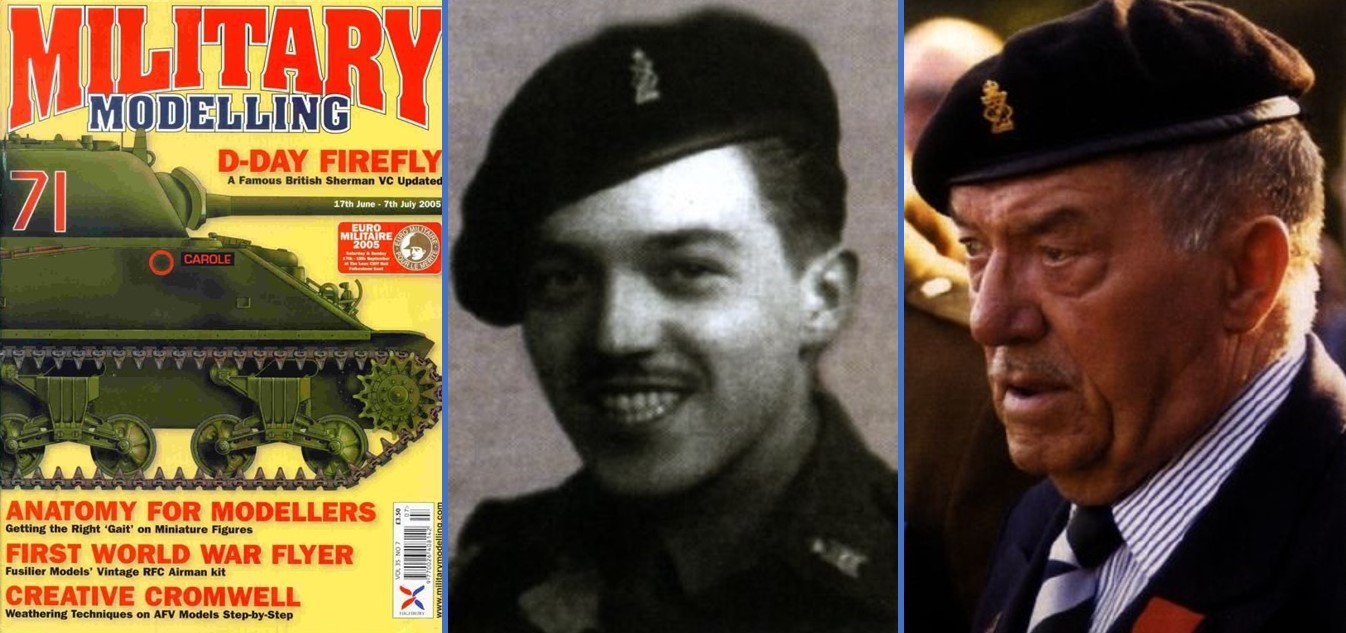
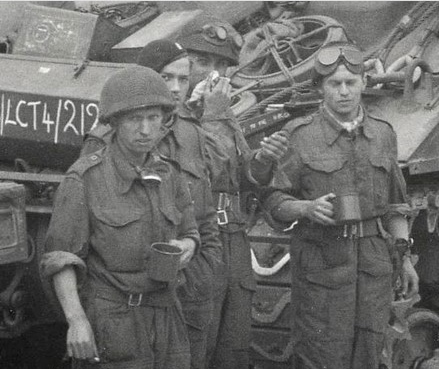
I was intrigued by the photo of the four young members of “Carole’s” crew in front of their vehicle “brewing up” at Gosport just before leaving England on their way to Normandy. The human interest value of the photo is immense, as we know the fate of at least two of these young men — Commander Fred Scamp perished soon thereafter, while Gunner Douglas Kay survived into old age. This type of photo where you look into the faces of men who will soon face their fate is always touching to me, whether the soldiers are American, British, Russian, German, Japanese, or any other nationality.

At any rate, I wanted to recreate the aforementioned photo, or something that evinced its feel. However, the fact that the photo was taken while “Carole” still had the wading trunk made it a non-starter as the Dragon model is of “Carole” after the trunk was removed. In addition, recreating anything that even looked like the background in the scene was beyond my meager modeling capabilities. The only avenue available to me was to depict the scene after “Carole” and its crew arrived in Normandy.

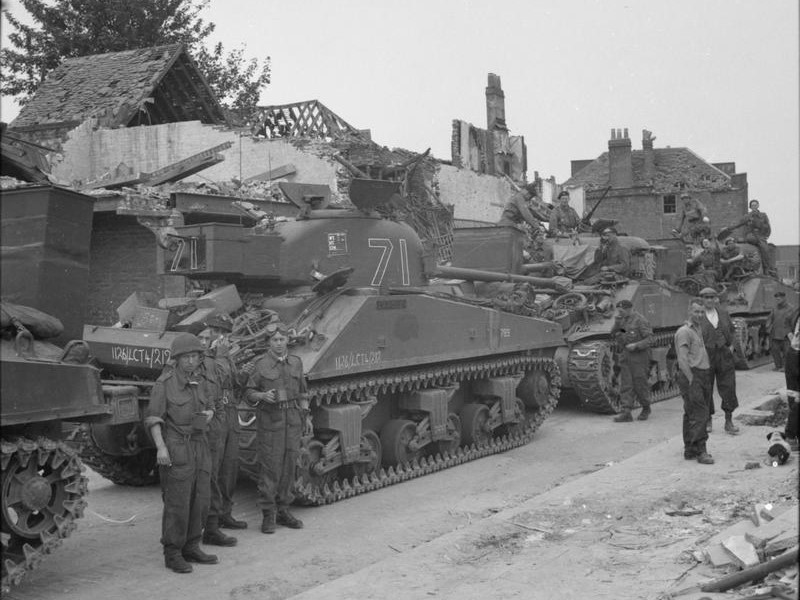
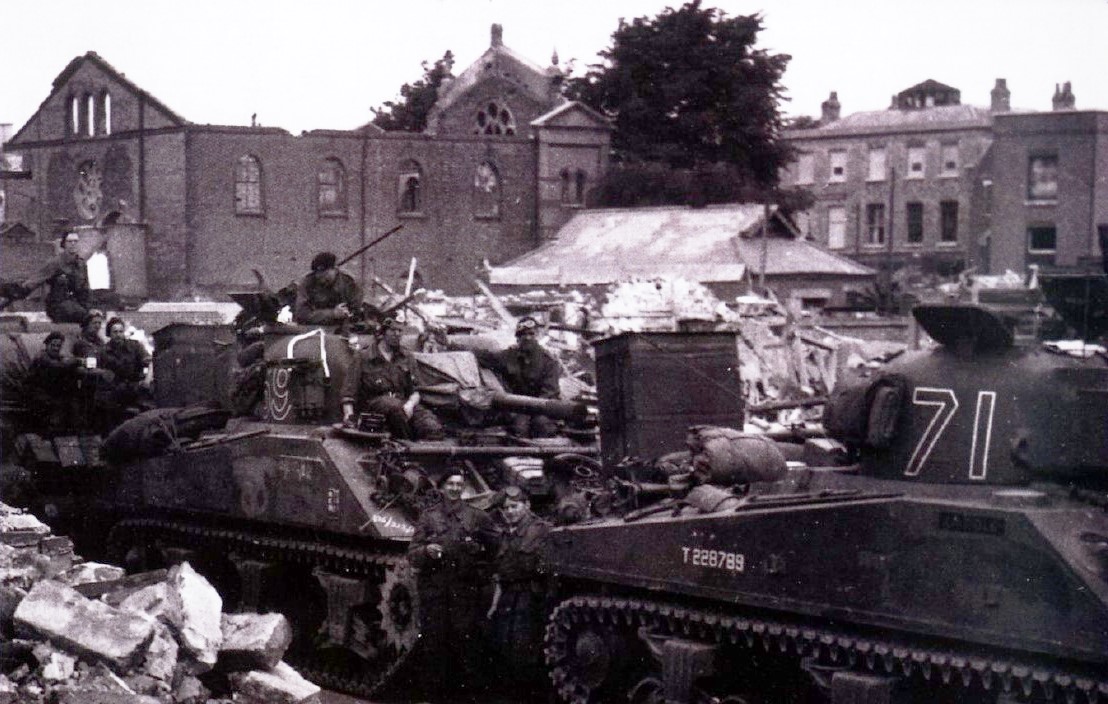
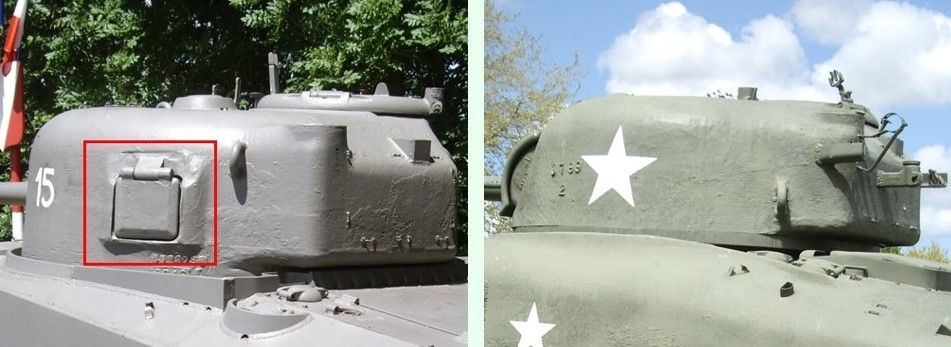
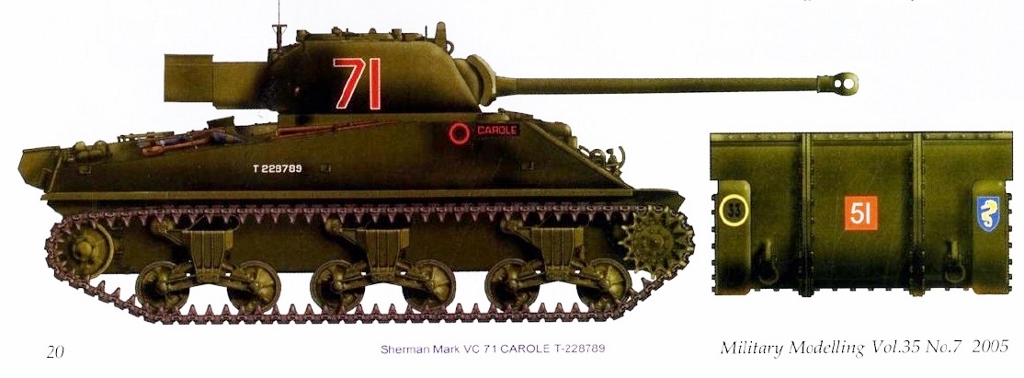
The aforementioned photo is on the left in the triptych below. (See previous post for a larger, uncropped view of this photo.) The middle photo shows “Carole” in Normandy. Note the high grass, the stone wall behind the tank, and the destroyed buildings behind that wall. The photo on the right shows a similar scene of a British tank crew with their Sherman. An interesting feature of the photo is that it includes tankers wearing different clothing. Click on the photo to enlarge it.
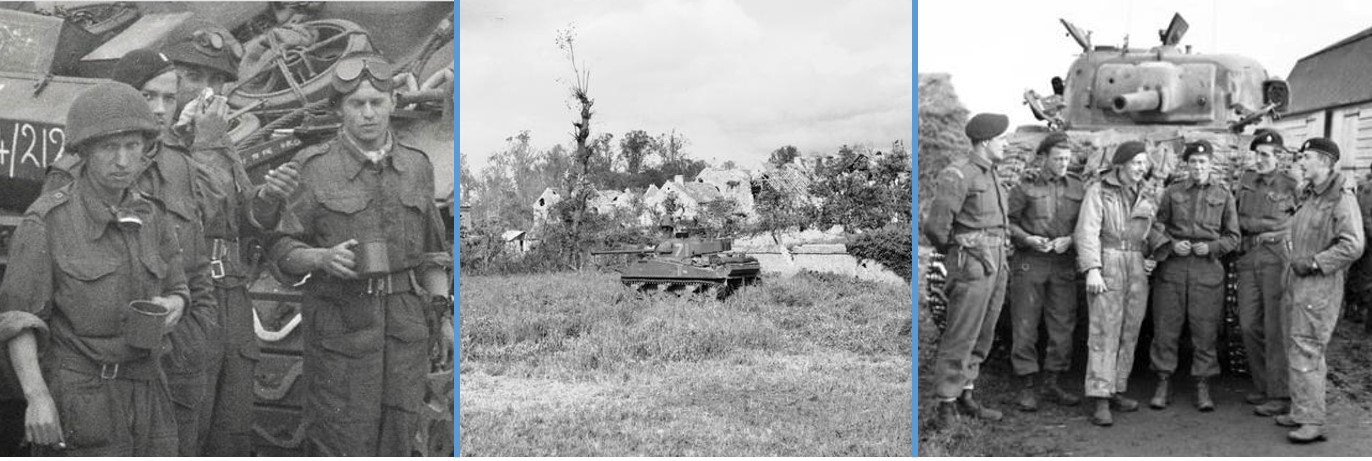
carole-triptych-blue-lineThe Diorama

The diorama below is a composite of those three photos. The modest effort depicts the crew taking a break in front of their tank somewhere in Normandy. Note the tall grass and stone fence present in some photos taken during the Normandy campaign. I’m not unaware that the stone fence is inexplicably intact while the building is in ruins and the tree next to it is completely charred. Still, I concluded that carving rocks out of the wall to simulate damage would not be worthwhile as it could not match the picture in my head anyway.1-008-best-bw
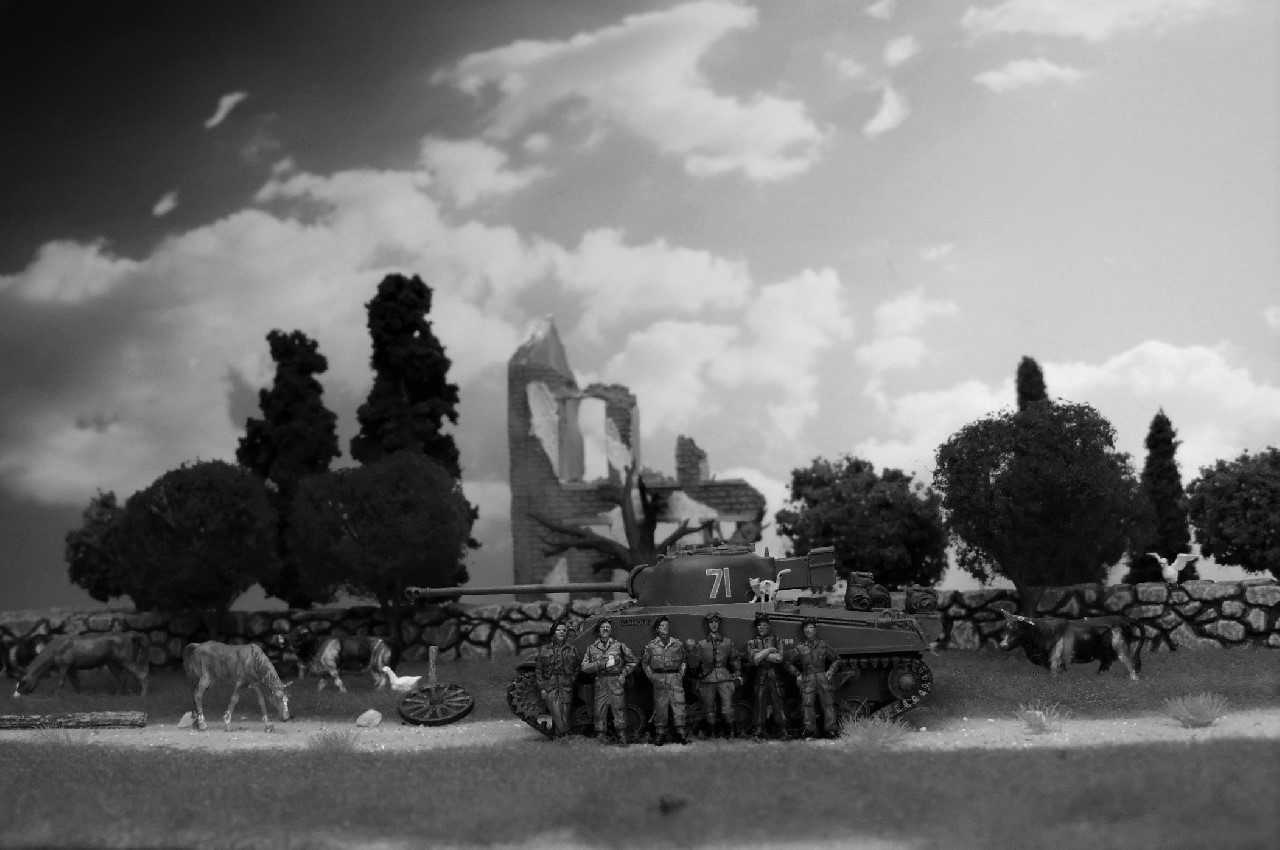
Below is the same photo in color. Ever the philistine, I’m convinced that color photos are infinitely better than black & white photos. To me, continuing to film in B&W in this day and age, as was done in The Good German, which is actually an excellent film, is as silly as would be continuing to film silent movies even though we’ve mastered sound.

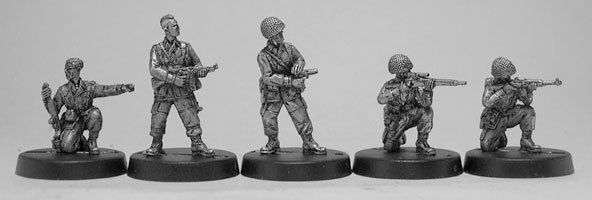
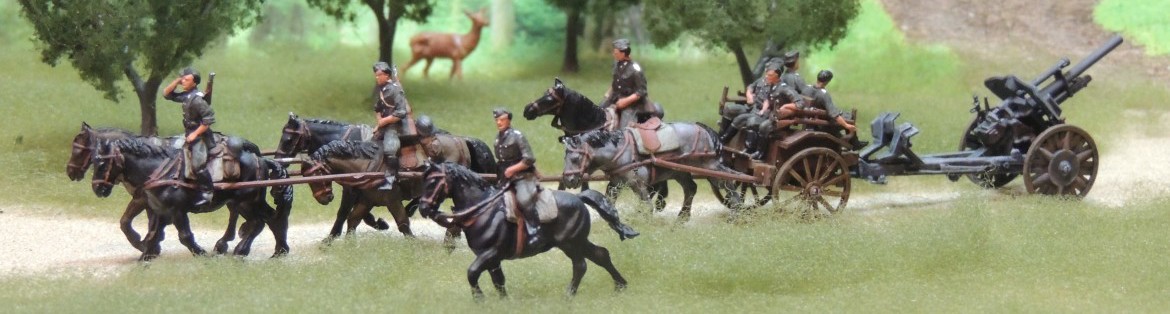
Note that the six tankers sport different uniforms, with the 1st, 4th, and 6th (from left) wearing standard British battledress serge while the 2nd and 3rd figures wear denim overalls. The 5th figure is dressed more casually, reflecting the motley nature of clothing in units throughout the war. These Milicast figures are nothing short of cromulent*. Click on the photo to embiggen* it.1-008-best
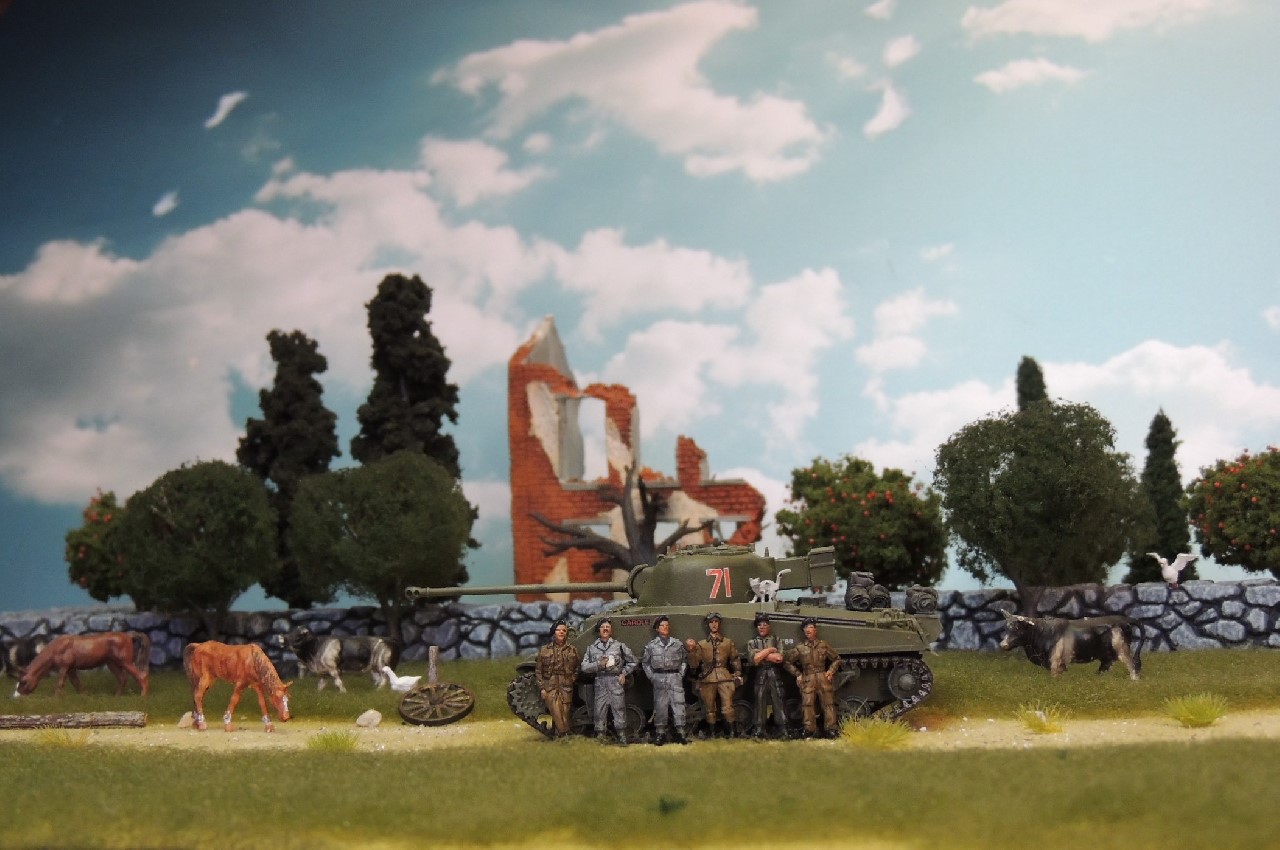
Note that all the men wear a black beret, the hallmark of a WWII British tanker. According to Military Modelling Vol.30 No.11, the design of the distinctive black beret was inspired by French berets used during WWI. The unstiffened crown allowed it to be easily stowed in the tight spaces within the tank while the dark color helped hide grime and stains inherent in working inside a tank.

This is not an idle observation as knowing that Brit tankers wore a black beret and Brit paras a red one would greatly enhance the casual viewer’s enjoyment of a A Bridge Too Far, as a red beret would immediately signal that the action is taking place at Arnhem. 🙂 By the same token, recognizing the “Screaming Eagles” patch versus the “All American” patch immediately reveals whether the action is taking place at Eindhoven or Nijmegen.3-032
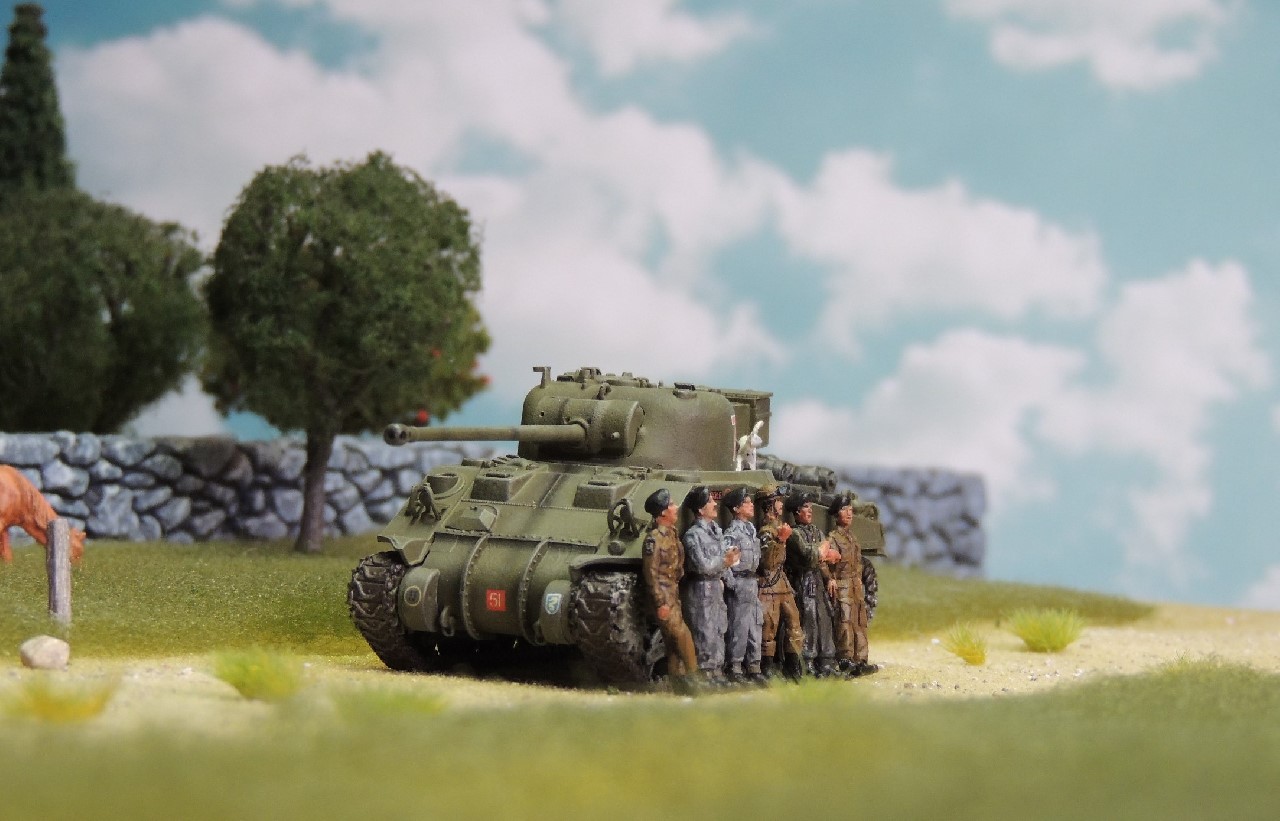
Note that the animals move from photo to photo. The tan horse with a white blaze, in particular, had trouble staying on its four legs so every time it tipped over I placed it somewhere else. 🙂 The photo below is my favorite out of the dozens I took of this diorama, though I’m uncertain why.4-030

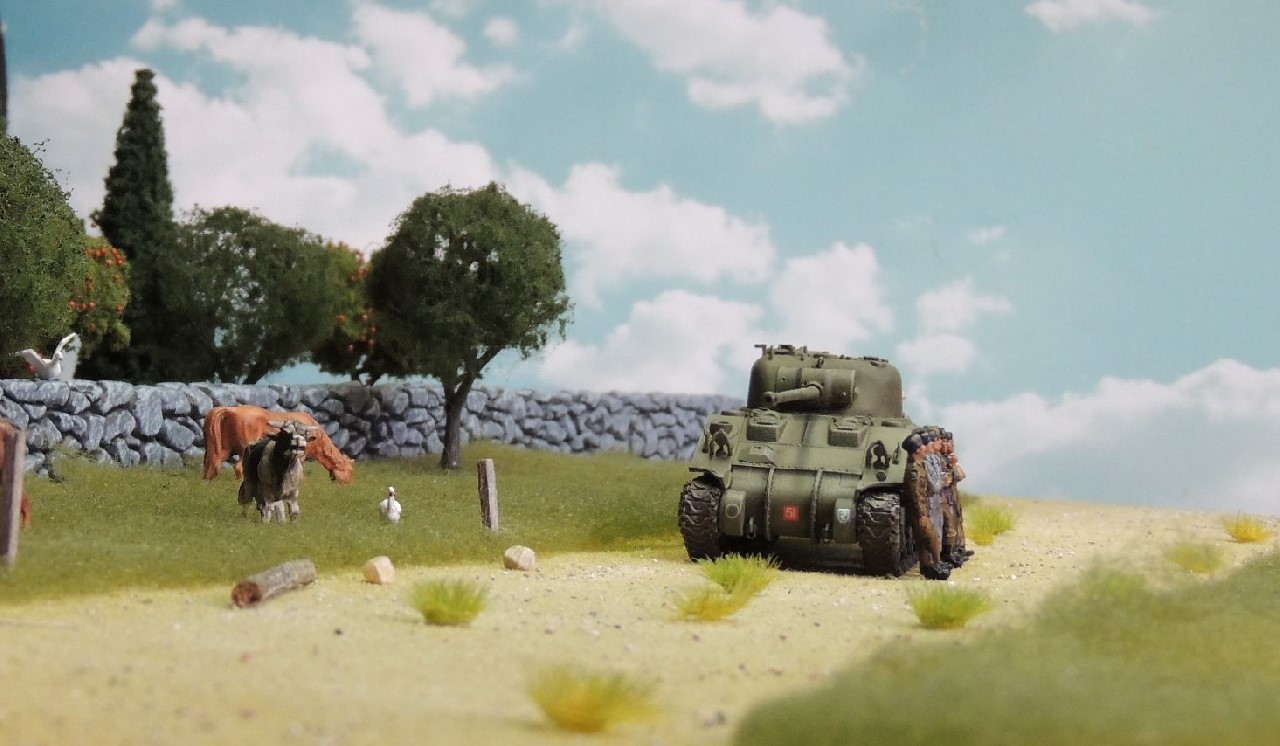
“Everyone has a backstory and deserves a guess in the absence of facts,” Ara Hagopian.

For the first time in writing these posts I had an urge to create a backstory for the cat I whimsically placed just behind the turret number. Do my fellow German bloggers, who seem to be cat lovers, or any other readers have any ideas? 5-015
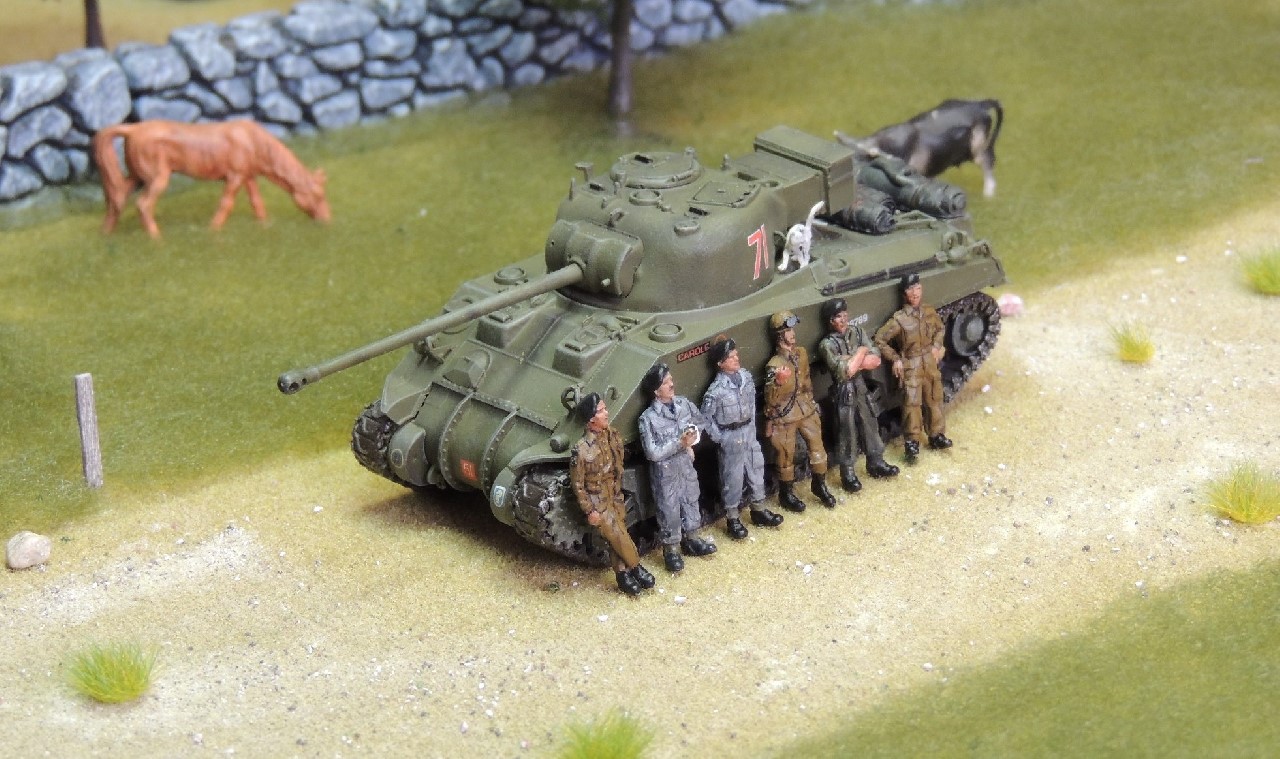
The cattle and horses are Preiser HO scale prepainted figures, which at first blush appeared to me to be the same size as the horses and cattle in the unpainted Preiser 1/72 scale 72511 Horses, Cows, and Sheep set. 

An indolent man at heart, I opted for the prepainted figures to avoid: 1) clipping the 72511 figures from the sprue; 2) cleaning the flash and seams; 3) gluing the two halves of each figure together; 4) priming them to ensure the paint adheres; 5) painting them; 6) detailing them; and 7) being disappointed with the results. I learned afterwards, upon actually placing the two sets side by side, that the 1/72 scale figures were proportionately larger than the HO scale figures. Alas, Preiser is a German company, after all.6-066
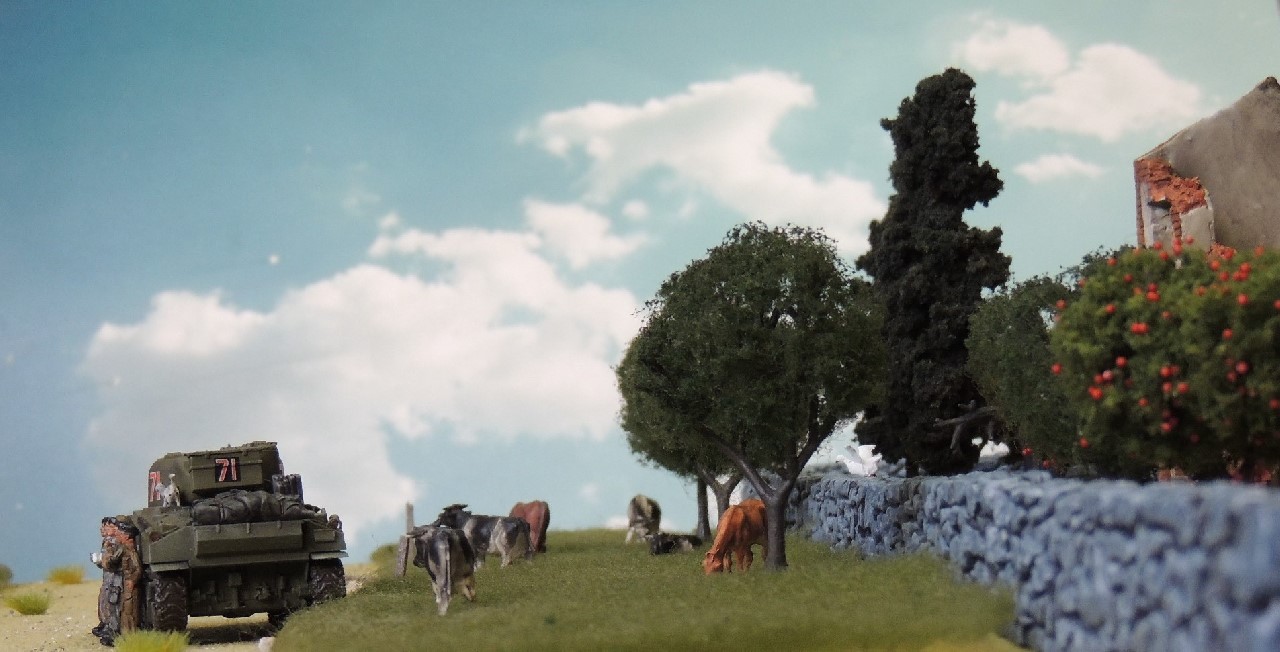
Note the tarps and blanket rolls on the rear hull of the tank. These are Value Gear pieces and they are superb. The stone fence is a Pegasus product that surprisingly looked the part with a simple black wash. 7-060
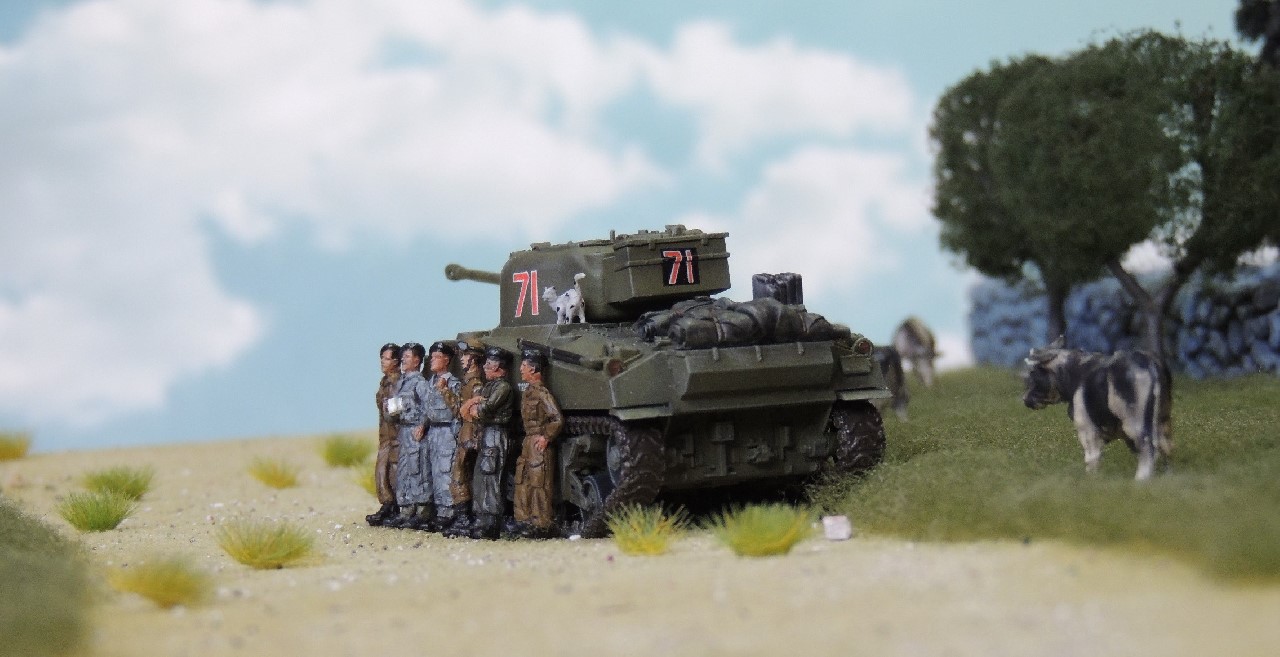
Below is a fairly clear shot of the ruined building, which I had trouble bringing into focus at the same time as the tank and crew. Again, a photographer I am not. The realistic building is from the PMA Stalingrad set. PMA diorama pieces are really quite nice, though difficult to find.
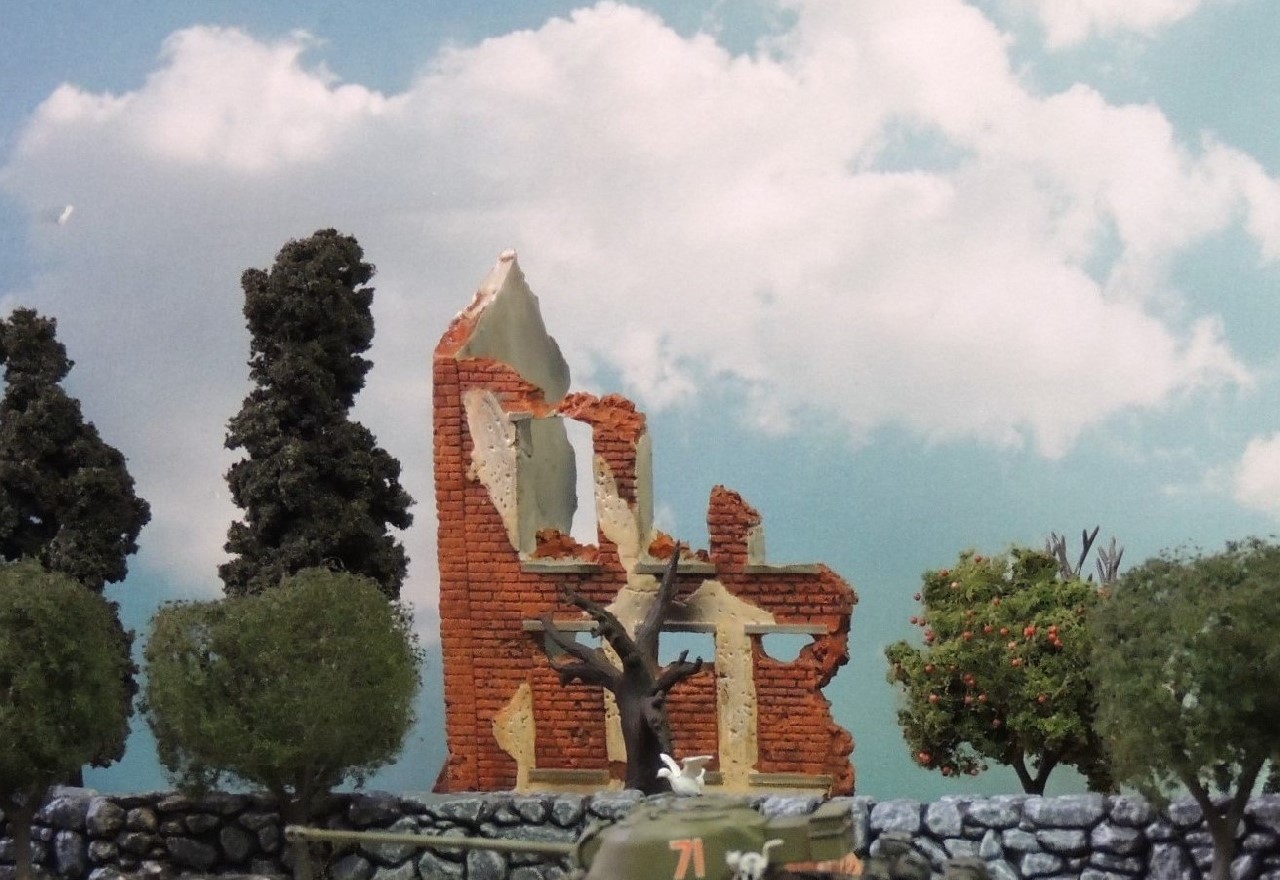
8-067“Brewing Up”

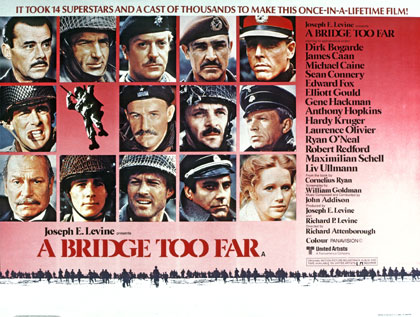
Much has been written about the British soldier’s expectation of regular tea breaks to the detriment of achieving the objective. Some have offered explanations of this phenomenon cloaked in scholarly terms. Nonsense. The Brits may love their tea, but as their opponents have found out throughout history, they certainly achieve their objectives.british-drinking-tea
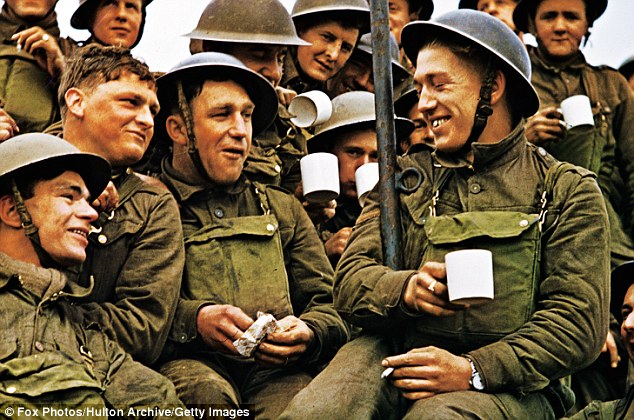
For those of us non-British subjects, the 1977 film A Bridge Too Far was in some respects a formative reference on the peculiarly British affinity for drinking tea. The star-studded film has two important tea-related scenes that left an indelible impression on this blogger. 

The first scene, with Sean Connery, perfectly encapsulates how the British perceive drinking tea:

Major General Urquhart:

“Hancock, I’ve got lunatics laughing at me from the woods. My original plan has been scuppered now that the jeeps haven’t arrived. My communications are completely broken down. Do you really believe any of that can be helped by a cup of tea?

Corporal Hancock:

“Couldn’t hurt, sir,” as he hands Urquhart a cup of tea.

YouTube link: https://www.youtube.com/watch?v=LKr9eja-1cw

The second — this time heated — exchange features Robert Redford, and is more a reflection of how Americans perceive the British love affair with tea:

American Officer:

“I don’t understand, why aren’t you moving, what’s the matter with you guys? Those are British troops at Arnhem. They’re hurt, bad. You’re not going to stop, not now.”

British Tank Officer:

“I’m sorry, we have our orders.”

American Officer:

“We busted our asses getting here. Half my men are killed. And you’re just gonna stop . . .  and . . . drink tea? “

YouTube link: https://www.youtube.com/watch?v=i1EsDkm_r3o

At the risk of belaboring the point, I believe ABTF was simply propagating an incorrect — yet widely held — belief among American soldiers that tea time was fairly important to the British. Still, at least in this case, let’s not blame Hollywood as this was a joint British/American production. ABTF was written by Cornelius Ryan, an Irishman; the screenplay was written by William Goldman, an American; and the film was directed by Richard Attenborough, an Englishman.

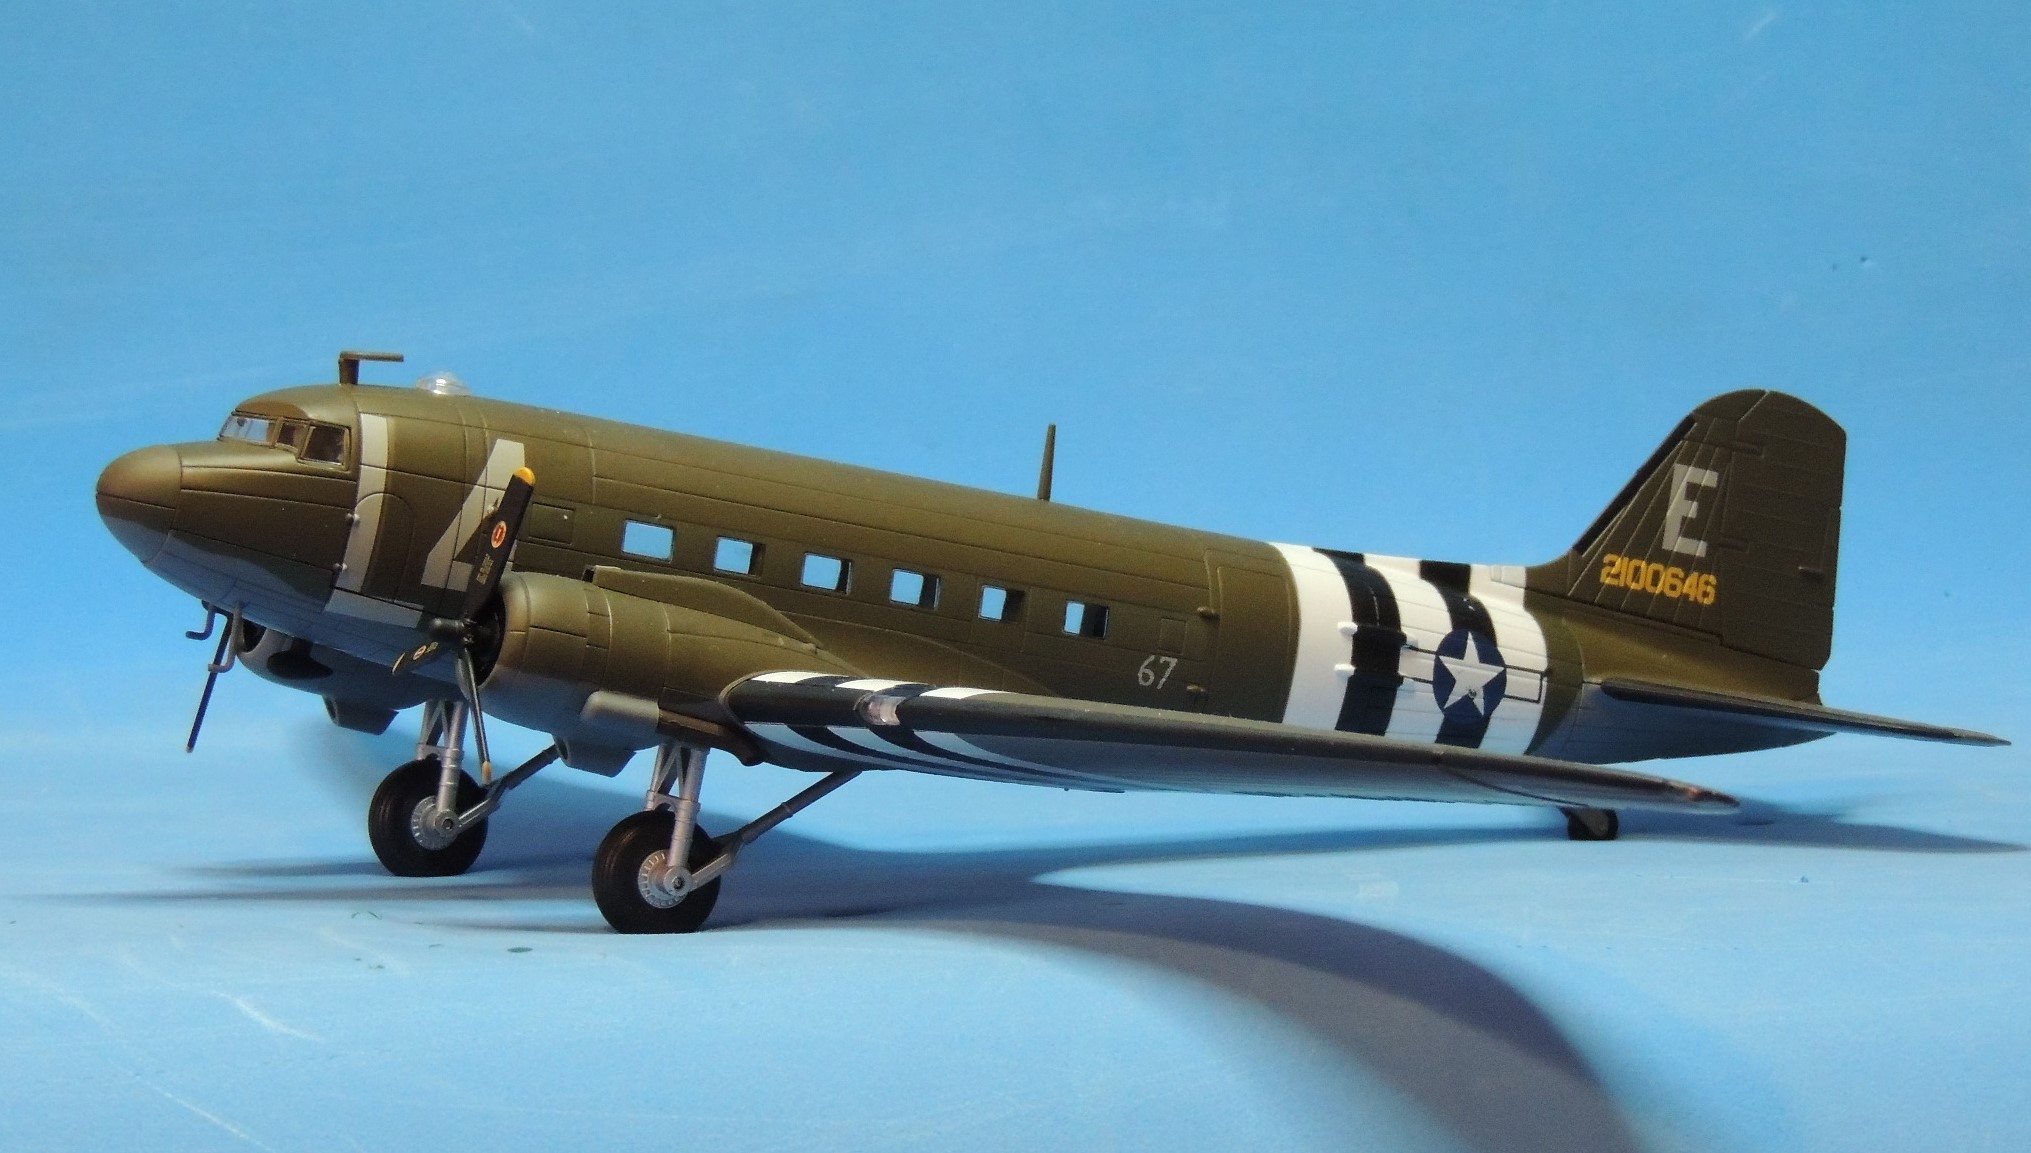
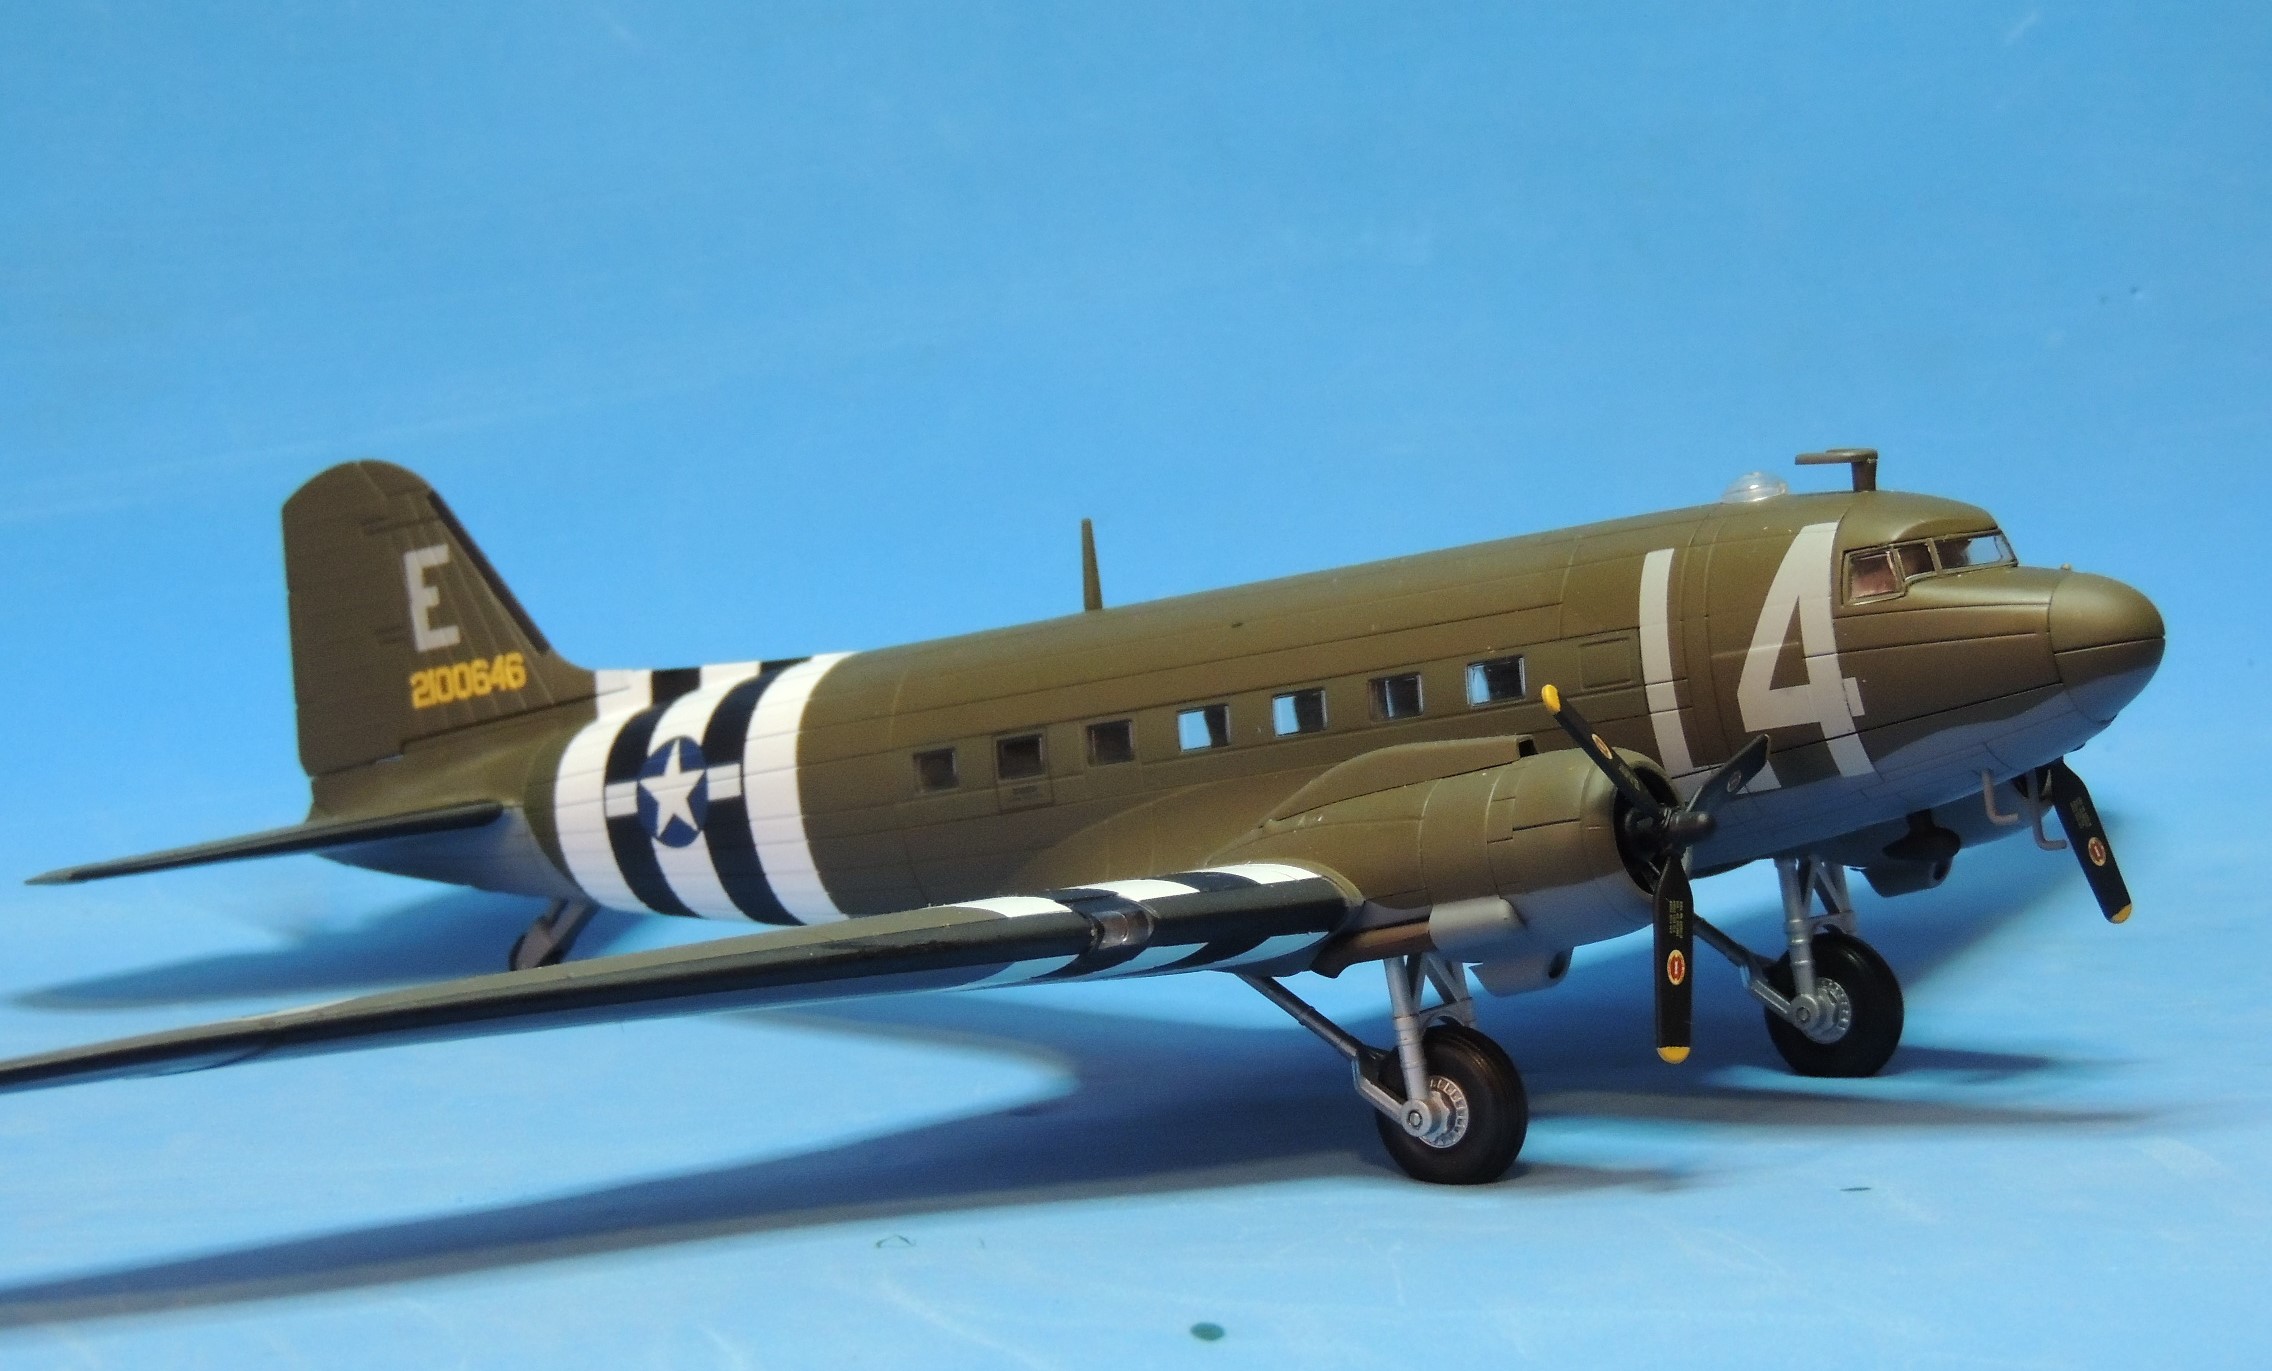
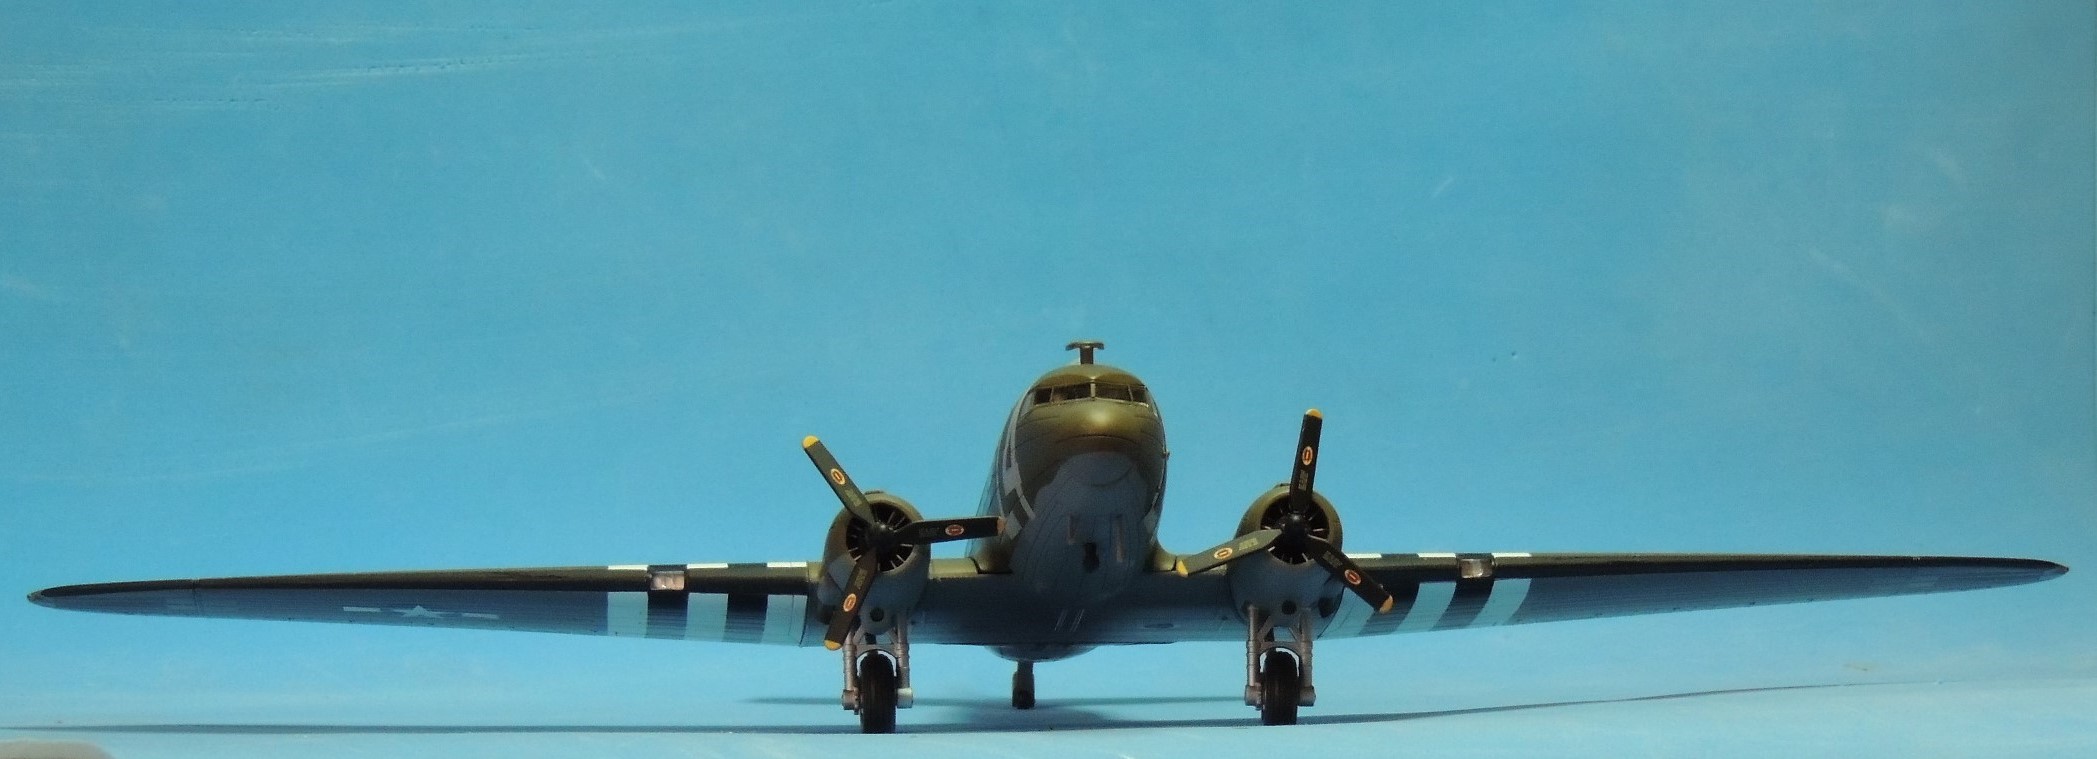
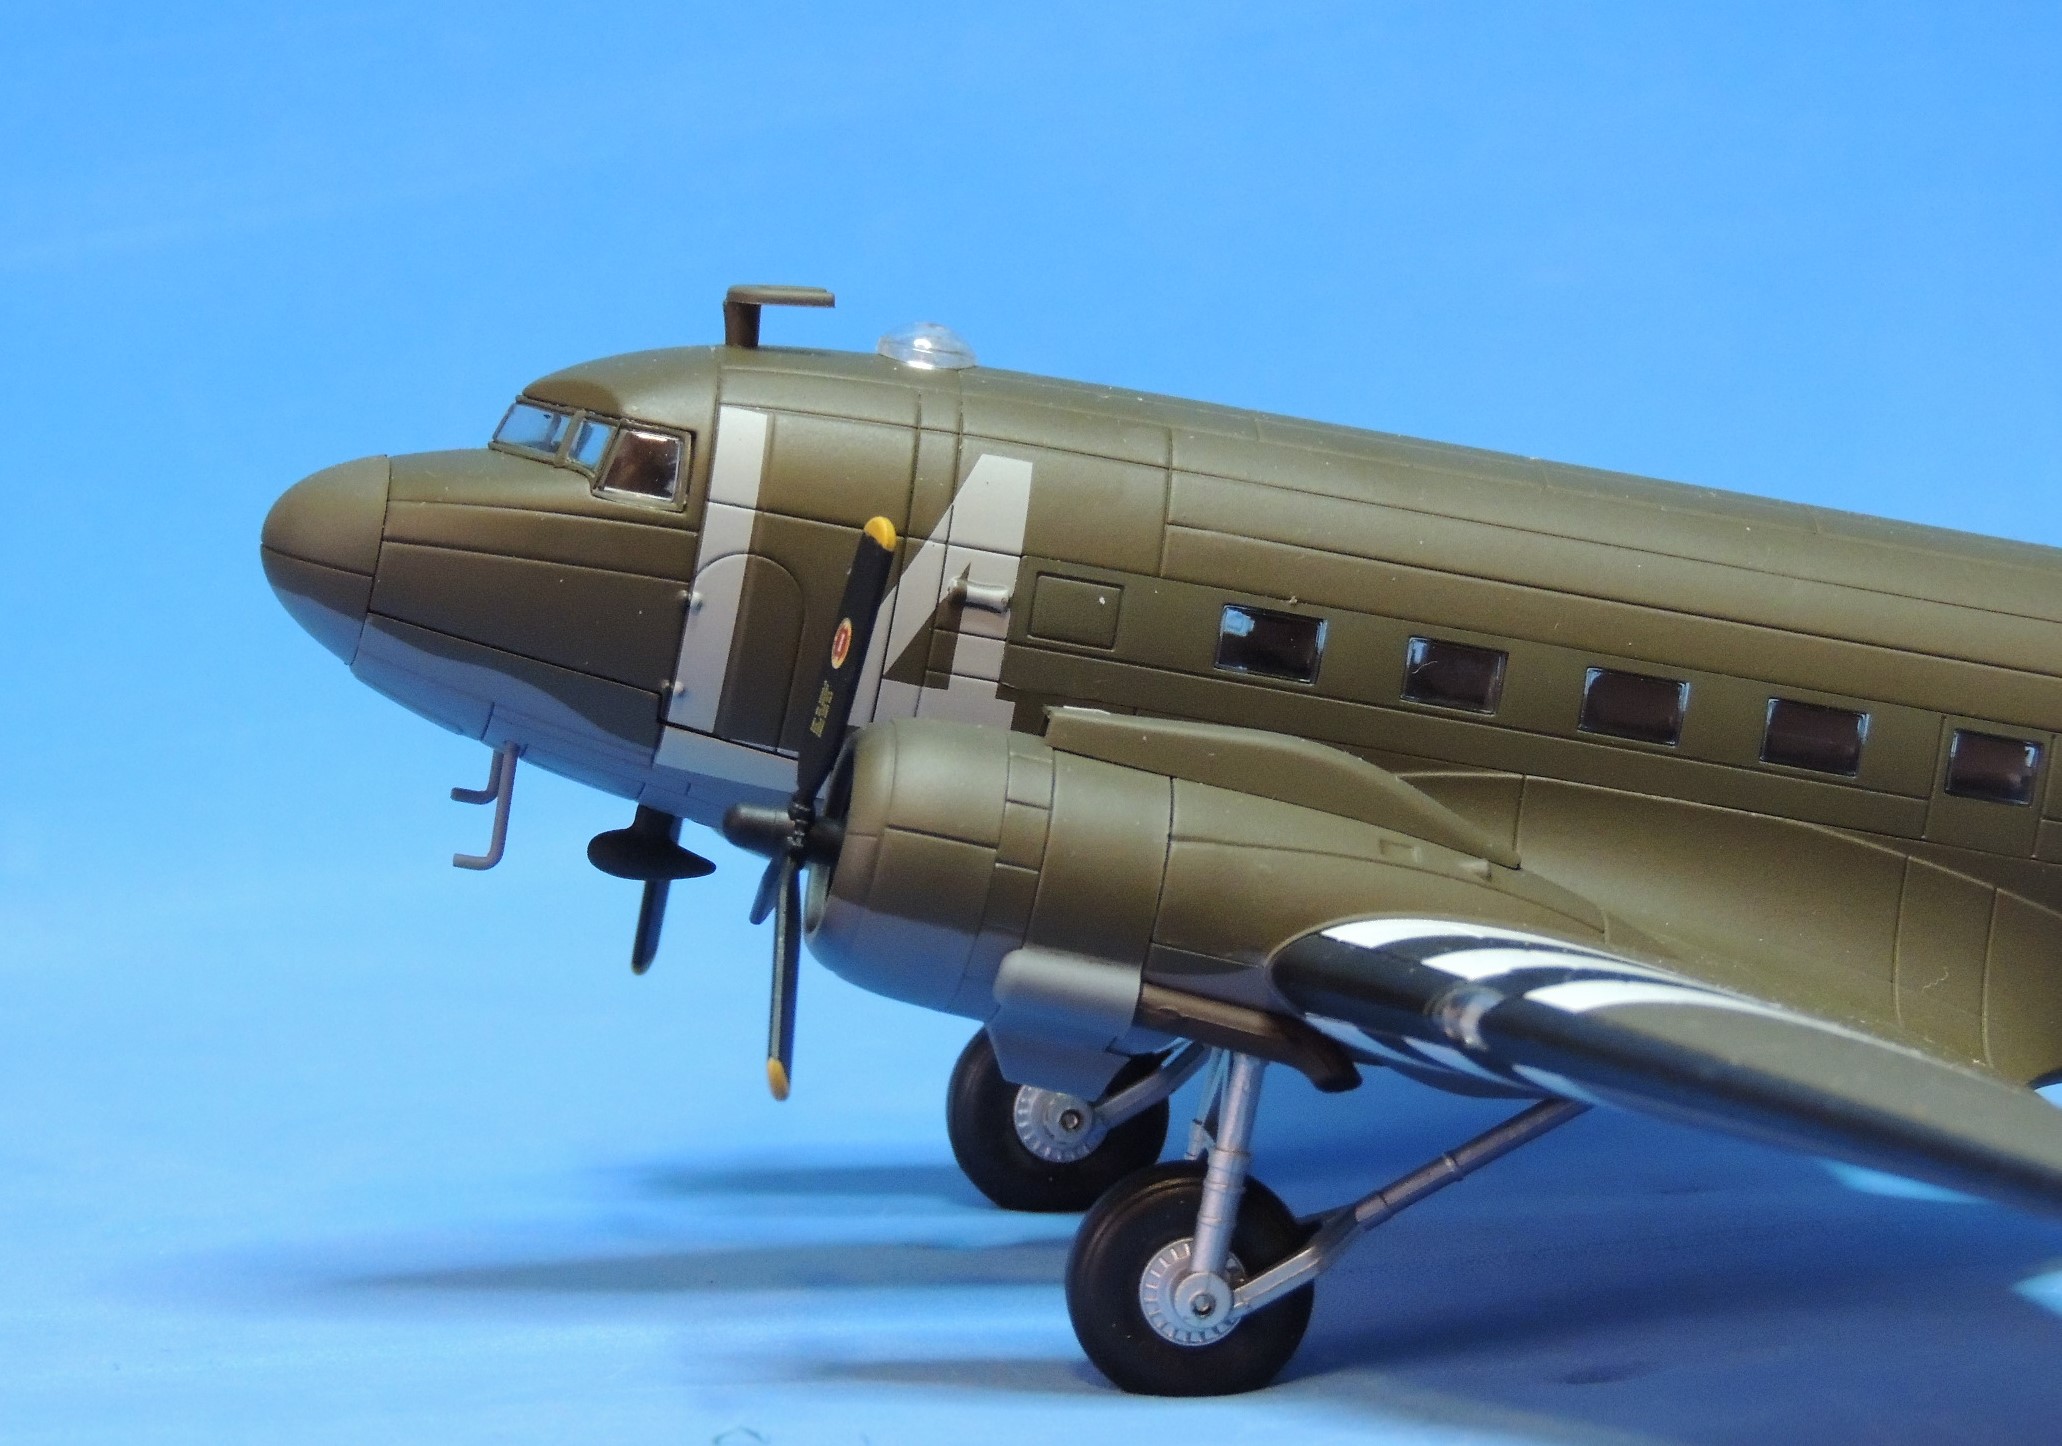
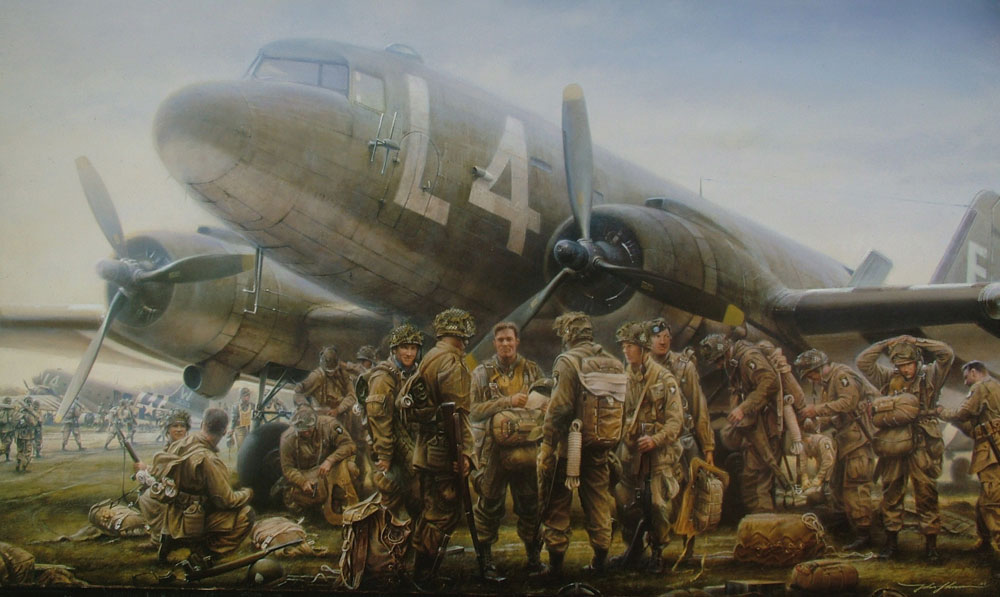
(Incidentally, what a cast! Laurence Olivier, Sean Connery, Ryan O’Neal, Anthony Hopkins, Robert Redford, Michael Caine, Gene Hackman, Dirk Bogarde, Edward Fox, Elliot Gould, and James Caan, just to name the Allies. Only Is Paris Burning?, Tora, Tora, Tora, and Midway come close. Also, those were real C-47 Skytrains/Dakotas in the film — eleven of them in total, borrowed from various countries, including Denmark, Djibouti, Finland, and Portugal. Sorry, I couldn’t resist. 🙂 )

a-bridge-too-far-2-big

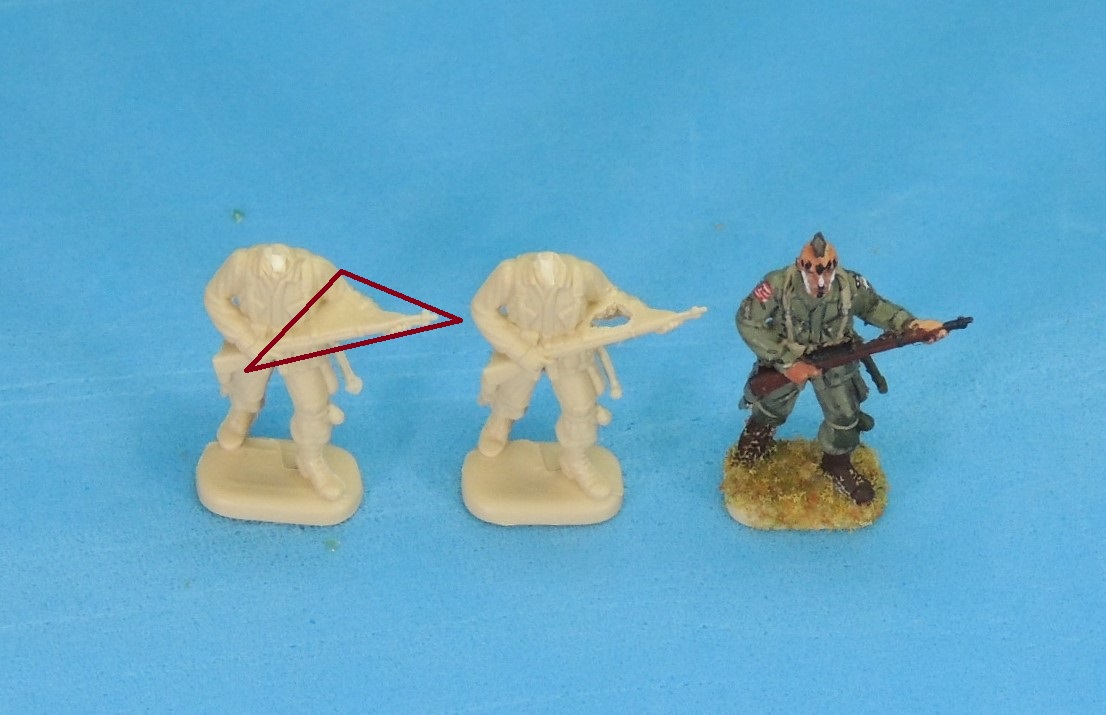
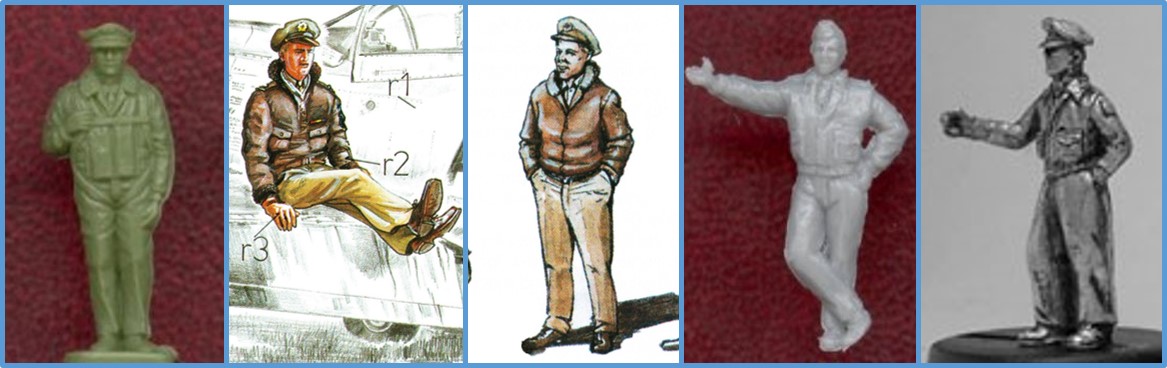
Irrespective of how it came to be, or whether it’s a fair or accurate characterization, it is undeniable that tankers-tea
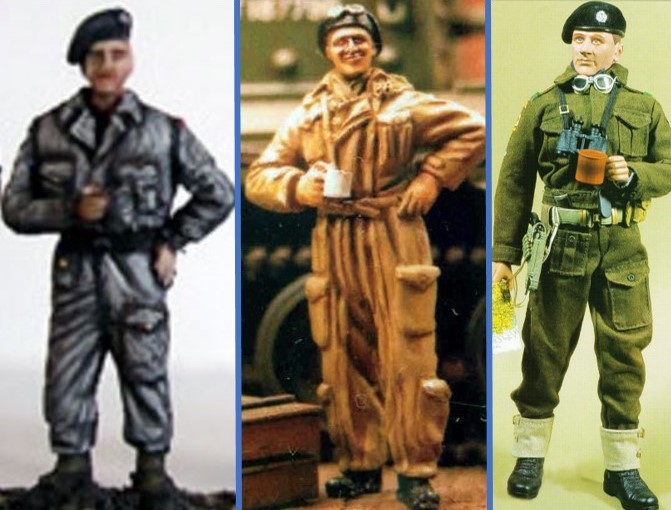
British tankers are now firmly entrenched in the modeler’s psyche as soldiers with a strong love affair with tea. Thus, regardless of the scale, they are often depicted “brewing up” with a “cuppa” in hand. The photo triptych at left, showing tanker figures in different scales, makes the point clearly. At left is the Milicast 1/76 figure used in the diorama; at center is a Dartmoor 1/48 figure; and at right is a Dragon 1/6 figure. The first two photos are from their respective manufacturer’s websites; the third I scanned from an article in the French magazine Steel Masters #58.

List of Diorama Pieces

For those interested, below is the source of each piece:

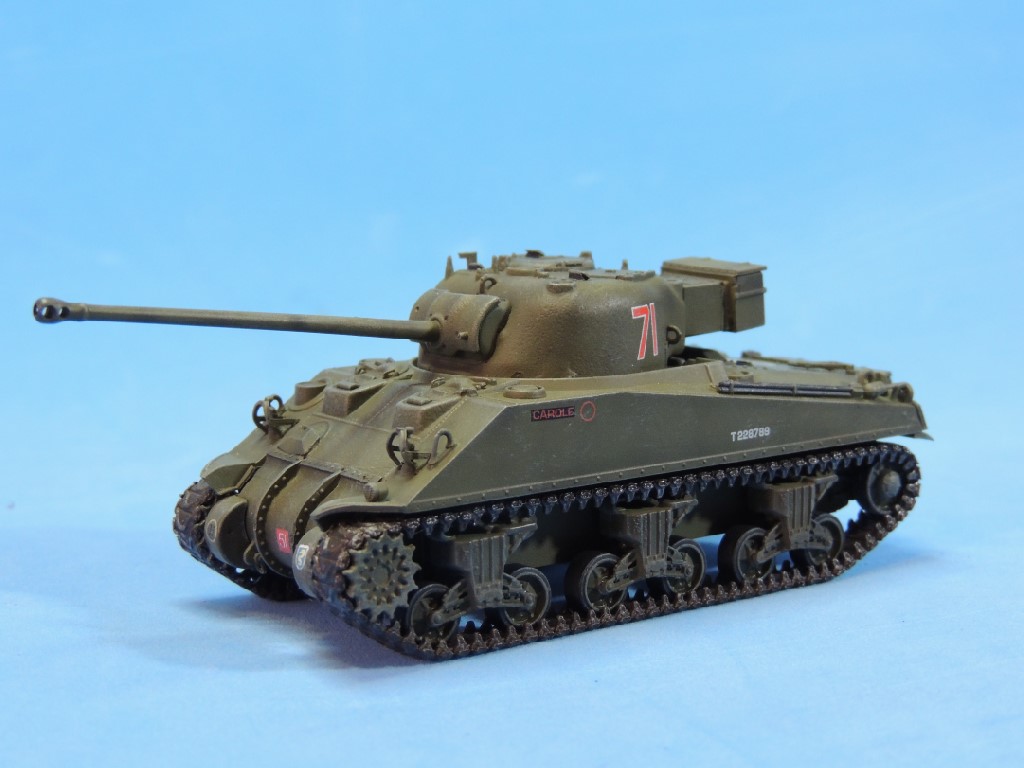
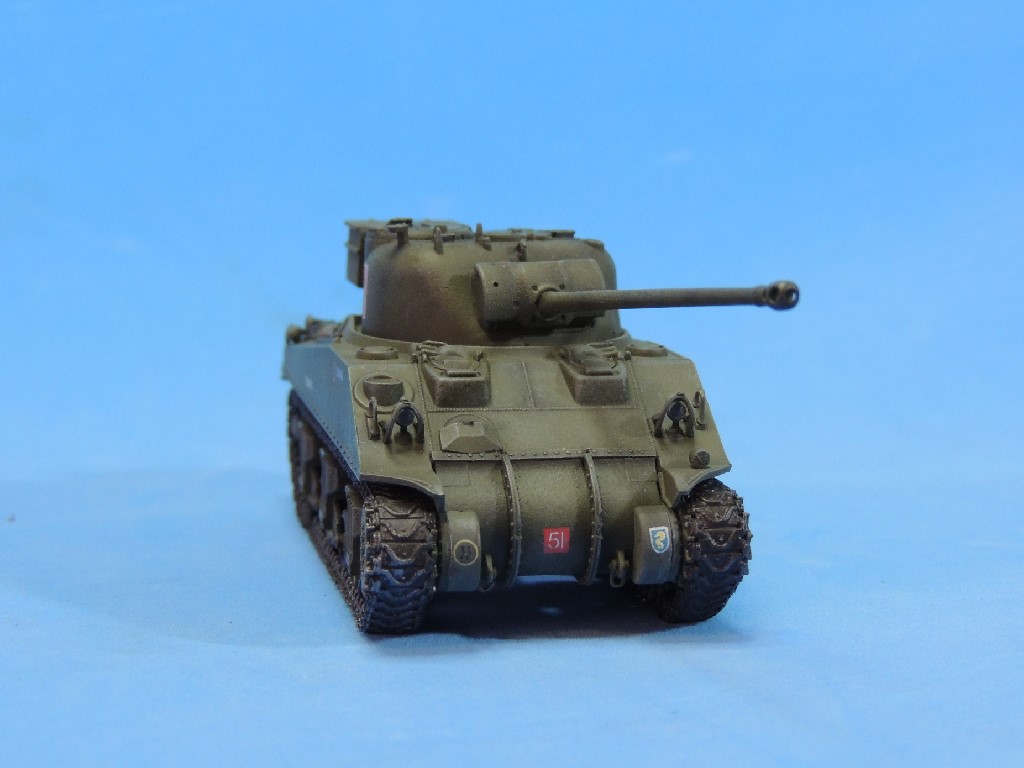
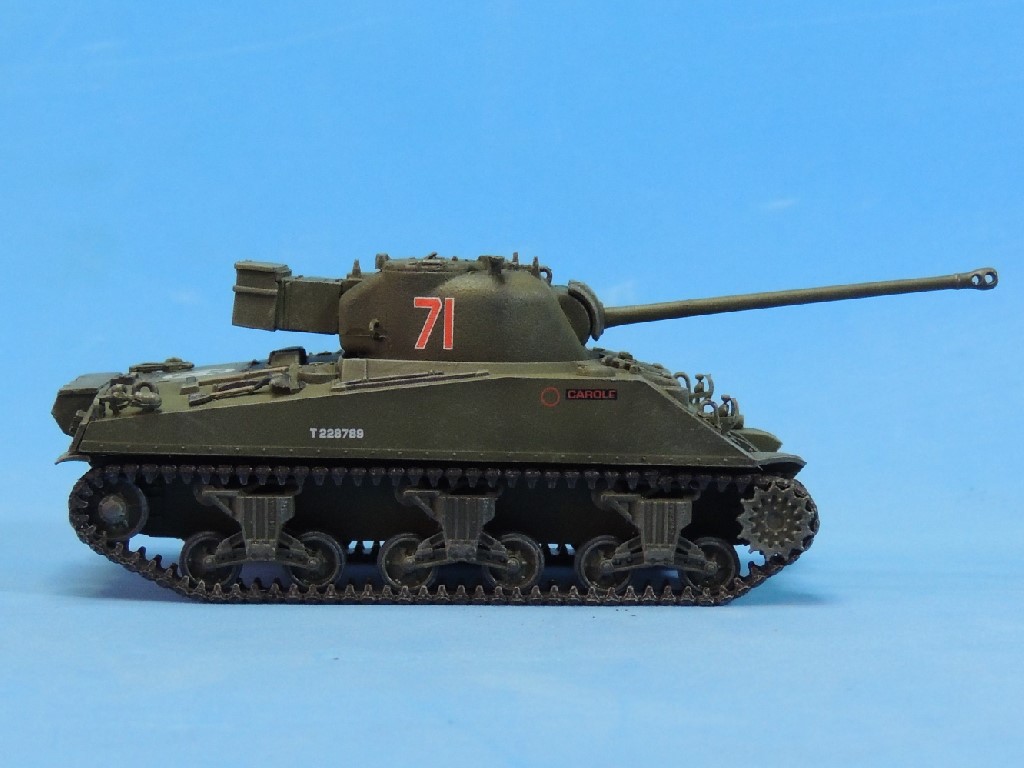
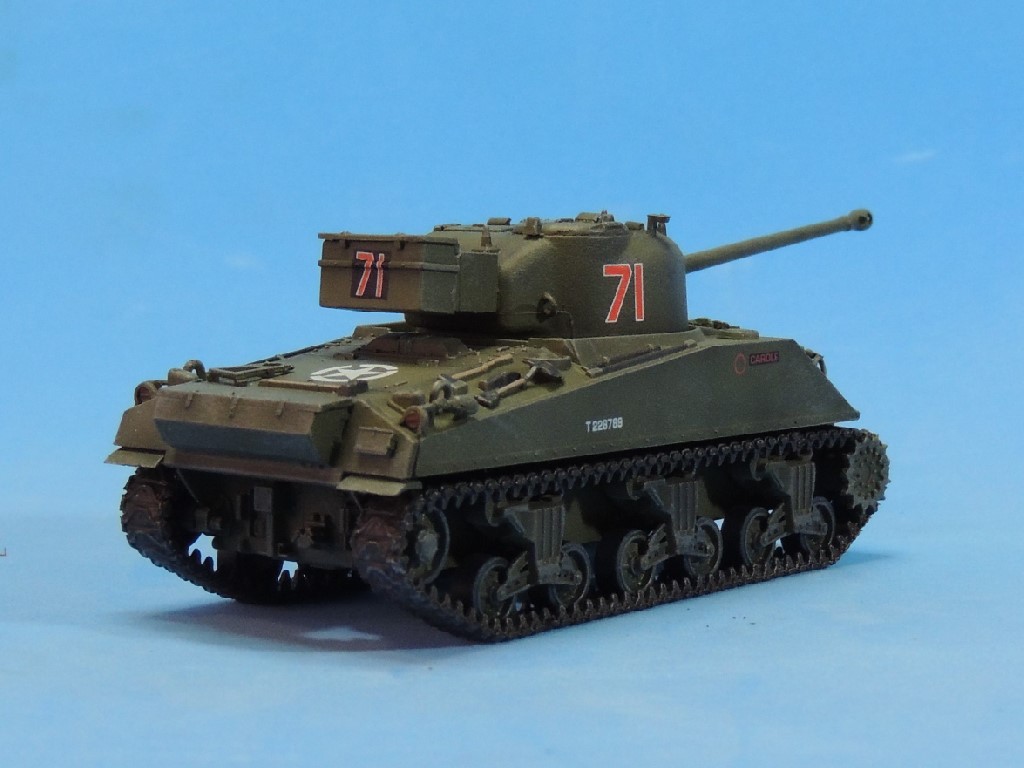
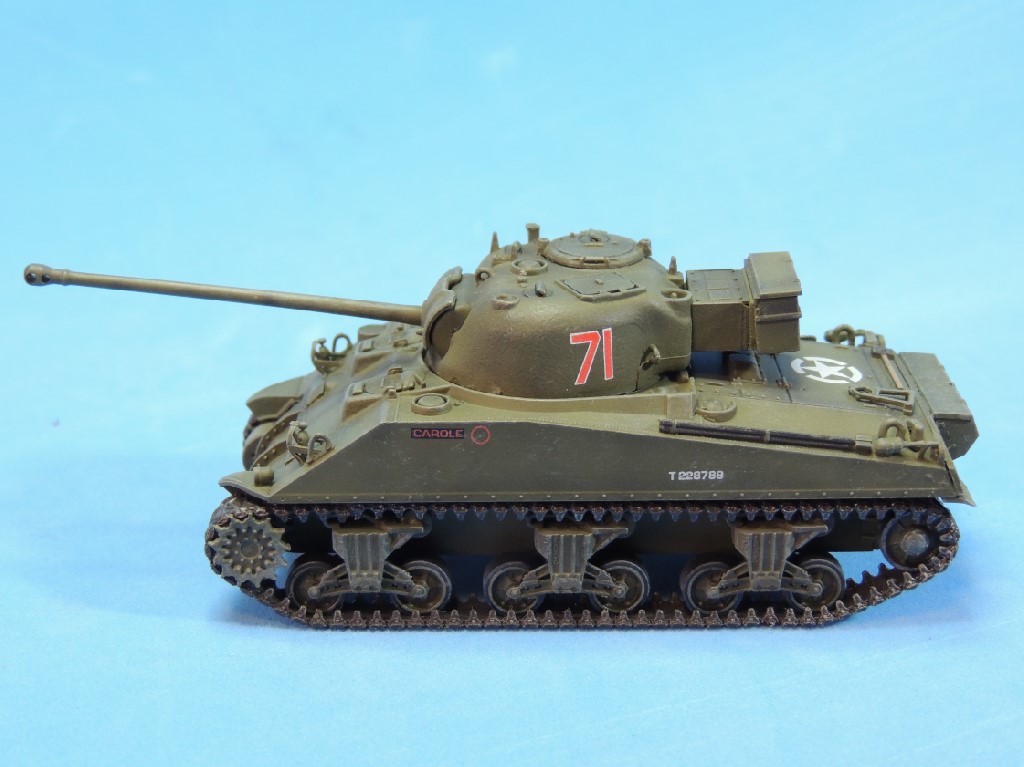
  • Tank: Dragon 60250 Firefly Vc, 13th/18th Royal Hussars, 27th Armoured Brigade, Normandy 1944;
  • Tarp and Blanket rolls on hull: Value Gear Allied Tents, Tarps, and Crates;
  • Crew: Milicast 061 British Squaddies and Milicast 054 British Troops;
  • Animals: Various Preiser HO and 1/72 sets;
  • Trees: Various Woodland Scenics;
  • Building: Precision Model Art PMA P0204 Stalingrad;
  • Stone Fence: Pegasus Hobbies 5202 Stone Walls;
  • Spoked Wheel: Hat 8260 WWI German Field Wagon;
  • Meadow: Woodland Scenics Grass Mat;
  • Tufts of Grass: Noch Scenemaster, Spring Grass Tufts; and
  • Backdrop: Silk poster ordered on Amazon from China.

I hope you enjoyed this simple diorama of “Carole” and its crew. Again, if something looks amiss, please let me know. I would be delighted to correct inaccurate information so that this may be useful for other 1/72 scale collectors and wargamers. As always, comments, questions, corrections, observations, and backstories for the cat are welcome.

————————————————————————————————————————————–

Once again, I’d like to thank my friend and fellow collector J. Buccellato of NY for his incredible skill and patience in painting the Milicast figures. He’s the sine qua non in creating these dioramas. His “therapy” is my joy. *For those not familiar with the two neologisms in this post, I highly recommend Season 7, Episode 16 of the Simpsons on the episode’s 20th anniversary. 🙂

The Sherman in 1/72: A Firefly Named “Carole” in Normandy, Part 1 – The Tank

Tank enthusiasts frequently admire a tank and blissfully identify its markings as well as its physical features — the version or type of hull, turret, gun, running gear, or tracks. This tendency to focus on the vehicle, rather than what it represents, holds especially true for Sherman tanks, which carry dizzying combinations of  these various elements. We often forget, however, that each of these fighting vehicles was manned by five young men who had names and families and dreams, and many made the ultimate sacrifice inside those very vehicles. “Carole” stands out in that Douglas Kay, its gunner, survived the war and serves as a reminder of the human element we often ignore.

The Actual Tank

“Carole” was a Sherman Mark V Firefly belonging to the 13th/18th Royal Hussars Regiment of the 27th Armoured Brigade of the British Army. In its eight-month operational life, “Carole” participated in the D-Day invasion in Normandy in June 1944 and in Operation Market Garden in Holland in September 1944. It was destroyed in Germany in February 1945.

Below is the best known photo of “Carole” preparing to be loaded onto a Normandy-bound landing craft at the Port of Gosport in Southern England, on June 3, 1944. The photo is from the Imperial War Museum archives (IWM H38995) and is used here under their non-commercial license. Note the deep wading trunk at the rear of the hull, behind the gun, which itself has been traversed to face the rear for embarkation. THE BRITISH ARMY IN THE UNITED KINGDOM 1939-45 (H 38995) A Sherman Firefly and Sherman tanks of 'C' Squadron, 13th/18th Royal Hussars waiting to be loaded aboard landing ships at Gosport, 3 June 1944. The Firefly crew in the left foreground are Trooper Fred Shaw, Trooper Doug Kay, Sergeant Fred Scamp and Trooper Bill Humphries. Their vehicle was named 'Carole'. Copyright: © IWM. Original Source: http://www.iwm.org.uk/collections/item/object/205126259“Carole” and the 13th/18th Royal Hussars took part in the Normandy landings on Sword Beach on June 6, 1944, successfully spearheading the invasion force in support of  the British 3rd Infantry Division. Sword Beach, assigned to the British Army, was the easternmost Allied landing site. All told, almost 30,000 allied troops came ashore at Sword Beach, with losses of 683 men. The IWM photo below shows “Carole” still equipped with its wading trunk.carole-4-2Below is another IWM photo (B5471) of “Carole” in the village of Bréville-les-Monts, on June 13, 1944, a week after D-Day. The Germans had occupied the village in early June and from there had been attacking British positions at Sword Beach. “Carole’s” unit, Squadron C of the 13th/18th Royal Hussars, successfully supported the 6th Airborne Division in securing Bréville, thereby protecting the beachhead. Forgive the graininess of the photo, which has been enlarged from a shot taken at considerable distance. Note that by this time the trunk had been removed.carole-scan-1Once the landings were completed and secured, the British Army disbanded the 27th Armoured Brigade in July 1944, and “Carole” and the 13th/18th Royal Hussars were transferred to the 8th Armoured Brigade. During this time, “Carole” is credited with knocking out a Tiger and a Panther on August 11-12, 1944, towards the end of the Normandy campaign. As part of Operation Market Garden, “Carole” crossed the Nijmegen Bridge, a key Allied objective, on September 21, 1944. The fighting was so brutal at Nijmegen that it came to be known as “Little Omaha” and has been compared to Guam, Tarawa, and Omaha Beach.

“Carole” was destroyed on February 12, 1945, in Goch, Germany, by an 88mm round that entered through the mantle and lodged itself in the radio box at the rear of the turret. The round killed Sgt. Fred Scamp, the commander, and Trooper Wilson, a substitute gunner who was filling in for Douglas Kay, who was on leave that particular day. Kay refers to himself as the “luckiest man” in the world because of this tragic but fortuitous event.

The Model

The Dragon 60250 Sherman Firefly is a special Dragon release issued during the 2006 Dragon Expo in Europe. It is one of the most sought-after Dragon fireflies, and for good reason. A look at the photos below reveal a finely crafted model from Dragon’s heyday, when workmanship was at its apex. The model represents “Carole” after the landing at Normandy, once the wading trunk had been removed. “Carole” was assigned to “C” Squadron, necessitating that its name begin with that letter. Sgt. Fred Scamp, the tank commander, named “Carole” after his daughter, who was born in 1944. In the photo below, note the red circle indicating “C” Squadron, just aft of the name. A triangle would indicate “A” Squadron, while a square would indicate “B” Squadron.1-port-3-047-3Below is a front view photo. Note that “Carole” has the early bolted three-piece transmission cover, as opposed to the cast one-piece cover. Note also that the model does not have the stowage box above the transmission cover visible in the first photo of the actual tank above. This is not a mistake. The stowage bin was temporarily moved from its permanent place at the rear of the hull to the front of the hull to allow the wading trunk to be installed. Once the tank landed and the trunk was removed, the stowage bin was reinstalled in its original place on the rear plate of the hull. Finally, note that while Dragon has often bungled the tracks on its Shermans, “Carole” is equipped with the correct T54E1 steel chevron tracks recognizable in the aforementioned photo.

Dragon faithfully rendered on the transmission cover the colorful and distinctive markings so characteristic of British tanks. Starting from the left, the “33” inside a yellow circle is a bridge classification number, indicating that the Firefly weighed 33 tons, as compared to a standard 30-ton Sherman. The “51” inside the red box identifies the regiment to which “Carole” belonged. The 27th Armoured Brigade had three regiments: the 13th/18th Royal Hussars were assigned “51”; the Staffordshire Yeomanry, “52”; and East Riding Yeomanry, “53.” The yellow seahorse on a blue shield, colloquially known as the “pregnant pilchard,” is the emblem of the 27th Armoured Brigade. The seahorse was a reference to the cavalry roots of its regiments. 2-front-043-3Below is a starboard profile photo of “Carole.” Note the cast surface on the cheek of the turret, which differs from the smooth surface of the metal on the hull — another example of Dragon’s outstanding attention to detail. The British Firefly wielded a 76.2mm gun and the length of the barrel was a whopping 13 ft. 9 in. Incidentally, each troop comprised four tanks — one 17-pounder Firefly and three 75mm Shermans. The other tanks in “Carole’s” 2nd Troop were “Charmer” (68), “Cameo” (69), and “Cavalier” (70).3-starboard-2-037-2Note the “71” on a square black oilcloth on the face of the blanket box in the photo below. The black square was intended to provide more contrast with the red number, making it more visible. As previously mentioned, the model represents “Carole” after it had landed and the wading trunk had been removed with the stowage box moved back to its original place on the rear plate of the hull. Finally, note Dragon’s signature drybrushing that highlights the edges throughout the tank, providing a “worn” look.5-back-039-2The semi-overhead shot below provides a view of the commander’s round hatch as well as the loader’s rectangular hatch on the top of the turret. Note the radio box attached to the back of the turret. In order to fit the huge 76.2mm gun in the 75mm turret, the British removed the radio from the interior and attached it to the rear of the turret. Attached behind the radio box is a blanket box. Note the War Department identification number “T 228789.” Of course, the “T” indicates “tank.” Among others, an “L” before the number would indicate a lorry, an “M” a car, and an “S” a self-propelled gun. 4-port-4-049-3Beyond the Call of Duty

Probably the most outstanding feature of the Dragon piece is the accuracy of the turret. The close-up photo below clearly shows that the turret of the “Carole” did not have a pistol port.carole-scan-biggest-2 Firefly turrets were converted 75mm turrets, which had a pistol port on the rear port side of the turret. In April 1943, the U.S. Ordnance Department determined that it was a ballistic hazard and ordered builders to eliminate it from the turret. The response from the field was so negative, however, that the Ordnance Department reversed the order in July 1943. Still, a number of 75mm turrets without the pistol port were produced during those three months, and “Carole” appears to be one of those. 

The side-by-side photos below from the Sherman Minutia Website show the two different Sherman 75mm turrets as regards the pistol port — the common one with a pistol port and the uncommon one without. 2-pistol-portsDragon brought us two terrific British Fireflies: the Dragon 60250 “Carole” (right) and the 60251 “Velikye Luki” (left) in the side-by-side photo below. Other than the markings and the addition of the blanket box on the “Carole,” the two are nearly identical. Obviously, the most important difference is the absence of the pistol port on the turret of the “Carole” – highlighted in yellow on the “Velikye Luki.” Dragon could have easily taken a short cut and simply used the same common turret on both. Instead Dragon was faithful to both tanks, and produced two different turrets — in my view, a commendable decision.004-2-paint-2In that same vein, note the siren on the front port side fender just above the tracks. If you click on the photo you will find that the siren has a “V” for victory grill used on the actual sirens — a diminutive detail but indicative of Dragon’s erstwhile zeal.

A Little Back Rub

Forgive the lame pun, but “Carole’s” only fault — the “rub” — is that Dragon failed to include markings on the rear plate of the tank hull. There are no clear photos of “Carole” from the rear, though barely visible on one of the photos above is the “51” regiment number on the port side of the rear plate. However, the photo below from British Tanks in Normandy by Ludovic Fortin clearly shows that other tanks of the 13th/18th Hussars — this is “Balaclava” — carried both the “51” regiment number and seahorse markings on the rear plate.balaclava-markings-scan-paintBelow is a corresponding rear view photo of “Carole” sans markings.003-2The Upshot

There is no question that the Dragon 60250 Firefly is a little gem — a rare combination that brings together human interest, historical significance, and accuracy in detail. From the transmission housing to the rear plate and from the steel tracks to the turret hatches, this piece is well crafted. The accuracy of the turret — with its cast surface, radio box, blanket bin, lack of a pistol port, and markings — makes for an outstanding model. The superb finish, light drybrushing, and crisp markings throughout the tank make this an exceptional piece.

The Profile

In 2005, Military Modelling magazine conducted a series of interviews with Douglas Kay, resulting in a terrific, well-illustrated article in its July 2005 issue that featured “Carole” on its cover. The beautiful color profile below comes from that article. It’s a sure bet that Dragon used this profile as its guide. 6-carole-profile-military-modelling-1024x378What little information there is about the actual “Carole” comes from that issue. Should the reader be interested in finding it, below is a photo of the magazine cover. The triptych also includes a photo of 19-year-old Kay in 1944 and Mr. Kay in his 80’s in 2005.

douglas-kay-tryptichThe Crew

Finally, so we can put faces to “Carole,” below is a lagniappe photo of the crew brewing up. From left to right: Fred Shaw (loader/radio operator), Douglas Kay (gunner), Fred Scamp (commander), and Bill Humphries (driver).

 5-crew-439x369

I hope you enjoyed the post. If something looks amiss, please let me know. I would be delighted to correct inaccurate information so that this may be useful for other 1/72 scale collectors and wargamers. As always, comments, questions, corrections, and observations are welcome. Stay tuned for a simple diorama of “Carole” in the next post.

The Filthy Thirteen of the 101st Airborne Division, Part 5: Preboarding Diorama

This is the fifth and final post of the Filthy Thirteen five-part series. For a synopsis of these colorful characters, creating the figures in 1/72 scale, selecting their weapons, and a look at the finished figures, please refer to the previous four posts, The Filthy Thirteen, Part 1, Part 2, Part 3, and Part 4, respectively.

The Group Photo

As previously mentioned, our 1/72 scale Filthy Thirteen are bareheaded — clearly not in combat as they’re not wearing a helmet. Thus, one of the few plausible diorama options was a scene taking place just prior to boarding the aircraft. Before embarking on a mission, it was customary for a stick of paratroopers to pose for a group photo with the pilot and crew of the aircraft. (A paratrooper stick typically numbered 15-18 men.) The reader is directed to the History Channel’s Dangerous Missions: Pathfinders episode, for example, wherein a paratrooper recalls sitting for the group photo. “They must be taking a photo for our obituary,” he quips wryly. The photo below, for example, is of the 506th Parachute Infantry Regiment just before boarding for a mission. pathfinder-photo-506-pirThe Diorama

The diorama below depicting such a photo shoot at Upottery Airfield in East Devon, England, just before the Filthy Thirteen board their aircraft, is loosely based on this concept. A kneeling paratrooper, a sergeant, and a pilot stand directly facing the photographer, with the rest of the stick arranged in a semicircle in front of a Douglas C-47 Skytrain. A brief discussion and additional photos of the Skytrain appear in a separate section below.z-039-2Below is a close-up photo of the scene. The paratroopers have been discussed extensively in previous posts so I will not belabor them further. However, I point the reader’s attention to the pilot, who is also covered in a separate section below.014-2Below is a view from the right side. I was unable to locate a 1/72 scale U.S. photographer so I ended up using a Preiser HO scale figure. Note the three Jeeps, which were ubiquitous at Upottery Airfield.016-2Below is a view from the left side. Note the markings on the front bumper of the Willys Jeep on the right, which clearly identify it as belonging to the 506th Parachute Infantry Regiment. (Click on the photo to zoom in on the bumper.)020-3Below is an overhead shot. Note the drybrushing on the pilot’s leather jacket, which came out better than I expected, once again proving the adage, particularly applicable to me, that “even a stopped clock is right twice a day.” 034-2For those skeptical that paratroopers would actually pose for photos, I direct you to the photo below of Jake McNiece, taken just before the Filthy Thirteen boarded their C-47 on D-Day.posed-photo

The Pilot

Given that group photos often included the aircraft crew, the scene cried out for a pilot. As shown in the composite photo below, there are several U.S. pilot options in 1/72 scale.

us-pilots-graph
From left to right: Airfix 1748; CMK 72039; CMK 72221; Hasegawa 35008; and TQD-AA9.

While I considered the pilots from the Airfix 1748 U.S.A.F. Personnel, CMK 72039 US Army Pilots (resin), CMK 72221 USAAF Pilots (resin), and Hasegawa 35008 WWII Pilots sets, I ultimately opted for the pilot included in the white metal TQD-AA9 US Airborne Infantry & Pilot set, as I found it to have the quintessential WWII U.S. pilot “look.”

The TQD pilot sports the A-2 leather flying jacket so characteristic of WWII U.S. pilots. a-2-flying-leather-jacket-2The backs of these brown leather jackets were often decorated with squadron insignia, victory slogans, or pinup art, as seen in the illustration at left by Francis Chin taken from Osprey Publishing US Army Air Force. The TQD figure also wears the popular officer’s peaked cap that was often worn with the crown stiffener removed, both to get the stylish “crushed” look and, more importantly, to allow the headset to fit over the cap. Note also that these pilots are almost invariably depicted either smoking a cigarette, as in the illustration, or chomping on a cigar, as in the TQD figure. I rejected the Airfix and CMK figures because they appear to be wearing the winter B-3 jacket with fur collar. I note, however, that CMK resin figures are generally some of the most realistic 1/72 scale figures on the market. Similarly, I passed over the Hasegawa figure because it’s wearing the garrison side cap with earflaps, rather than the more distinctive peaked cap.

The Willys Jeep

Numerous sources of information on the jeep are readily available and the reader is directed to them. However, for the sake of completeness, below are several photos of the jeeps used in the diorama. To my knowledge, there are only two 1/72 scale jeeps that specifically represent the 101st Airborne Division. First, below is the Hobby Master HG4203, US Willys Jeep, 101st Airborne Div., 506th A.B. Regiment, Company “C,” Normandy, 6 June 1944 (2010).081-2Made of diecast, the Hobby Master’s heft is pleasing to the hand. Below is a portside view.094-2Below is a front view shot of the Hobby Master model. The markings of the 101st Airborne Division 506th Parachute Infantry Regiment are clearly visible on the bumper.099-2Pictured below is the only other 1/72 scale jeep specifically representing the 101st Infantry Division, the Dragon 60505, 1/4 Ton 4×4 Truck, U.S. Army Western Front 1944, 101st Airborne Division, 401st Glider Infantry Regiment, France 1944 (2011). 082-2Unlike the Hobby Master, the Dragon 60505 is all plastic and, like other Dragon jeep releases, comes bundled in a package of two. Below is a portside view.083-2Finally, below is a side-by-side photo of the Hobby Master and Dragon pieces. As is readily apparent from the photo, the Hobby Master (left) is slightly larger than the Dragon (right). I note that the proportions of the Hobby Master are identical to those of the Cararama and Zylmex 1/72 scale jeeps and it’s probably at scale. In addition, there are reports that the Dragon jeep is underscaled — probably at 1/76 scale. While the Hobby Master model is diecast and the Dragon piece is plastic, a quick glance at the radiator grilles in the photo below immediately attests to Dragon’s redeeming quality — realism.079-3The C-47 Skytrain

The first thing one notices in the diorama is the fabulous Douglass C-47 Skytrain behind the paratroopers. While the versatile “Gooney Bird,” as the Skytrain was known to Air Force personnel, had various military uses, its primary role was as a transport plane, ferrying paratroopers to its targets and becoming the most widely used transport of World War II. Douglas built 10,700 C-47s and more than 1,000 of these participated in the D-Day invasion alone. Below is a portside view of the diecast Corgi  AA38207 used in the diorama.018-2Band of Brothers, the highly acclaimed TV Mini-Series (2001) depicting the travails of the 506th Parachute Infantry Regiment of the 101st Airborne Division, brought international fame to the 506th PIR and spawned a number of products specifically depicting that unit. The Corgi AA38207, for example, represents the transport for Richard “Dick” Winters, the leader of the first platoon of the 2nd Battalion, 506th PIR of the 101st AD. Below is a starboard shot.031-2Below is a shot taken from the front. The 95 ft. 6 in. wingspan of the Douglass C-47 Skytrain was virtually identical to its German counterpart, the Junkers Ju52 “Tante Ju,” which had a wingspan of 95 ft. 11 in. Note the realistic transparent lens of the landing lights on the leading edge of the wings.022-2As can be readily appreciated in the photo below, the Corgi AA38207 is a magnificent piece of diecast. It’s unfortunate that the model disappeared from the shelves long ago. Note the pilot and co-pilot figures through the windows.027-2Below is shot of the portside fuselage. I almost wish Corgi had designed the model with an opening cargo door but such features often come at the expense of accuracy, making the models look toyish. Still, an opening cargo door would provide additional diorama opportunities.025-2The Terrain 

Because of their small size, creating realistic braille scale dioramas is inherently challenging — at least for a novice like me. In addition, the bases of the figures significantly detract from any setting, no matter how realistic it is. Thus, I had two options to try to improve the diorama: Either clip the bases of the figures as I have done for previous posts, or find a way to hide them. I opted for the latter.

I began by cutting out the flat part of styrofoam paper plate. I proceeded to draw the outline of the bases of the figures on the plate and carefully carved them out. When I inserted the figures into the recessed slots in the flat base, I found to my surprise that they fit snugly and were neatly flush with the base. The photo below shows the figures already embedded in the base. (Click on the photo to zoom in on the base.)z-004-2I then enlarged the base with additional styrofoam plates, covered it with hydrocal plaster to create contoured terrain, and painted it with acrylic paints. Finally, I flocked it with Woodland Scenics green and yellow grass to resemble Upottery Airfield in East Devon, England, whence the flights for D-Day originated. The photo below shows the countours of the terrain.001-2The Meltdown

While taking photos of the diorama in my backyard, I realized that the sky backdrop had warped, completely ruining the photos — and an entire morning. 🙁 Following a couple of hours of frustration attempting to salvage the photos by digitally cutting out the background, I decided to photograph the scene again. I was fairly certain that when I glued the silk poster to the cardboard backing I had achieved a good bond and there had been no warping. Still, I carefully unglued the poster and reglued it, using Elmer’s spray adhesive.

Despite diligent efforts and newly acquired photographic lights, indoor illumination continues to confound me, resulting in my strong preference for outdoor photography with natural light. Thus, after ensuring that there was no warping and the glue had set, I again moved the pieces outside and began to photograph. Alas, within ten minutes, the poster began to warp again. I suddenly realized that the 90 degree heat outdoors was melting the glue. As with the warped deck of an aircraft carrier in a previous project, I was once again paying the price of my incompetence and inability to take adequate photos indoors. Nonetheless, the few photos I managed to take before the meltdown were sufficient for this post. The side-by-side photo below is worth a thousand words.contrast-5

List of Diorama Pieces

For those interested, below is the source of each piece:

  • Photographer: Preiser 28069, Photographer (HO Scale);
  • Pilot: TQD Castings, TQD-AA9, US Airborne Infantry & Pilot Boarding Aircraft;
  • Paratroopers: Various sets (see previous four posts);
  • Jeep (far right): Hobby Master HG4203, US Willys Jeep, 101st Airborne Div., 506th A.B. Regiment, Company “C,” Normandy, 6 June 1944 (2010);
  • Other Jeeps: Dragon 60505, 1/4 Ton 4×4 Truck, U.S. Army Western Front 1944, 101st Airborne Div., 401st Glider Infantry Rgt., France 1944 (2011);
  • Aircraft: Corgi AA38207, Douglas C-47 Skytrain, USAAF 439th TCG, 50th TCW, June 5th, Upottery, England (2014);
  • Meadow: Styrofoam plates painted with acrylic colors and flocked with Woodland Scenics grasses;
  • Backdrop: Silk poster ordered on Amazon from China.

Lagniappe

This series of posts began with a wonderful painting of the Filthy Thirteen by Joel Iskowitz. It is only fitting, therefore, that it end with another beautiful painting. The lagniappe painting below, entitled We Were a Band of Brothers, is by John D. Shaw. It is reproduced here for discussion purposes under the fair use exception to the copyright laws. z-john-d-shaw-we-were-a-band-of-brothersI hope you enjoyed this simple diorama and the Filthy Thirteen series of posts. Again, if something looks amiss, please let me know. I would be delighted to correct inaccurate information so that this may be useful for other 1/72 scale collectors and wargamers. As always, comments, questions, corrections, and observations are welcome.

The Filthy Thirteen of the 101st Airborne Division, Part 4: The Finished Figures

This is the fourth of a five-part series on the Filthy Thirteen. For a synopsis of these colorful characters, creating the figures in 1/72 scale, and selecting their weapons, please refer to the three previous posts, The Filthy Thirteen, Part 1, Part 2 and Part 3, respectively.

Although I generally paint my own figures, my skills are mediocre at best, and I was too excited about this particular set to ruin it with my efforts. I freely concede: I’m a dilettante — I dabble in everything and master nothing. Thus, I turned to a genuine hobbyist with real expertise for help. The awesome results of his skill, dedication, and patience follow.  

Before we start, let’s put things in perspective. I fully understand that most people reading this post are z 007 - Copy (2)familiar with 1/72 scale and know the height of a typical figure. However, for those casual internet browsers who happen upon this site, the average 1/72 scale figure is approximately 1 inch or 25 mm tall. Borrowing a practice from the terrific WW2 Germans in 1/72 website, the photo at left provides perspective to help us understand the significant painting challenges posed by this scale. I know hobbyists who use a one-bristle paint brush for detail work. In addition, anyone who has painted 1/72 scale figures will understand the severe eye strain and occasional headache that results from concentrating on a figure — there’s a reason 1/72 is known as braille scale. And yet, those of us who engage in this activity know the nirvana with which we’re rewarded. 🙂 Yes, I love doing it; I just stink at it.

The Painted Figures

The following pictures follow the order established in the Figure Chart of the two previous posts. Unless otherwise specified, comments always refer to the photo below the comments.

BELOW: Here are the first four figures. Note the warpaint on their mugs, bearing in mind that the width of their faces is about 2 mm. Note the patches used to reinforce the elbows and knees on the jackets and trousers, a distinct characteristic of paratrooper uniforms. The Revell BAR gunner (second from left) is wearing the BAR belt with six pockets, each for two 20-round magazines, giving him a total of 240 rounds. Note the magazine pouches on the belt of the ESCI figure with the M1A1 Thompson submachine gun (third from left).

023
From left to right: Revell, Revell, ESCI, and ESCI.

BELOW: Note the hand-painted U.S. flag patches on the right shoulder. Astute observers will immediately notice that the flag is seemingly facing in the wrong direction as the applicable U.S. Army regulation requires that the “star field face forward,” like a flag flying in the breeze as it is carried forward. In other words, the regulation requires the flag to be backwards when on the right shoulder.

However, U.S. paratroopers were allowed to use the regular U.S. flag patch, probably because they were dropped behind enemy lines and needed to be easily identified by advancing U.S. forces. (I found at least a dozen photos of WWII U.S. paratroopers wearing the regular U.S. flag patch on their right shoulders before I was convinced.) 025BELOW: Note the famed Screaming Eagle shoulder patches of the 101st Airborne Division on the left shoulder. Only the painter knows how much eye strain these patches are worth. Another U.S. Airborne characteristic is the M3 trench knife and scabbard attached to the lower leg, as can be seen in the picture above on the right leg of the two ESCI figures on the right. A peculiarity of the ESCI set is that 13 of the 14 figures in the set sport the knife in the same fashion — the prone machine gunner being the only exception. The other sets only have two or three figures carrying the trench knife.027BELOW: The ESCI figure on the far right has the 10-inch M1 Bayonet attached to the folding stock M1A1 Carbine. The M1 Bayonet became standard in 1943, replacing the earlier 16-inch bayonet. Note the “U.S.” designation on the covers of the entrenching tool and canteen on the same ESCI figure. 026BELOW: Here are the second four figures. Note that the head on the Caesar figure on the far left is disproportionately large — a melonhead if I ever saw one. Although the Revell figure (second from left) appeared to lack facial detail, paint really brought it out. Note the 10-inch bayonet attached to the M1 Garand rifle on the Caesar figure on the far right. 

7 028
From left to right: Caesar, Revell, ESCI, and Caesar.

BELOW: Note that the first three figures — the three original Pathfinders with Mohawk haircuts — have the M3 trench knife attached to the lower right leg, making them honest paratroopers. Created by three different sculptors, note the difference in the heads. This variety in heads is realistic and the welcome result of mixing figures from different companies. Note the first aid pouch on the right leg of the walking Caesar figure (far right), who also sports one of the Caesar melonheads. These first aid kits typically contained field dressing and morphine.

030BELOW: ESCI’s attention to detail is evident in the inclusion of a helmet attached to the back of its Pathfinder figure (third from left). Neither the Caesar nor the Revell bareheaded Pathfinders with Mohawk haircuts (first and second from left) thought to include a helmet.032BELOW: Note the M1936 Musette Field bag on the back of the Caesar figure on the far right. Though usually associated with paratroopers, this lightweight canvas backpack was also available to officers in the regular infantry.031BELOW: Here are the last four figures. Note the Imex figure (second from left) is tall but slim, lending greater variety to the figures. Note the yellow gloves on the Italeri figure holding the M9 Bazooka (far right), recommended to protect the hands in case of back-flash when the rocket left the muzzle.

033
From left to right: Caesar, Imex, Imex, and Italeri.

BELOW: Note that the Italeri bazooka gunner (far right) has the M3 trench knife on his lower right leg.

034

BELOW: I could not identify the bag on the left hip of the Caesar figure (far left). While it’s probably an M1936 Musette field bag, it’s missing the two straps and buckle to close the flap, as seen on the two Imex figures next to it.

036

BELOW: Of particular interest is the folded M1A1 Carbine on the back of the bazooka gunner (far right). This may be the only folding stock M1A1 Carbine that is actually folded in the various sets. On the same figure, note as well the superb rendition of the “U.S.” designation on his canteen. Note that both Imex figures in the middle have the M1936 Musette field bag. As with the ESCI sculptor who included the distinctive trench knife on virtually all his paratroopers, the Imex sculptor’s idiosyncrasy was to include the characteristic musette field bag on all but two of his 14 paratroopers.

035BELOW: Here are some photos of the TQD figure, completing the Filthy Thirteen. It bears mentioning again that TQD white metal figures are generally excellent, with realistic proportions, fine detail, and historical accuracy. 

Pathfinder (2)
TQD AA5 Pathfinder white metal figure

Comparison Chart

Finally, below is a lagniappe comparison chart that summarizes the project. It shows the original figures with helmets, the set they came from, the figures with the transplanted heads, and the finished figures, as well as the weapon each carries.Filthy Thirteen Final 2

The Upshot

I was pleasantly surprised by the results of this project, an honest and well-intentioned 1/72 scale tribute to the Filthy Thirteen, “the orneriest, meanest group of paratroopers” who ever lived. And it was loads of fun to boot. However, I do have two regrets, as discussed previously: 1) I wish I’d used an Airfix figure to represent all available U.S. paratrooper sets; and 2) I wish I’d used a figure with an M3 “grease gun” to better represent most of the small arms used by U.S. paratroopers.

I hope you enjoyed this Filthy Thirteen series of posts. If something looks amiss, please remember that I’m just an amateur enthusiast (redundancy intended) and let me know. I would be delighted — truly — to correct inaccurate information so that this may be useful for other 1/72 scale collectors and wargamers. Stay tuned next week or so for Part 5: Preboarding Diorama, a simple diorama featuring these characters. As always, comments, questions, corrections, and observations are welcome. 

—————————————————————————————————————————-

I want to thank my friend and fellow collector Joe Buccellato, of NY, whose love of craft, workmanship, and patience far exceed mine — “therapy,” he calls it. He enthusiastically painted these figures and to the extent they succeed the credit is all his. I’m fortunate he’s a Civil War collector for I doubt he’d part with my WWII figures after he paints them. More of his outstanding work will be featured in future posts.

The Filthy Thirteen of the 101st Airborne Division, Part 3: Selecting the Weapons

This is the third of a five-part series on the Filthy Thirteen. For a synopsis of these colorful characters and creating the figures in 1/72 scale, please refer to the two previous posts, The Filthy Thirteen, Part 1 and Part 2.

U.S. Army Airborne Weapons

The nature of U.S. Airborne troops in WWII was such that their weapons had to be specialized, usually to make them lighter or more portable. Because paratroopers were often dropped behind enemy lines where resupply was uncertain, they had to schlep loads of 100 lbs. or more on their backs, making lighter, more portable weapons a must.

As I mentioned in Part 2, one of my goals was for the 1/72 scale unit to reflect as many of the weapons used by U.S. paratroopers as possible. I compiled the weapons plate below from a number of illustrations contained in various Osprey books, including US Army Airborne 1940-1990, US Paratrooper 1941-1945, US Army Airborne and Paratroops; and US Army Paratrooper in the Pacific Theatre 1943-45. The Pathfinder illustration is by renowned military artist Ron Volstad. The plate summarizes the small arms — hand-held small caliber firearms, such as handguns, rifles, manual, semi-automatic, and fully automatic weapons — used by U.S. paratroopers. US Airborne Paratrooper Weapons 13

Figure and Weapons Chart

Below is a chart showing the weapons used by each of the selected figures. A discussion of each weapon follows. Where the options were limited for a particular weapon, I’ve included photos of the various alternatives.Weapons Chart

Weapons in 1/72 Scale

1. M1911A1 Colt .45 Pistol: The venerable seven-round, semi-automatic .45 caliber “Colt 45,” introduced prior to WWI, was issued to officers, non-commissioned officers, and machine gunners and was so effective that it wasn’t replaced until 1986, 75 years and several wars after its debut.

042
Left, Revell; right, Imex.

Every unit has an officer — always with binoculars and a pistol — and the various paratrooper sets offer different alternatives. However, only the Revell and Imex officers have a pistol in hand and the latter is clearly firing his in combat, leaving the Revell figure as the only choice. See photo inset at left. While it is impossible to determine at this scale what pistols the officers are really wielding, we must assume they’re the M1911A1 Colt .45 pistol, common with U.S. Airborne officers. 


2. M3 Submachine Gun “Grease Gun”: The .45 caliber M3 Submachine gun was designed to be a simplified, cheaper ($20) replacement for the Thompson submachine gun. Commonly known as

047
From left to right: Caesar, Imex, Italeri, and Revell.

the “grease gun” because of its visual similarity to an actual mechanic’s grease gun, it was unjustly perceived to be less reliable than a Thompson, though its lighter weight (8 lbs.) made it popular among paratroopers who had to schlep loads of 100 lbs. or more on their backs.

For the most part, I succeeded in representing all the standard weapons used by U.S. Airborne troops shown in the Weapons Plate above. However, I failed to use a figure with the M3 “grease gun,” though there were four available. See photo inset above. Note how well-defined the weapon is on the Imex figure (second from left; click on the photo to enlarge). The proportions, detail, and sculpting on the Imex figures are dead-on.

3. M1 Garand Rifle: The semi-automatic, 8-round .30 caliber M1 Garand rifle replaced the 1903 Springfield rifle as the standard issue for U.S. troops in 1938, giving U.S. soldiers a distinct advantage over the slower German K-98 bolt-action rifle, which had become standard Wehrmacht issue in 1935. General Patton considered it “the greatest battle implement ever devised” and many soldiers preferred the M1 Garand’s greater range and stopping power over the M1 Carbine that was supposed to replace it. By the end of the war, over five million M1 Garands had been produced.

The various U.S. paratrooper sets included many figures with the M1 Garand rifle, reflecting the fact that it was the most common weapon used by U.S. Airborne troops. Thus, there were a number of choices and four of the selected 13 figures are carrying one, including one with the 10-inch M1 Bayonet attached. (See the Figure and Weapons Chart above.) 

4. M1 Carbine w/ Wooden Stock: The semi-automatic, 30-round, .30 caliber M1 Carbine, which replaced the M1 Garand as the standard issue rifle in 1942, was intended to be smaller and lighter than the M1 Garand. At 35.5 in. and 5.5 lbs, it was, in fact, eight inches shorter and weighed four pounds less than the M1 Garand, making it well suited for paratroopers. With more than six million wood-stocked M1 Carbines produced, it was much more widely used by U.S. forces than its cousin, the folding stock M1A1 Carbine, of which only 150,000 were made. However, designed specifically for U.S. paratroopers, the M1A1 Carbine was more common among this group.

As with the M1 Garand rifle, the various U.S. Airborne sets offered a fair selection of figures equipped with the M1 Carbine. As noted, however, the folding stock M1A1 Carbine was more widely used by U.S. paratroopers so I selected only one figure carrying the M1 Carbine, the Revell figure (sixth from left), as can be seen on the Figure and Weapons Chart above.

5. M1A1 Carbine w/ Folding Stock: Identical to the M1 Carbine except for the folding metal stock, the M1A1 Carbine was 25 inches long when folded, fully 10 inches shorter than the M1 Carbine, making it an excellent weapon for the highly mobile paratroopers.

Given that the M1A1 Carbine was specifically designed for U.S. paratroopers, it is no surprise that at least 10 figures in the various U.S. paratrooper sets are equipped with it. The ESCI set alone includes five figures wielding this weapon. There are three figures with the M1A1 Carbine in the selected 13 — the ESCI (fourth from left) and Caesar (ninth from left) figures shown on the Figure and Weapons Chart above plus the Italeri figure (far right) with the M9 Bazooka, who carries the M1A1 Carbine on his back. 

6. M1A1 Thompson Submachine Gun: One of the most recognized weapons in history, the M1A1 Thompson submachine gun was a favorite among the troops. Though generally only issued to squad leaders and officers in the regular army, it was widely used among paratroopers. Accurate up to 50 yards, it could fire its large .45 caliber rounds at a rate of 650 per minute, giving it devastating “sweeping” power within that distance. Though heavier than the M3 “grease gun,” the M1 Thompson submachine gun was more widely used.

The various figure sets provided a fair selection of figures wielding the M1A1 Thompson submachine guns, reflecting its wide use among paratroopers.  As shown in the Figure and Weapons Chart above, I selected three — the ESCI figure (third from left), the kneeling Caesar figure (fifth from left), and the TQD Pathfinder figure, a picture of which appears in the previous post.

7. M1918A2 Browning Automatic Rifle (BAR): The fully automatic .30 caliber M1918A2 BAR, which replaced the M1918 used in WWI, was designed to be fired from the hip as an automatic rifle while moving forward in support of riflemen or from a stationary position as a light machine gun.

13 002
Left, Imex; right, Revell.

However, its paltry 20-round magazines greatly limited its effectiveness as a machine gun. While used by U.S. paratroopers, the BAR’s 20-lb weight and need to be reassembled after a jump made it an inconvenient — and therefore uncommon — weapon for Airborne troops. To reduce the BAR’s weight, experienced paratroopers often ditched the bipod, buttplate, and carrying handle, lowering the weight to 15 lbs.

There are only two BAR gunners in the 69 paratrooper poses available — one in the Imex set and one in the Revell set, as seen in the photo inset above. Thus, the Revell figure (on the right) was an easy choice since the Imex figure is prone firing the weapon, clearly in combat. The Revell gunner, who has not removed the bipod or carrying handle from his BAR, is presumably a novice. 🙂 

8. M9 Bazooka: The M9 Bazooka was a portable recoil-less, anti-tank rocket launcher that replaced the earlier M1 Bazooka in 1943. At 54 inches, the M1 Bazooka was unwieldy during jumps so the Airborne command specifically requested the M9 Bazooka, which could be broken down into two parts to make it more portable. By happy coincidence, the modification allowed engineers to make it longer, increasing range and accuracy.

14 001
From left to right: Caesar, Imex, and Italeri.

Considered the perfect infantryman’s anti-tank weapon, it could immobilize a tank with a solid, accurate hit. According to the conventional wisdom, the much-feared German 88mm Panzershreck was copied from a captured American bazooka.

The M9 Bazooka was common with U.S. Airborne troops so the set would have been incomplete without a figure carrying one. There were three potential figures with a bazooka, as can be seen in the photo inset above. However, two of them are actually firing the weapon so the Italeri figure was the only non-combat choice. 

A passing glance at the Figure and Weapons Chart above quickly reveals that the Italeri figure (far right) is somewhat bulkier than the other 12, which gave me pause. In the end, I used it anyway. First, I rationalized that human height and girth varies significantly. It turned out that the figure is 26.4mm tall, which scales out to only 6’2”, totally within the acceptable range. He is crouching a bit, which means he’s actually taller. Secondly, the figure — huge as it is — represents the gentle but slow-witted giant often seen in Hollywood movies, including the one in the aforementioned Dirty Dozen. (To my mind, the all-time greatest Hollywood brute is Andre the Giant as the unforgettable Fezzik in The Princess Bride.) And finally, it makes sense that the biggest man in the unit would carry the M9 Bazooka, the heaviest weapon in the paratrooper arsenal, weighing 16 lbs — one pound more than the stripped down 15-lb BAR. 

Browning M1919A4 Light Machine Gun

I intentionally did not include the Browning M1919A4 light machine gun in the Weapons Plate or in the discussion, as there were no figures carrying it in non-combat. However, four of the six sets include such a weapon and, for the sake of completeness, I’ve included a lagniappe photo of those four below. Referring strictly to the weapon and not the paratrooper, the ESCI machine gun (far left) has the most detail and best proportions, with the Revell and Italeri weapons closely behind. The Caesar machine gun (far right) is underscaled and has very little detail, though the paratrooper figure itself is excellent.

BMG 004
From left to right: ESCI, Revell, Italeri, and Caesar.

This concludes our lightning-fast survey of U.S. Army Airborne small arms. I hope you found the post informative. Stay tuned tomorrow for Part 4: The Finished Figures, with lots of photos of the painted figures. As always, comments, questions, corrections, and observations are welcome.

The Filthy Thirteen of the 101st Airborne Division, Part 2: Creating the Unit in 1/72 Scale

This is a follow-up to the previous post, The Filthy Thirteen, Part 1. For a synopsis of these colorful characters, please refer to that post.

It is highly unlikely that any major plastic soldier manufacturer would create a 1/72 scale set of the Filthy Thirteen, as the set would lack wide enough appeal to make it financially viable. While compulsive collectors like me would welcome such figures, the wargamers who currently drive the market would probably not find sufficient uses for them to warrant their purchase. With their distinctive Mohawk haircuts, the only other possible use for such paratrooper figures would be as Pathfinders during the Normandy invasion. Thus, the subject is one more appropriate for the resin or white metal cottage industries.

U.S. Paratroopers in 1/72 Scale

So where are we to find our Filthy Thirteen in 1/72 scale? The group can be created with just a little work. As always, our point of departure is the Plastic Soldier Review (PSR) website to determine the universe of figures available. Six major plastic soldier manufacturers have produced WWII U.S. paratroopers in 1/72 scale, with various levels of success. In chronological order of release they are:

  1. Airfix 1751 U.S. Paratroops (1975) (14 poses);
  2. ESCI 209 U.S. Paratroopers “Screaming Eagles” (1983) (14 poses);
  3. Revell 2517 US Paratroopers (1995) (12 poses);
  4. Imex 527 Easy Company (2007) (14 poses);
  5. Italeri 6131 Anti Tank Teams (2009) (4 poses); and
  6. Caesar H076 US Paratroopers (2012) (11 poses). 

Of course, some of these have been re-released by other companies. Please visit the PSR website for an excellent analysis and photos of each of these six sets.

We are fortunate that five of the six sets are excellent, with high PSR ratings in both historical accuracy and sculpting — the two characteristics most important to me. The mediocre 41-year-old Airfix set is the Original 2
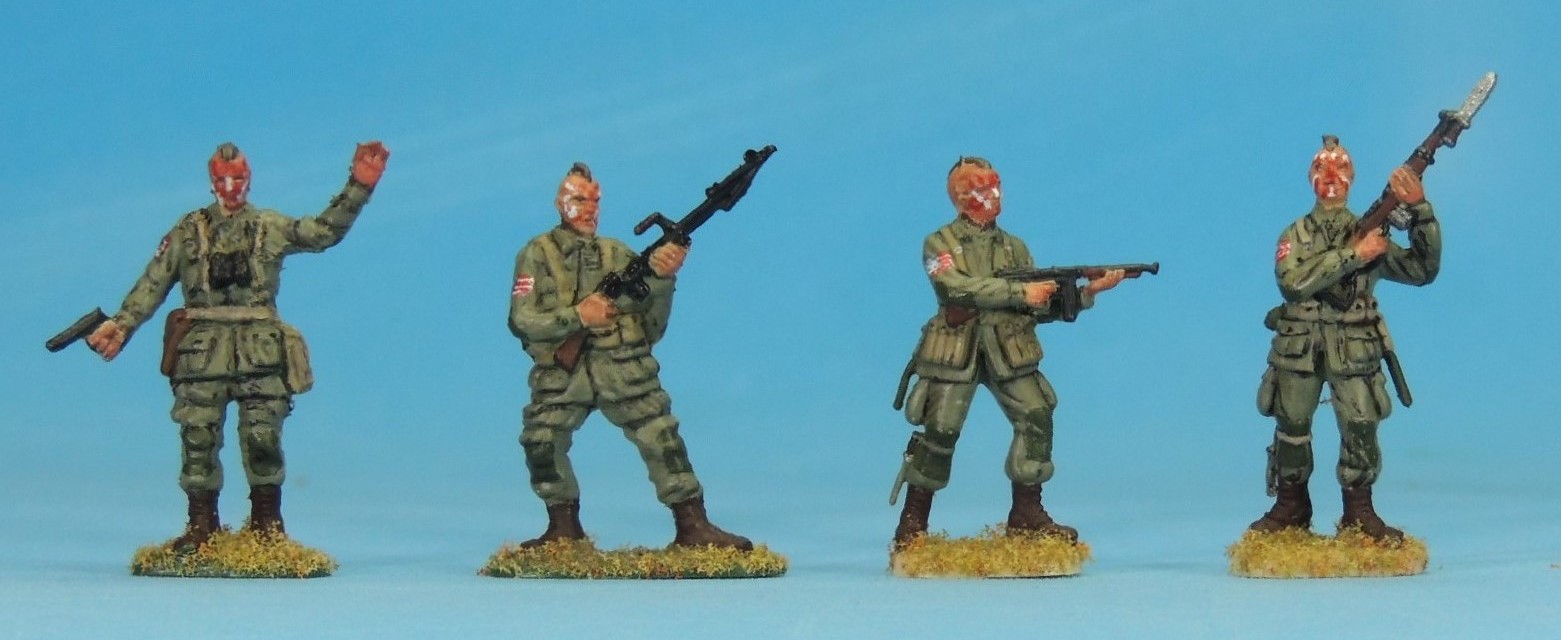
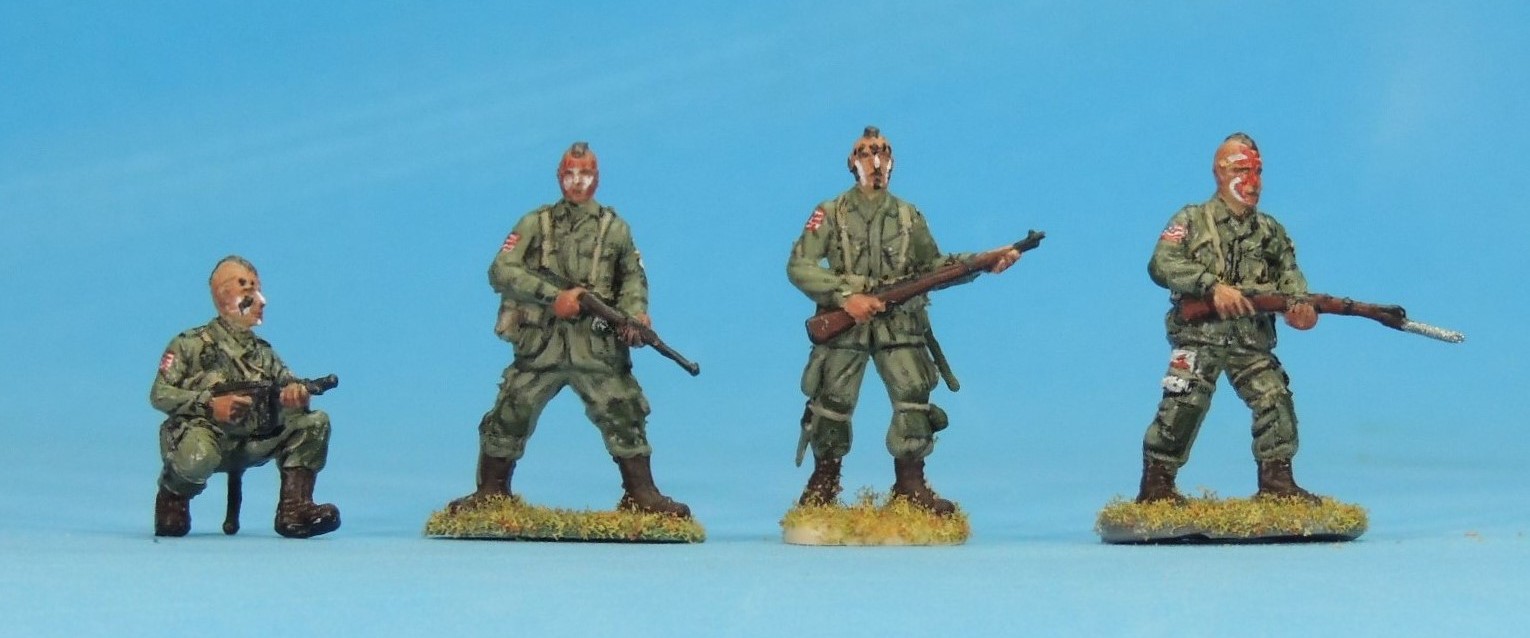
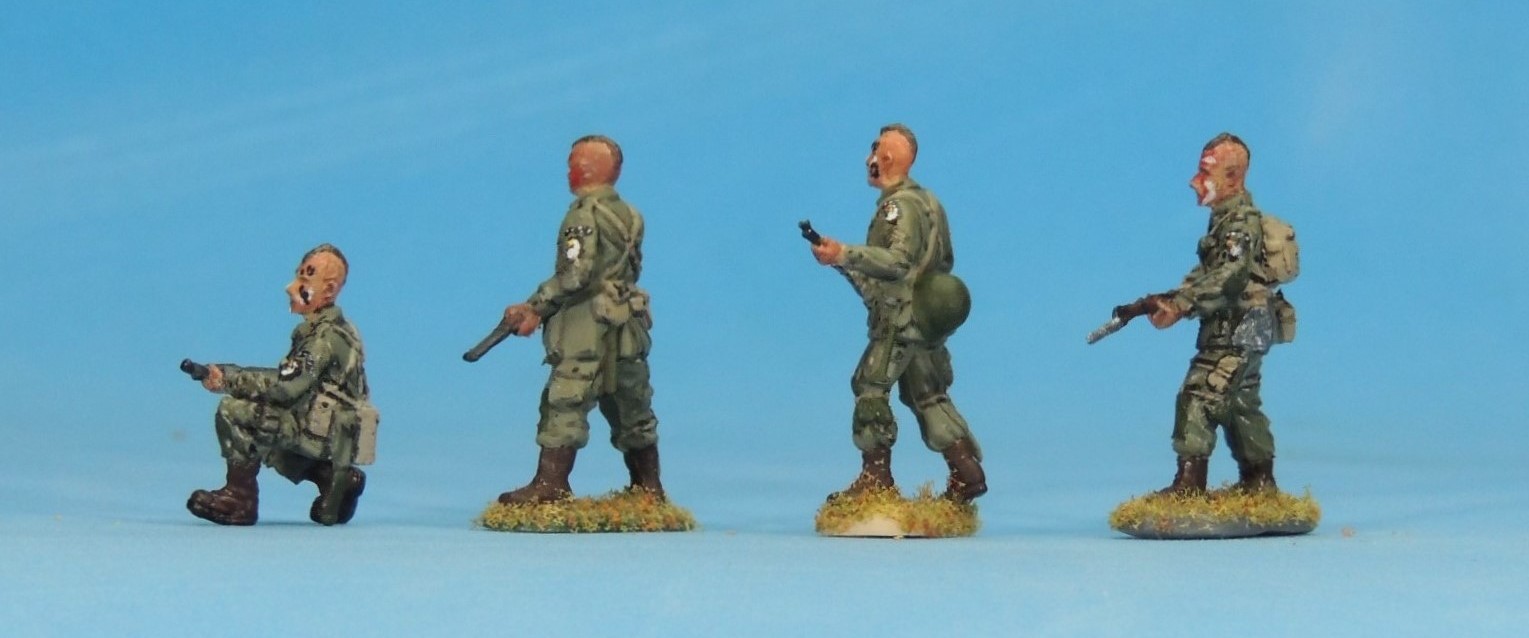
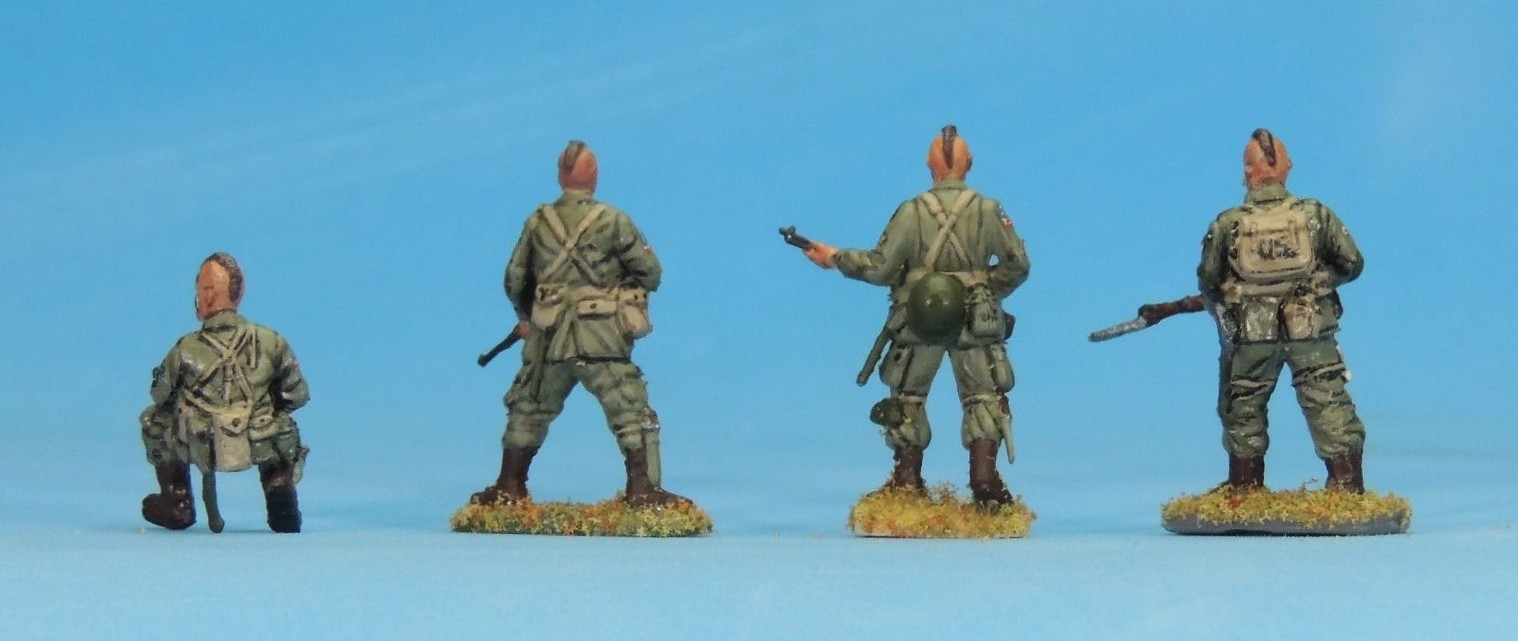
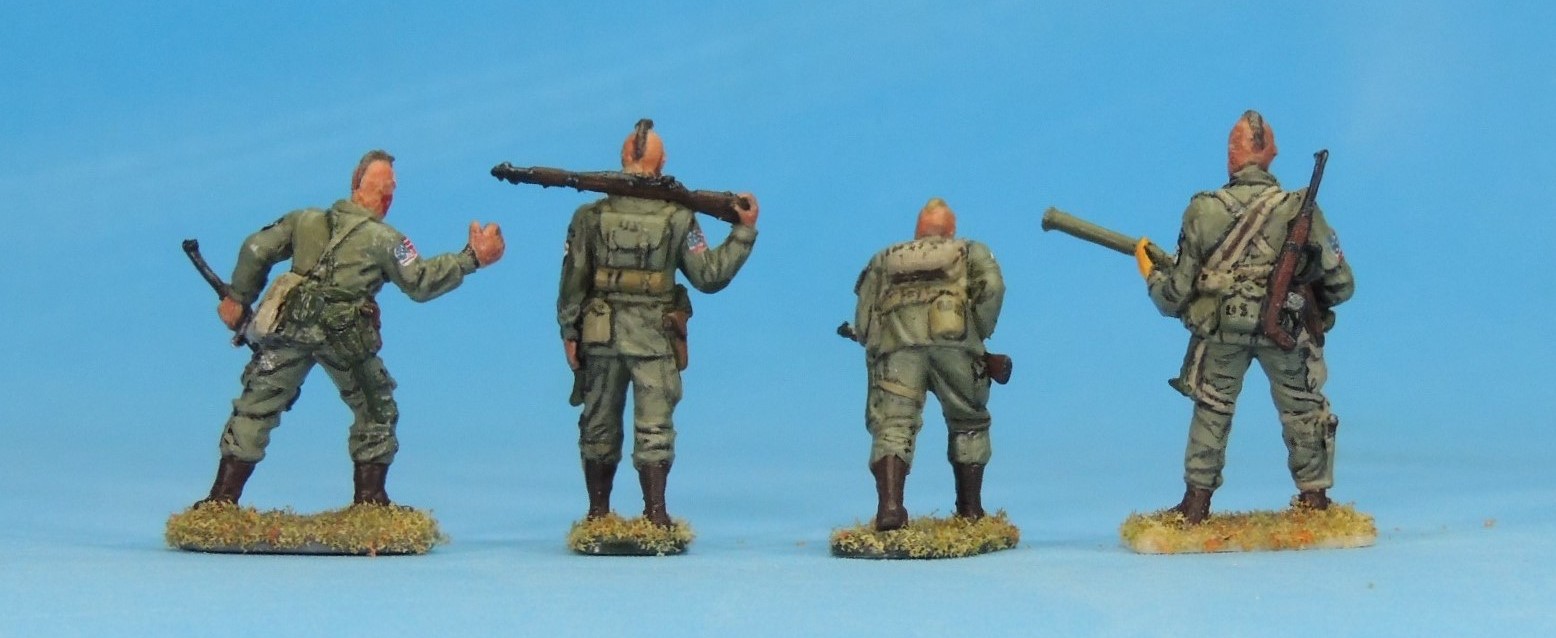
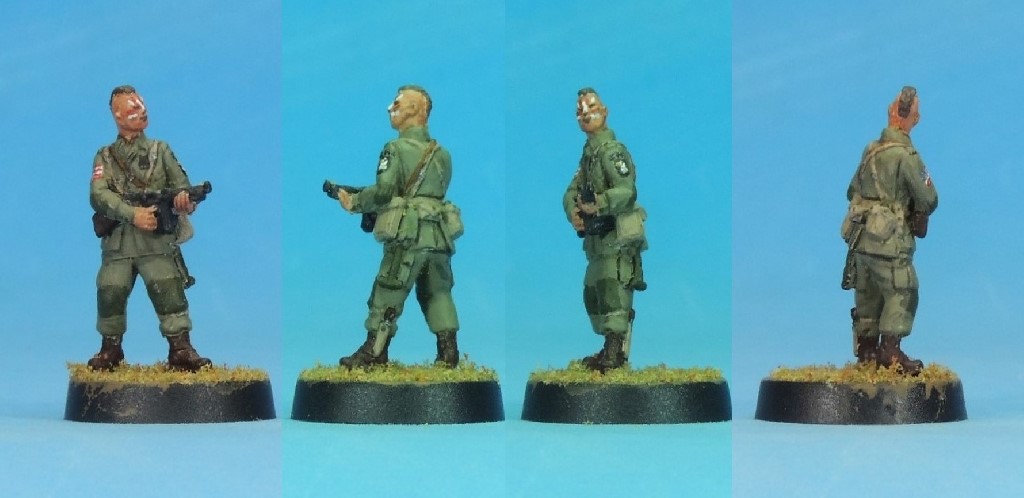
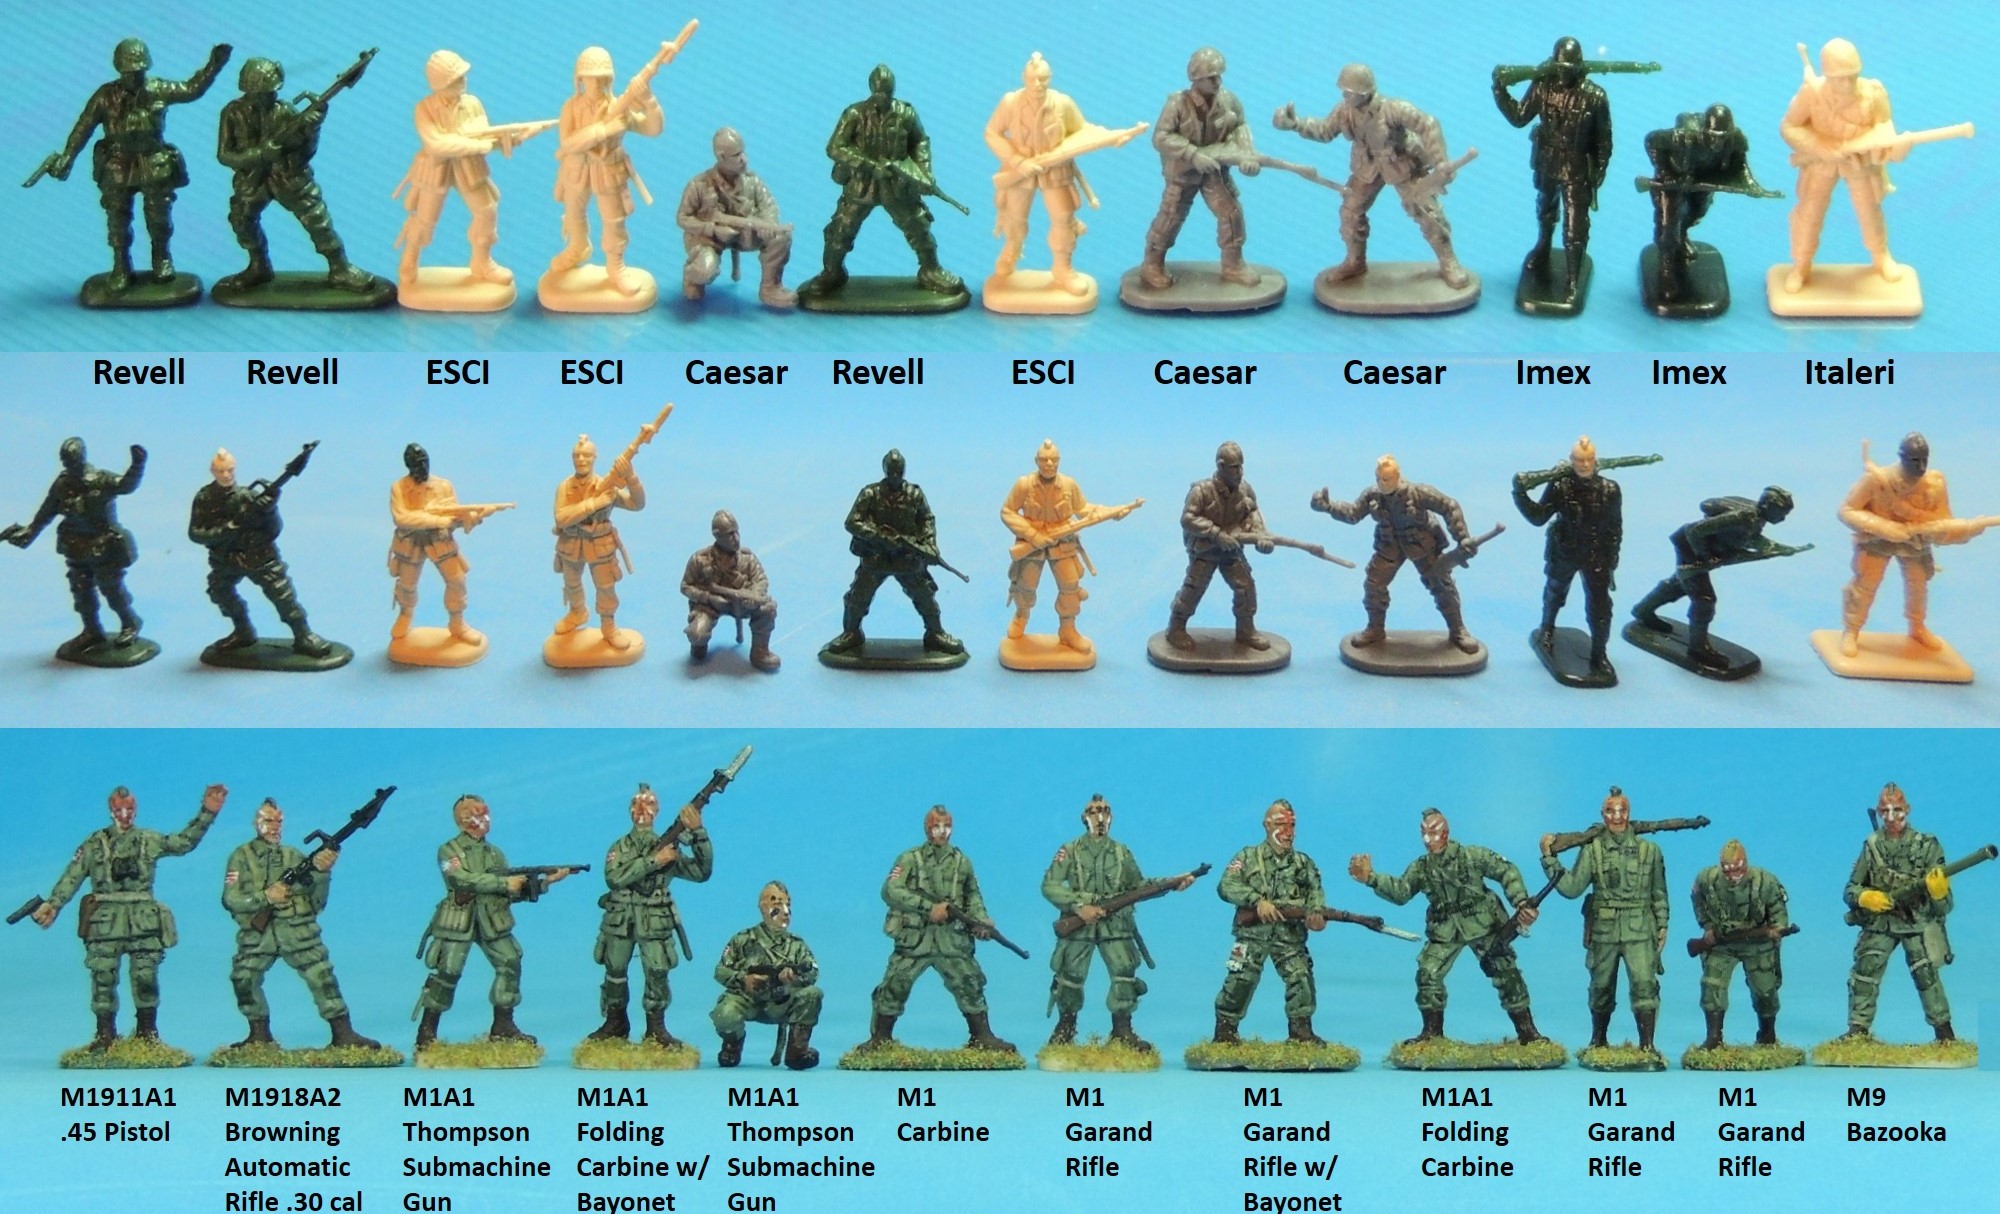
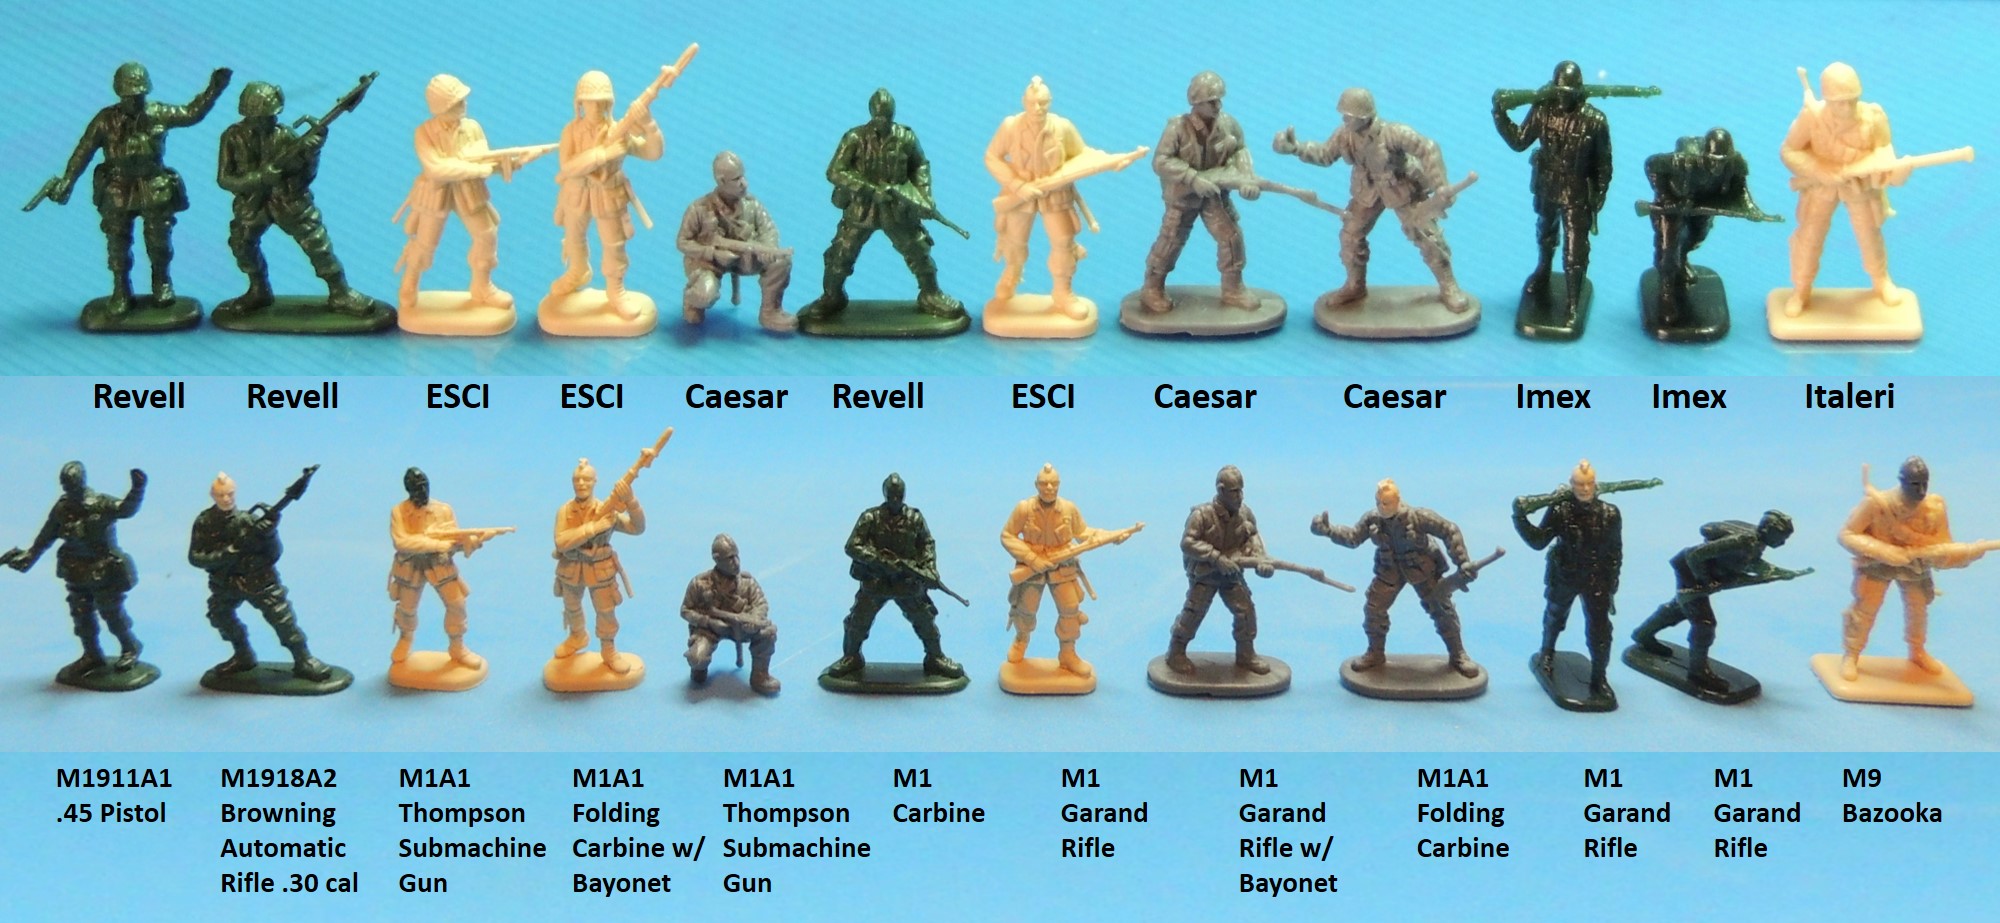
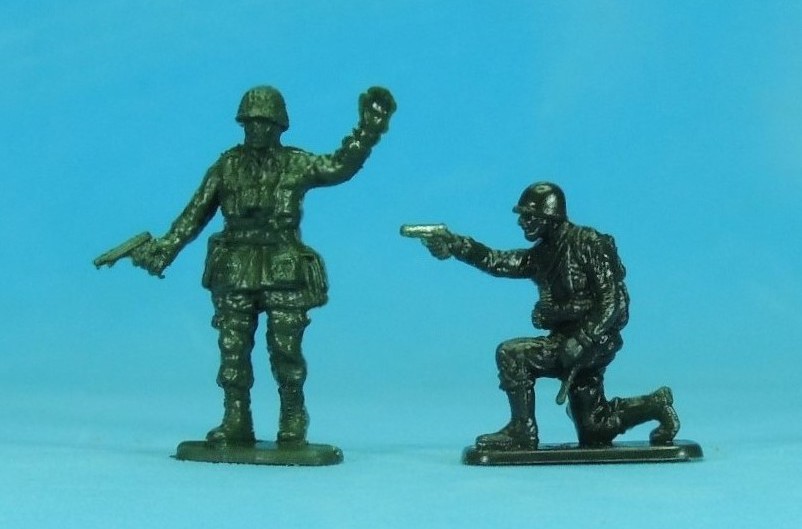
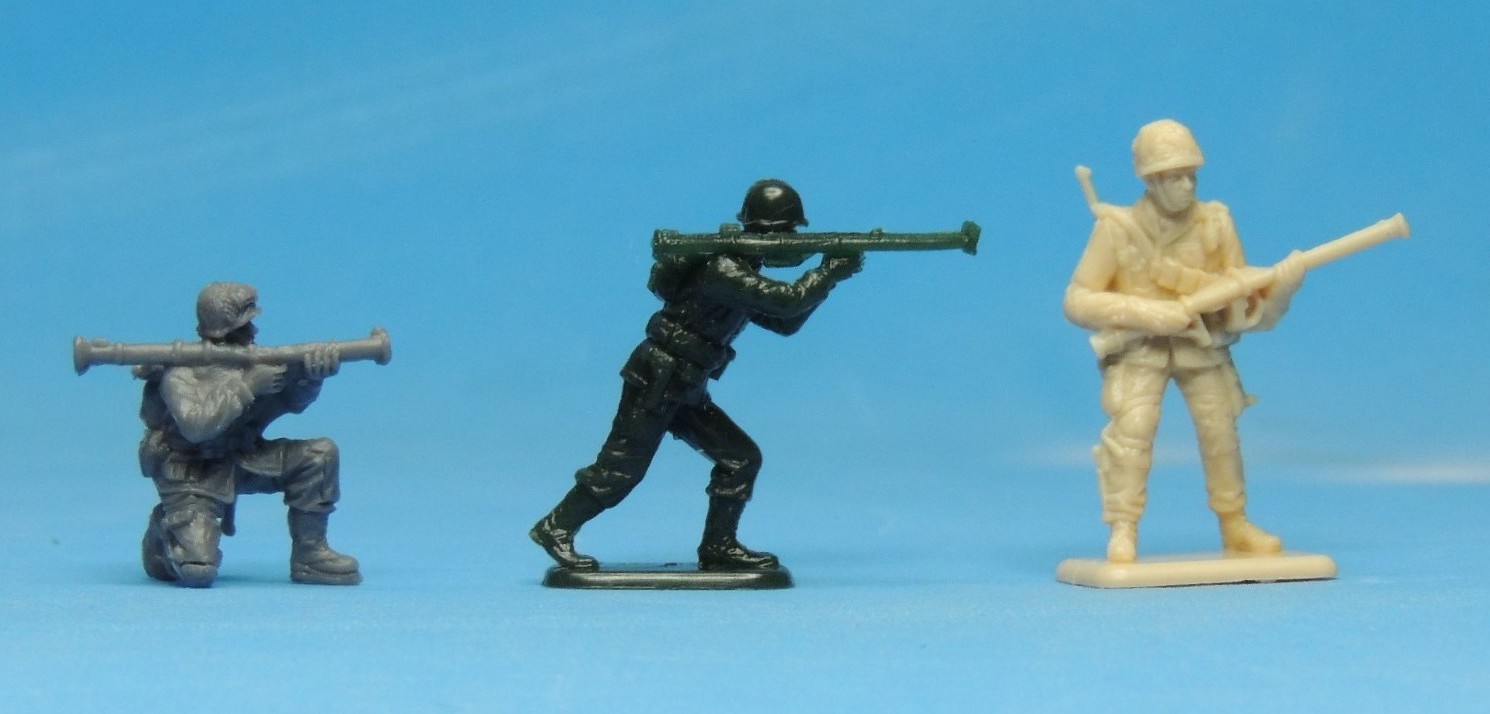
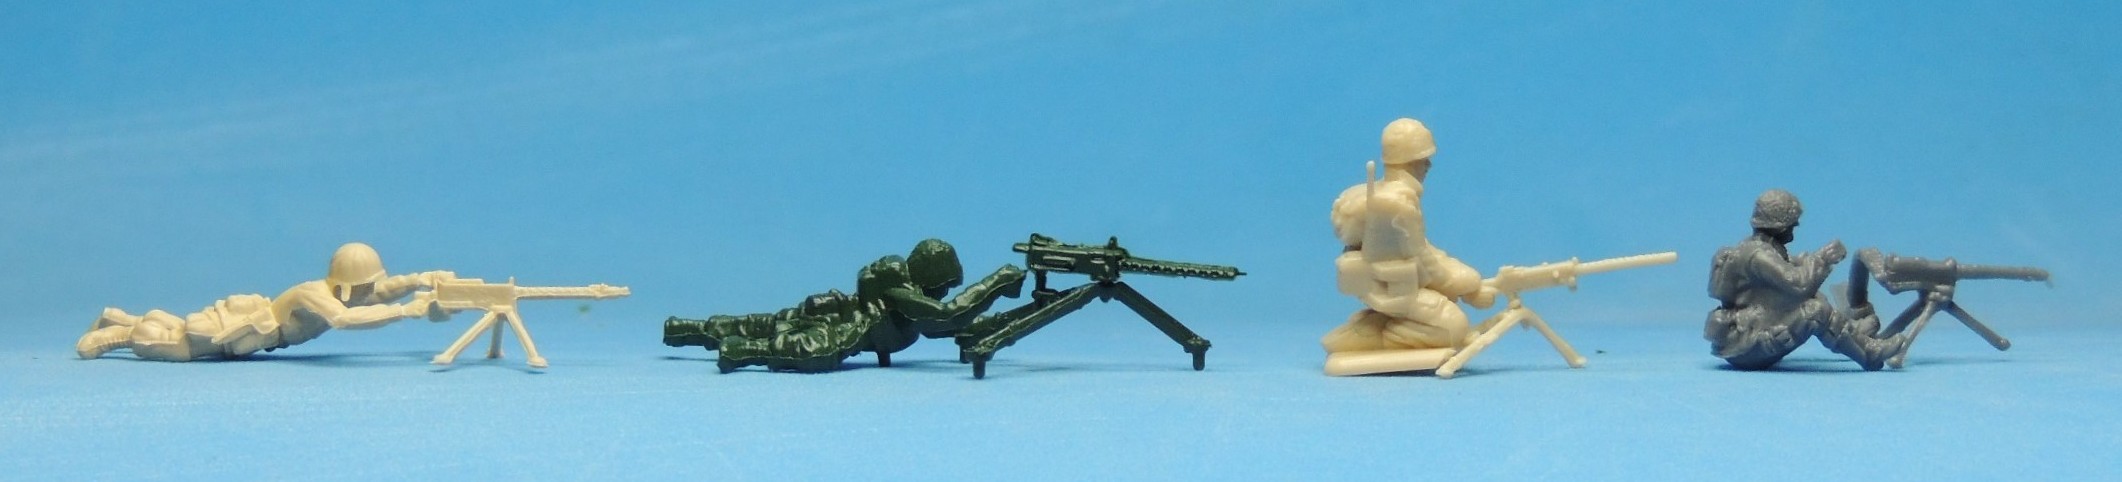
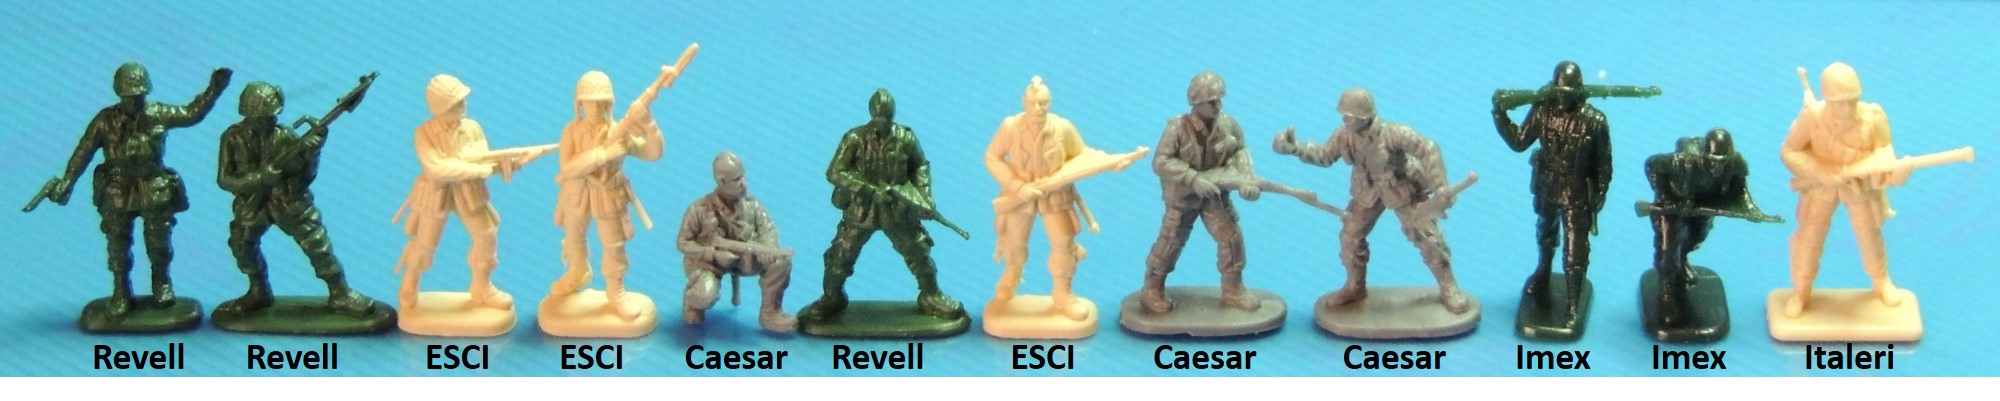
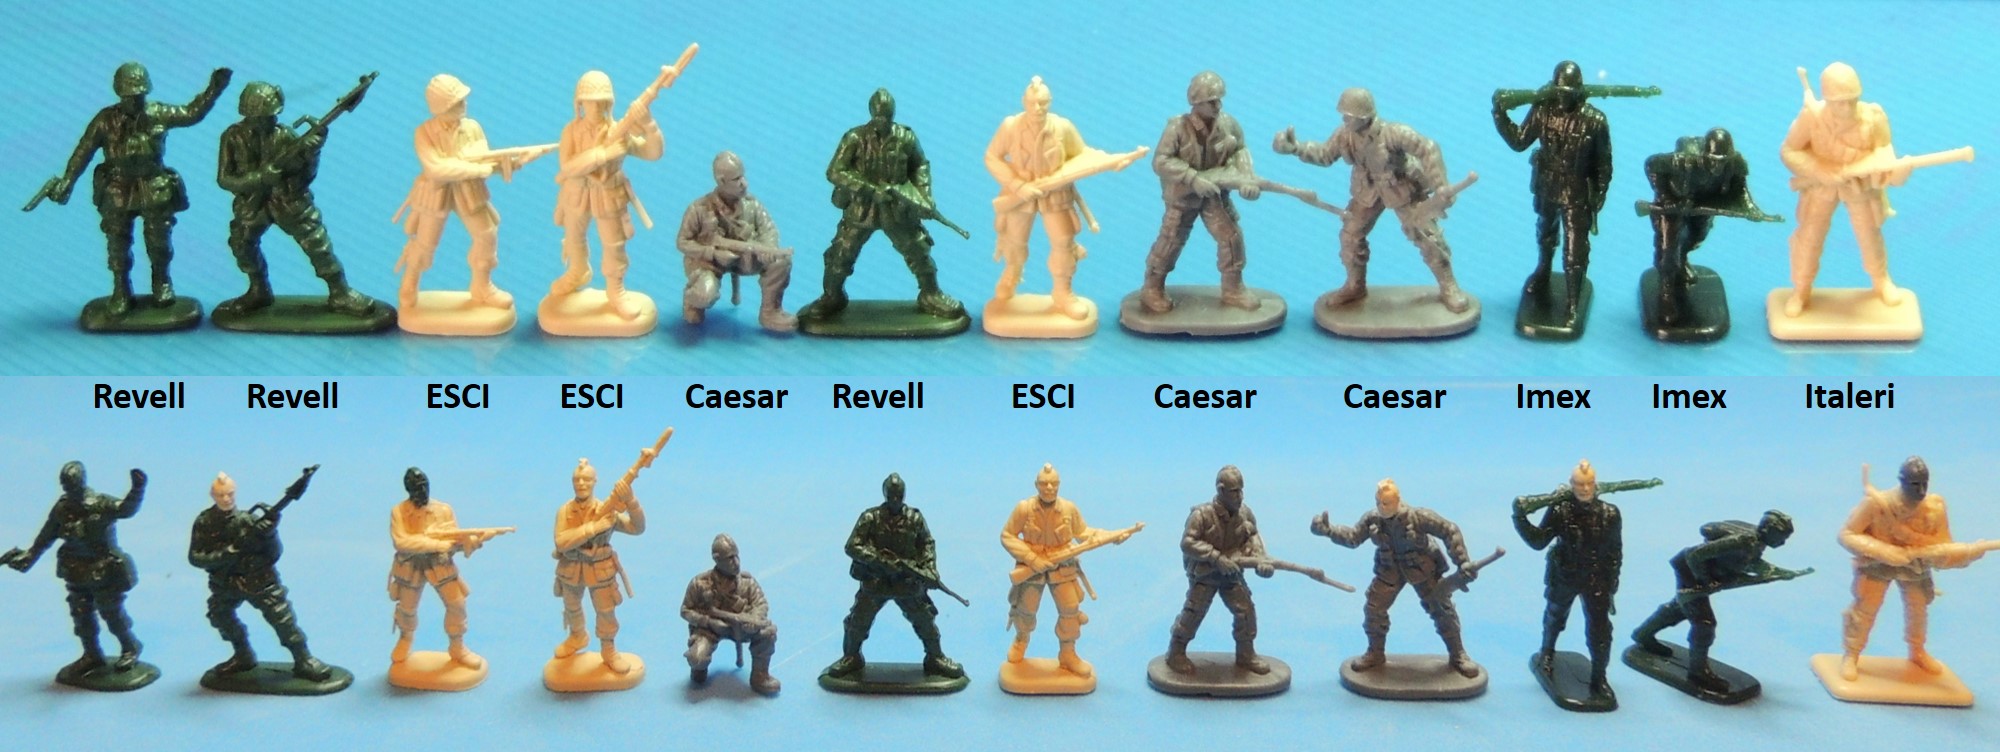
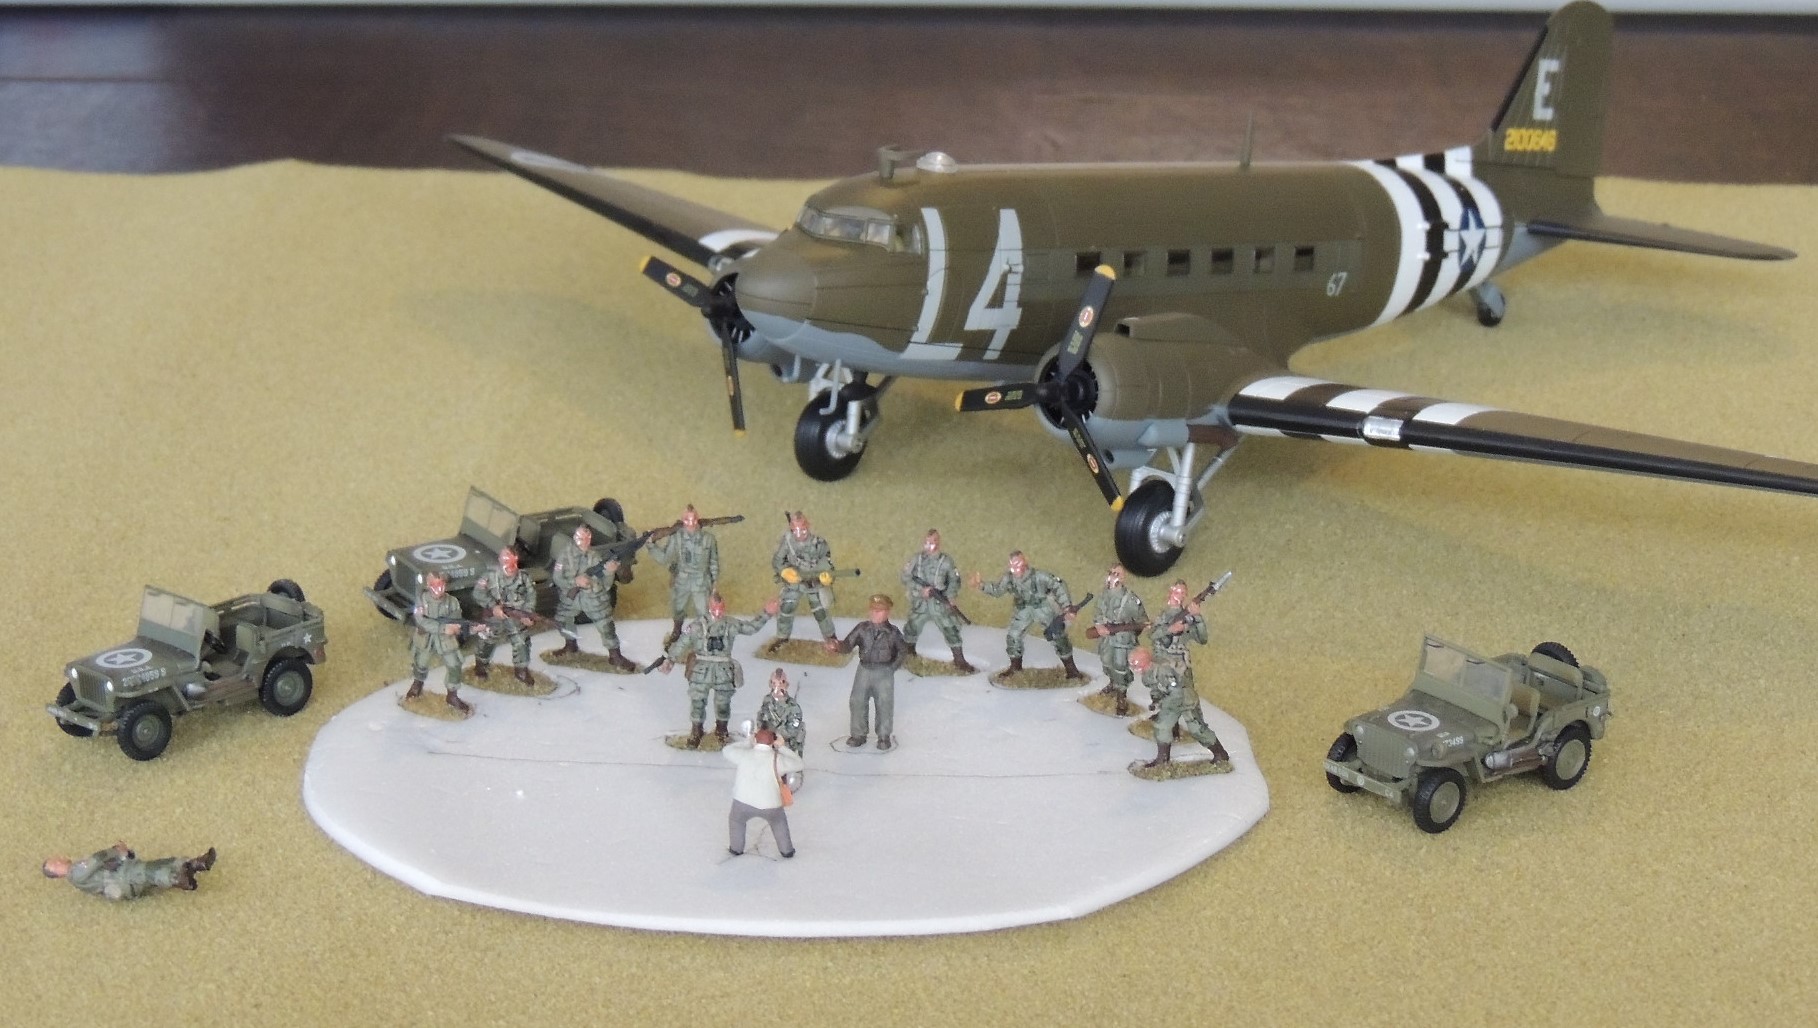
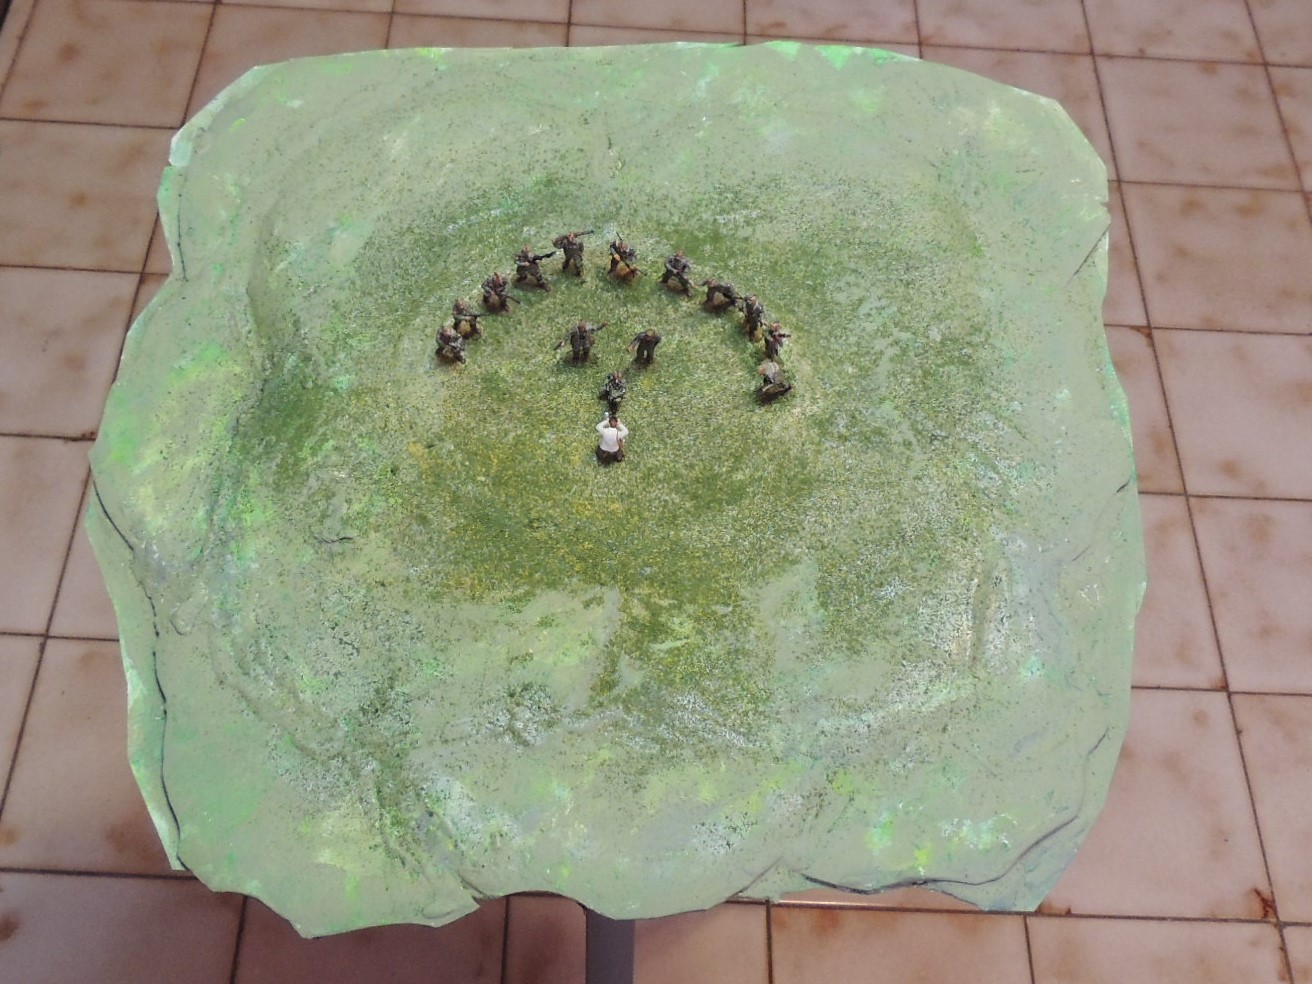
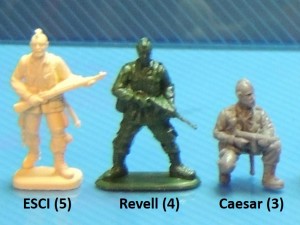
only exception, lacking sharpness in detail, though still not a bad effort. The ESCI, Revell, and Caesar sets each include one Pathfinder pose, fortunately with 5, 4, and 3 samples in each set, respectively. See photo inset at left. Thus, we have a total of 12 figures: three different ready-made figures and nine extra copies of those figures. To create 12 different figures with Mohawk haircuts, we take the heads of the nine extra copies and transplant them on the torsos of U.S. Airborne figures from the different sets. 

Selecting the Bodies: The Lucky Twelve

The inspiration for this effort was Joel Iskowitz’ painting (see The Filthy Thirteen: Part 1), which depicts most of the Filthy Thirteen without their helmets preparing to board a C-47 Skytrain. Naturally, paratroopers always wore their helmets on their heads in combat, regardless of how sporting their haircuts were. Thus, if our boys were to be shown bareheaded, we needed to use paratroopers not in action. Secondly, paratroopers used a number of different weapons, some of which were specially suited to their jumps. I wanted the set to reflect that variety. I therefore had but two simple criteria for selecting donor bodies: 1) they should not be overtly in action, e.g., aiming their weapons, and 2) they should represent as many of the weapons used by U.S. Airborne troops as possible.

These two parameters greatly limited selection but after careful consideration I judged the twelve figures below — out of a combined total of 69 poses from all six sets — to be least in combat and to represent most of the weapons used by U.S. paratroopers:FT DonorsEvery unit needs an officer with a pistol and the Revell figure on the far left best fit the bill, though he’s more animated than I would have preferred. Similarly, every unit has a gentle giant — at least according to Hollywood — and the slightly oversized Italeri figure on the far right met that need. In retrospect, I regret not using at least one Airfix figure so that every figure set was represented. As an aside, one of the Airfix figures is “the spitting image of John Wayne,” according to a 1975 issue of Airfix Magazine — something of a redeeming quality of the Airfix set, at least for me. As a further aside, I’m partial to the Imex set, which, to my eye, looks the most natural and best sculpted. Unfortunately for this project, all its figures are clearly engaged in combat except the two I used. 

Transplanting the Heads

Head transplants are fairly straightforward:

  1. Lop off the helmeted head;
  2. Drill a hole on the neck of the torso;
  3. Drill a hole on the base of the donor head;
  4. Superglue a tiny metal pin in the torso hole; and
  5. Superglue the donor head in place.

Presto! You’ve got brand new figures. For an excellent, detailed how-to discussion of head-switch conversions, see this Figure Conversion article on the oneseventytwoscale.com website.

The photo below shows the selected figures before and after the head transplant.FT Donors w New Heads 2

Of course, I cleaned up the seams and, where necessary, I removed excess plastic from the figures, particularly where the piece was 045blind to the mold, which is common between the midsection of the figure and a weapon when held with both hands. See the excess plastic marked in red in the ESCI figure at left. Though Caesar’s modern multi-mold process allows its sculptors to be adventurous, crafting poses that are more three-dimensional, the downside is that their figures often have excess plastic in these blind spots.

The Thirteenth Samurai

The title is a thinly veiled reference to Eiichi Kudo’s 1963 film The Thirteen Assassins — one of the best Samurai movies not directed by Akira Kurosawa. (The 2010 remake of this classic is also pretty darn good.) Incidentally, any reader who has not seen Ran, Kurosawa’s 1985 masterpiece, is missing out on the best war movie ever made — bar none — in my not unbiased opinion.

TQD Pathfinder
TQD-AA5 1944-45 US Airborne

But forgive the digression. As I mentioned, the plastic figure sets yielded a total of 12 Mohawk heads but I still needed one more to complete my devil’s dozen. I decided to use the Pathfinder figure from the TQD-AA5 1944-45 US Airborne white metal set — to my knowledge the only other 1/72 scale Pathfinder figure in production. The photo above is from the TQD website. TQD figures are somewhat more pricey compared to plastic but are generally superb, and this set is no exception: realistic proportions, fine detail, historical accuracy, and metal content, which, unlike plastic, takes paint well.

There they are: 13 U.S. Airborne 1/72 scale figures to represent the Filthy Thirteen. I hope you enjoyed the post. Stay tuned tomorrow for Part 3: Selecting the Weapons, covering the most common weapons used by U.S. paratroopers. As always, comments, questions, corrections, and observations are welcome.

The Filthy Thirteen of the 101st Airborne Division, Part 1: The Misfits

Caveat Lector!  I had more fun with this series of posts than a novice blogger ought to have, which means you’ll probably find the next five posts somewhat self-indulgent.

The Painting

I recently came across this fabulous painting of the Filthy Thirteen by Joel Iskowitz. It depicts the 1st Demolition Unit of the 506 Parachute Infantry Regiment of the vaunted 101st Airborne Division (that of Band of Brothers fame) as they prepared to board a C-47 Skytrain in an airfield in England on June 6, 1944. It is based on a photo published in the Stars and Stripes on June 9, 1944 — just days after D-Day. Iskowitz’s painting is reproduced here for discussion purposes under the fair use exception to the copyright laws. 1/72, 101st Airborne, 506 Parachute, 506 PIR, Battle of the Bulge, C-47, Choctaw, D-Day, Dakota, Demolition Unit, Dirty Dozen, Filthy Thirteen, Hell's Highway, Iskowitz, Market Garden, McNiece, Mike Marquez, Mohawk, Normandy, Pathfinders, SkytrainI was smitten. This is a classic example of an artist brilliantly blending art and history to create something more beautiful than either: the historical importance of the scene; the seemingly relaxed poses of the men clearly fraught with tension; the introspected expressions on their faces, which actually look like those of the real subjects; the attention to accuracy in detail, such as the weapons and equipment; the workhorse C-47 Skytrain with its alternating white-black-white invasion stripes in the background, with all the power it evokes; and the absolutely stunning sky, which despite its beauty portends the furious storm that was D-Day.

The Unit

The Filthy Thirteen — actually, it was more like “the 20 unbathed misfits” — was an elite demolition unit created and trained to undertake difficult, suicidal missions, often behind enemy lines. They were led by then-25-year-old Jake McNiece, a sergeant from Oklahoma who was half-Choctaw. They became famous after the aforementioned Stars and Stripes article was published in 1944. While the article’s overall premise was mostly accurate, it resulted in a number of myths that became the basis for the 1965 novel The Dirty Dozen, which, in turn, was the basis for the 1967 film of the same name, a blockbuster of a movie that spawned several sequels and a TV series.

Yes, the Filthy Thirteen really existed, though their story has been extensively fictionalized by a movie that bears only a passing resemblance to the real unit. No, they weren’t convicts, though some often flirted with trouble. Yes, they were filthy, bathing only once a week. No, they weren’t Native American, though they did sport Mohawk haircuts and Indian war paint in honor of their half-Choctaw leader. And yes, above all, they were misfits — the type who deliberately disobey rules they find useless, like saluting officers, yet somehow manage to get the job done. (In taped interviews, McNiece actually refers to saluting officers as “malarkey” and standing retreat as “stupid.”)

This first — professional quality — photo is the one that appeared in the 1944 Stars and Stripes article.1/72, 101st Airborne, 506 Parachute, 506 PIR, Battle of the Bulge, C-47, Choctaw, D-Day, Dakota, Demolition Unit, Dirty Dozen, Filthy Thirteen, Hell's Highway, Iskowitz, Market Garden, McNiece, Mike Marquez, Mohawk, Normandy, Pathfinders, SkytrainThe Jumps

The Filthy Thirteen participated in three of the best known episodes of the war in the European Theatre — the Normandy Invasion in France, Operation Market Garden in Holland, and the Battle of the Bulge in Belgium. During the Normandy Invasion in June 1944, the Filthy Thirteen parachuted behind enemy lines, destroying two bridges and securing a third on the Douve River, which marked the boundary between Utah Beach and Omaha Beach, to prevent the Germans from reinforcing the beach heads. Of those who jumped, more than half perished during the mission.

The group made their second jump in September 1944, during Operation Market Garden, in Eindhoven, Holland. Market Garden was dependent on Highway 69 as its only route of advance and supply and the Filthy Thirteen were tasked with holding bridges to ensure that this vital corridor, which came to be known as “Hell’s Highway” because of the carnage it witnessed, remained open. This they did —  for well over two months. (That does it: it’s time to endure A Bridge Too Far, for the umpteenth time. 🙂 )

Following those two missions, the Filthy Thirteen disbanded and the handful who survived — I believe it was six — joined the 101st Airborne Division Pathfinder Company – an elite group of specially trained paratroopers assigned to jump into enemy territory ahead of the main force to mark landing and drop zones to guide the main force. With the 101st Airborne encircled in Bastogne in December 1944 during the Battle of the Bulge, resupply became critical. Because of the heavy cloud cover, the Pathfinders were ordered to parachute in to set up electronic beacons for C-47 aircraft to follow when dropping their sorely-needed supplies. The Pathfinders completed their mission successfully and the 101st Airborne was effectively resupplied.1/72, 101st Airborne, 506 Parachute, 506 PIR, Battle of the Bulge, C-47, Choctaw, D-Day, Dakota, Demolition Unit, Dirty Dozen, Filthy Thirteen, Hell's Highway, Iskowitz, Market Garden, McNiece, Mike Marquez, Mohawk, Normandy, Pathfinders, SkytrainI captured the photo above from a widely available video clip of the 101st on June 6, 1944, just before the Filthy Thirteen took off from England. Forgive the bad quality.

This last lagniappe photo, also captured from the aforementioned video clip, shows Jack McNiece putting warpaint on someone who, to my eyes, appears to be Mike Marquez, a Texas native who was the only Hispanic member of the team, though some have identified him as Johnny Hale. Together, all three photos form the basis of Iskowitz’s painting and you can identify all three vignettes in various parts of the scene.Screenshot (3)The Books

In addition to The Dirty Dozen (1965) novel by E.M. Nathanson, at least three nonfiction books have been published about this colorful unit: The Filthy Thirteen (2003) by Richard E. Killblane; Fighting With The Filthy Thirteen: The World War II Story of Jack Womer – Ranger and Paratrooper (2012) by Stephen DeVito; and War Paint: The Filthy Thirteen Jump Into Normandy (2013) also by Richard E. Killblane. For a detailed history of the unit, the reader is directed to these books as this synopsis was intended merely as a predicate for Part 2.

I hope you enjoyed this simple post. For those who, like me, love figure conversions, stay tuned next week for Part 2: Creating the Unit in 1/72 ScaleAs always, comments, questions, corrections, and observations are welcome. 

The Sherman in 1/72: M4 “Cannon Ball,” 70th Tank Battalion, Utah Beach 1944

I had intended to write a brief review of the Dragon 60369 Sherman “Cannon Ball,” a wading Sherman that landed at Utah Beach on D-Day. However, as I tried to understand where it fit in within the framework of the D-Day landings, I found that my knowledge of tank warfare on D-Day was quite limited. I had no real sense for how many tanks landed at each beach and how many were lost. I decided that, at the very least, I would get a rudimentary “big picture” grasp of tank landings at Utah Beach and try to understand the other four beaches at a later time. For those not interested, please skip to the photos below. 

Sherman Tanks at Utah Beach

On D-Day, June 6, 1944, approximately 100 U.S. Army Sherman tanks attempted to land at Utah Beach in support of the 4th Infantry Division. The U.S. deployed two tank battalions at Utah Beach, the 70th and 746th – each consisting of 48 Sherman tanks.

The 70th Tank Battalion was comprised of three tank companies, each with 16 Sherman tanks. Companies A and B were equipped with Duplex Drive Shermans; Company C was made up of 16 wading Shermans, including 4 dozers. “Cannon Ball” was one of the wading tanks in Company C. (Note: Each tank battalion also had a D Company made up of Stuart light tanks.) 

The 70th lost 9 Shermans during the landing — 5 DD Shermans and 4 Wading Shermans, including “Cannon Ball.” Throughout the day, the 70th lost another 7 tanks, for a total of 16. Thus, by the end of D-Day, the 70th had lost one third of its Sherman tanks.

The 746th Battalion, on the other hand, did not have Duplex Drive Shermans, and all 48 Wading Sherman tanks landed safely, though the Battalion did lose two Shermans throughout the day.

It bears mentioning that by the end of D-Day, all objectives at Utah Beach had been achieved and the area was securely under control of the Allies. This is in sharp contrast with Omaha Beach, where the Allies suffered tremendous casualties and did not reach all objectives.

The chart below provides context regarding how “Cannon Ball” fit within the organizational framework of the 70th Tank Battalion at Utah Beach on D-Day. (I made the chart for learners like me who want to visualize where a small piece fits into a larger whole. I’m just an amateur so please use at your own risk.)

1/72, 60369, 70th Tank Battalion, 70th Tank Btn, AFV, Cannonball, Cannon Ball, D-Day, Dragon, M4, Normandy, Peckerwood, Sherman, Tanks, U.S. Army, Utah Beach, Wading

The 70th Tank Battalion

Before we get to “Cannon Ball,” here are a few bullets on the storied 70th Tank Battalion, to which “Cannon Ball” belonged:

  • Formed in July 1940, the 70th Tank Battalion was the first independent tank battalion in the U.S.
  • The Battalion fought in every major U.S. campaign in WWII, beginning with North Africa, through Sicily, Italy, and France, and finally in Germany itself.
  • While in Algeria, the 70th trained the Free French soldiers who later formed the 2nd French Armored Division.
  • The 70th was called the “soixante-dix” (meaning “70”) by the French, a phrase that later appeared on the sash of their mascot, Joe Peckerwood.
  • Among other achievements, the 70th participated in the D-Day invasion, the Battle of the Bulge, and eventually crossed the Rhine to see the end of the war in Germany.
  • In Normandy, the 70th supported the famous 101st Airborne Division during combat at St. Mere Eglise.
  • Considered the most experienced U.S. tank battalion, the 70th was one of the most decorated of the war and received a Presidential Unit Citation for its role in the invasion of Normandy.

The Actual Tank

Unfortunately, there isn’t much information specifically on “Cannon Ball,” other than a well-known photo of it stuck in a shell hole at Utah Beach (see photo below). Nonetheless, here are a few bullets on what little I could gather from books and various corners of the internet:

  • On D-Day, “Cannon Ball” was one of 16 Sherman wading tanks in C Company of the 70th Tank Battalion.
  • It landed at Utah Beach but got bogged down in a shell hole.
  • “Cannon Ball” was pulled out of the hole and put back into action.
  • The tank had been previously fitted with a T4 Whiz-Bang Demolition Rocket Launcher in advance of D-Day. Following tests, the U.S. Army concluded that the launcher presented a risk to the crew and decided to remove the launcher prior to D-Day.
  • “Cannon Ball” is one of very few D-Day tanks with wading trunks for which we have reliable marking information. But beyond that, it’s representative of the hundreds of amphibious tanks that fought the waves to reach shore at Normandy. Numerous DDs failed to make it, particularly at Omaha, while most wading tanks made it to shore.

I searched numerous books and the internet and, as far as I know, the two photos below are the only existing photos of “Cannon Ball.” If anyone knows of any other pictures, I’d love to see them.

1/72, 60369, 70th Tank Battalion, 70th Tank Btn, AFV, Cannonball, Cannon Ball, D-Day, Dragon, M4, Normandy, Peckerwood, Sherman, Tanks, U.S. Army, Utah Beach, Wading

1/72, 60369, 70th Tank Battalion, 70th Tank Btn, AFV, Cannonball, Cannon Ball, D-Day, Dragon, M4, Normandy, Peckerwood, Sherman, Tanks, U.S. Army, Utah Beach, Wading

Of interest are the two mounting attachments on either side of the top of the turret. As mentioned, prior to D-Day “Cannon Ball” had been equipped with the Whiz Bang rockets (see profile below). The photo with the red arrows was posted by Steve Zaloga on another forum.

Note: Subsequent to publication of this article in December 2015, the photo of “Cannon Ball” below appeared in Armored Strike Force: The Photo History of the American 70th Tank Battalion in World War II, by Charles C. Roberts Jr., published July 1, 2016. It is posted here for discussion purposes under the fair use exception to the copyright laws.Though somewhat grainy, this photo is important historically in that it provides clear evidence that “Cannon Ball” survived the landing at Utah and lived to fight another day. It is similarly important for the modeler in that it confirms that the markings on the starboard side of the tank were symmetrical to those on the port side — an assumption usually made but often wrong. Note that the wading stacks were removed once the tank left the beach.

D-Day Shermans: Only “Cannon Ball” and “Carole” in 1/72

As far as I know, the only two D-Day Shermans in 1/72 scale are “Cannon Ball” and “Carole,” a Firefly with the 13th/18th Royal Hussars of the 27th Armored Brigade (Dragon 60250). 

Dragon produced another Normandy M4, the 60370 “Tonto,” representing the U.S. 37th Tank Battalion, but that battalion didn’t arrive in Normandy until July 13, 1944, incidentally, at Utah Beach. 

Dragon also produced another Normandy Firefly, the 60251 “Velikye Luki,” representing the Northamptonshire Yeomanry, but the unit didn’t arrive until June 12 at Gold Beach. 

The Dragon 60369 “Cannon Ball” Model

  • This is the only U.S. tank in 1/72 representing D-Day and makes a fine pair with “Carole,” its British D-Day counterpart.
  • “Cannon Ball” is something of a unique tank in 1/72, as it’s the only tank with wading trunks that represents an actual tank. (Note: Dragon included a 75mm M4A1 with its LCM(3) but it has no markings and did not represent any particular tank.)
  • The markings on “Cannon Ball” are colorful – and distinctive. The turtle is “Joe Peckerwood” the Truculent Turtle with a tanker’s helmet and the sash carries the words “soixante-dix” meaning “70” in French. (See inset in the profile.)
  • The model is missing the T4 Whiz Bang brackets and gun sight pointed by red arrows in the photo above.

And finally, here are the photos:

1/72, 60369, 70th Tank Battalion, 70th Tank Btn, AFV, Cannonball, Cannon Ball, D-Day, Dragon, M4, Normandy, Peckerwood, Sherman, Tanks, U.S. Army, Utah Beach, Wading

Note the dark band around the turret. Mastic glue was used as a sealant to waterproof the tank over the opening of the turret ring and hatches.

1/72, 60369, 70th Tank Battalion, 70th Tank Btn, AFV, Cannonball, Cannon Ball, D-Day, Dragon, M4, Normandy, Peckerwood, Sherman, Tanks, U.S. Army, Utah Beach, Wading

Note the red number with white trim, a distinctive feature of the 70th. Note also the applique armor on the starboard side of the turret.

1/72, 60369, 70th Tank Battalion, 70th Tank Btn, AFV, Cannonball, Cannon Ball, D-Day, Dragon, M4, Normandy, Peckerwood, Sherman, Tanks, U.S. Army, Utah Beach, Wading

Note that the stars have been obscured. The black and white photo towards the bottom of this post graphically illustrates why.

1/72, 60369, 70th Tank Battalion, 70th Tank Btn, AFV, Cannonball, Cannon Ball, D-Day, Dragon, M4, Normandy, Peckerwood, Sherman, Tanks, U.S. Army, Utah Beach, Wading

1/72, 60369, 70th Tank Battalion, 70th Tank Btn, AFV, Cannonball, Cannon Ball, D-Day, Dragon, M4, Normandy, Peckerwood, Sherman, Tanks, U.S. Army, Utah Beach, Wading

Here’s a close-up of Joe Peckerwood the “Truculent Turtle” and the waterproofing label.

1/72, 60369, 70th Tank Battalion, 70th Tank Btn, AFV, Cannonball, Cannon Ball, D-Day, Dragon, M4, Normandy, Peckerwood, Sherman, Tanks, U.S. Army, Utah Beach, Wading

The U.S. Army began to obscure the white stars because they made excellent targets for German tank crews.

1/72, 60369, 70th Tank Battalion, 70th Tank Btn, AFV, Cannonball, Cannon Ball, D-Day, Dragon, M4, Normandy, Peckerwood, Sherman, Tanks, U.S. Army, Utah Beach, Wading

The Profiles

For those who love profiles, this is what “Cannon Ball” looked like on D-Day, from Zaloga’s Sherman at War (2): The U.S. Army in the European Theatre 1943-45.

1/72, 60369, 70th Tank Battalion, 70th Tank Btn, AFV, Cannonball, Cannon Ball, D-Day, Dragon, M4 Normandy, Peckerwood, Sherman, Tanks, U.S. Army, Utah Beach, Wading

This is what “Cannon Ball” looked like before D-Day, when it still had the Whiz Bang rockets, from Steve Zaloga’s U.S.  Armored Funnies: U.S. Specialized Armored Vehicles in the ETO in World War II.

1/72, 60369, 70th Tank Battalion, 70th Tank Btn, AFV, Cannonball, Cannon Ball, D-Day, Dragon, M4, Normandy, Peckerwood, Sherman, Tanks, U.S. Army, Utah Beach, Wading

For those interested in what a wading dozer looks like, here’s a profile of the “Double Trouble,” also from the 70th Tank Battalion. The profile is also from Zaloga’s Funnies.

1/72, 60369, 70th Tank Battalion, 70th Tank Btn, AFV, Cannonball, Cannon Ball, D-Day, Dragon, M4, Normandy, Peckerwood, Sherman, Tanks, U.S. Army, Utah Beach, Wading

Here’s a lagniappe photo of the “Cannon Ball” with “Carole” (Dragon 60250), its British D-Day Sherman brother (or sister).

1/72, 60369, 70th Tank Battalion, 70th Tank Btn, AFV, Cannonball, Cannon Ball, D-Day, Dragon, M4, Normandy, Peckerwood, Sherman, Tanks, U.S. Army, Utah Beach, Wading

The Upshot

The Dragon 60369 M4 Sherman “Cannon Ball” is almost flawless.  Other than the two mounting attachments for the Whiz Bang rockets missing on either side of the top of the turret, the 60369 is a fine and faithful representation of the actual Sherman tank that landed at Utah Beach on D-Day.

I hope to do a review of the Dragon 60250 Sherman Firefly “Carole” in the near future.