The A6M Zero in 1/72: Shigeru Itaya Leads the Zeros at Pearl Harbor, Part 2 – The Dragon Model

This is Part 2 of Shigeru Itaya Leads the Zeros at Pearl Harbor. It is a review of the Dragon Wings 50017 1/72 scale model of Itaya’s Zero at Pearl Harbor. For a brief biographical note on Shigeru Itaya, please refer to the previous post. Today, December 7, 2016, on the 75th anniversary of the attack on Pearl Harbor, let us remember the men who died that day.

Itaya’s A6M2 Zero, Tail No. AI-155

As discussed in Part 1, Itaya led the 43 Zeros from all carriers in the first wave of the attack on Pearl Harbor. In each wave the Zero planes were the first airborne, both because they needed the least runway to take off and in order to protect the slower, less maneuverable torpedo and dive bombers that followed. As the leader of the first wave of Zeros, Itaya was the first Japanese pilot airborne during the attack.

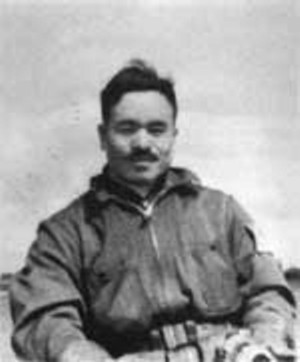
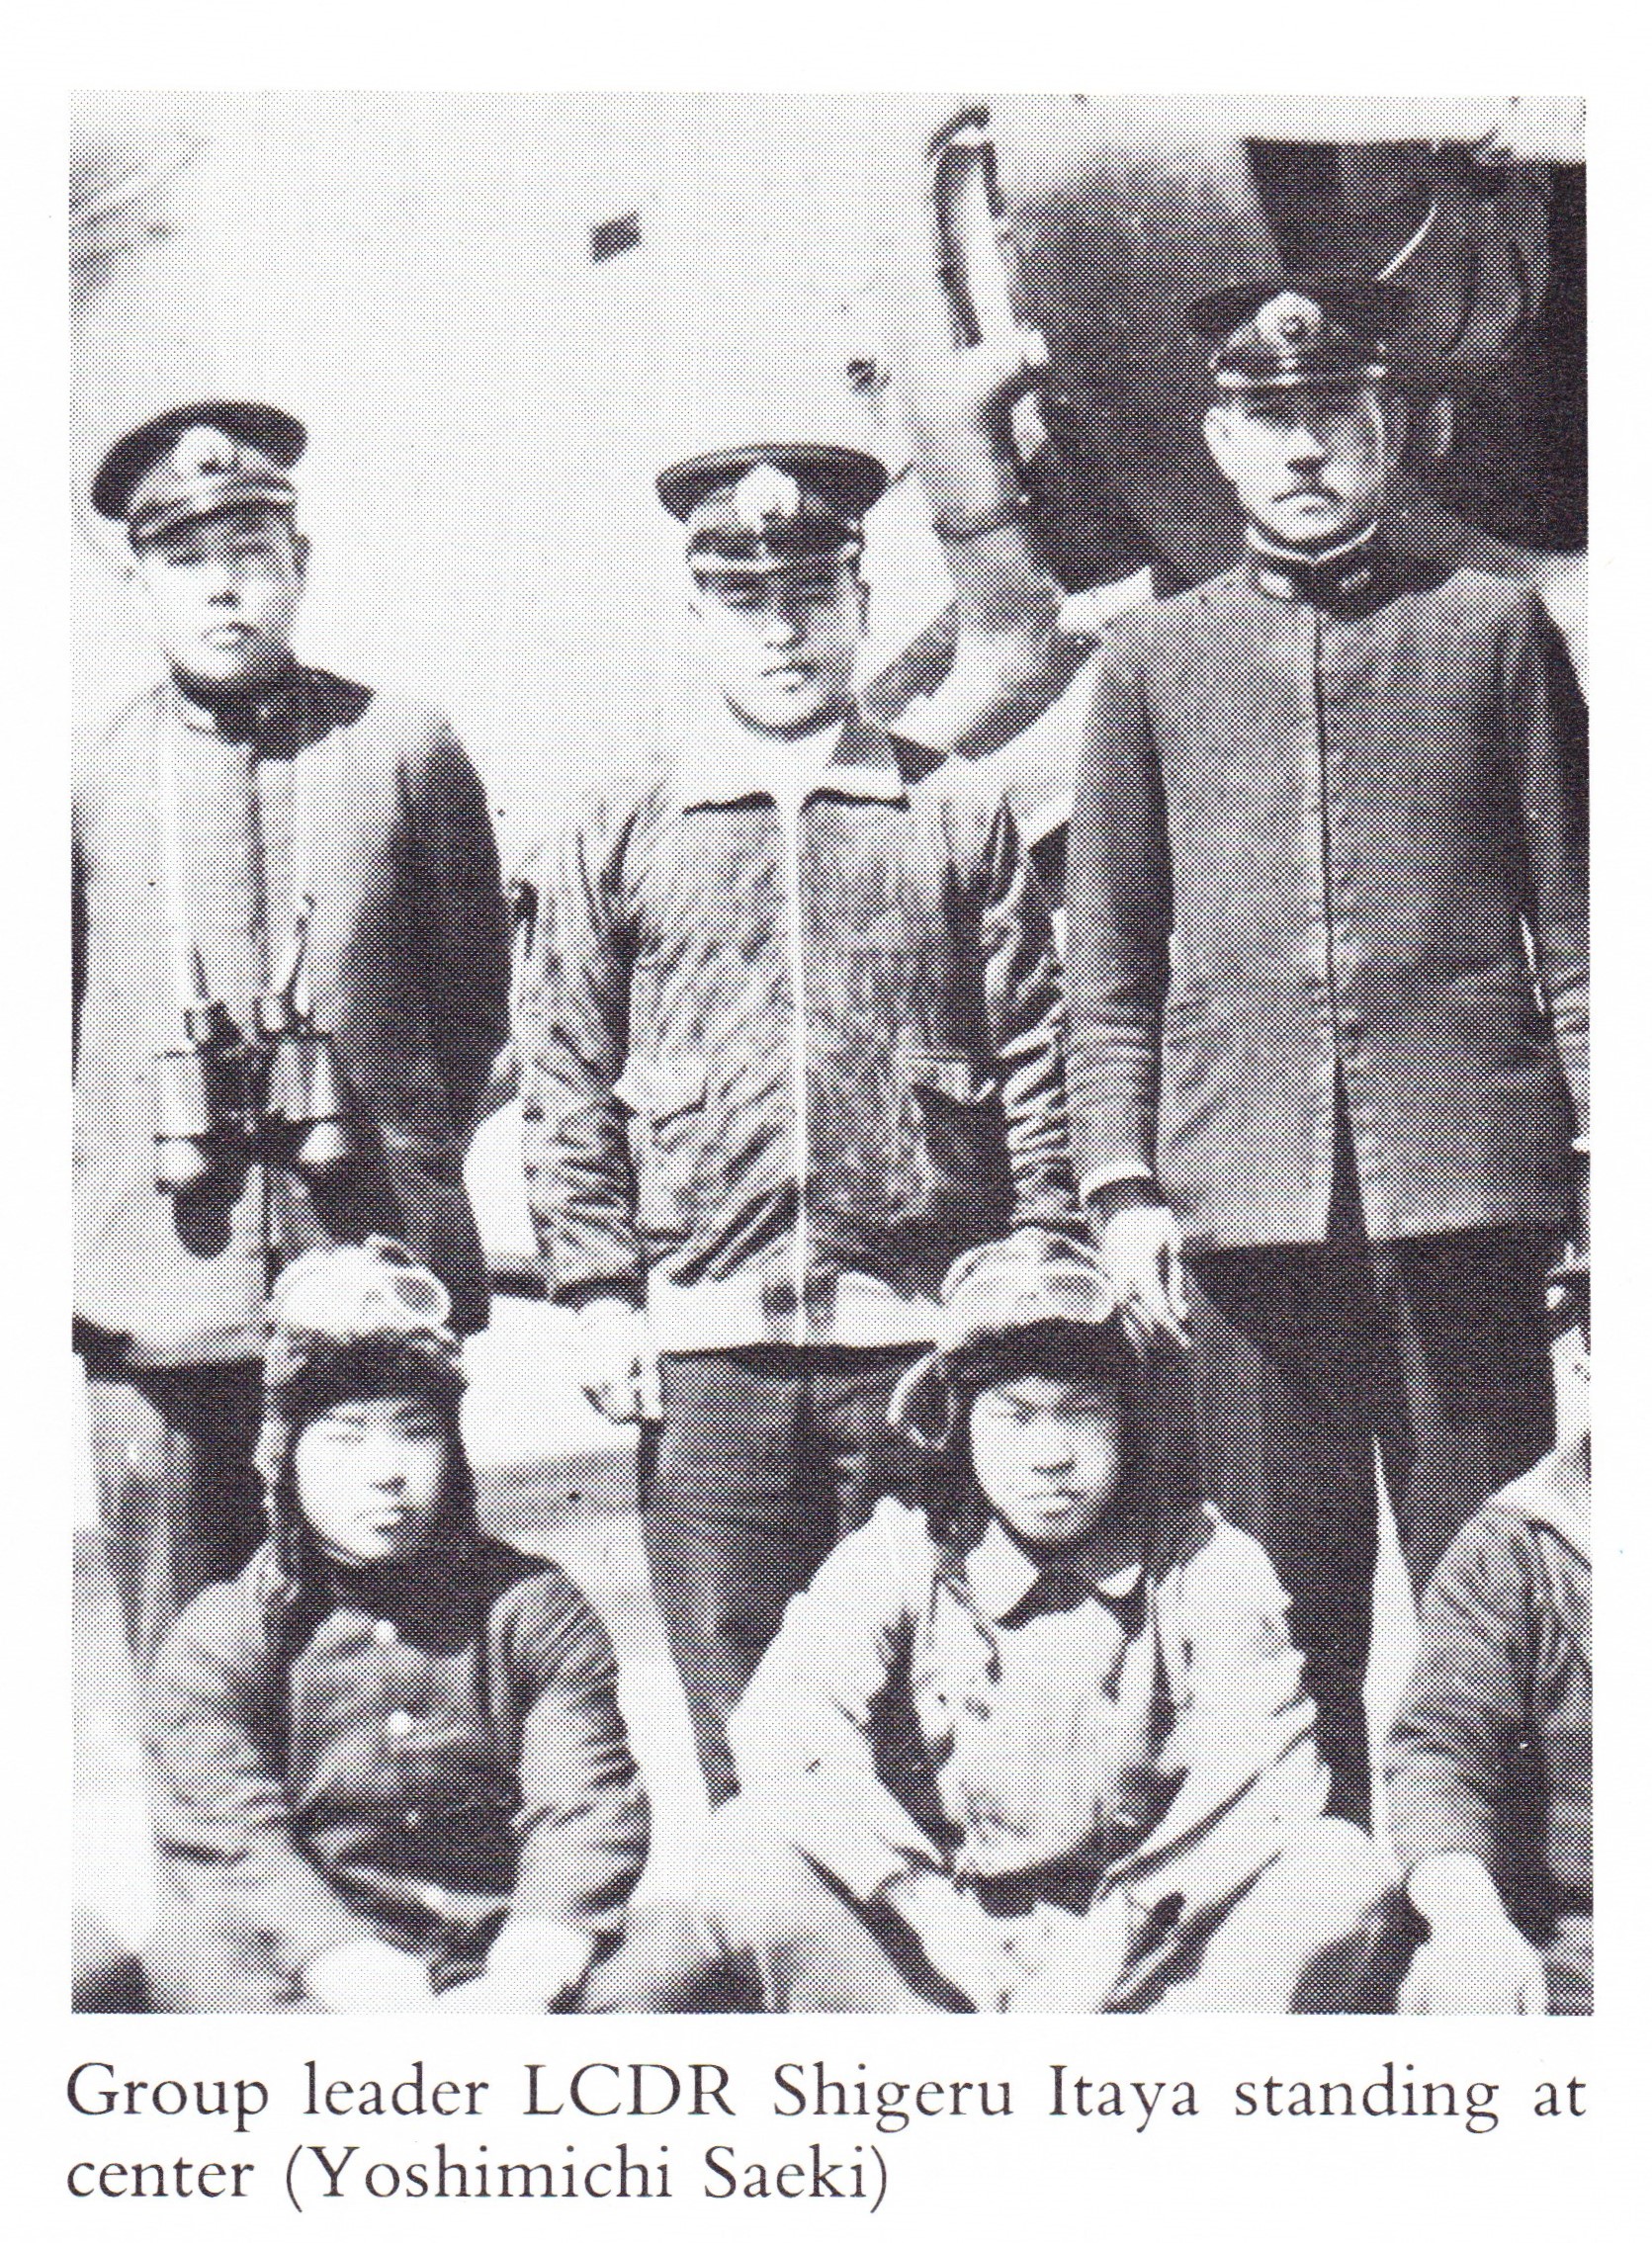
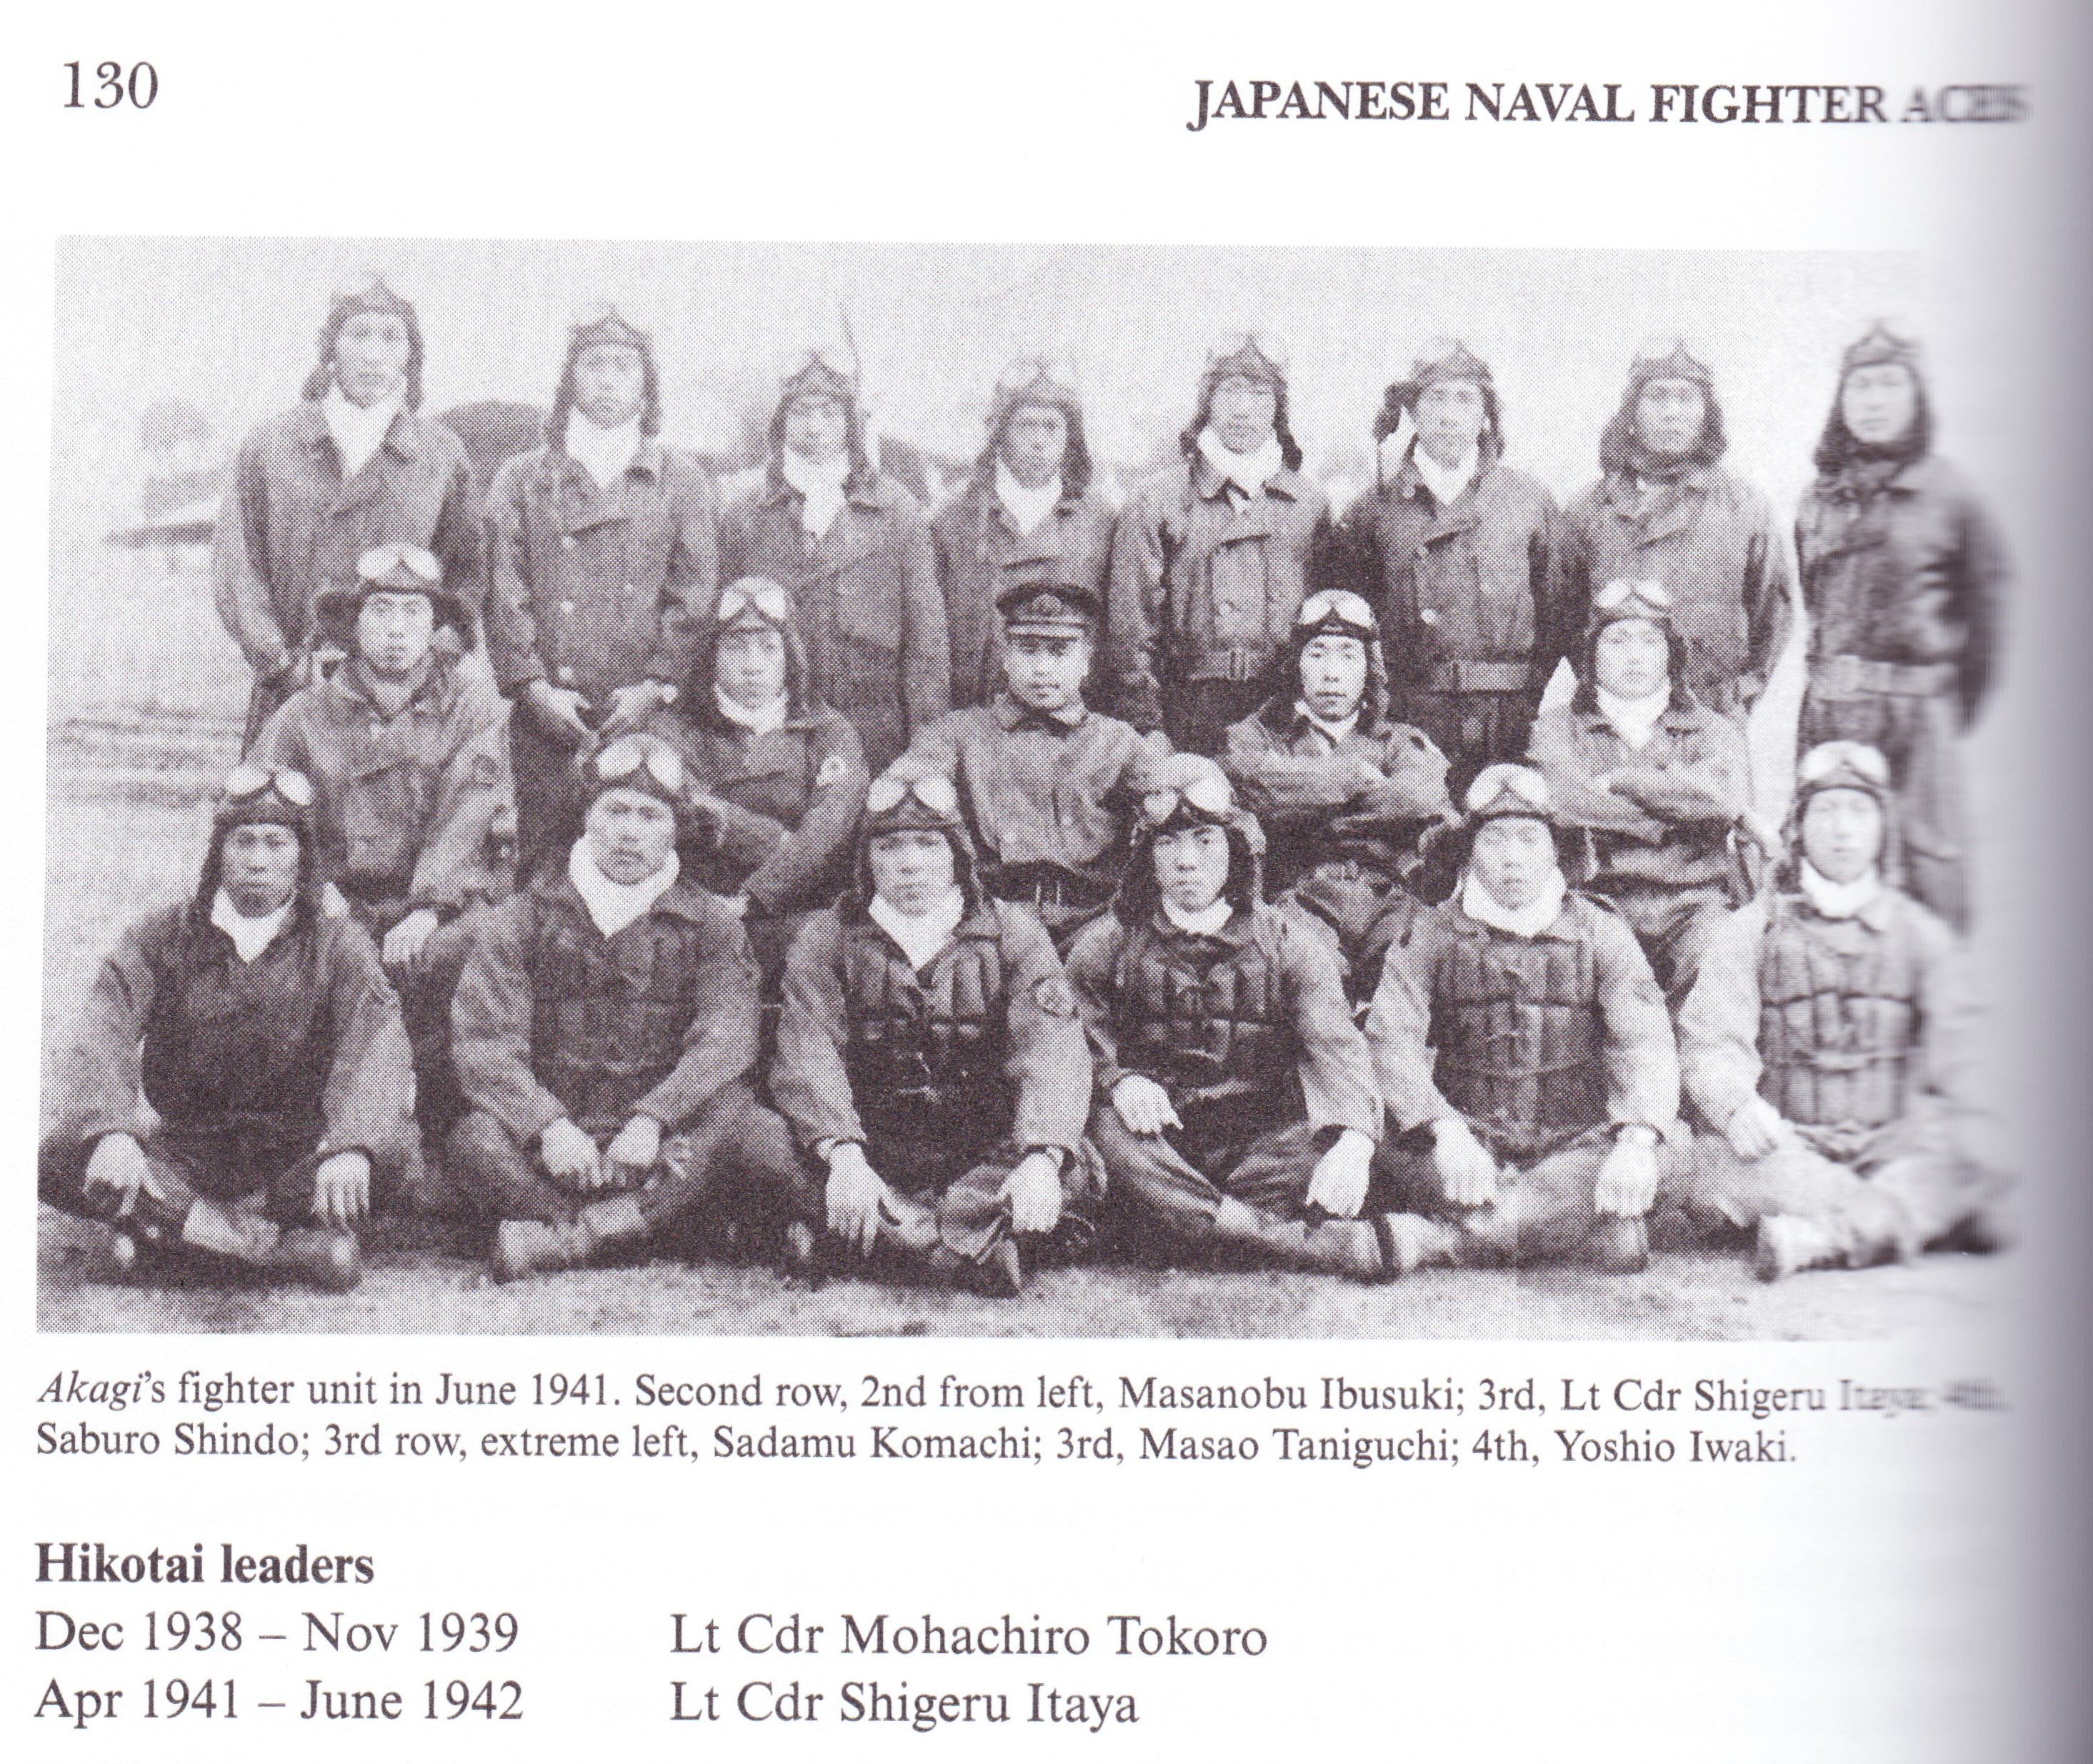
As noted previously, there is precious little information available on Itaya. This dearth of information extends to Itaya’s plane at Pearl Harbor, a Mitsubishi A6M2 Zero, tail no. AI-155. Although there are some references on the internet that Itaya’s Zero’s tail no. may have been something other than AI-155, the books I consulted consistently use that number. To my knowledge, there are no existing photos of the AI-155, though there are enough photos of other planes from the Akagi aircraft carrier to give us a reasonably accurate understanding of its colors and markings.

Below is a color profile from what is probably the most comprehensive source of information on the colors and markings of WWII Japanese aircraft, Eduardo Cea’s eight-volume treatise entitled Japanese Military Aircraft. I scanned this particular profile from Volume 2, The Air Force of the Japanese Imperial Navy: Carrier-Based Aircraft, 1922-1945 (I). While I’m aware that there are a number of errors in the English translation of the Spanish text that are somewhat distracting, the series is beautifully illustrated, incredibly informative, and inarguably comprehensive, and, being fluent in Spanish, I blithely overlooked the errors. 🙂 The profile is reproduced here for discussion purposes under the fair use exception to the copyright laws.1/72, 50017, A6M, AI-155, Akagi, Eduardo Cea, Dragon, IJN, Itaya, Japanese Navy, Pearl Harbor, Zeke, Zero
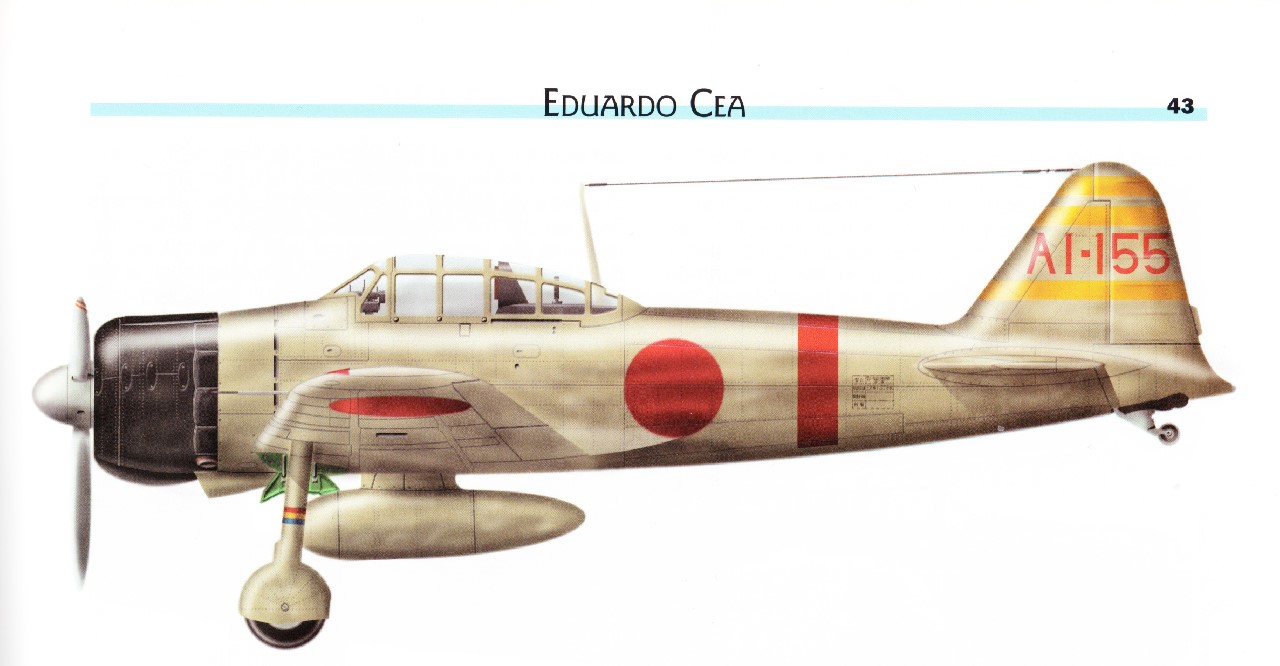
Itaya’s Zero at Pearl Harbor has been released in 1/72 scale by three different manufacturers: Dragon Wings 50017; Forces of Valor 85032; and Witty Wings 72-012-001. This post concerns the Dragon Wings 50017. Reviews of the other two will follow shortly in separate posts, with equivalent photos of each of the three models for ease of comparison.

The Dragon Wings 50017 Zero

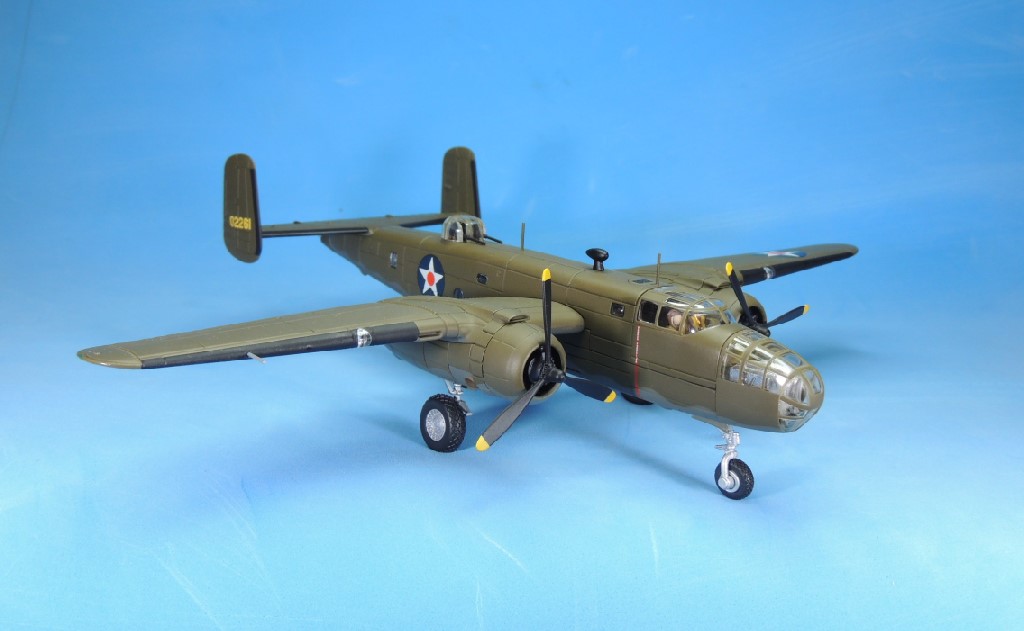
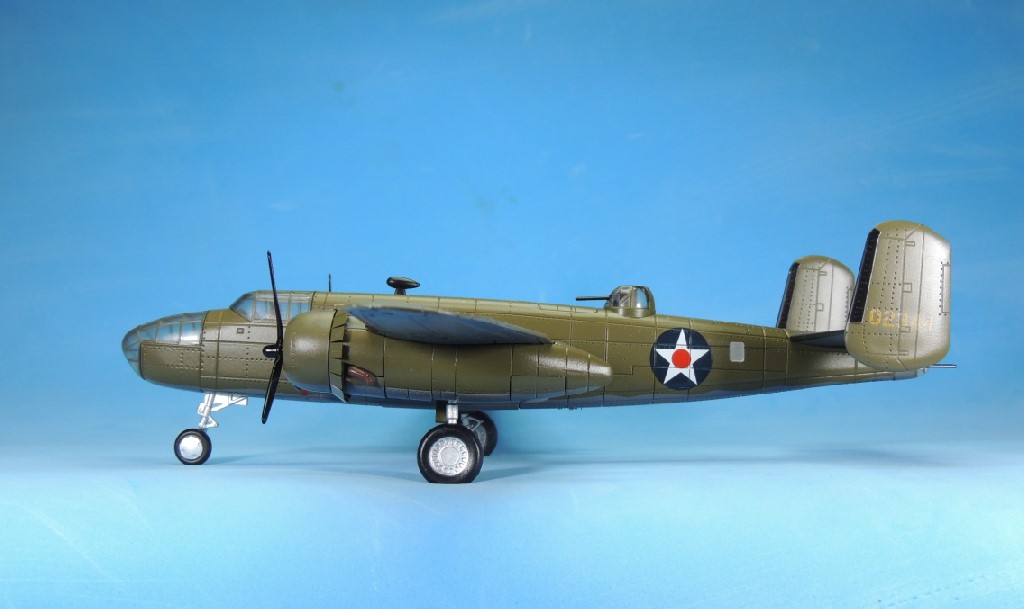
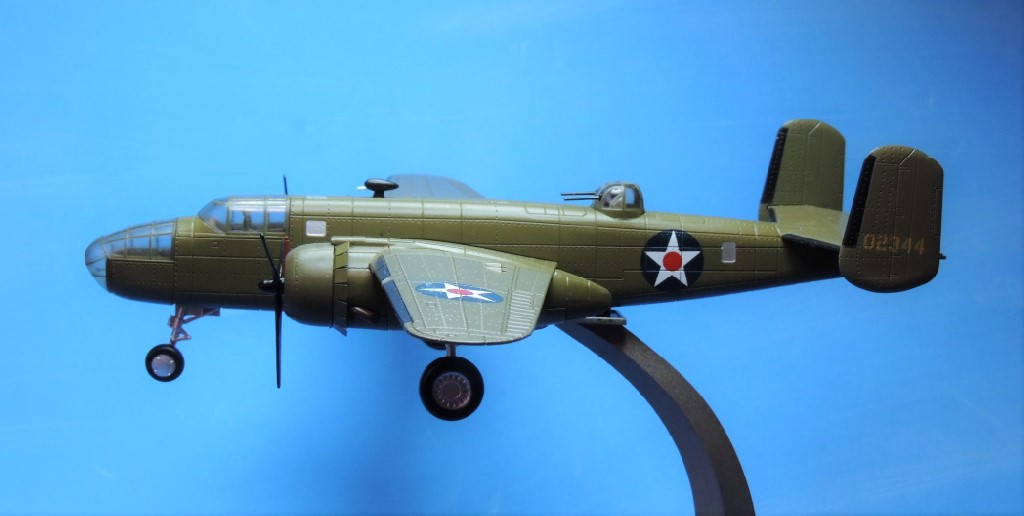
Below is a portside view of the Dragon model. Immediately apparent is the beautiful caramel finish. Putting aside the continuing debate about whether the caramel color was the effect of a protective layer of varnish or the natural result of the aging of the pigments, the fact remains that the Zeros had an “ameiro” tone, which means “caramel-colored” in Japanese. Upon review of Zeros in my collection from a dozen different manufacturers, I’m convinced that Dragon is the only manufacturer that got it right (though Hobby Master produced some terrific “ameiro” D3A1 Vals). If nothing else, the Dragon finish matches the description and color plates in Cea’s eight-volume set on Japanese planes.1/72, 50017, A6M, AI-155, Akagi, Dragon, IJN, Itaya, Japanese Navy, Pearl Harbor, Zeke, Zero
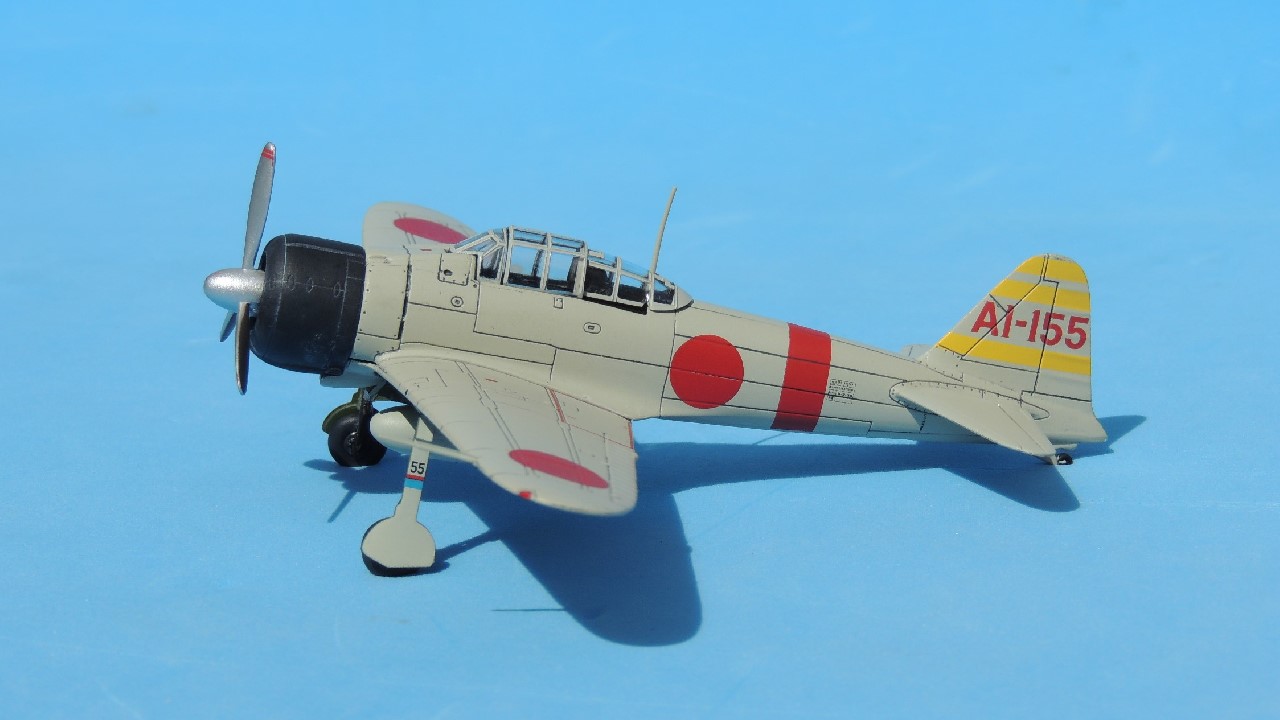
In the photo below, note the pronounced panel lines, which disappointed some collectors. In my view, however, it is not so much that the lines are significantly overscaled as the fact that Dragon inexplicably “inked” them — for lack of a better term — as one would highlight the crevices on a tank with an umber wash to make them stand out better. It is this combination of overscaling and “inking” that gives the impression that the panel lines are deeper and wider than they actually are.1/72, 50017, A6M, AI-155, Akagi, Dragon, IJN, Itaya, Japanese Navy, Pearl Harbor, Zeke, Zero

The photo below provides an excellent view of the tail no. “AI-155.” The “AI” code was the designation for the Akagi aircraft carrier. In the three-digit number after “AI”, the first digit (“1”) indicates that it is a fighter plane. The last two digits (“55”) are simply the aircraft number within the unit. The tail numbers on Japanese carrier aircraft were usually red except on two carriers (Zuiho and Hosho) whose tails were already red. The identification numbers on aircraft from those two carriers were white so as to make them stand out against the red tails. 

Note also the three horizontal yellow stripes on the tail that indicated command: three stripes for the group leader; two stripes for a squadron leader (9 aircraft); and one stripe for a flight leader (3 aircraft). Note also the “no step” rectangular area outlined in red at the rear of each wing next to the wing root.1/72, 50017, A6M, AI-155, Akagi, Dragon, IJN, Itaya, Japanese Navy, Pearl Harbor, Zeke, Zero

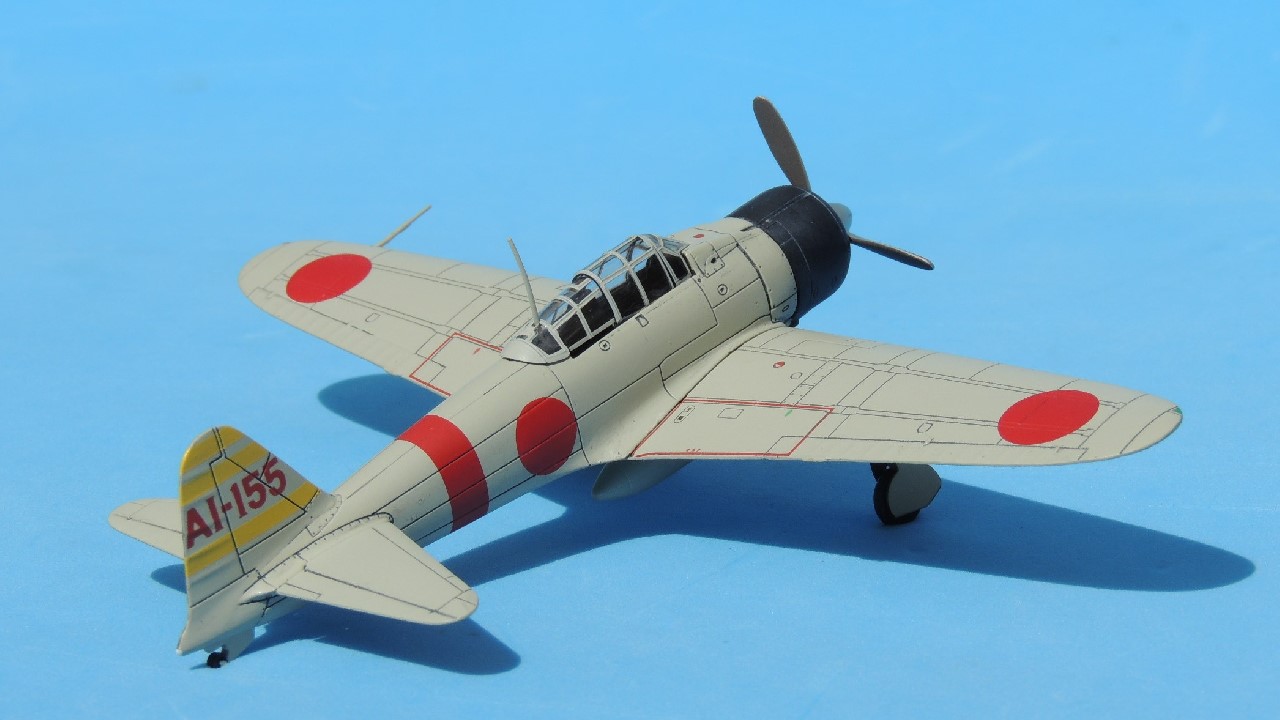
The photo below provides an excellent view of the Hinomaru, which was carried on both sides of the fuselage aft of the wing and on both the upper surface and underside of each wing — six “circles of the sun” in total. The vertical red stripe is the identification mark for the aircraft carrier Akagi.

Note also the manufacturing plate stenciled just aft of the red stripe. The inset shows that the plate bears the number 7702, meaning it was the 7,702nd Zero built. The “2-3-30” means it was built in the Japanese year 2602, third month, thirtieth day = March 30, 1942. (Yes, more than three months after Pearl Harbor. 🙂 ) Incidentally, the A6M is called the “Zero” because it first entered service in the Japanese year 2600 (1940), the zero year of the new Japanese century. Please bear in mind that the entire plate is just 4mm wide (just over 1/8 inch). Again, Dragon’s attention to detail is remarkable.1/72, 50017, A6M, AI-155, Akagi, Dragon, IJN, Itaya, Japanese Navy, Pearl Harbor, Zeke, Zero
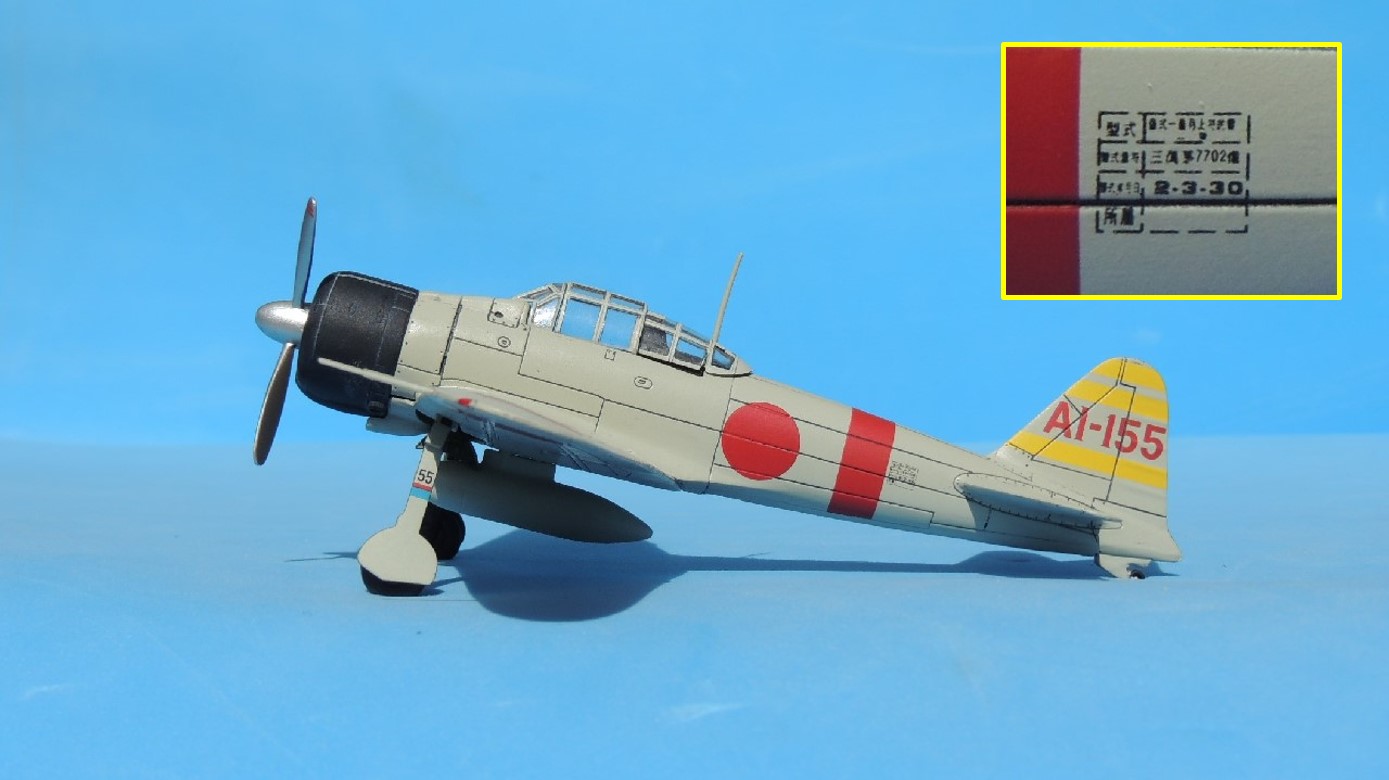
Below is a shot of the starboard side. Note the absence of the manufacturing plate, which was only stenciled on the port side.1/72, 50017, A6M, AI-155, Akagi, Dragon, IJN, Itaya, Japanese Navy, Pearl Harbor, Zeke, Zero
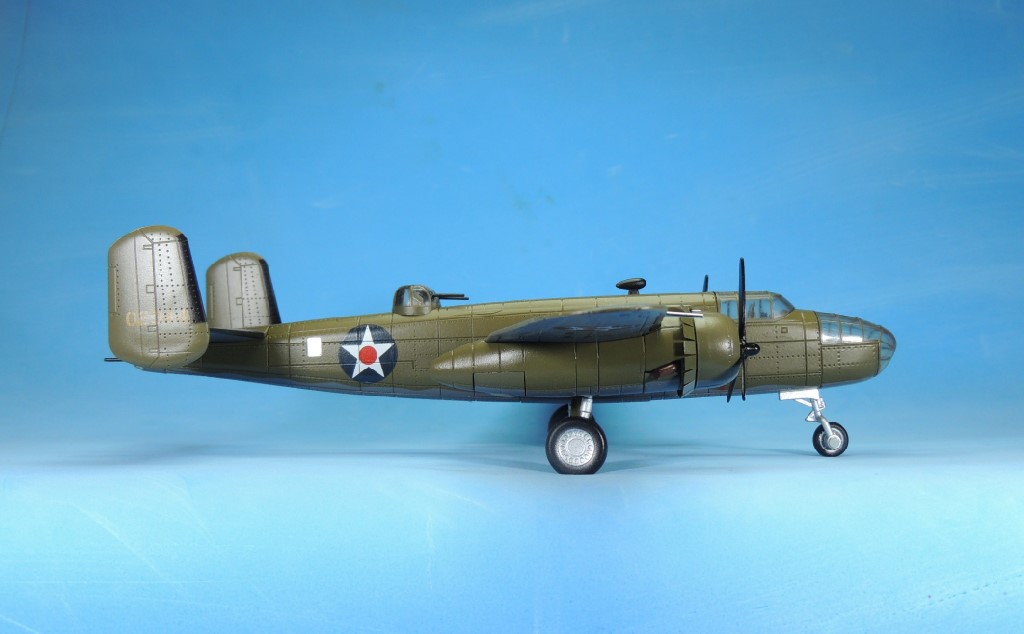
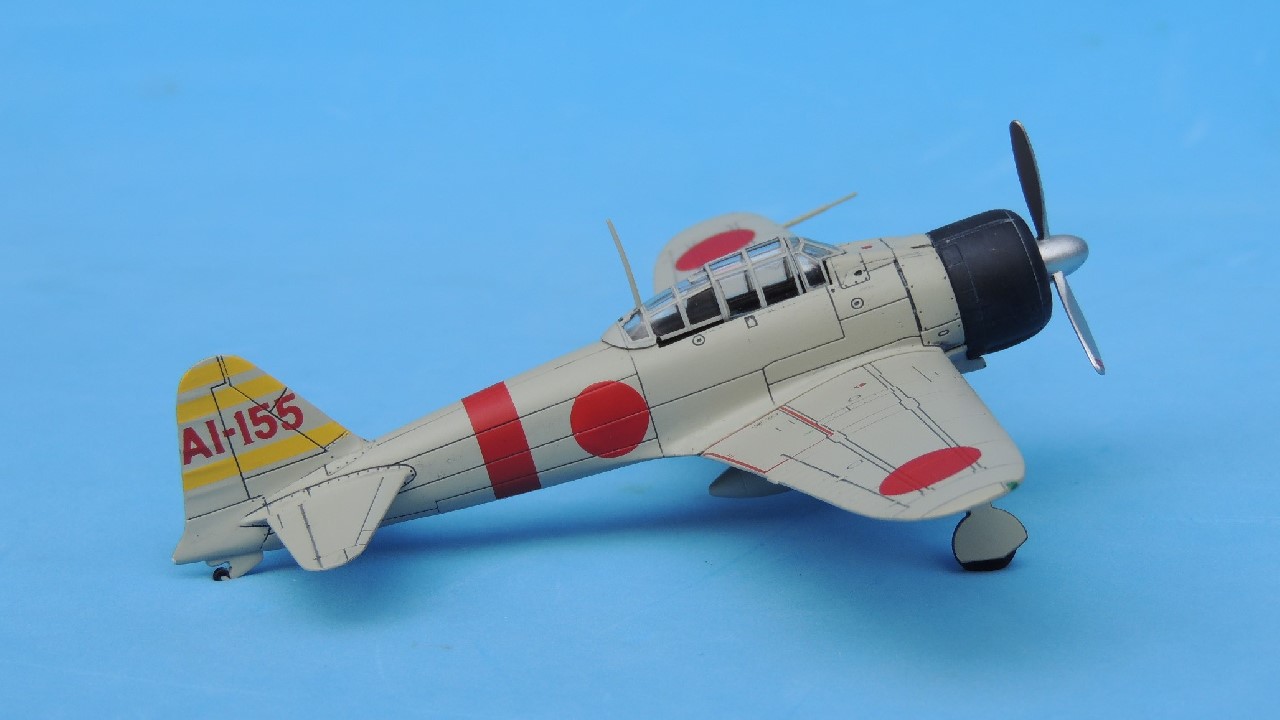
In the photo below, note the polished natural metal propeller with the two red warning stripes on the tips of the blades. As is the case with the vast majority of 1/72 scale prebuilt models, the propeller spins freely. Note the outlets on the leading edges of the wings just above the landing struts for the 20mm cannons. Also on the leading edge of the portside wing, note the pitot tube.1/72, 50017, A6M, AI-155, Akagi, Dragon, IJN, Itaya, Japanese Navy, Pearl Harbor, Zeke, ZeroThe photo below shows the aircraft’s number “55” on the landing strut cover, which matches the last two digits of the tail number. Note the correct cowling for an A6M2, which had four oval-shaped fasteners on each side of the matte black cowling, one on the front part of the cowling and three on the sides. Note also the metal drop tank that gave the Zero an extra 73 imperial gallons of fuel (87 US gallons), significantly increasing its range. Later drop tanks were made of wood and had a slightly different shape.1/72, 50017, A6M, AI-155, Akagi, Dragon, IJN, Itaya, Japanese Navy, Pearl Harbor, Zeke, Zero

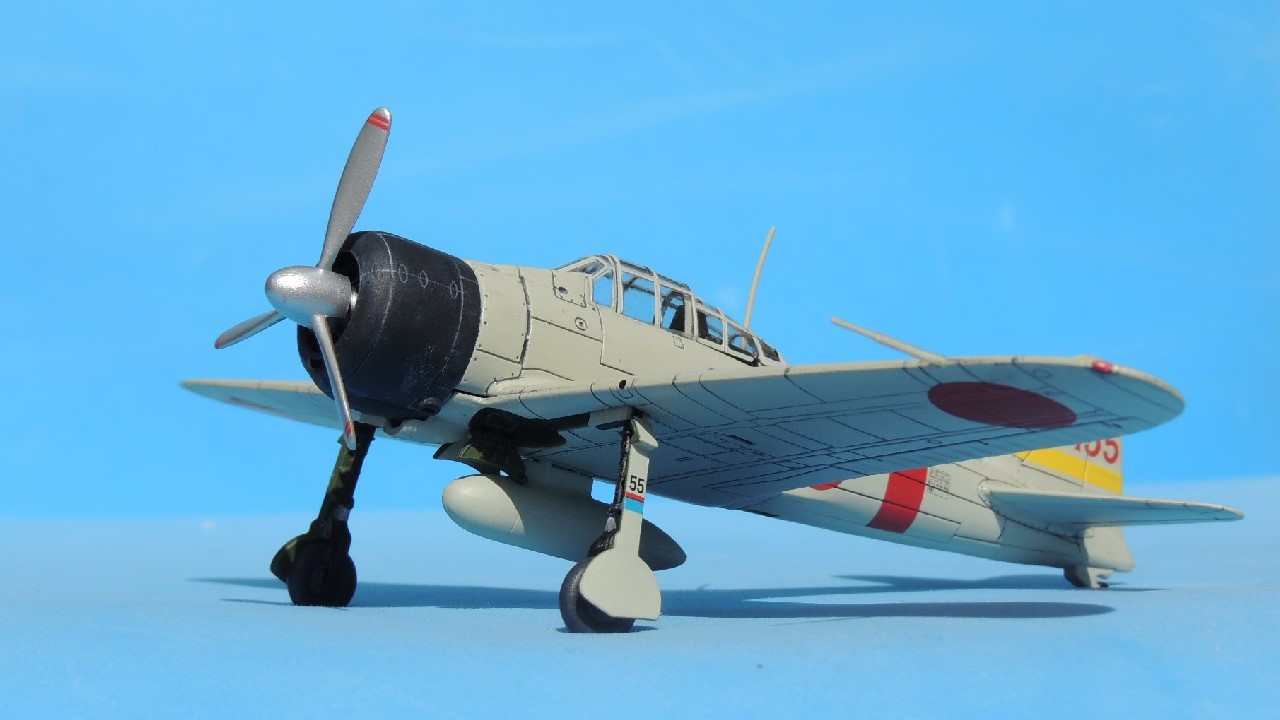
The Feature and the Rub

In the close-up below, note that the canopy slides back — an interesting feature of the Dragon model. While some collectors were critical of the noticeable gap on the rear bottom part of the canopy necessary to allow the front canopy to slide back, some of us applauded this precise feature as it opens up significant diorama possibilities. Quite obviously, the gap is overscaled. As I’ve pointed out in the past, added features often come at the expense of accuracy. Still, in this particular instance, the gap looks fine when the canopy is open. Please bear in mind that close-up photos greatly amplify defects.1/72, 50017, A6M, AI-155, Akagi, Dragon, IJN, Itaya, Japanese Navy, Pearl Harbor, Zeke, Zero

The Interior 

The lagniappe close-up photo below provides a good view of the interior of the canopy. Note the superbly detailed instrument panel and the handle of the control column. To my knowledge, Dragon is the only manufacturer that produced a prebuilt model with an opening cockpit and, therefore, with a detailed instrument panel. Unfortunately, Dragon did not include a pilot.
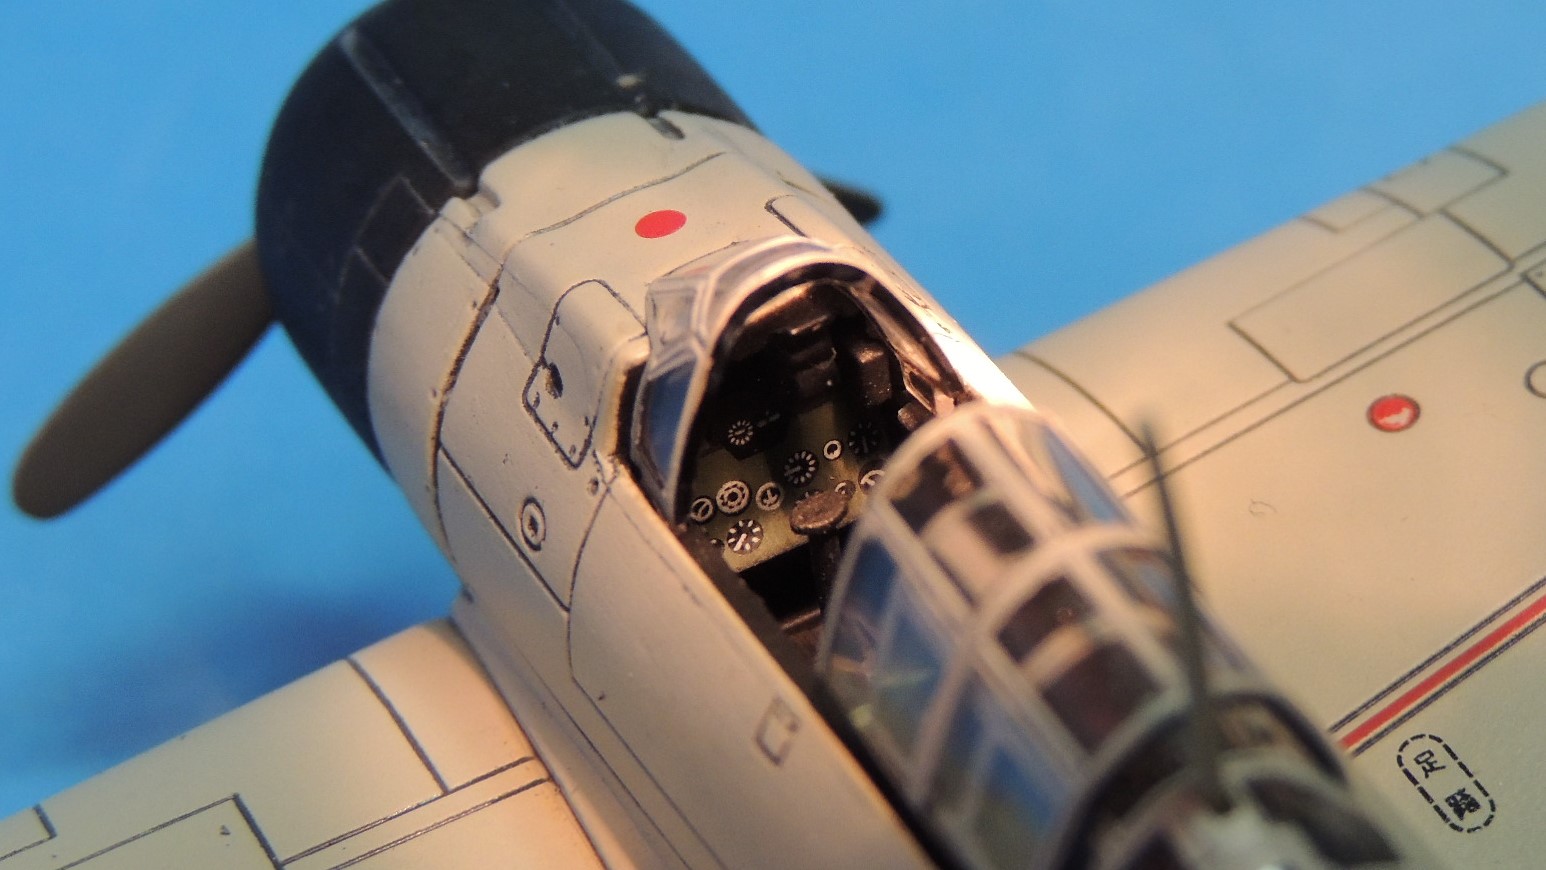
1/72, 50017, A6M, AI-155, Akagi, Dragon, IJN, Itaya, Japanese Navy, Pearl Harbor, Zeke, Zero

The Upshot

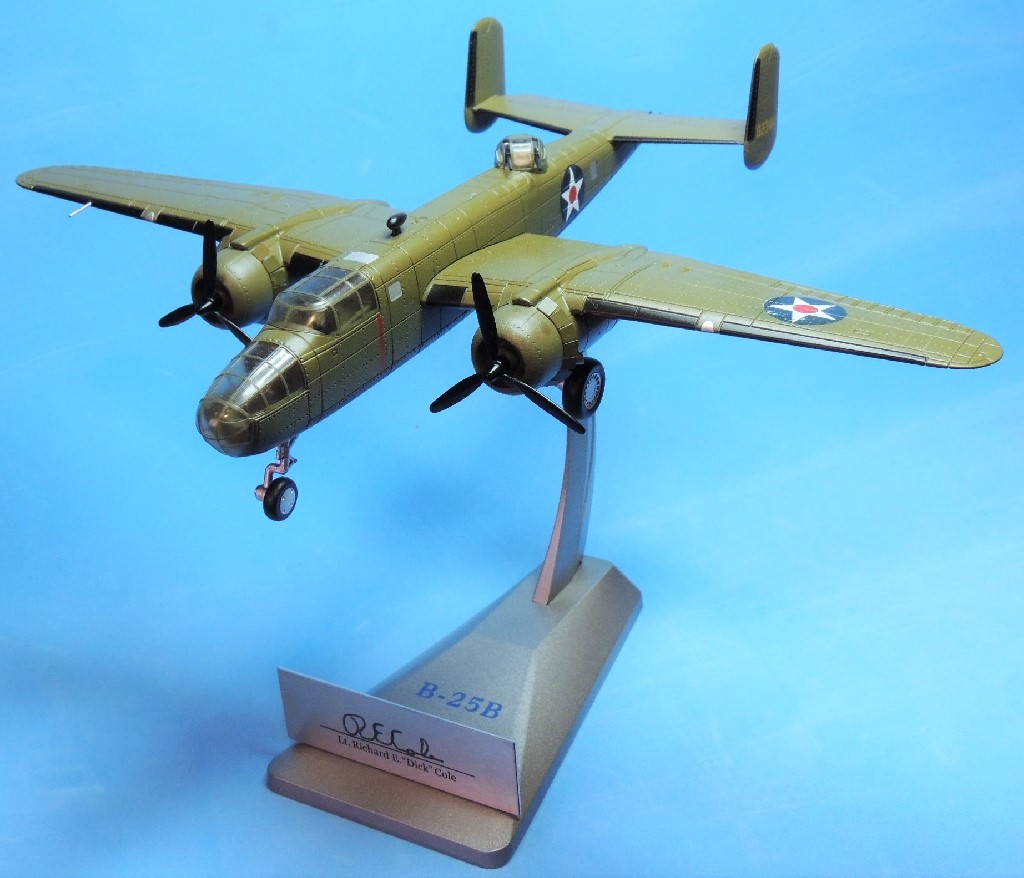
The Dragon Wings 50017 Mitsubishi A6M2 Zero is a superb model that closely resembles the original. The excellent casting shows no perceptible problems in its proportions. The cowling, propeller, and undercarriage are all well executed, with no apparent accuracy issues. The “ameiro” finish is beautiful, though, admittedly, the “inked” panel lines detract from the overall effect. The markings are accurate and crisp throughout. The sliding canopy is a welcome feature, at least for those of us who build dioramas. All Dragon Zeros came with wheels up and wheels down options and, in addition, this particular Dragon Zero issue included a diorama deck and display case. In my humble opinion, it’s a terrific little model that compares favorably with Zero models of most other manufacturers. 

Again, thank you for your indulgence and I hope you enjoyed the post. If something looks amiss, please let me know. I would be delighted to correct inaccurate information so that this may be useful for other 1/72 scale collectors and wargamers. As always, comments, questions, corrections, and observations are welcome. Stay tuned for a review of the Forces of Valor model of the very same aircraft in the next post.

The A6M Zero in 1/72: Shigeru Itaya Leads the Zeros at Pearl Harbor, Part 1 – The Pilot

I had been contemplating doing a series on the A6M Zero, the Japanese Imperial Navy’s legendary fighter, for quite some time. However, I found the task daunting as there were several different versions of the Zero and, by my count, 15 different manufacturers who have tried their hand at producing prebuilt 1/72 scale models of Japan’s iconic fighter. Together, they have released more than 50 prebuilt Zeros in 1/72 scale. A6M2s, A6M3s, A6M5s, clipped wings, floatplanes, carrier-based, land-based — I was completely at a loss about where to begin. Then I had an epiphany: Start at the Beginning — literally.  🙂

The United States entered WWII following the Japanese attack on Pearl Harbor. That attack occurred in two waves of aircraft taking off from Japanese carriers, each wave comprising Zero fighters, torpedo bombers, and dive bombers. In each wave, the Zeros were the first airborne, both because they needed the least runway to take off and in order to protect the slower, less maneuverable torpedo and dive bombers that followed. The pilot who led the Zeros in the first wave and the first to take off from a Japanese carrier was Shigeru Itaya, flying his A6M2 off the flagship carrier Akagi. Thus, one can reasonably argue that Itaya’s Zero was the first Japanese aircraft to take an aggressive action against the United States, in essence beginning the Pacific War.

Shigeru Itaya

This site is dedicated to 1/72 scale models and presumes general knowledge of WWII on the part of the reader. Thus, I’m ordinarily reticent to regurgitate historical information, as there are plenty of sources on the internet accessible to any reader. If I can readily find information, so can others. 1/72, A6M, AI-155, Akagi, IJN, Itaya, Japan, Japanese Navy, Pearl Harbor, Zeke, ZeroHowever, I found such precious little information on Lieutenant Commander Shigeru Itaya, other than the oft-repeated fact that his Zero was the first plane airborne during the attack on Pearl Harbor, that I reasoned some readers would be interested in my amateur research. I found scant references to him in the books available to me and the dearth of information extended to the internet, where, despite diligent efforts, a search yielded only dribs and drabs of information.

On a hunch that Itaya might be better known in Japan, I searched Japanese sites and stumbled upon Japanese Wikipedia, where I found that Itaya had his own entry. Unfortunately, the entry was skeletal, with not much more information than that available in English. Still, it was more information than I had. Bearing in mind that I know no Japanese and had to resort to imperfect searches on Japanese websites using Google Translate, below is what little information I could gather from various sources. Itaya’s career highlights may prove somewhat tedious so the casual reader may want to skip to the next post, a review of the 1/72 scale models of Itaya’s Zero.

1. Beginnings

Itaya was born July 10, 1909, and graduated from the Naval Academy in 1929. He was a veteran of the China War and by 1937 is listed as a division officer on the Ryujo aircraft carrier. By 1940, he is listed as group leader on the Hiryu aircraft carrier. By April 1941, Lieutenant Commander Itaya had been named group leader on the Akagi, the flagship of the Japanese Imperial Navy’s First Fleet.

2. Pearl Harbor

According to Jim Rearden in Cracking the Zero Mystery, Itaya himself trained the Zero pilots for the Pearl Harbor raid. He was in overall command of the 43 Zero fighters in the first wave from all six carriers, including the nine from the Akagi, Itaya’s carrier. He was the first to take off, guiding the other 42 Zeros to their destination. Once in Hawaii, Itaya and the eight other pilots of the Akagi attacked Hickam Field, Ewa Air Control, and Ford Island, while the Zeros of the five other carriers had different assigned targets. According to Peter Smith in Mitsubishi Zero, Itaya and his two wingmen shot down an unsuspecting B-17 bomber at Hickam Field that had at that precise moment improvidentially flown in from California. The B-17 crew managed to land the crippled bomber and run for cover, though one unfortunate member was killed in the ensuing strafing by the Japanese Zeros.

3. Port Darwin

Two months later, on February 19, 1941, in an aerial surprise attack that has been called Australia’s “Pearl Harbor,” Itaya led the 36 Zero fighters — nine from each of four carriers — in the bombing of Port Darwin, according to Peter Smith in Mitsubishi Zero. Considered the single most destructive raid in Australian history by a foreign power, the raid on Port Darwin was massive, with more bombs dropped than at Pearl Harbor, though loss of life — at 236 — was one tenth that at Pearl Harbor. Incidentally, the four carriers at Port Darwin had all participated at Pearl Harbor and were the same four subsequently sunk at Midway.

4. Ceylon

Itaya appears again on April 5, 1942, during the surprise “Easter Sunday Raid” on Colombo, Ceylon (now Sri Lanka). As at Pearl Harbor and Port Darwin, Itaya led Zero fighters — this time 36 — that escorted bombers from five Japanese carriers whose targets were British warships, harbor installations, and air bases in an attempt to destroy the British Easter Fleet. Although the day before a PBY Catalina pilot spotted the five Japanese carriers and radioed in their position before it was shot down, the Japanese still achieved surprise in yet another Pearl Harbor-style weekend attack. The attack resulted in the sinking of a British carrier and several other warships and cost the lives of 424 British subjects. However, as at Pearl Harbor, most of the British Eastern Fleet was away from the port, thereby reducing potential damage.

5. Midway

Volumes have been written about the Battle of Midway in June 1942 and anyone reading this is likely familiar with the battle. Thus, I will not repeat that information here. Suffice it to say that, according to Peter Smith in Mitsubishi Zero, Itaya once again was in charge of all the Zero fighters at Midway and, in particular, led the attack on the 15 ill-fated TBD Devastators from the USS Hornet, killing 29 men (only Ensign George Gay survived). Once the Akagi was sunk, its pilots ditched their planes near other Japanese warships and Itaya and others pilots were rescued by the escorting ships.

6. Staff Officer

My admittedly faulty understanding of the Google translation of the Japanese Wikipedia indicates that Itaya became chief of staff for 23 Air Corps in October 1942 and chief of staff of 54 Air Corps in July 1944. Despite checking the indices of numerous books, I found no information on Itaya covering the two-year period between those two appointments. However, logic indicates that like many other highly skilled veteran pilots who survived Midway, he would have been used by the Japanese Navy to train the thousands of new pilots required to restore the staggering losses suffered during Midway and elsewhere as the tide turned against Japan. Still, if anyone has more information, please post a comment.

7. Kuril Islands

On July 24, 1944, just after his 35th birthday, while flying on a Mitsubishi G3M aircraft in the Kuril Islands, Itaya’s plane was accidentally shot down by friendly fire. Although his death is listed as an accident on lists of WWII Japanese pilots, it’s unclear to me whether he was shot down by ground anti-aircraft fire or by a Japanese Army plane. Either way, the G3M bomber went down and Itaya was killed in the crash. It is an interesting coincidence and perhaps a fitting end that a man who had dedicated his entire career to serving Admiral Isoroku Yamamoto, the Commander-in-Chief of the Combined Fleet of the Imperial Japanese Navy, who was killed when his G4M aircraft was shot down, would meet his fate the same way.

8. Was Itaya an Ace?

I found a couple of references on the internet stating that Itaya had made ace during the China War but these statements were unsourced. On the other hand, I could not find Itaya on the lists of Japanese aces I consulted, including Osprey’s Imperial Japanese Navy Aces 1937-45 by Henry Sakaida and Stackpole’s Japanese Naval Fighter Aces: 1932-45 by Ikuhiko Hata et al. It is something of a conundrum that a fighter pilot who graduated from the Naval Academy in 1929 and died in 1944 would have failed to shoot down five planes during his 15-year career, particularly since Itaya was presumably a highly skilled pilot, as evidenced by his position and rank. It is even more perplexing when one considers that from 1937 to 1944 he witnessed seven years of continuous combat firsthand. Furthermore, Itaya would have had many opportunities available during the early years of the Sino-Japanese War, when the Zero reigned supreme over the inferior Russian-made aircraft used by the Chinese, and during the Battle of Midway, where 150 American aircraft were shot down. Perhaps more information will surface in the future that will confirm his status one way or the other.

9. Conclusion

To summarize, the highlights of Itaya’s career parallel that of the Akagi. The Akagi’s victories were essentially Itaya’s victories and the Akagi’s bitter loss at Midway effectively ended Itaya’s career as a pilot. While it is ironic that a pilot who survived countless aerial encounters was ultimately shot down by friendly fire, it is hardly surprising that Itaya did not survive the war, for only a handful of the elite Japanese Zero pilots at Pearl Harbor managed to do so. What is surprising is that there is no evidence that Itaya made ace during his 15-year career as a pilot during one of the most tumultuous and target-rich periods in aerial warfare.

Below are two lagniappe group photos from the Hiryu and Akagi aircraft carriers. The photo at left is from Itaya’s time on the Hiryu, scanned from Hata et al’s Japanese Naval Aces and Fighter Units (1989 version translated by Don Gorham). The photo at right is from Itaya’s time on the Akagi, scanned from Hata et al’s Japanese Naval Fighter Aces (2011 version translated by Christopher Shores). The content and photos of the two versions of Hata et al’s book differ somewhat.

itaya-hiryu    itaya-akagi

Again, thank you for your indulgence. I hope you enjoyed the post, or at least found it informative. I will continue to update this post as I come across more information or photos on Itaya. If something looks amiss, please let me know. I would be delighted to correct inaccurate information so that this may be useful for other 1/72 scale collectors and wargamers. As always, comments, questions, corrections, and observations are welcome, particularly in this case where so little information on Itaya is available. Please stay tuned for reviews of prebuilt 1/72 scale models of Itaya’s Zero in the next three posts.

The Doolittle Raid, April 1942, Part 2: B-25 Mitchell Bombers in 1/72 Scale

This is a follow-up to the previous post, The Doolittle Raid, Part 1. For details of the actual raid, please refer to that post. To my knowledge, three diecast manufactures have produced the B-25 Mitchell in 1/72 scale — Forces of Valor, Corgi, and newcomer Air Force 1. Of these, only Corgi and Air Force 1 have liveries specifically for the Doolittle Raid, with Corgi releasing two and Air Force 1 releasing one. Forces of Valor did not release a Doolittle Raid model since their casting is of the later B-25J version of the Mitchell, rather than the B-25B used in the Doolittle Raid.

The Corgi AA35302 represents Colonel Doolittle’s plane, the “40-2344,” the first one to take off from the Hornet. The Corgi AA35312 represents the “Ruptured Duck,” the seventh bomber to take off from the Hornet. The Air Force 1 A00111 is also a model of the “40-2344,” Colonel Doolittle’s plane. While I missed the first Corgi release, I do have the second one, which is essentially identical to the first one other than the markings. Thus, this post concerns Corgi’s “Ruptured Duck” and Air Force 1’s “40-2344.”

Corgi Aviation Archive AA35312
North American B-25B Mitchell
40-2261 “Ruptured Duck,” Doolittle Raid, USS Hornet, 1942
Limited Edition (2,000 pieces)

Below are photos of the Corgi AA35312, which represents the “Ruptured Duck,” the 7th plane to take off from the Hornet. The “Ruptured Duck” was piloted by Lt. Ted Lawson, who wrote Thirty Seconds Over Tokyo, arguably the most widely-read account of the Doolittle Raid and upon which the 1944 movie of the same name was based. If you’re reading this blog, it’s a safe bet you read the book as a youngster.

The model is a beauty — casting, panel lines, finish, and markings.1/72, 40-2261, 40-2344, A00111, AA35312, Air Force 1, B-25, Corgi, Doolittle, Hornet, Japan, Japanese, Mitchell, Ruptured Duck, Thatcher, Thirty Seconds, TSOT, USAAFThe opaque olive drab finish is outstanding, as is the gray camouflage on the underside of the fuselage. Note that, according to most sources, the propeller tips on the actual Doolittle B-25 Mitchells were not yellow. 1/72, 40-2261, 40-2344, A00111, AA35312, Air Force 1, B-25, Corgi, Doolittle, Hornet, Japan, Japanese, Mitchell, Ruptured Duck, Thatcher, Thirty Seconds, TSOT, USAAFHere’s a port-side eye-level view of the ship. Note the US Army Air Force marking (the Air Force was under the Army at the time) — red disk within a five-pointed white star on a circular blue field with the shades specified for the U.S. flag — used until May 1942. The insignia was included on the fuselage on both sides aft of the wing and on the upper surface of the port wing and lower surface of the starboard wing. A curiosity of the marking is that the red “meatball” does not touch the inside angles of the star. The star, on the other hand, does go out to the edge of the blue disk, something that was later changed. These seemingly trivial details are important when dating photos.1/72, 40-2261, 40-2344, A00111, AA35312, Air Force 1, B-25, Corgi, Doolittle, Hornet, Japan, Japanese, Mitchell, Ruptured Duck, Thatcher, Thirty Seconds, TSOT, USAAFHere’s a starboard-side eye-level view. Note that Corgi correctly removed the nose gun from this release, as the Doolittle Raiders had done on the actual bombers. Corgi had mistakenly included it in their first release.1/72, 40-2261, 40-2344, A00111, AA35312, Air Force 1, B-25, Corgi, Doolittle, Hornet, Japan, Japanese, Mitchell, Ruptured Duck, Thatcher, Thirty Seconds, TSOT, USAAFHere’s a view from the rear. Note that the Doolittle Raid bombers had a crew of five, rather than six, because the tail gunner section was removed to reduce weight and increase fuel storage space. Thus, the guns were removed from the tail cone and broomsticks were substituted in their place to deter enemy fighters from stern attacks. Corgi correctly left the tail guns — or broomsticks — in place.1/72, 40-2261, 40-2344, A00111, AA35312, Air Force 1, B-25, Corgi, Doolittle, Hornet, Japan, Japanese, Mitchell, Ruptured Duck, Thatcher, Thirty Seconds, TSOT, USAAFThis close-up shows the distinctive “Ruptured Duck” motif well. Amazingly, the words “Danger Propeller” can be read clearly on the vertical red warning line, which is only 1 mm wide. Note also the pilot and copilot figures. Although Corgi had included a bombardier figure on the nose of their previous B-25 releases, including their first Doolittle Raid release, Corgi inexplicably did not include one in this release, despite the fact that Corgi’s packaging clearly shows one. 1/72, 40-2261, 40-2344, A00111, AA35312, Air Force 1, B-25, Corgi, Doolittle, Hornet, Japan, Japanese, Mitchell, Ruptured Duck, Thatcher, Thirty Seconds, TSOT, USAAFHere’s a photo of the model on its stand. Corgi provides the option of landing gear up or down. Like most of Corgi’s Limited Edition models, this piece has a numbered Collector Card.1/72, 40-2261, 40-2344, A00111, AA35312, Air Force 1, B-25, Corgi, Doolittle, Hornet, Japan, Japanese, Mitchell, Ruptured Duck, Thatcher, Thirty Seconds, TSOT, USAAFLike other heavy Corgi models, this one sits on a cradle in an inclined take-off position.1/72, 40-2261, 40-2344, A00111, AA35312, Air Force 1, B-25, Corgi, Doolittle, Hornet, Japan, Japanese, Mitchell, Ruptured Duck, Thatcher, Thirty Seconds, TSOT, USAAFThe Rub

I would be remiss if I failed to point out an exasperating design flaw in the model: it’s hopelessly tail-heavy. The model will simply not stand on its three wheels, but instead tilts back like a stubborn donkey sitting on its haunches.1/72, 40-2261, 40-2344, A00111, AA35312, Air Force 1, B-25, Corgi, Doolittle, Hornet, Japan, Japanese, Mitchell, Ruptured Duck, Thatcher, Thirty Seconds, TSOT, USAAFTo solve the problem, I carefully removed the nose piece and increased the weight at the front by inserting the sawed-off half of an Allen wrench in the crawlway leading to the bombardier compartment. It fit perfectly, though the photo shows it protruding slightly out of the crawlway to better illustrate the placement. I then added two 1/4 ounce lead weights to the nose. The extra weight did the trick.1/72, 40-2261, 40-2344, A00111, AA35312, Air Force 1, B-25, Corgi, Doolittle, Hornet, Japan, Japanese, Mitchell, Ruptured Duck, Thatcher, Thirty Seconds, TSOT, USAAFThe Crew

To personalize this model, here’s a photo of the crew of the actual “Ruptured Duck.” From left to right: Lt. Charles L. McClure, navigator; Lt. Ted W. Lawson, pilot; Lt. Robert S. Clever, bombardier; Lt. Dean Davenport, copilot; and Sgt. David Thatcher, flight engineer/gunner. 1/72, 40-2261, 40-2344, A00111, AA35312, Air Force 1, B-25, Corgi, Doolittle, Hornet, Japan, Japanese, Mitchell, Ruptured Duck, Thatcher, Thirty Seconds, TSOT, USAAFIt should be noted that Lt. Ted Lawson, author of Thirty Seconds Over Tokyo, lost his left leg due to the crash landing. Sgt. David Thatcher, on the far right, is one of only two Doolittle Raiders alive today.

Air Force 1 A00111
North American B-25B Mitchell
40-2344, Jimmy Doolittle and Richard Cole
Limited Edition Signature Series Hand-Signed by Lt. Cole

Below are photos of the Air Force 1 A00111, which represents the “40-2344,” Colonel Doolittle’s ship and the first one to take off from the USS Hornet. The first thing one notices is that the overall olive drab finish is entirely too shiny. A coat of dullcote clear flat lacquer will be necessary for a more realistic look. Similarly, the gloss black color of the propellers makes them look too “plasticky” and will require a coat of flat black. 1/72, 40-2261, 40-2344, A00111, AA35312, Air Force 1, B-25, Corgi, Doolittle, Hornet, Japan, Japanese, Mitchell, Ruptured Duck, Thatcher, Thirty Seconds, TSOT, USAAFThe casting is really not a bad effort. The panel lines and details are crisp and rivet holes are included on every panel. The casting is diminished, however, by the porthole windows, which are mere indentations in the metal that have been painted silver to simulate glass. The effect is reminiscent of windows found on hand-made wooden models. While the technique works on wooden models, since all windows on a model are represented in the same fashion, the contrast between the simulated glass of the porthole windows and the clear plastic of the nose and cockpit glass on this model is too distracting.
1/72, 40-2261, 40-2344, A00111, AA35312, Air Force 1, B-25, Corgi, Doolittle, Hornet, Japan, Japanese, Mitchell, Ruptured Duck, Thatcher, Thirty Seconds, TSOT, USAAFAir Force 1 correctly did not paint the propeller tips yellow, a mistake made by Corgi. Unlike the Corgi model, the Air Force 1 does not have pilot or copilot figures. 1/72, 40-2261, 40-2344, A00111, AA35312, Air Force 1, B-25, Corgi, Doolittle, Hornet, Japan, Japanese, Mitchell, Ruptured Duck, Thatcher, Thirty Seconds, TSOT, USAAFLike the actual B-25 Mitchell it’s based on, the model has no individual markings or artwork other than the “02344” tail number. Note that Air Force 1 did not include the words “DANGER PROPELLER” on the vertical red warning lines that mark the propeller line, a detail that stands out on the Corgi.
1/72, 40-2261, 40-2344, A00111, AA35312, Air Force 1, B-25, Corgi, Doolittle, Hornet, Japan, Japanese, Mitchell, Ruptured Duck, Thatcher, Thirty Seconds, TSOT, USAAFThe dorsal gun turret appears to have a “sloped” front, rather than a rounded one. See a comparison of the turrets in the next section below. The turret rotates but, unlike the Corgi model, the guns are fixed in place and do not elevate. 1/72, 40-2261, 40-2344, A00111, AA35312, Air Force 1, B-25, Corgi, Doolittle, Hornet, Japan, Japanese, Mitchell, Ruptured Duck, Thatcher, Thirty Seconds, TSOT, USAAFThe model sits on a sturdy all-metal display stand. Unlike the Corgi model, which has separate wheels to provide wheels up or down options, the Air Force 1 model has fixed landing gear so there is no wheels up option. Note the limited edition metal plaque with Lt. Richard Cole’s signature. One wonders how “limited” the edition really is, as Air Force 1 did not provide an edition number.1/72, 40-2261, 40-2344, A00111, AA35312, Air Force 1, B-25, Corgi, Doolittle, Hornet, Japan, Japanese, Mitchell, Ruptured Duck, Thatcher, Thirty Seconds, TSOT, USAAFThe model sits horizontally on its stand, unlike the Corgi model, which is sits at an inclined angle.1/72, 40-2261, 40-2344, A00111, AA35312, Air Force 1, B-25, Corgi, Doolittle, Hornet, Japan, Japanese, Mitchell, Ruptured Duck, Thatcher, Thirty Seconds, TSOT, USAAFThe Rub

Many collectors were disappointed in Air Force 1’s turret, noting that it appeared too tall or oversized. I think it’s neither. Instead, Air Force 1 used the wrong turret — one with a sloped front that I believe was used on later versions of the B-25 Mitchell, such as the B-25J. I would appreciate confirmation from any reader.1/72, 40-2261, 40-2344, A00111, AA35312, Air Force 1, B-25, Corgi, Doolittle, Hornet, Japan, Japanese, Mitchell, Ruptured Duck, Thatcher, Thirty Seconds, TSOT, USAAF

The Crew

Once again, to personalize the model, here’s a photo of Doolittle’s crew. From left to right, Lt. Henry A. Potter, navigator; Lt. Col. James H. Doolittle, pilot; SSgt. Fred A. Braemer, bombardier; Lt. Richard E. Cole, copilot; and SSgt. Paul J. Leonard, flight engineer/gunner. 1/72, 40-2261, 40-2344, A00111, AA35312, Air Force 1, B-25, Corgi, Doolittle, Hornet, Japan, Japanese, Mitchell, Ruptured Duck, Thatcher, Thirty Seconds, TSOT, USAAFIn addition to Sgt. David Thatcher, pictured under the Corgi section above, Lt. Richard Cole, second from right, is the only other Doolittle Raider alive today.

Side-by-Side Comparison

Finally, here are some side-by-side shots. Note the superb riveting on the Air Force 1 (left) on every single panel. On the other hand, note the simulated porthole windows on that same model, which, at least to me, blemish the entire effort.

1/72, 40-2261, 40-2344, A00111, AA35312, Air Force 1, B-25, Corgi, Doolittle, Hornet, Japan, Japanese, Mitchell, Ruptured Duck, Thatcher, Thirty Seconds, TSOT, USAAFNote the stark difference in the finish, with the Air Force 1 (left) having a distracting shine. Despite the apparent difference in size in the photos, the two models are identical in their dimensions. The difference in the photos is a result of using a close-up lens, which exaggerates perspective. 1/72, 40-2261, 40-2344, A00111, AA35312, Air Force 1, B-25, Corgi, Doolittle, Hornet, Japan, Japanese, Mitchell, Ruptured Duck, Thatcher, Thirty Seconds, TSOT, USAAFHere’s a photo of the starboard side. Note the difference in the placement of deicing boots (the black surfaces on the leading edge of the wings). As far as I can tell, Air Force 1’s depiction is correct. 1/72, 40-2261, 40-2344, A00111, AA35312, Air Force 1, B-25, Corgi, Doolittle, Hornet, Japan, Japanese, Mitchell, Ruptured Duck, Thatcher, Thirty Seconds, TSOT, USAAFThe Upshot

This being a comparison review, the reader will naturally wonder which of the two models is recommended. Let’s compare the various features:

  • Casting: Both castings are excellent, with crisp detail throughout, though I was impressed with the rivets on every panel of the Air Force 1, even if they may be slightly overscaled. However, the simulated porthole windows detract from the casting.
  • Finish: No contest, the Corgi’s opaque olive drab finish is superb, resulting in a realistic model. The shiny finish on the Air Force 1, on the other hand, will need dulling. Both have gray camouflage on the underside of the fuselage but the Corgi’s is more undulating, and more realistic. The propellers on the Air Force 1 are also noticeably shiny and look plasticky.
  • Markings: I’m a sucker for art on a model and the well-documented “Ruptured Duck” design on the Corgi is fabulous. It’s an unfair comparison, I concede, since Doolittle’s ship carried no art. However, beyond the insignia, Corgi’s attention to detail is evident in including a warning on the vertical red propeller warning line, which, truly, is only 1 mm wide.
  • Detail Accuracy: The sloped turret on the Air Force 1 appears to be that used on later B-25 Mitchells and is wrong. The Corgi’s appears to be accurate. The deicing boots and the absence of yellow tips on the propellers on the Air Force 1 are correct, though these are details that can be easily corrected on the Corgi.
  • Engineering Design: The tail-heavy design of the Corgi is exasperating and makes you wonder how Corgi could bungle a feature that they had previously done properly. The Air Force 1 stands on its three wheels, as it should.
  • Extras: The Corgi model includes pilot and copilot figures, which is always a welcome feature. Inexplicably, however, it does not have a bombardier, unlike previous Corgi B-25 releases, including their first Doolittle release. On the plus side for Air Force 1, I love having Lt. Cole’s signature. It’s as close as I’ll get to such an historic event.

While both models are excellent replicas of the B-25 Mitchell, the Corgi version is clearly superior but, given that it cost twice as much as the Air Force 1, it ought to be. It is not, however, twice as good as the Air Force 1. Thus, in my view, the Air Force 1 is a great value, particularly as the two Corgi models disappeared into collectors’ homes and are now difficult to find. Still, both models are worthy of any collection, if for no other reason than they represent an important event in World War II.

Again, thank you for your indulgence and I hope you enjoyed the post. As always, comments, questions, observations, and corrections are welcome. Stay tuned next week for Part 3, a simple diorama of a B-25 Mitchell taking off from the deck of the Hornet.

—————————————————————————————————————————-

I want to thank and remember my dear friend and fellow WWII buff David C. Brooks, who passed away in 2014. As a token of our friendship, David kindly gave me his childhood copy of Thirty Seconds Over Tokyo in 2002while we were serving in Nicaragua. Here’s a lagniappe photo for my dear friend.1/72, 40-2261, 40-2344, A00111, AA35312, Air Force 1, B-25, Corgi, Doolittle, Hornet, Japan, Japanese, Mitchell, Ruptured Duck, Thatcher, Thirty Seconds, TSOT, USAAF

The Doolittle Raid, April 1942, Part 1: The Mission

In the early hours of April 18, 1942, just over four months after the Japanese surprise attack on Pearl Harbor, the USS Hornet, escorted by its sister aircraft carrier, the USS Enterprise, got within 650 miles of Tokyo when it was spotted by a Japanese patrol boat. The Hornet, on its maiden voyage, was on a mission to launch 16 B-25 Mitchell bombers off its deck to strike Tokyo and other Japanese cities as retribution for Pearl Harbor. The Enterprise was accompanying to provide protection from Japanese air attack, as the Hornet’s fighters were below deck to make room for the B-25 bombers.

This photo provides an excellent view of the Hornet’s deck.Doolittle, Halsey, B-25, Mitchell, Tokyo, USS Hornet, USS Enterprise, Japan, Pearl Harbor, Japanese

The photo below shows six of the 16 B-25 Mitchells staggered on the deck of the Hornet. With a 67-foot wingspan, the B-25 Mitchell barely fit on the deck. Note that the port-side wings of the aircraft on the left overhang the deck.Doolittle, Halsey, B-25, Mitchell, Tokyo, USS Hornet, USS Enterprise, Japan, Pearl Harbor, JapaneseFearing the mission had lost the element of surprise and the carriers would come under attack, Admiral William “Bull” Halsey, who was in overall command of the carrier task force, ordered the B-25 bombers to launch, despite the fact that the Hornet was to get within 400 miles from the coast of Japan — still 250 miles away. Although the 1,300 mile range of the B-25 bombers was significantly increased for the mission, the bombers would be lucky to hit their targets in Japan and still have enough fuel to make it to landing strips just outside occupied China.

I’ve modified the map below, captured from Battle 360: Season One, Call to Duty episode to provide a graphic sense of the distances involved. The green circle, at 400 miles, shows how far the Hornet needed to reach for the B-25 bombers to strike their targets and safely land in China. The yellow circle, at 650 miles, shows how far the Hornet actually got before launching the bombers.Doolittle, Halsey, B-25, Mitchell, Tokyo, USS Hornet, USS Enterprise, Japan, Pearl Harbor, JapaneseOne by one, the 16 B-25 bombers, each with a five-man crew and carrying 2,000 pounds of explosives, precariously took off from the deck of the Hornet on their four-hour flight to their targets. Colonel James Doolittle, who had planned and led the operation, was the first and, being at the front of the line, had the least runway to take off.

The feat warrants explanation. For obvious reasons, aircraft carriers provide a limited stretch of runway. Aircraft-based fighter planes are specifically designed so they can take off from the short runways on a carrier. Larger bomber planes are a horse of a different color. The B-25 Mitchell, a medium-sized bomber, required 1,500 feet of runway and a speed of 90 mph to take off. With 16 medium-sized bombers parked on the rear of its 814-foot-long deck, the Hornet afforded the Mitchells only 500 feet of runway — one-third of the required length — and permitted acceleration to only 50 mph. In fact, Col. Doolittle’s bomber only had 467 feet of runway.

To accomplish such take-off, the aircraft were supplied with high octane fuel, while the carrier was positioned so that the bombers could take off against the wind, providing them additional lift. Although the aircraft were also stripped of all non-essential equipment to lessen their weight, that reduction was offset by the extra fuel to allow them to reach and land in China, as it would be impossible to return and land an aircraft the size of a Mitchell on a carrier. Doolittle, Halsey, B-25, Mitchell, Tokyo, USS Hornet, USS Enterprise, Japan, Pearl Harbor, JapaneseAll 16 B-25 bombers took off safely, though at least two dipped down after leaving the deck and seemed to skim the “drink” dangerously before finally lifting up and continuing their trajectory to their targets. While some encountered resistance from Japanese fighter planes, all successfully completed their mission, each dropping four 500-lb bombs on Tokyo, Kobe, Nagoya, Osaka, Yokohama, or Yokosuka. It bears noting that all targets were military — factories, munitions plants, shipyards — though the crews understood that there would be civilian casualties.

I couldn’t resist including this fabulous centerfold painting from The Doolittle Raid 1942, Osprey Campaign 156, by Clayton Chun. The painting is by Howard Gerrard. It is posted here for discussion purposes under the fair use exception to the copyright laws.Doolittle, Halsey, B-25, Mitchell, Tokyo, USS Hornet, USS Enterprise, Japan, Pearl Harbor, JapaneseAs a result of the additional fuel consumption caused by the premature launch, 15 of the 16 aircraft either crash-landed in China or were ditched at sea, killing three crew members. Japanese soldiers in occupied China captured eight crew members and later executed three, while one died in captivity. Only one aircraft, dangerously low on fuel, managed to land safely by flying to the Soviet Union, which was closer than China, though its five crew members were held by the Soviets for more than a year. Thus, of the 80 crew members who participated in the Doolittle Raid, seven never returned.

While the Doolittle Raid caused negligible damage to Tokyo or other cities, the psychological impact on Japanese morale was immense. Japanese leaders had convinced the populace that Japan was invulnerable to surprise attacks. The Doolittle Raid dispelled this myth and sowed doubt in the Japanese public about its leadership. Moreover, the raid showed the Japanese that the islands were not immune to American bombs, persuading Japanese officials to pull troops from the field to protect the home islands and ships from the Pacific to patrol the coasts. More importantly, it convinced Japanese officials that it was imperative to destroy the U.S. fleet once and for all — something they had failed to do at Pearl Harbor — prompting them to gamble most of their fleet at the Battle of Midway, which was to prove disastrous to the Imperial Japanese Navy.

Conversely, the Doolittle Raid provided a significant morale boost for Americans, particularly its fighting forces, many of whom harbored a thirst for revenge. The Raid also marked the first time that medium bombers had launched from an aircraft carrier and is a textbook example of successful joint Air Force/Navy operations.

Today, 74 years after that fateful day, let us remember the 80 men who selflessly and courageously volunteered for an operation that was in all respects a suicide mission. Of those 80 brave men, only two remain alive today.

I hope you enjoyed the post. Stay tuned next week for Part 2, regarding available B-25 Mitchell bombers in 1/72 scale specifically representing the Doolittle Raid.

Operation Detachment, Part 1: Amtanks in the Invasion of Iwo Jima, 1945

On February 19, 1945, 30,000 U.S. Marines of the 4th and 5th Marine Divisions landed on the beaches of Iwo Jima, a tiny pork chop-shaped island measuring eight square miles in the middle of the Pacific Ocean, halfway between Tokyo and Saipan. Many more Marines, including those of the 3rd Marine Division, followed in subsequent days. Iwo Jima was of immense strategic importance to the U.S. war effort in the Pacific, as fighter aircraft, whose range was far less than that of larger bomber aircraft, would be able to use it as a staging area to escort U.S. bomber aircraft taking off from the Marianas on their way to Tokyo, providing indispensable protection from Japanese Zero fighters. In addition, U.S. bombers returning from Japan would have an airstrip to use as a refuge should they be damaged or otherwise incapacitated while carrying out their missions. In fact, 859 U.S. bombers made emergency landings at Iwo Jima beginning in March 1945.

I’ve modified the map below, from Collins Atlas of the Second World War, to show the strategic importance of Iwo Jima as a staging area for fighters escorting bombers originating in the Mariana Islands (Guam, Tinian, Saipan).

1/72, 60425, AFV, Amphibian, Amphibious, Amtank, Corps, Dragon, Grzmot, HG4402, HM, Hobby Master, Iwo Jima, Japanese, Landing Vehicles, LVT, LVT(A)-4, Mariana, Marines, Tanks

For a detailed history of the Battle of Iwo Jima, the reader must consult other sources, as my focus here is on 1/72 scale vehicles. Suffice it to say that the Marines took Iwo Jima after over a month of the fiercest and bloodiest fighting the Marines had ever faced, costing the lives of almost 7,000 Marines plus over 19,000 injured. Of the estimated 21,000 Japanese who defended the island, just over 200 survived. The Japanese had hoped that the high cost in American lives at Iwo Jima would deter America from invading Japan. They succeeded. Based on the casualty count at Iwo Jima, American military strategists estimated that invading Japan would cost approximately 1 million American and 2 million Japanese lives. Ironically, to keep from invading Japan, the U.S. made the fateful decision to use the atomic bomb on Hiroshima on August 6, 1945, and on Nagasaki three days later.

This map of Iwo Jima, from the Wikipedia entry for the 28th Marine Regiment, shows the landing beaches well.

1/72, 60425, AFV, Amphibian, Amphibious, Amtank, Corps, Dragon, Grzmot, HG4402, HM, Hobby Master, Iwo Jima, Japanese, Landing Vehicles, LVT, LVT(A)-4, Mariana, Marines, Tanks

Today, on the seventy-first anniversary of the Battle of Iwo Jima, let’s remember and honor the almost 28,000 American and Japanese soldiers who forfeited their lives on that tiny speck of an island, as well as the over 19,000 others who were injured during that battle.

Landing Vehicles Tracked (Armored) at Iwo Jima

The U.S. Navy had bombarded Japanese positions at Iwo Jima for three days prior to the invasion on February 19. When bombardment ceased to allow the Marines to land, 68 amphibious armored landing vehicles (LVT(A)-4’s) of the four companies of the 2nd Armored Amphibian Battalion accompanied the Marines to provide protection, suppressing fire from entrenched Japanese positions.

By February 1945, the armored tracked landing vehicle, commonly known as an “amtank,” had evolved from the LVT(A)-1 with its 37mm peashooter to the LVT(A)-4, which carried a 75mm howitzer gun in an open turret and a 50mm caliber machine gun to protect against infantry attacks. In addition, the experience gained in the Mariana Islands had by then taught the Marines to utilize the LVT(A)-4’s effectively in amphibious operations, using them during the landing at the beaches and then relying on M4A2 Sherman tanks inland for close fire support. An additional 380 LVTs – landing vehicles without the 75mm gun turret — ferried Marines and cargo to the beaches.

These drawings, from Jim Mesko’s Amtracs in Action: Part One, provide a good idea of the differences between LVT(A)-4’s and LVT(A)-2’s. I’ve added the numbers of each at Iwo Jima.

1/72, 60425, AFV, Amphibian, Amphibious, Amtank, Corps, Dragon, Grzmot, HG4402, HM, Hobby Master, Iwo Jima, Japanese, Landing Vehicles, LVT, LVT(A)-4, Mariana, Marines, Tanks

To save a trip to Wikipedia for those not familiar with the LVT(A)-4, here’s a synopsis from David Harper’s Project LVT’s: Amtanks:

“The LVT(A)-4 Amtank was a direct descendant of the earlier LVT2 Amtracs. Production of the new “Amtank” vehicles began in 1944. The LVT(A)-4 came about from the US Marines’ request for increased turret fire power from the earlier LVT(A)-1’s high velocity 37mm weapon (mounted in an M5 type turret). The result was the mounting on an M8 “Stuart” type turret which mounted a 75mm Howitzer. . . . The LVT(A)-4 was first used in the Marianas campaign during the invasion of Guam, Tinian, and Saipan. The US Marines used 535 of the vehicles to equip three Amtank battalions while the US Army equipped seven Amtank battalions with the 1,300 LVT(A)-4s they were issued.”

To my knowledge, only Hobby Master and Dragon have released 1/72 versions of the LVT(A)-4. To date, Hobby Master has released two, the HG4402 and the HG4408, while Dragon has also released two — the 60425 and 60500. This comparison review covers the HG4402, named “Grzmot,” and the Dragon 60425, named “Corps,” both based on vehicles from the 2nd Armored Amphibian Battalion at Iwo Jima. (HG4408 and Dragon 60500 are based on vehicles used in other campaigns.) It bears mentioning that this is one of the few instances where two major manufacturers have produced the same vehicle in the same scale. Perhaps both Dragon and Hobby Master were looking to capitalize on the success of “The Pacific,” a television series widely acclaimed for its portrayal of the Pacific war where LVTs were extensively used.

The Actual Tanks

As always, let’s start with photos of the actual vehicles. First here’s a photo from the Naval History and Heritage Command (photo 80-G-303914) of the “Corps,” whose tactical number “D35” on the sides of the hull superstructure identifies it as being from D Company, being hoisted unto the USS Hansford in preparation for the invasion. Tactical numbers had by this time become smaller, as the larger numbers previously used on the side of the hull presented an alluring bull’s-eye for Japanese artillery. 1/72, 60425, AFV, Amphibian, Amphibious, Amtank, Corps, Dragon, Grzmot, HG4402, HM, Hobby Master, Iwo Jima, Japanese, Landing Vehicles, LVT, LVT(A)-4, Mariana, Marines, Tanks

Here’s a photo from the Naval History and Heritage Command (photo NH-104216) of the “Grzmot,” whose “A21” tactical number pinpoints it to A Company. We can reasonably assume that there was a Pole in the crew as “Grzmot” means “Thunder” in Polish.

1/72, 60425, AFV, Amphibian, Amphibious, Amtank, Corps, Dragon, Grzmot, HG4402, HM, Hobby Master, Iwo Jima, Japanese, Landing Vehicles, LVT, LVT(A)-4, Mariana, Marines, Tanks

The Models

Here is the Hobby Master HG4402: LVT(A) -4, US Marines, 2nd Armored Amphibian Battalion, Iwo Jima 1945.

1/72, 60425, AFV, Amphibian, Amphibious, Amtank, Corps, Dragon, Grzmot, HG4402, HM, Hobby Master, Iwo Jima, Japanese, Landing Vehicles, LVT, LVT(A)-4, Mariana, Marines, Tanks

1/72, 60425, AFV, Amphibian, Amphibious, Amtank, Corps, Dragon, Grzmot, HG4402, HM, Hobby Master, Iwo Jima, Japanese, Landing Vehicles, LVT, LVT(A)-4, Mariana, Marines, Tanks

And here’s the Dragon 60425: LVT(A)-4, US Marines, 2nd Armored Amphibian Battalion, Iwo Jima 1945.

1/72, 60425, AFV, Amphibian, Amphibious, Amtank, Corps, Dragon, Grzmot, HG4402, HM, Hobby Master, Iwo Jima, Japanese, Landing Vehicles, LVT, LVT(A)-4, Mariana, Marines, Tanks

1/72, 60425, AFV, Amphibian, Amphibious, Amtank, Corps, Dragon, Grzmot, HG4402, HM, Hobby Master, Iwo Jima, Japanese, Landing Vehicles, LVT, LVT(A)-4, Mariana, Marines, Tanks

The markings on the Hobby Master HG4402 are terrific. Markings are extremely important in models, as they individualize the vehicle, and most collectors are far more likely to purchase a model with markings than without. The vertical red bar indicates that “Corps” landed at Red Beach 1, on the southeastern coast of Iwo Jima. The map of Iwo Jima above shows the locations of the various beach landing areas.

1/72, 60425, AFV, Amphibian, Amphibious, Amtank, Corps, Dragon, Grzmot, HG4402, HM, Hobby Master, Iwo Jima, Japanese, Landing Vehicles, LVT, LVT(A)-4, Mariana, Marines, Tanks

Note that the Dragon 60425 has no markings other than the tactical number “A21”. Note also that Dragon inexplicably — and unforgivably — omitted from its model the name “Grzmot,” clearly seen on the front of the hull on the starboard side in the photo of the actual tank. While the “Grzmot” did not have bars indicating the beach to which it was assigned, one internet source indicates it landed at Blue Beach 1. See the map of Iwo Jima above. On the plus side, note the superb weathering on the tracks of the Dragon 60425, which makes them really stand out.

1/72, 60425, AFV, Amphibian, Amphibious, Amtank, Corps, Dragon, Grzmot, HG4402, HM, Hobby Master, Iwo Jima, Japanese, Landing Vehicles, LVT, LVT(A)-4, Mariana, Marines, Tanks

The escape hatches on the Hobby Master HG4402 are more realistic and the hooks are separate pieces, whereas on the Dragon 60425 they are molded into the body.

1/72, 60425, AFV, Amphibian, Amphibious, Amtank, Corps, Dragon, Grzmot, HG4402, HM, Hobby Master, Iwo Jima, Japanese, Landing Vehicles, LVT, LVT(A)-4, Mariana, Marines, Tanks

1/72, 60425, AFV, Amphibian, Amphibious, Amtank, Corps, Dragon, Grzmot, HG4402, HM, Hobby Master, Iwo Jima, Japanese, Landing Vehicles, LVT, LVT(A)-4, Mariana, Marines, Tanks

Seen from the back, the Hobby Master HG4402 looks to be in pristine condition fresh off the factory, whereas it’s pretty clear that the Dragon 60425 has been dry brushed, giving it a weathered effect. Note the more detailed cable ends on the Hobby Master HG4402. Note also that the company letter and tactical number were also carried on the rear of the hull.

1/72, 60425, AFV, Amphibian, Amphibious, Amtank, Corps, Dragon, Grzmot, HG4402, HM, Hobby Master, Iwo Jima, Japanese, Landing Vehicles, LVT, LVT(A)-4, Mariana, Marines, Tanks

1/72, 60425, AFV, Amphibian, Amphibious, Amtank, Corps, Dragon, Grzmot, HG4402, HM, Hobby Master, Iwo Jima, Japanese, Landing Vehicles, LVT, LVT(A)-4, Mariana, Marines, Tanks

The surprise comes from this top view of the interior. The Hobby Master HG4402 does not have seats. The Dragon 60425, on the other hand, has a fairly detailed interior, complete with a turret basket, and seats. Also note the black weathering on the inside of the barrel on the Dragon 60425. Note that neither model has the protective tub for the machine gunner — very likely a field modification — seen in the photos of the actual vehicles.

1/72, 60425, AFV, Amphibian, Amphibious, Amtank, Corps, Dragon, Grzmot, HG4402, HM, Hobby Master, Iwo Jima, Japanese, Landing Vehicles, LVT, LVT(A)-4, Mariana, Marines, Tanks

1/72, 60425, AFV, Amphibian, Amphibious, Amtank, Corps, Dragon, Grzmot, HG4402, HM, Hobby Master, Iwo Jima, Japanese, Landing Vehicles, LVT, LVT(A)-4, Mariana, Marines, Tanks

Here’s a lagniappe photo of the two, side by side.

1/72, 60425, AFV, Amphibian, Amphibious, Amtank, Corps, Dragon, Grzmot, HG4402, HM, Hobby Master, Iwo Jima, Japanese, Landing Vehicles, LVT, LVT(A)-4, Mariana, Marines, Tanks

The Profiles

For those of us who love profiles, here’s one of each of these two models. This first one of the “Corps” is from Amtracs in Action: Part One, by Jim Mesko, Color by Don Greer & Tom Tullis, Illustration by Joe Sewell.

1/72, 60425, AFV, Amphibian, Amphibious, Amtank, Corps, Dragon, Grzmot, HG4402, HM, Hobby Master, Iwo Jima, Japanese, Landing Vehicles, LVT, LVT(A)-4, Mariana, Marines, Tanks

This profile of the “Grzmot” is from US Amtracs and Amphibians at War 1941-45, by Steven J. Zaloga and George Balin, Color plates by Arkadiusz Wrobel. Note that the artist did not include the name “Grzmot.” I firmly believe Dragon failed to include it because it relied on this profile.

1/72, 60425, AFV, Amphibian, Amphibious, Amtank, Corps, Dragon, Grzmot, HG4402, HM, Hobby Master, Iwo Jima, Japanese, Landing Vehicles, LVT, LVT(A)-4, Mariana, Marines, TanksThe Upshot

This being a comparison review, the reader will naturally wonder which model is more accurate. Let’s compare the various features:

  • Heft: The lower hull of the Hobby Master HG4402 is metal, while the rest is plastic. The Dragon 60425 is entirely plastic. The weight of the Hobby Master HG4402 feels considerably more satisfying on the hand.
  • Surface Detail: Given that both have plastic upper hulls, which allows more crisp detail than metal, they’re about even, though the hatches on the Hobby Master appear to be more realistic.
  • Markings: The Hobby Master has all the standard markings found on the real tanks. The Dragon does not. In addition, it’s unforgivable that Dragon did not include the name “Grzmot” on its model.
  • Interior: No contest. The Dragon has far more interior detail, including a fairly elaborate turret basket.
  • Weathering: No contest again, the Dragon has been very lightly dry brushed. The tracks on the Dragon have been weathered and are superior. In addition, the inside of the Dragon barrel has been blackened, contributing to an overall realistic effect. The Hobby Master, on the other hand, appears to be in factory fresh condition.
  • Camouflage: Although both have a three-color scheme using olive drab, sand, and red brown, the appearance is very different. The Dragon’s appearance is dominated by olive drab, while sand is much more prominent on the Hobby Master. The camouflage on the Hobby Master more closely resembles most color profiles and is likely more accurate.
  • Historical Basis: Both models have solid historical photographic support, with at least three photos of the “Corps” and one of the “Grzmot” known to exist.

As can be gathered from the above comparison, the two models are fairly evenly matched. However, Dragon’s boneheaded omission of the name “Grzmot” tilts the balance — at least for me — in favor of the Hobby Master.

I hope you enjoyed the post. As always, comments, questions, corrections, etc. are welcome.

A Sherman Tank Named “Battlin Basic” and the Liberation of Santo Tomas, Manila 1945

Seventy-one years ago today, on the evening of February 3, 1945, a Sherman tank barreled its way through the front gates of the University of Santo Tomas, in Manila, Philippines. The tank, a composite hull M4 Sherman named the “Battlin Basic” by its crew, belonged to Company B of the U.S. 44th Tank Battalion and was the first glimpse of liberation for over 4,000 civilians – mostly Americans and British citizens, including Australians and Canadians – interned at the university from January 1942 to February 1945. Santo Tomas was the largest of several internment camps established by the Japanese throughout the Philippines and liberated in February 1945.

Here’s a photo of the “Battlin Basic” from Steven Zaloga’s Tank Battles of the Pacific.

44th Tank Battalion, AFV, Battle of Manila, Battlin Basic, Internment, Japanese, Liberation, Manila, Pacific War, Philippines, Santo Tomas, Sherman, Tanks, U.S. Army, Yamashita

The Battle of Manila, which raged throughout the month of February 1945, cost the lives of over 100,000 Filipinos and completely destroyed Manila, considered one of the most beautiful cities in the world at the time and commonly referred to as the Pearl of the Orient. According to General MacArthur, next to Warsaw, Manila was the most devastated city in WWII. It is ironic that whereas Hitler’s order to burn Paris went unheeded, thereby saving Paris, General Yamashita’s command to leave Manila without defending it, which would have saved the city, was also disobeyed, but with contrasting and devastating consequences. Yamashita was later tried at the U.S. High Commissioner’s Residence – now the U.S. Embassy in Manila – and later hanged for war crimes. (During my years of service in the Philippines, I sat many times at the very table where Yamashita was tried in Manila. I also spent several nights in Yamashita’s room in the U.S. High Commissioner’s Summer House in the mountains of Baguio in the northern region of the Philippines.) 

These sobering photos of internees at Santo Tomas and of the devastation of Manila need no caption.

44th Tank Battalion, AFV, Battle of Manila, Battlin Basic, Internment, Japanese, Liberation, Manila, Pacific War, Philippines, Santo Tomas, Sherman, Tanks, U.S. Army, Yamashita

This story – an oversimplification, to be sure – is personal to me. While serving in the Philippines years ago, I made friends with an American who had been interned at Santo Tomas. As with many others who gathered every year on this date to commemorate the liberation of Santo Tomas, the striking image of the “Battlin Basic” followed by five other Sherman tanks coming to their rescue was emblazoned in his memory. A member of the crew of the “Battlin Basic,” Corporal Hencke, wrote that “when the internees realized we were Americans there to free them, they went wild and were all over us.”

A Sherman crew listens attentively as a survivor of Santo Tomas relates his years of internment.

44th Tank Battalion, AFV, Battle of Manila, Battlin Basic, Internment, Japanese, Liberation, Manila, Pacific War, Philippines, Santo Tomas, Sherman, Tanks, U.S. Army, Yamashita

My dear friend passed away three years ago and as I read that another member of the Doolittle Raid had passed in 2015 and only two remained, I wondered how many Santo Tomas survivors were left. At any rate, on this 71th Anniversary of the Liberation of Santo Tomas, I want to remember those 100,000 Filipinos who gave their lives during the Battle of Manila, many not understanding why. And I want to remember the many Filipinos, Americans, British, Australians, Canadians, and others who perished in Japanese internment camps as well as those who survived, some to witness the beautiful sight of a Sherman tank coming to end their misery.

Finally, here’s a painting of the “Battlin Basic” by Yoshiyuki Takani. The artist clearly understood the importance of this tank.

44th Tank Battalion, AFV, Battle of Manila, Battlin Basic, Internment, Japanese, Liberation, Manila, Pacific War, Philippines, Santo Tomas, Sherman, Tanks, U.S. Army, Yamashita, Yoshiyuki Takani

For those wondering why this article appears in a 1/72 scale site, the answer is simple. I intend to build the “Battlin Basic” in 1/72 scale in the near future.