Joachim Marseille’s Bf 109 Refueling at Quotaifiya Airfield, Egypt — I. Introduction

October 1, 1942, Quotaifiya, Egypt — 78 years ago today.

The disconsolate, careworn faces of the attendees contrasted sharply with the upbeat cadence of the Cuban Rumba Azul playing on the wind-up gramophone. The pilots and ground crews of Luftwaffe Fighter Wing JG 27 paid their final respects before the remains of their fallen comrade were to be flown to Derna, Libya, 300 miles west, where the body would be interred at the Heroes’ Cemetery that same day. Once in Derna, Generalfeldmarschall Albert Kesselring, the Wehrmacht’s Commander in Chief in the Mediterranean, delivered an emotional paean, recalling the deceased’s legendary aerial exploits.

Marseille’s body lies in state in Derna, Libya, on October 1, 1942.

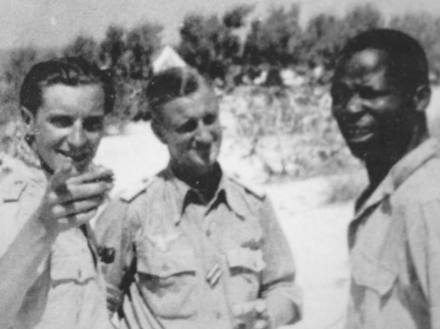
Clearly, this was no ordinary funeral. This final farewell was for a highly decorated hero of the Third Reich, a man who had earned oak leaves, swords, and diamonds to his Knight’s Cross, the Luftwaffe’s youngest captain, and one of the greatest pilots of World War II. His unparalleled technical skills had earned the respect of comrades and foes alike, and his rebellious, yet kind, nature had won their admiration. The newly departed was a maverick – an iconoclast who, eschewing Nazi ideology, counted a black German-speaking South African POW as one of his closest friends and enjoyed “degenerate” American jazz and Latin music — Rumba Azul his favorite melody.

Marseille (left) with South African friend Matthew “Matthias” Letuku (right).

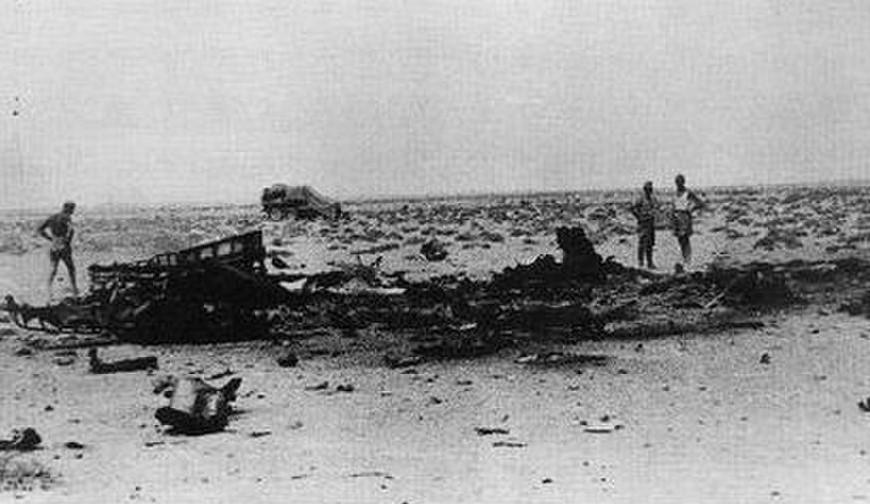
Hans Joachim Marseille, the 22-year-old “Star of Africa,” had shot down 158 enemy aircraft when the engine of his new Messerschmitt Bf 109G malfunctioned over the Egyptian desert on September 30, 1942. When the smoke from the engine filled the cockpit, entirely clouding visibility, Marseille baled out of his Gustav, accidentally hitting his head against the rudder that heralded his many victories. He was rendered unconscious immediately, before he could deploy his parachute, and plummeted thousands of feet to his death.

Members of JG 27 survey the wreckage of Marseille’s Bf 109.

Marseille was a legend even in life. In his eulogy, just one day after Marseille’s passing, Kesselring summed up Marseille thus: “Hauptmann Marseille is fallen. Unbeaten. With his passing, a heroic individual, a marvelous colleague, an artist in the air and the best fighter pilot in the world is gone from our ranks forever.” Adolf Galland, a Luftwaffe legend himself, called him “the unrivaled virtuoso among fighter pilots of the Second World War” in his memoirs.

Marseille was a man who clearly understood that each of his victories meant the loss of a son, father, brother, or husband. In a letter to his mother after his very first victory on August 24, 1940, during the Battle of Britain, Marseille wrote: “Today I shot down my first opponent. It does not set well with me. I keep thinking about how the mother of this young man must feel when she gets the news of her son’s death. And I am to blame for this death. I am sad, instead of being happy about the first victory. I always see the face of the Englishman in front of me and think about his crying mother.”

It is a tragic irony that following Marseille’s last seven victories — 152-158 — Erwin Rommel, the vaunted “Desert Fox,” called September 28 to request that Marseille accompany him to Berlin to attend a ceremony on September 30 — the day Marseille met his fate — where Marseille and Rommel were programmed to sit on either side of Adolf Hitler. Not fond of the Führer, Marseille declined, arguing that he would rather save his leave for December, when he intended to travel to Berlin to marry his fiancée. One can only wonder what destiny had in store had Marseille accepted Rommel’s invitation.

Marseille with Generalfeldmarschall Erwin Rommel.

Marseille’s career as a pilot spanned barely two years – from his first victory in August 1940 to his last in September 1942. Yet he is the subject of several books, countless articles, numerous documentaries, and a full feature German-Spanish film — Der Stern von Afrika (The Star of Africa). The reader is referred to those sources for an account of his aerial accomplishments and a sense of his extraordinary character. 

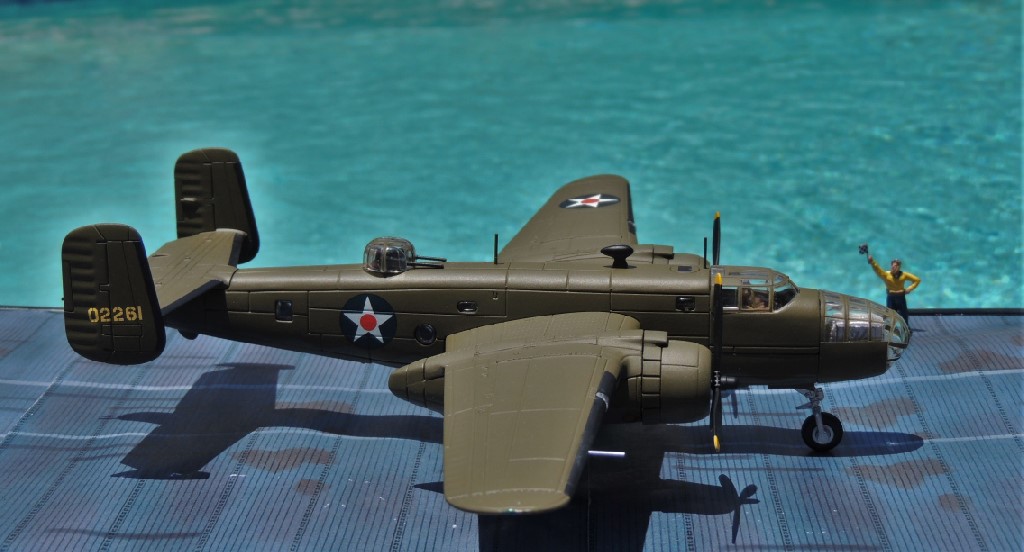
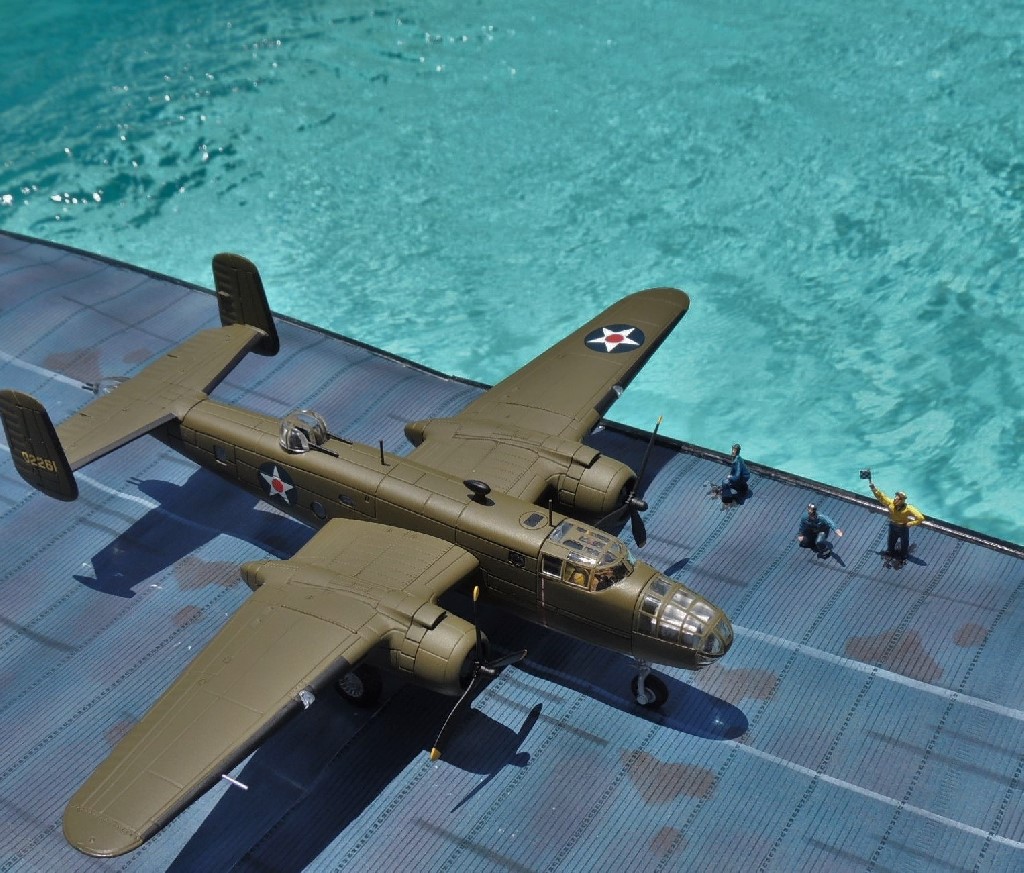
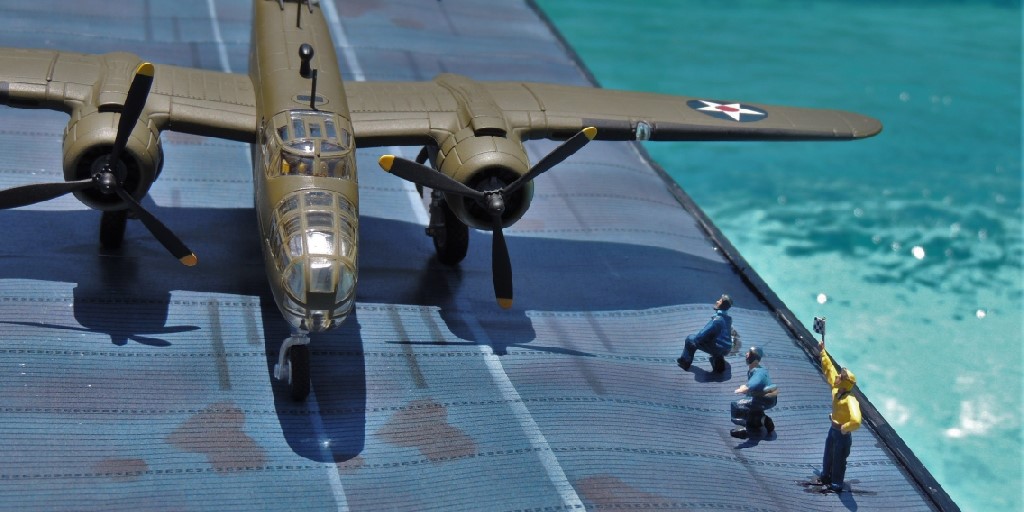
This post is but an introduction to a 1/72 scale diorama depicting Marseille’s aircraft refueling in Quotaifiya, Egypt, circa late September 1942, just days before his death. The diorama will comprise several components, each the subject of a separate post as follows:

I. Introduction – The foregoing post provides a brief sketch of Marseille and outlines the components of the project.

JG 27 engineers and ground crew, stripped from the waist up and wearing shorts and pith helmets due to the extreme heat in the desert, refuel a Messerschmitt Bf 109.

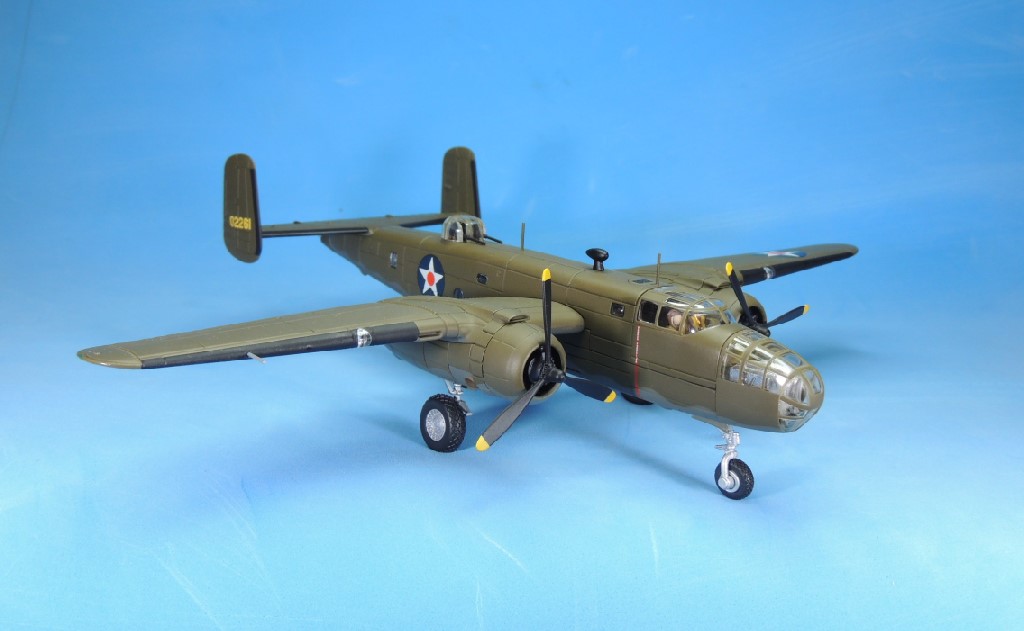
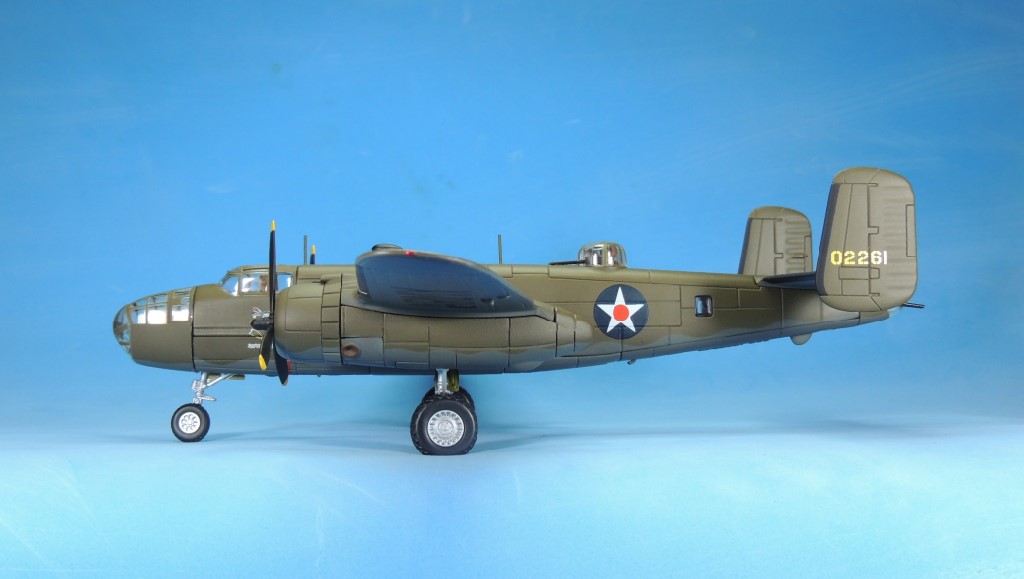
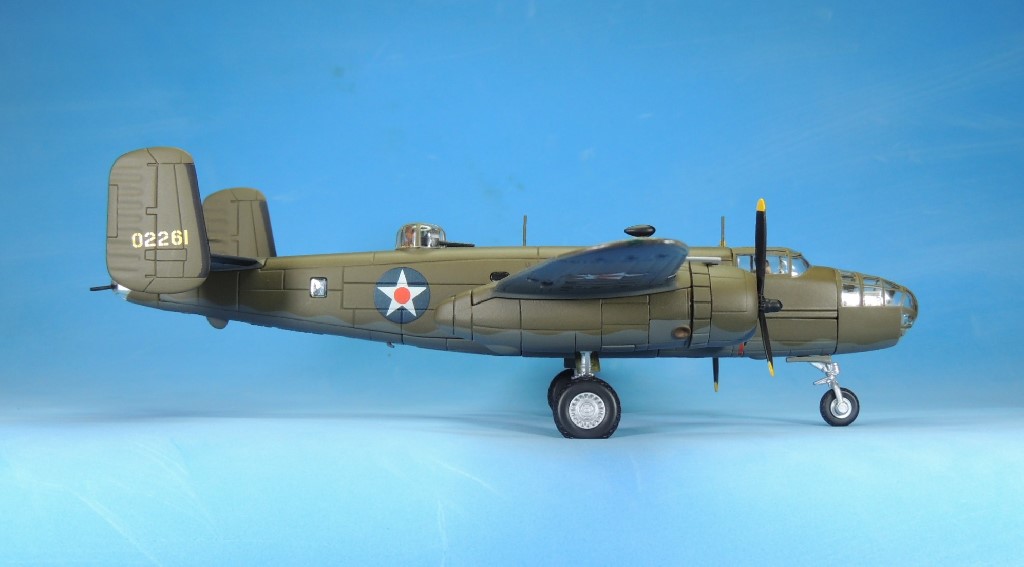
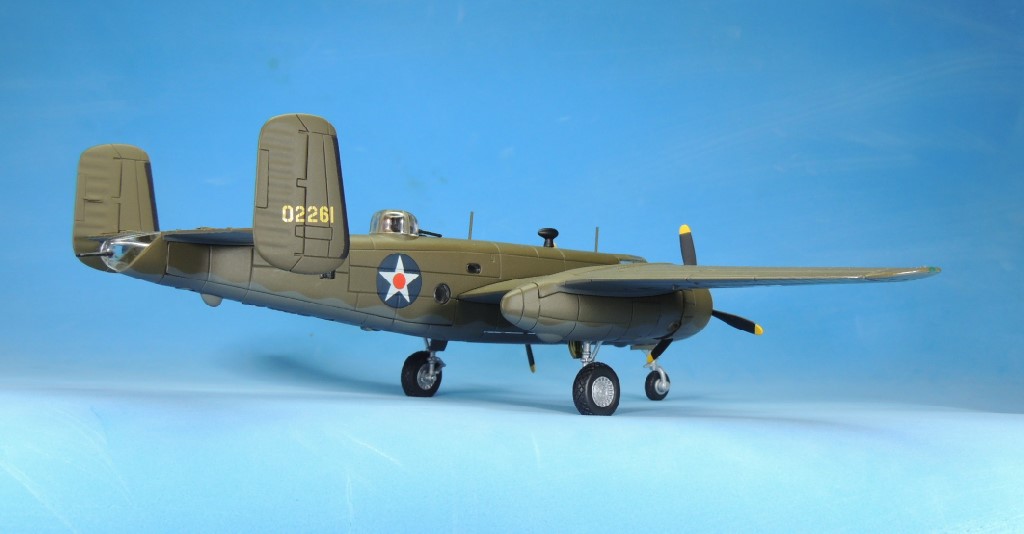
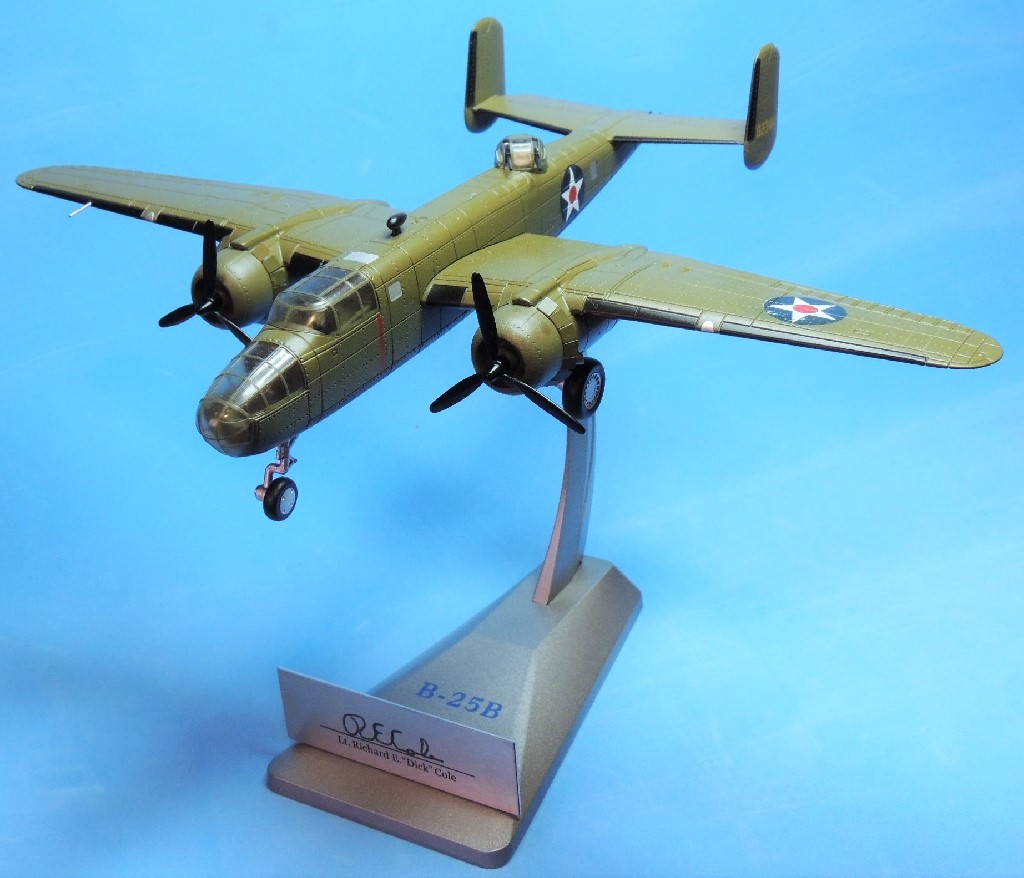
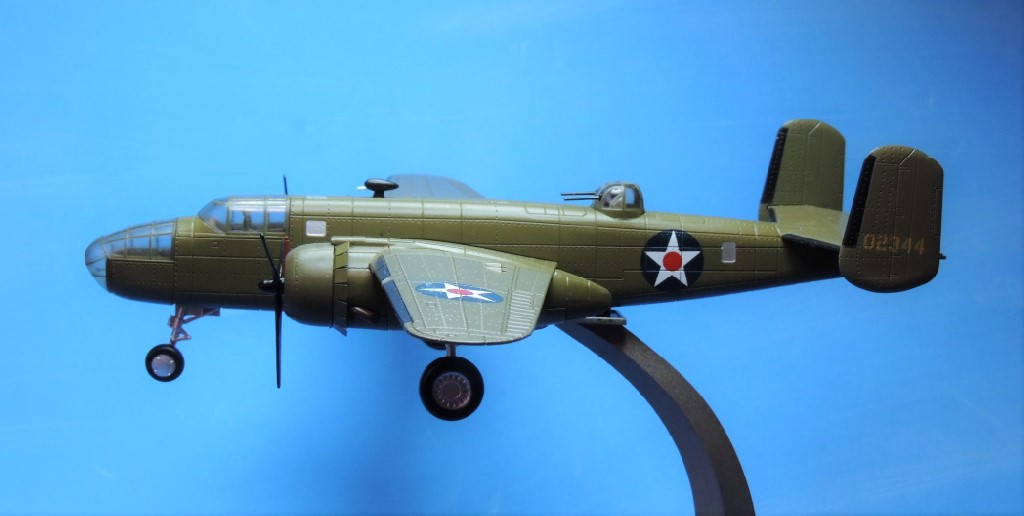
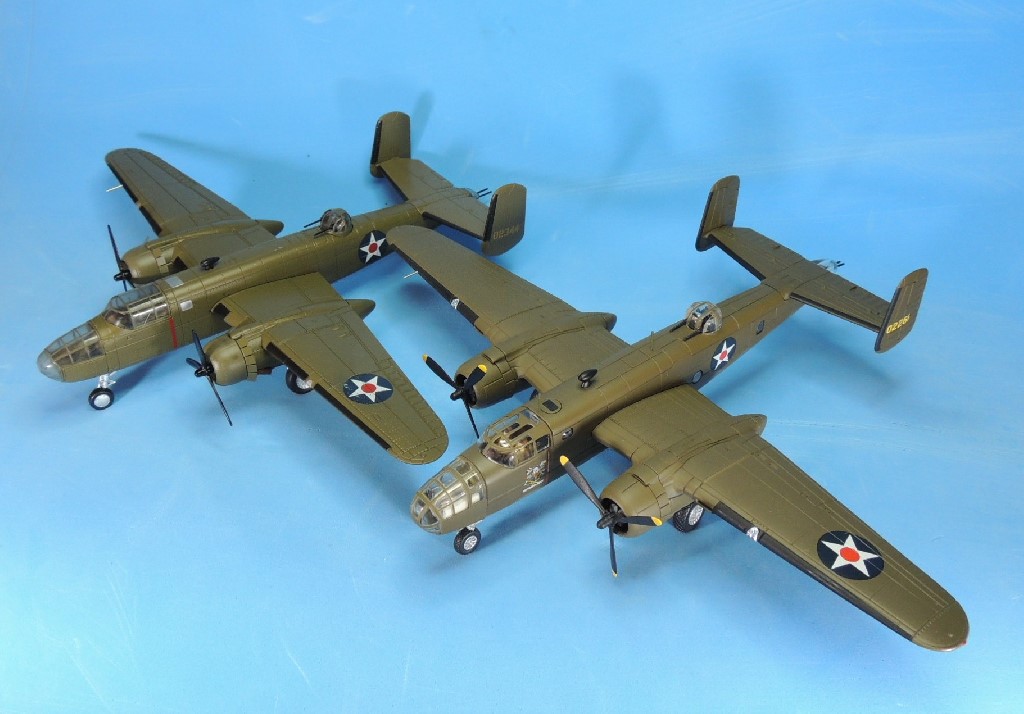
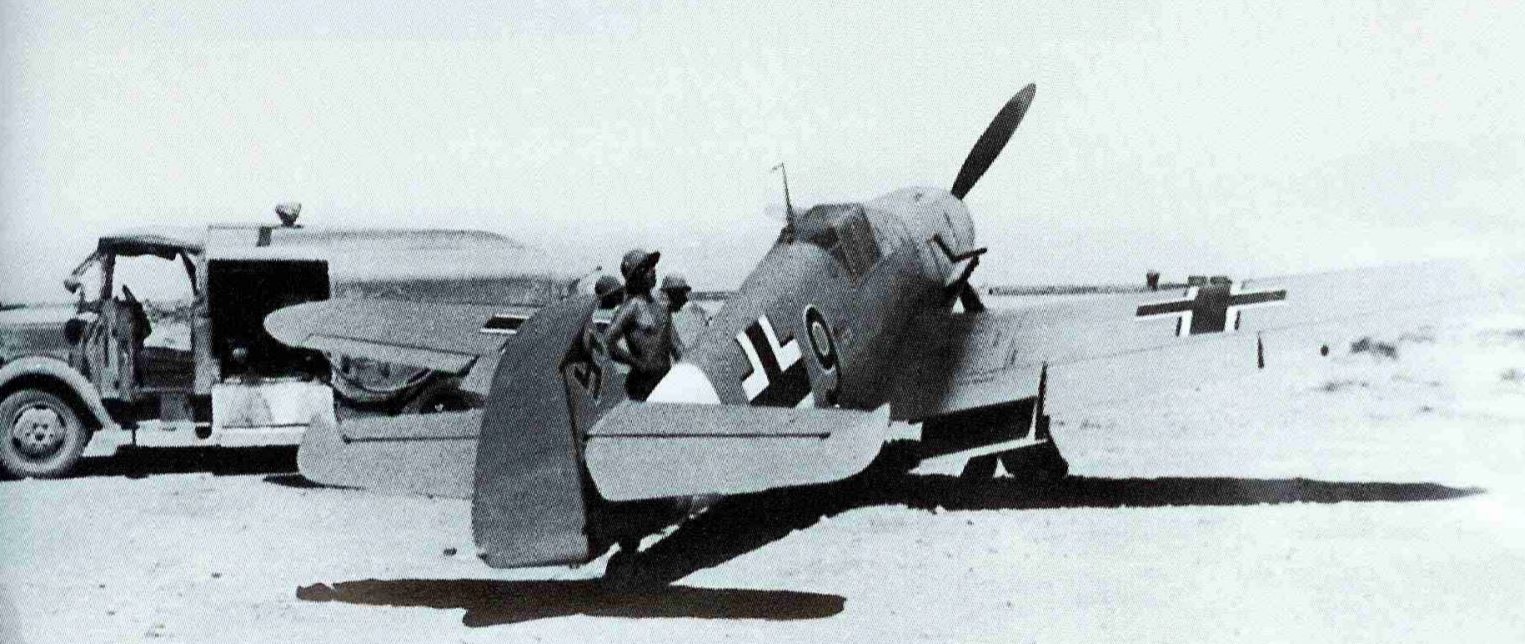
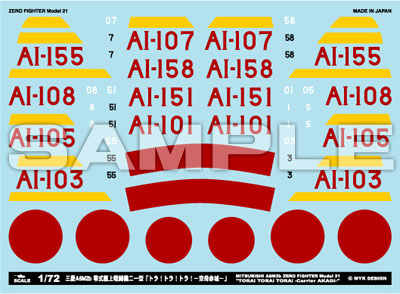
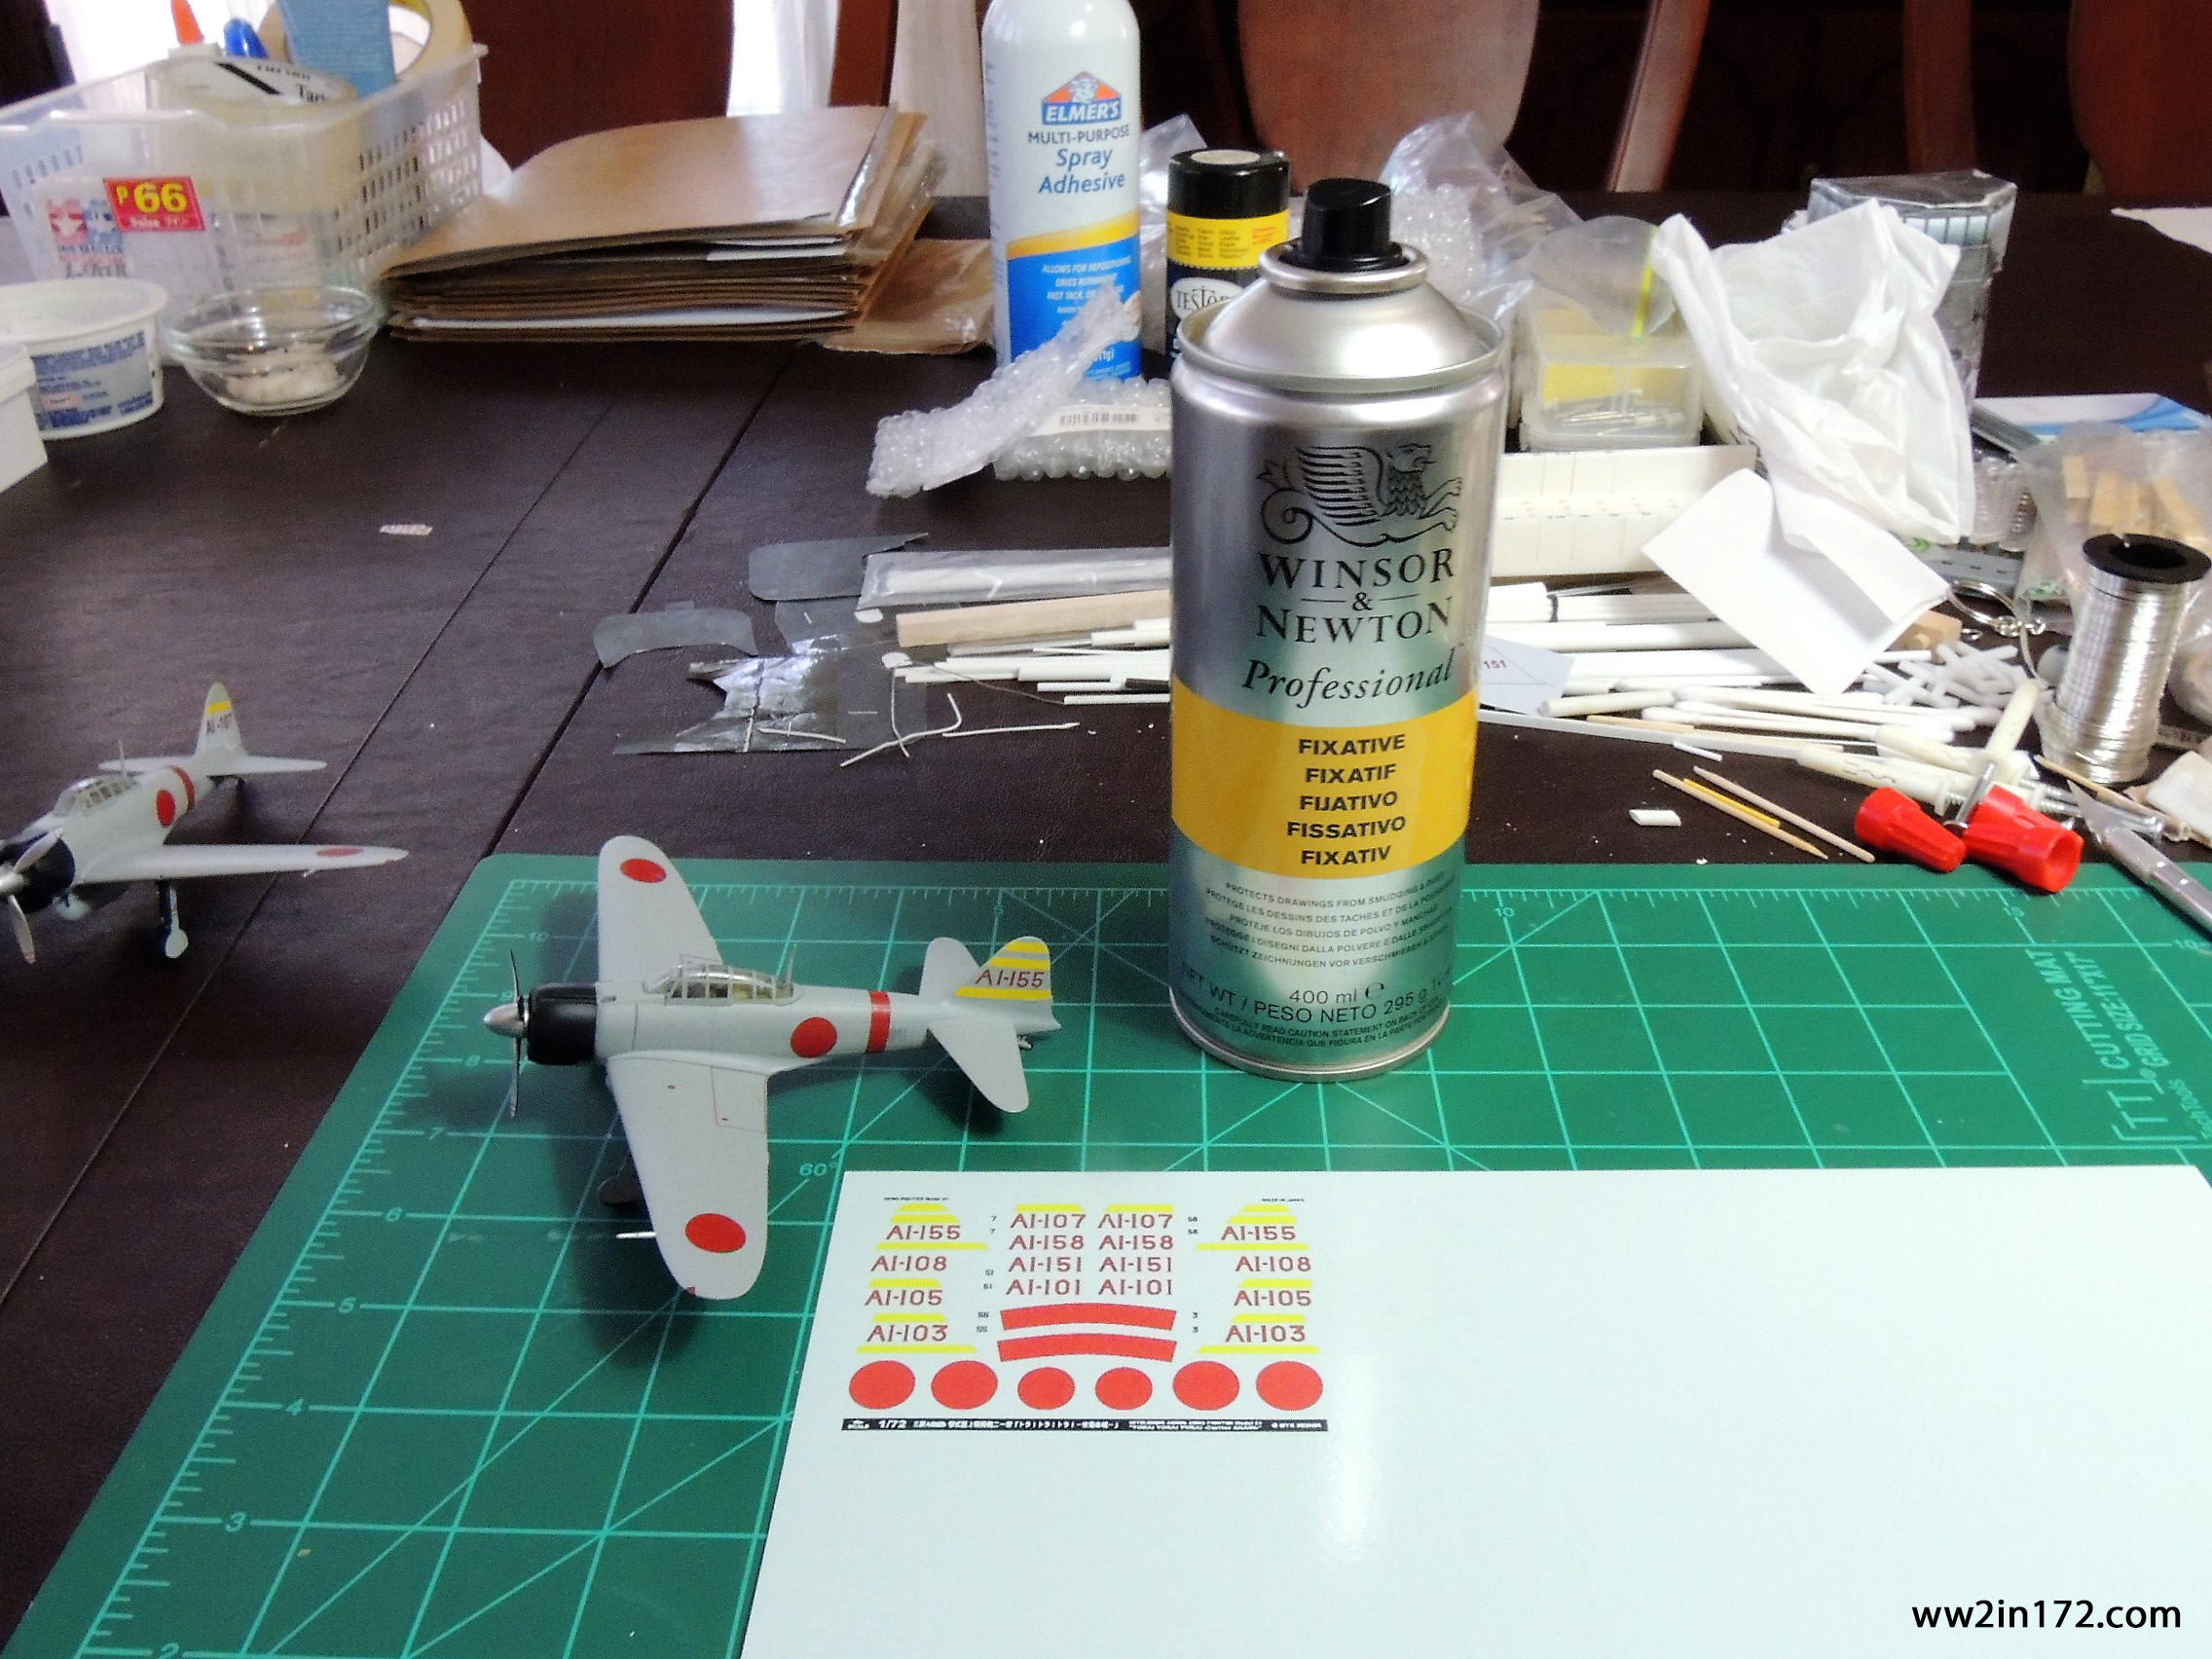
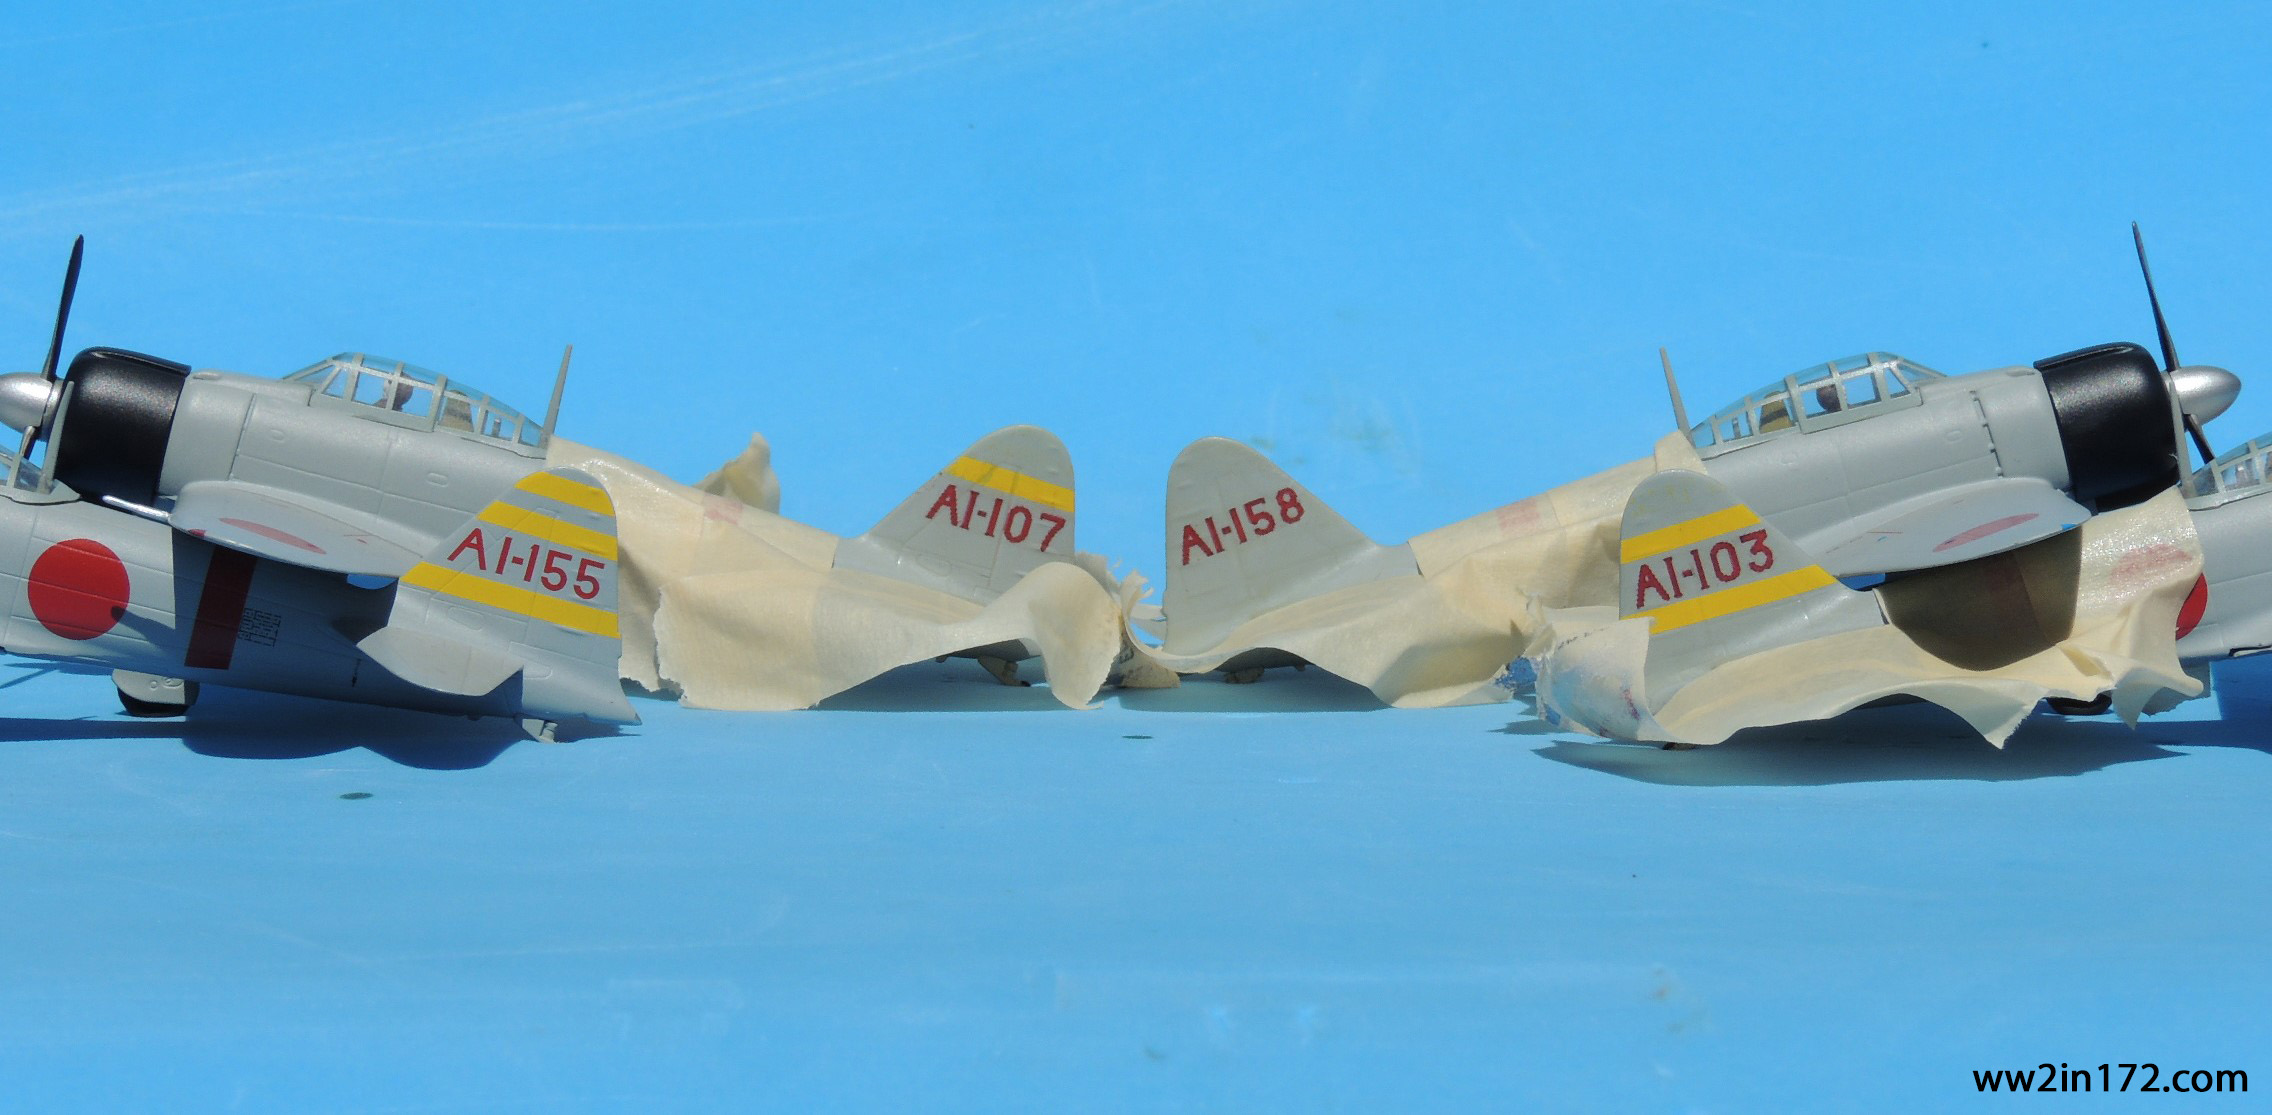
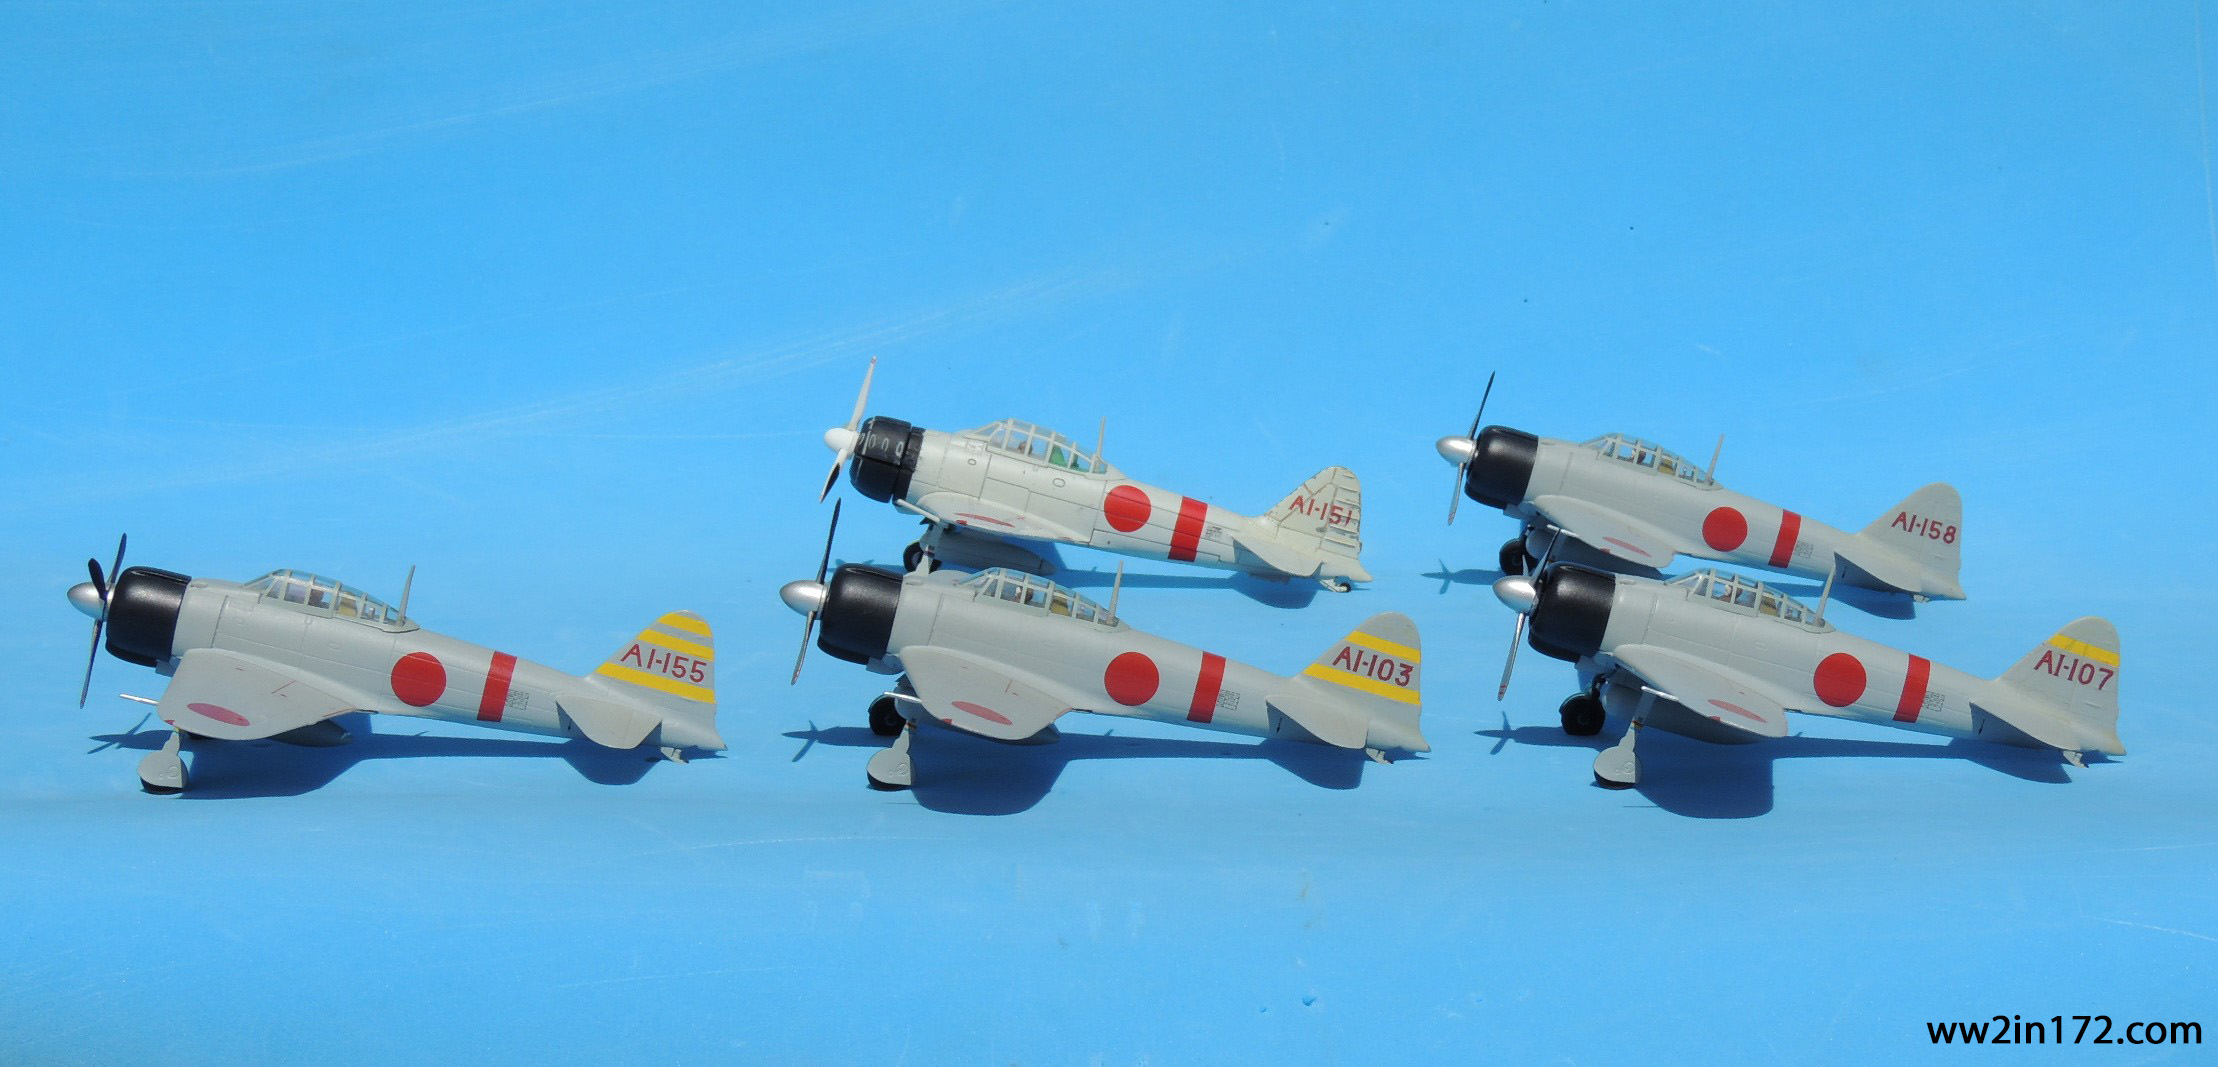
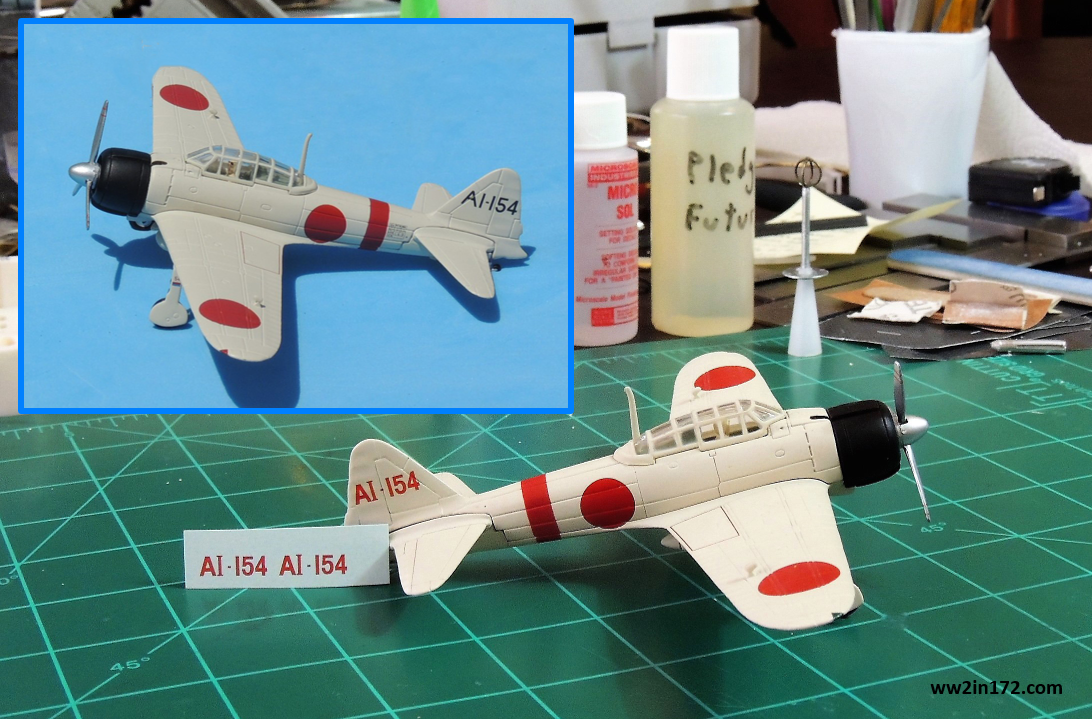
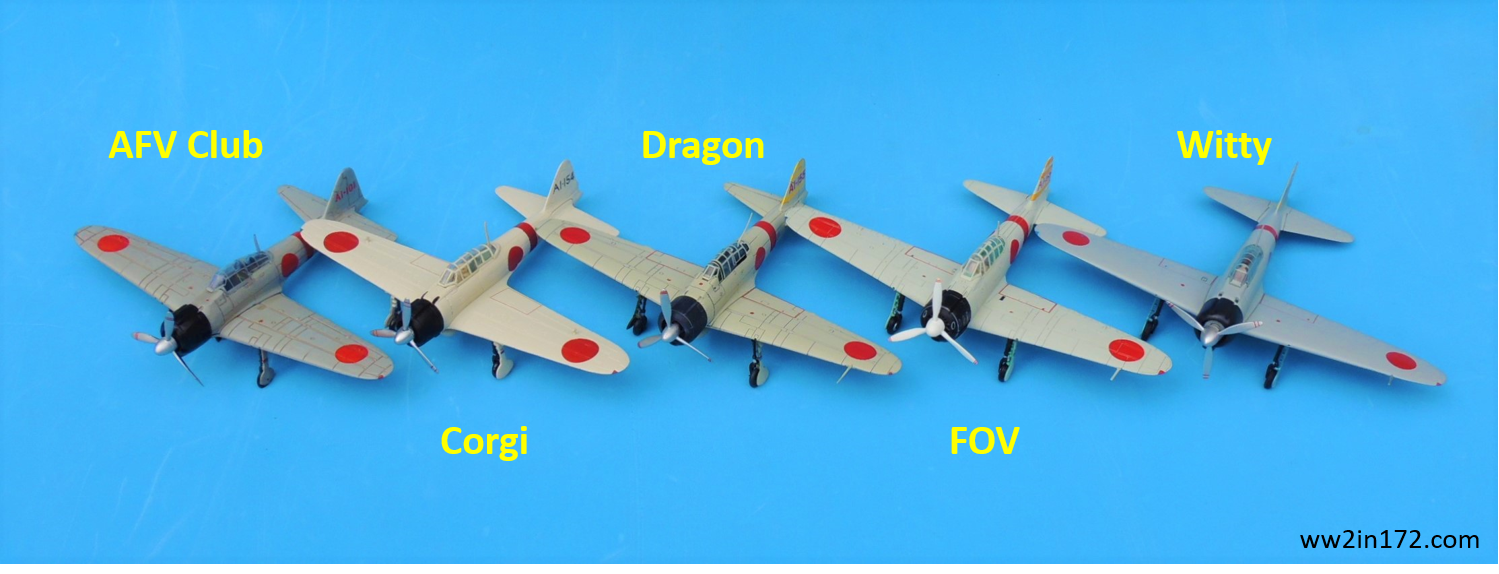
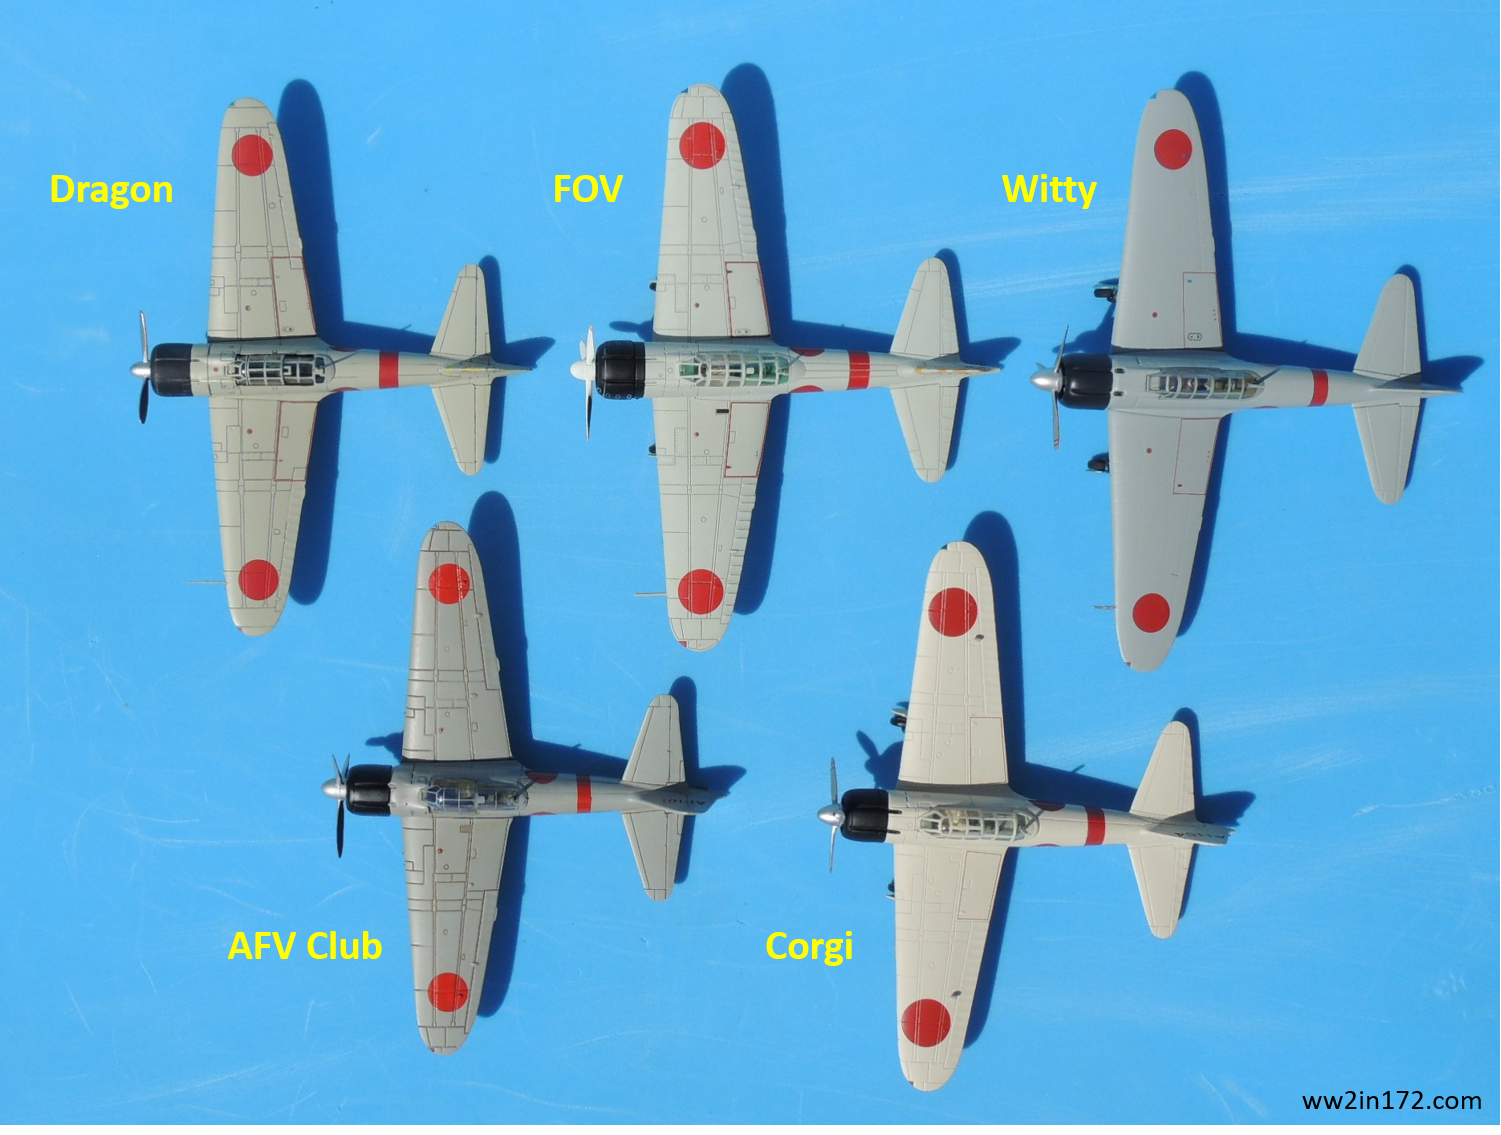
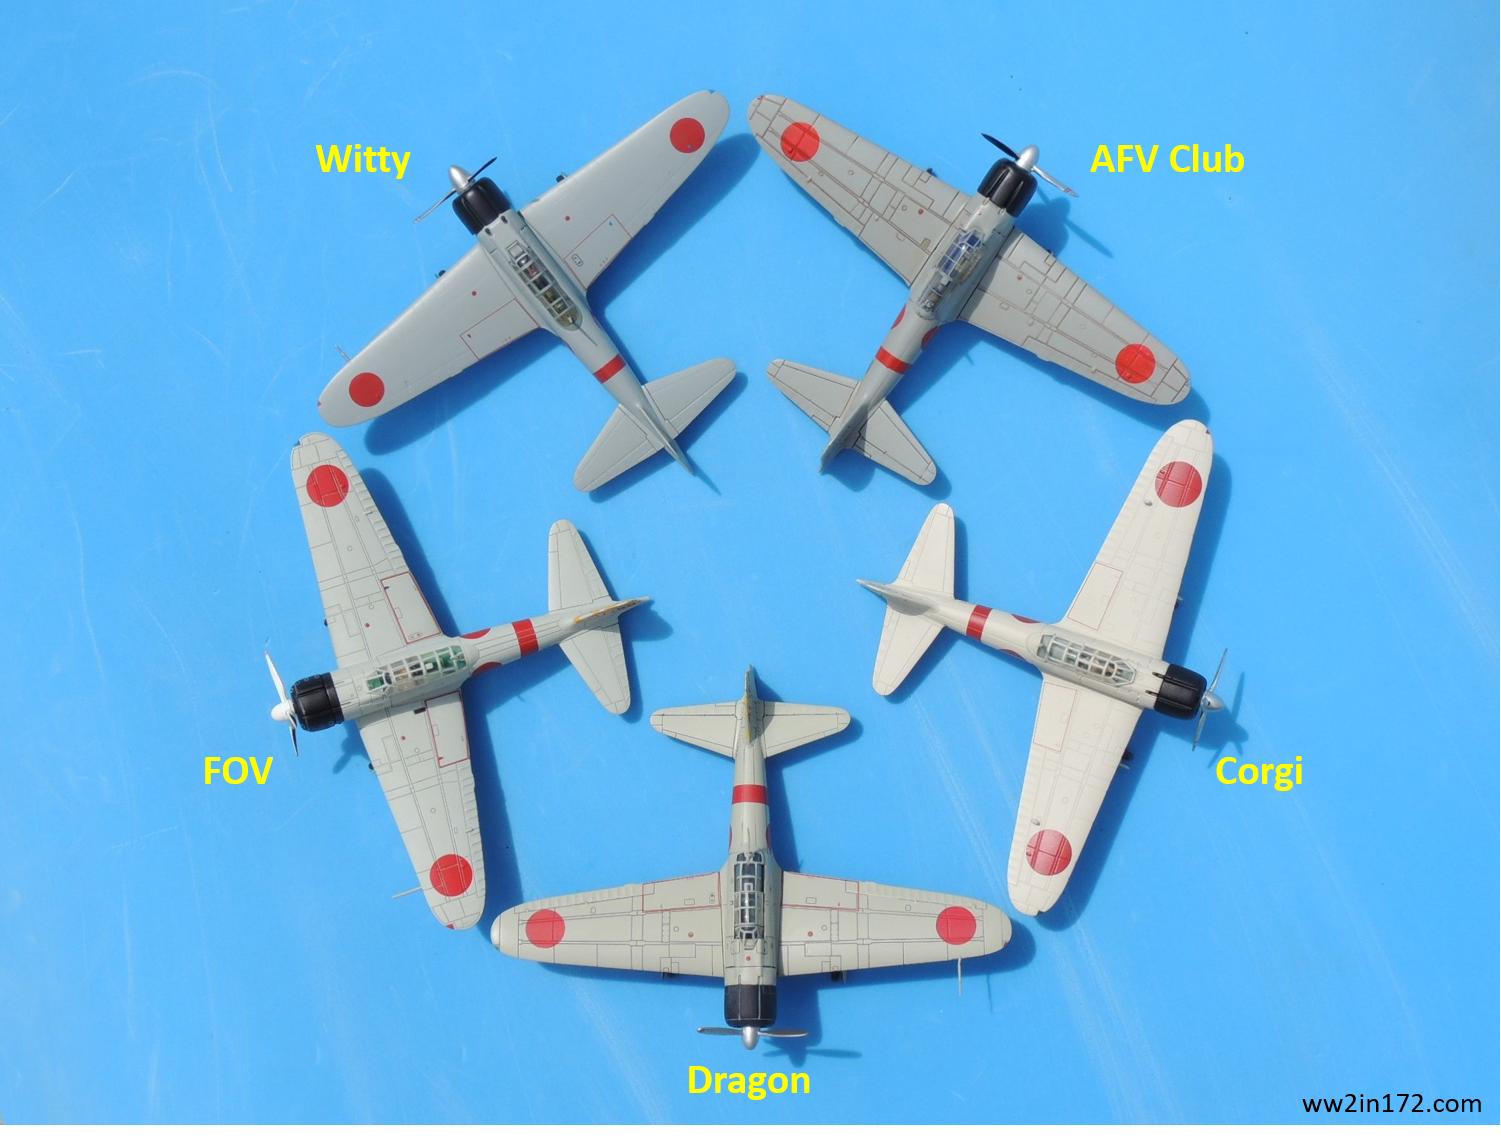
II. Marseille’s Messerschmitt Bf 109s – Marseille flew a number of different Messerschmitt Bf 109s throughout his career. To my knowledge, four different manufacturers – Atlas, Corgi, Easy Model, and Gemini – have produced a total of six prebuilt 1/72 diecast models of Marseille’s various aircraft spanning the two years from his first victory in August 1940 to his last in September 1942. I will be using one of these six for the diorama. This post will provide photos and observations of these models.

Marseille with his Messerschmitt Bf 109 “Yellow 14.”

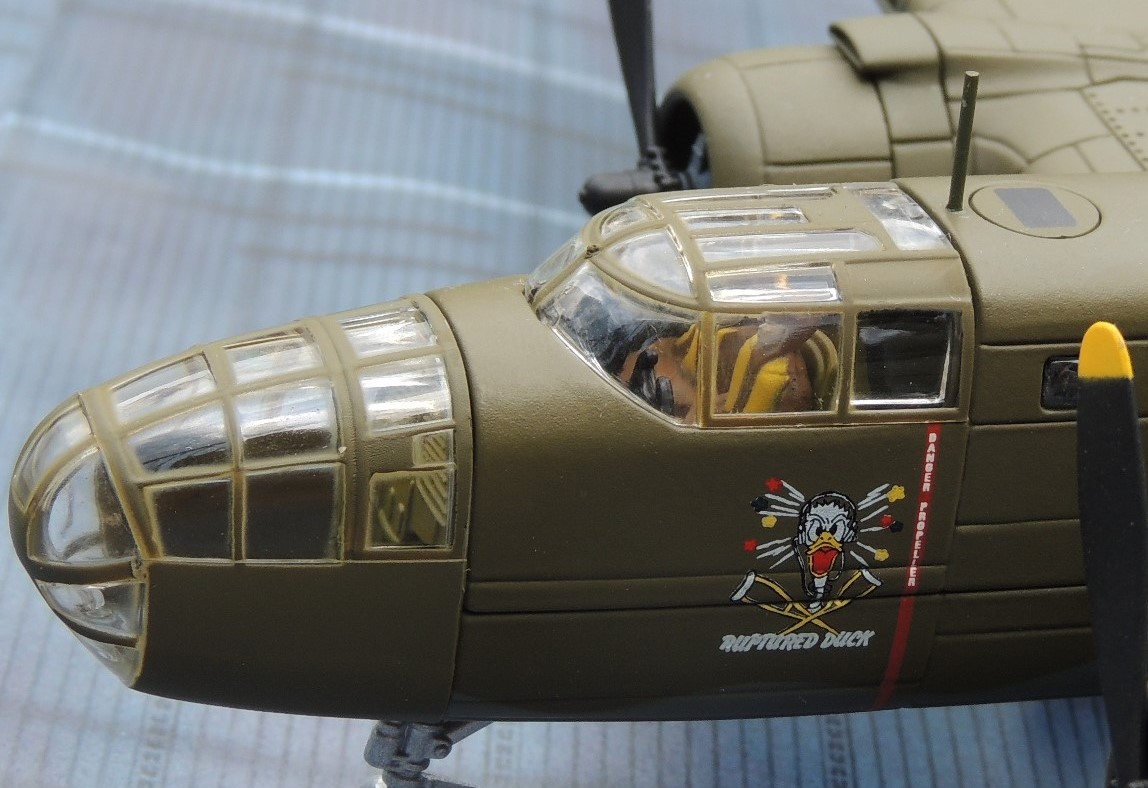
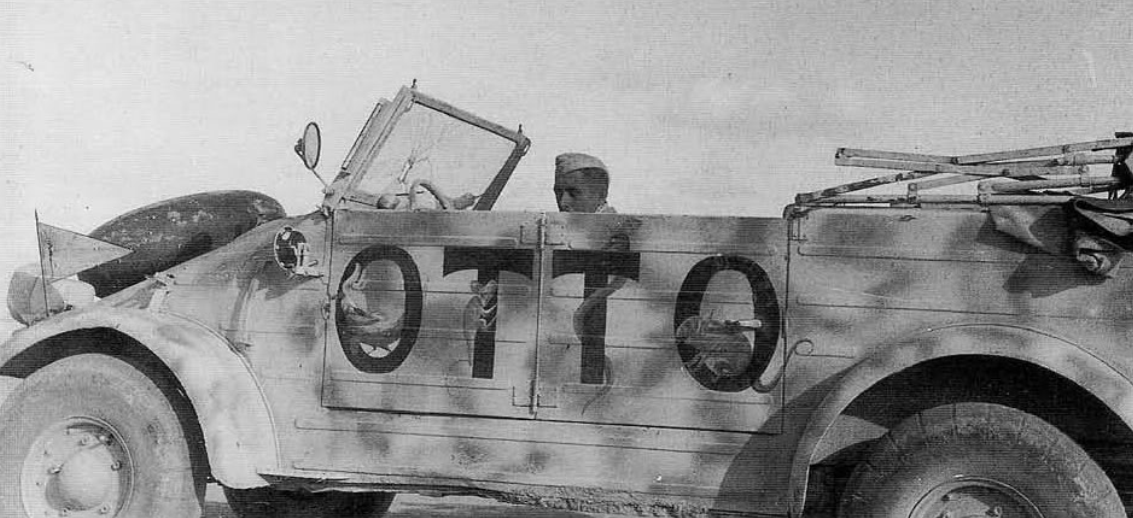
III. Marseille’s “OTTO” Kubelwagen – Upon Marseille’s downing of eight RAF P-40 Tomahawks in a 10-minute sortie on September 1, 1942, the Italians in the camp “borrowed” Marseille’s kubelwagen and painted “OTTO” – “eight” in Italian – on its sides, adorning the four letters with desert fauna. This post will describe the kubelwagen I intend to use for this diorama.

Marseille’s kubelwagen “OTTO.” Note the distinct balloon tires made specially for desert cross-country driving and the pennant on the driver’s side — characteristics often missed by model manufacturers.

IV. Luftwaffe Opel Blitz Tankwagen – The Luftwaffe used the Opel Blitz tankwagen Kfz. 385 to refuel their aircraft throughout the conflict, including in North Africa. As far as I know, three manufacturers have produced 1/72 model kits of the Kfz. 385 – two in plastic by Roden and MAC Distribution and one in resin by FM Detail Sets. This post will briefly discuss the tankwagen I intend to use for this diorama.

An Opel Blitz tankwagen refuels a Bf 109 of JG 27.

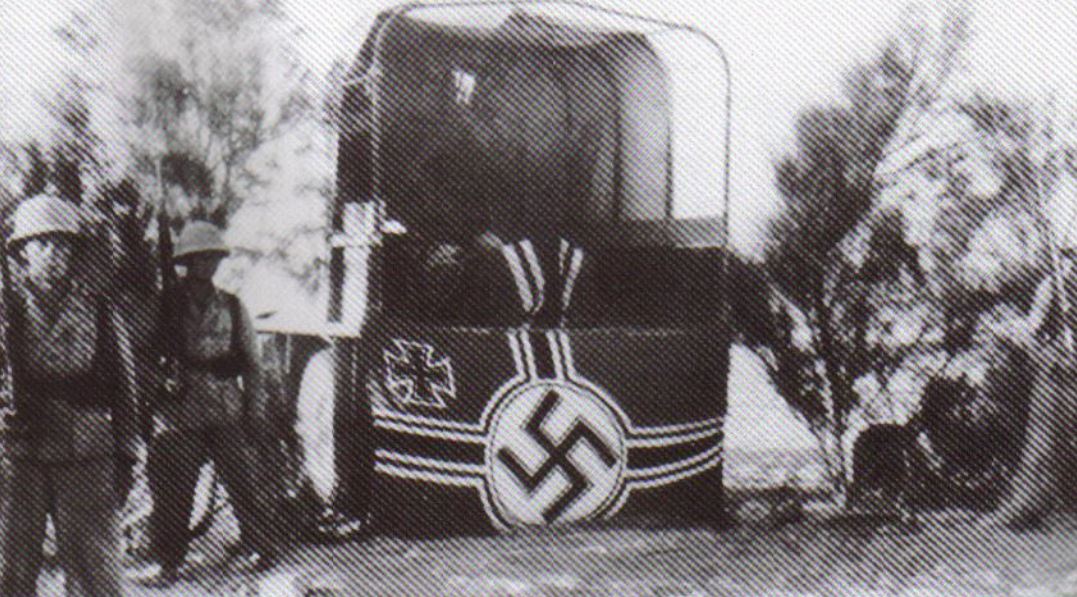
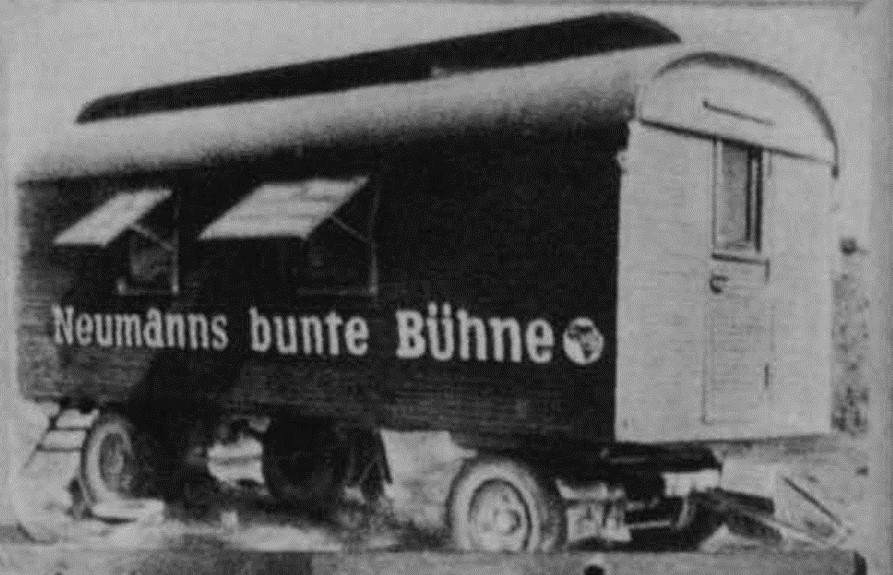
V. Neumanns bunte Bühne – JG 27 Commander Eduard Neumann’s trailer, known as “Neumanns bunte Bühne” (Neumann’s colorful stage), served as the headquarters of JG 27, Marseille’s fighter wing. There is no available model of this trailer in any scale so I will be creating it with plastic card mostly from scratch. Given that, to my knowledge, only a handful of photos of the trailer exist, information on dimensions and details is lacking. Of necessity, a significant portion of this effort will be educated guesswork. This post will describe this most challenging part of the project.

The headquarters of JG 27, a trailer Commander Eduard Neumann had appropriated in France.

VI. The Figures and other details – No diorama is complete without the figures to bring it to life and provide a sense of scale. We may not know the wingspan of a Messerschmitt Bf 109, but a human figure next to it provides immediate perspective. I am aware of two figures in 1/72 scale – one from Preiser and one from Dragon – clearly intended to represent Marseille. This post will cover these two figures as well as the approximately 60 other figures (plastic, resin, and metal) from many figure sets that I will use in the diorama. The challenge is that there are currently no shirtless figures wearing shorts and pith helmets. Thus, the project will involve many conversions using torsos, heads, and limbs from different figure sets.

Engineers of JG 27 enjoy a break. Again, note the pith helmets, shorts, and lack of shirts.

Lagniappe: Rumba Azul, by the Lecuona Cuban Boys

Finally, for those curious about Rumba Azul, here’s a YouTube video. Music begins at about the 30-second mark and lyrics at about the 90-second mark.

As is probably clear, this is an extremely ambitious project, at least for me, and it will likely take months to complete. Please bear with me and visit the site often.

Thank you for your indulgence and I hope you enjoyed the post. If something looks amiss, please let me know. I would be delighted to correct inaccurate information so that this may be useful to other 1/72 scale collectors and wargamers. As always, comments, questions, corrections, and observations are welcome. 

The A6M Zero in 1/72: Akagi’s Zeros Prepare for Pearl Harbor Diorama, Part 2.4 – The Decaled Zeros

This is Part 2.3 of a series of posts on the construction of a Pearl Harbor diorama. It will depict the Zeros of the Imperial Japanese Navy’s Akagi aircraft carrier preparing to take off during the first wave attack. This post is a follow-up to the previous post and concerns only the pre-built 1/72 scale Zeros to be used in the diorama with renumbered tail markings. To understand the concept of this diorama project, please refer to the previous posts. 

The Actual Akagi Zeros

As previously mentioned, the Akagi contributed nine A6M2 Zeros to the first wave attack. As a refresher, below is a table from a previous post of the Zeros that participated in Akagi’s first wave. Akagi's Zeros JPEG from Excel (2) - CopyThe Prebuilt 1/72 Scale Models

The photo below shows the prebuilt 1/72 scale Akagi Zeros currently available. It is immediately evident that of the nine actual Zeros that participated in Akagi’s first wave, only AI-155 and AI-154 have been produced in diecast. Unfortunately, the Corgi AI-154 is unusable as is, since Corgi used black, rather than red, tail numbers.Zero TailsThe Diorama Zeros

For purposes of the diorama, the goal is to use the five models in the photo above plus four spares — two additional Wittys and two additional FOVs. Only the Dragon AI-155 will be used unmodified; the remaining eight will require new tail numbers as per the chart above. Below is a notional photo of the expected result once the decals are applied. Zeros w New Tails

The Decaled Zeros

I searched extensively for MYK Design’s A-72009 Tora! Tora! Tora! Carrier Akagi 1/72 decal sheet (pictured below), since it includes five of the nine necessary tail numbers: AI-103, AI-107, AI-151, AI-155, and AI-158. (The AI-155 decal is unnecessary as I’ll be using the Dragon model that already carries that tail number.)  Alas, I was unsuccessful as the sheet has been out of print for years.

Ultimately, I had no choice but to make the decals myself. I enlarged the image at left, cleaned it up, enhanced the numbers as much as possible, and then reduced it back to 1/72 scale. I then printed the image on Micro-Mark decal paper.

To my dismay, I found that handling the decal sheet resulted in slight smudging. After rereading the decal paper directions, I reprinted the image and “fixed” it onto the sheet with Winsor & Newton fixative. Failure to apply a coat of fixative to protect the image will result in the image smudging like lead on a pencil drawing when touched.

The photo below shows the decal sheet printed on the Micro-Mark decal paper after the fixative had been applied.With decals in hand, I prepared the three Witty models for application of the decals by removing the tail numbers and yellow stripes as necessary — leaving two stripes for the AI-103; one stripe for the AI-107; and no stripes for the AI-158. See photo below.

There are essentially two ways to remove the tampo markings on diecast models: 1) by scraping them off, preferably with an X-Acto #10 curved blade; or 2) by applying some sort of solvent, such as Testors 1148 thinner or standard acetone for nail polish removal. I found that a combination of the two methods worked best for me. (Note: Do not use enamel thinner on plastic models. It will ruin the plastic finish.) Once the original markings were totally removed, I applied a coat of Pledge (Future) floor finish to ensure that the decals found a glossy base that would prevent silvering. (Pledge’s self-leveling properties are amazing!) After waiting a day for the Pledge to cure, I used Micro Set and Micro Sol solutions to apply the decals.

Micro Set prepares the surface where the decal is to be applied by cutting the oils in the paint, thus allowing the decal to slide on the surface, making it easier to reposition the decal as necessary. Micro Sol softens the decal, allowing it to conform to the surface of the model, which is particularly useful on irregular surfaces such as the panel lines and ridges on the Zero tails. Using these two solutions will help make the decals look “painted-on.” 

After waiting another day for the decals to dry, I again applied a coat of Pledge to completely seal the decals between two layers of Pledge. Of course, the Pledge application resulted in a glossy finish. After waiting yet another day, I sprayed the decals with Testors Dull Cote to give the tails a matte finish that matched the rest of the model. The photo below shows the results after the Dull Cote had dried.

In addition to an unmodified Witty model (AI-155), the photo below shows the three decaled Witty models (AI-103, AI-107, and AI-158), plus one decaled FOV model (AI-151). Note that some paint came off the tail of the FOV when I removed the tampo markings, giving it an unintended — though not totally unwelcome — weathered look. (Yes, I’m accepting that which I cannot change.  🙂  )As previously mentioned, Corgi inexplicably applied black tail numbers to the AI-154 (see inset in the photo below), rather than the well-documented red numbers. I removed the black numbers with Testors thinner and applied a decal with correct red numbers following the process discussed above. Note that the MYK Design A-72009 decal sheet did not include the AI-154 so I made the decals using letters and numbers from different fonts to simulate the MYK Design numbers. The lagniappe photo below shows the result. I made the extra decals standing by the tail in case I botched the first application — a common occurrence, at least for me, when applying decals. To summarize, six models are now ready: the unmodified Dragon AI-155 plus five decaled planes — three Witty models (AI-103, AI-107, and AI-158), one FOV (AI-151), and one Corgi (AI-154). I’ve decided not to decal the last three (AI-152, AI-153, and AI-156) as the FOV model did not respond well to removal of the tampo markings. Instead, I’ll use paper covers using the stencil in the previous post.

I apologize for such a tedious post. I realize that except for diehard readers, discussion of the tail numbers can get repetitive and confusing. Still, I think the photos by themselves tell the story. 

Again, thank you for your indulgence and I hope at least some of you enjoyed the post. If something looks amiss, please let me know. I would be delighted to correct inaccurate information so that this may be useful to other 1/72 scale collectors and wargamers. As always, comments, questions, corrections, and observations are welcome. Stay tuned for a brief discussion of the Zero pilots who participated in Akagi’s first wave attack in the next post.

The A6M Zero in 1/72: Akagi’s Zeros Prepare for Pearl Harbor Diorama, Part 2.3 – The Diorama Zeros

This is Part 2.2 of a series of posts on the construction of a diorama depicting the Zeros of the Imperial Japanese Navy’s Akagi aircraft carrier preparing to take off as part of the first wave attack on Pearl Harbor. Providing the history of the Zero or its technical details is beyond the scope of this article. This post concerns only the prebuilt 1/72 scale Zeros to be used in the diorama. To understand the concept of this diorama project, please refer to the previous posts. 

The Actual Akagi Zeros

As previously mentioned, the Akagi contributed nine A6M2 Zeros and 27 B5N2 Kates to the first wave attack. As a refresher, below is a table from a previous post of the Zeros that participated in Akagi’s first wave. As is readily apparent, the tail numbers are all in the AI-150’s except for AI-103 and AI-107. Up to this point, I had deliberately avoided discussing the tail numbers as creating the correct numbers will be one of the more difficult parts of this project, as discussed below. Akagi's Zeros JPEG from Excel (2) - CopyThe Prebuilt 1/72 Scale Models

The photo below shows the prebuilt 1/72 scale Akagi Zeros currently available.* It is immediately evident that of the nine actual Zeros that participated in Akagi’s first wave, only AI-155 and AI-154 have been produced in diecast. AI-155 — Shigeru Itaya’s Zero — has been produced by Dragon, Forces of Valor, and Witty. A review of each can be found by clicking on the name of the manufacturer. A short biography of Itaya is also available by clicking on his name. AI-154 has been produced by Corgi. Unfortunately, despite all evidence to the contrary, Corgi inexplicably used black tail numbers rather than red numbers, for which there is abundant proof. AFV Club also produced an Akagi Zero — the AI-101 — that participated in the second wave. For the sake of completeness, it will be used in this project so collectors may compare models from all five manufacturers that have thus far produced an Akagi Zero. Zero TailsThe Diorama Zeros

For purposes of the diorama, the goal is to use the five models in the photo above plus four duplicates. The challenge is to create models with all of Akagi first wave numbers other than AI-155. Even AI-154 will be required as the tail number must be in red. The idea is to scrape off the original painted numbers and replace them with appropriate decals so that they match the table above.Corgi AI-154 As thus far I have been unsuccessful in finding the decals, I made a stencil of the tail to cover the tail numbers in the interim. I then scanned the color of each model and applied it to the tail stencil. Matching base colors proved more difficult than I had anticipated.

For those interested in how the colors of the five manufacturers compare, below is a plate showing a scan of each model’s base color. The color of the Corgi model is actually beige and the inset at left matches the model reasonably well. I’m perplexed, however, by the difference in the color of the Corgi model in the photos and conclude it’s due to the lighting. The FOV and Witty colors look very similar but that’s as close to the models as the scanner could make them. Once I made stencils for all five colors, I covered the tail of each model with a new number.The lagniappe photo below provides a notional idea of the intended result. At this point, the tail numbers appear to be a weak part of the project. That will change, however, once the decals are applied. Zeros w New TailsAgain, thank you for your indulgence and I hope you enjoyed the post. If something looks amiss, please let me know. I would be delighted to correct inaccurate information so that this may be useful to other 1/72 scale collectors and wargamers. As always, comments, questions, corrections, and observations are welcome. Stay tuned for photos of the models once the decals are applied.


* Witty also produced AI-101 and AI-102 but both were used in the second wave and, except for the tail numbers, are identical to the AI-155. While Atlas/Oxford (same casting) also produced aircraft carrier A6M2 Zeros, they did not make an Akagi Zero. Instead, Atlas produced a model from the Kaga while Oxford produced one from the Ryujo. 

The A6M Zero in 1/72: Akagi’s Zeros Prepare for Pearl Harbor Diorama, Part 2.2 – Prebuilt 1/72 Models

This is Part 2.1 of a series of posts on the construction of a diorama depicting the Zeros of the Imperial Japanese Navy’s Akagi aircraft carrier preparing to take off as part of the first wave attack on Pearl Harbor. This post concerns only prebuilt 1/72 scale models depicting Zeros from the Akagi. To understand the concept of this diorama project, please refer to the previous two posts. 

Prebuilt 1/72 Scale Akagi Zeros

As I’ve indicated in the past, I lack the modeling skills to build the aircraft necessary for this diorama. Thus, I’ll be using nine prebuilt diecast 1/72 planes. To my knowledge, five manufacturers — AFV Club, Corgi, Dragon Wings, Forces of Valor, and Witty Wings — have tried their hand at producing models of the A6M2 Zero — the version of the Zero used at Pearl Harbor — specifically representing Zeros from the Akagi.*

The photo below shows the Akagi Zero models from the five aforementioned manufacturers, in alphabetical order from left to right. Note the difference in the base color, which reflects the continuing debate over the true color of the actual Zeros.Zero Fronts 3Below is an overhead shot of the five models. Note that the AFV Club and Dragon models have “inked” panel lines, burnt umber and black, respectively, which make the lines stand out. By contrast, the panel lines on the Witty, which are widely considered to be close to scale, are barely visible. My preference is the middle route taken by both Corgi and FOV — while their panel lines may be overscaled, the fact that they were not inked results in a Goldilocks look.Zero OverheadFinally, the lagniappe overhead shot below allows better comparison of dimensions. As is apparent from the photo, the difference in dimensions is de minimis (couldn’t resist the alliterative flourish). Ultimately, however, the reader can make that judgment.Zero Pentagon 1For purposes of the diorama, the plan is to use these five prebuilt models plus four duplicates to complete the nine Zeros in Akagi’s first wave. Since these manufacturers combined have produced only the AI-154 and AI-155, the project will require disguising the tail numbers so that they match the nine tail numbers used on the Akagi (see table in previous post). That is the subject of the next post. 

Again, thank you for your indulgence and I hope you enjoyed the post. If something looks amiss, please let me know. I would be delighted to correct inaccurate information so that this may be useful to other 1/72 scale collectors and wargamers. As always, comments, questions, corrections, and observations are welcome. As mentioned, stay tuned to see these Zeros with the nine new tail numbers in the next post.


* While Atlas Editions and Oxford Diecast also produced A6M2 Zeros for aircraft carriers, neither made an Akagi Zero. Atlas produced a model belonging to the Kaga aircraft carrier (AII-105). Using the same Atlas casting, Oxford Diecast later produced an A6M2 Zero model belonging to the Ryujo aircraft carrier (DI-108). In any case, the Atlas/Oxford models are wheels-up only (wheels are molded retracted into the lower fuselage), requiring a stand and making it difficult to pose them next to other models.

The Doolittle Raid, April 1942, Part 4: B-25 Mitchell Insignias for 1/72 Scale Diecast

This is the last of a four-part series on the Doolittle Raid. For details of the actual raid, B-25 Mitchells in 1/72 scale, and diorama of the take-off in 1/72 scale, please refer to the three previous posts, The Doolittle Raid, Parts 1, 2, & 3

As discussed in Part 2, models of only two of the 16 B-25 Mitchell bombers that participated in the Doolittle Raid have been made into diecast — Col. James Doolittle’s “02344” and Lt. Ted Lawson’s “Ruptured Duck.” Given that Corgi’s two Doolittle Raid Mitchells have essentially disappeared from the market, Corgi would do collectors a great service by releasing another B-25 Doolittle Raider — one with a new livery (i.e., different markings).

Corgi and Air Force 1 would have interesting alternatives at their disposal, as some of the other 14 B-25 Mitchells also had memorable artwork. The following passage is from Lt. Ted Lawson’s Thirty Seconds Over Tokyo, first published in 1943. The passage follows commentary regarding constant inspections of the aircraft for possible leaks. Presumably, Lawson’s plane was found to have sprung a leak.

One morning I came out to my plane and found that somebody had chalked the words “Ruptured Duck” on the side of the fuselage. I grabbed Corporal Lovelace, a gunner I knew, and asked him to paint some sort of design on the ship. He’s a good caricaturist. Lovelace got out his stuff and painted a funny Donald Duck, with a head-set and the earphone cords all twisted around his head.

Lovelace did a swell job in blue, yellow, white and red. Then he added something that gave all of us another laugh. Under Donald Duck he drew a couple of crossed crutches.

The other boys now got busy with insignias. In a couple of days a lot of hitherto anonymous B-25’s took on such names as Hari-Kari-er (a hefty hunch), Whiskey Pete, Anger Angel, Whirling Dervish, Fickle Finger of Fate and one fellow painted the chemical formula for TNT on the side of his ship.

It is clear from the passage that several of the aircraft had personalized markings and there is actually photographic support for some.

The table below summarizes what little information I could gather from various sources on the Doolittle Raid B-25 Mitchells and their names and markings, listed in the order in which they took off from the USS Hornet:

Position Number Name Markings Insignia
1 40-2344  None No Individual Markings  
2 40-2292  None No Individual Markings  
3 40-2270 “Whiskey Pete” Name Only  
4 40-2282  None No Individual Markings  
5 40-2283  None No Individual Markings  
6 40-2298 “Green Hornet” Name Only  
7 40-2261 “Ruptured Duck”   Donald Duck Cartoon
8 40-2242  None No Individual Markings  
9 40-2303 “Whirling Dervish”   Tornado Cartoon
10 40-2250  None No Individual Markings  
11 40-2249 “Hari Kari-er”   Angel with Bomb
12 40-2278 “Fickle Finger” Name Only  
13 40-2247 “Avenger” Name Only  
14 40-2297  None No Individual Markings  
15 40-2267 “TNT”   TNT Formula Design
16 40-2268 “Bat Out of Hell” Name Only  

As is readily evident from the table, nine of the 16 Mitchells had a moniker; seven did not. Of the nine with names, four had “insignias,” as Lawson called them. Thus, our choices of liveries are limited to those four and, given that the “Ruptured Duck” has already been produced, there remain only three choices: “Whirling Dervish,” “Hari Kari-er,” and “TNT.” It is interesting to note that all three of these Mitchells were specifically mentioned in the Lawson passage quoted above.

However, it is something of a mystery why “Anger Angel,” which Lawson mentions in the passage, is nowhere to be found. Is it plane #13 “Avenger”? Did Lawson simply misremember? Is the design for “Anger Angel” lost forever? I note that since Thirty Seconds Over Tokyo was published in 1943, while memories were still fresh, it is a contemporaneous account of the episode whose accuracy should be accorded significant probative weight.

Here are the three viable alternatives:

40-2249:  “Hari Kari-er”

Let’s begin with the “Hari Kari-er,” the 11th plane to take off from the Hornet, since there is ample photographic documentation for its livery. The “Hari Kari-er” is best known for downing two Japanese fighters during the mission. According to Chun in The Doolittle Raid 1942, Osprey Campaign 156, “Hari Kari-er,” piloted by Captain C. Ross Greening, was attacked by four Kawasaki Ki-61 Hiens, known as “Tonys” to Americans, on the way to Yokohama. The Hiens were still in the evaluation phase. The “Hari Kari-er” shot down two from its dorsal turret and managed to outrun the two others, subsequently dropping its bombs on an oil refinery. Please refer to the wonderful color illustration of this episode in The Doolittle Raid, Part 1.

Below is a portside photo of the “Hari Kari-er” on the Hornet, scanned from Chun’s Doolittle Raid 1942.1/72, AA35312, B-25, Corgi, diecast, Doolittle, Hari Carrier, Hari Kari-er, Japan, Lawson, Mitchell, Ruptured Duck, Thirty Seconds, TNT, Tokyo, TSOT, USS Hornet, Whirling Dervish
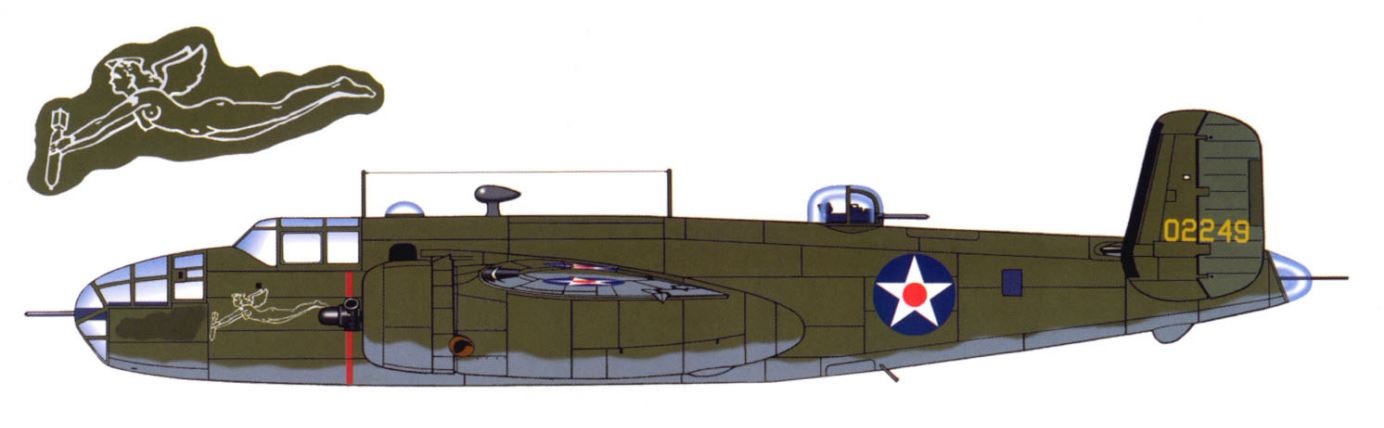
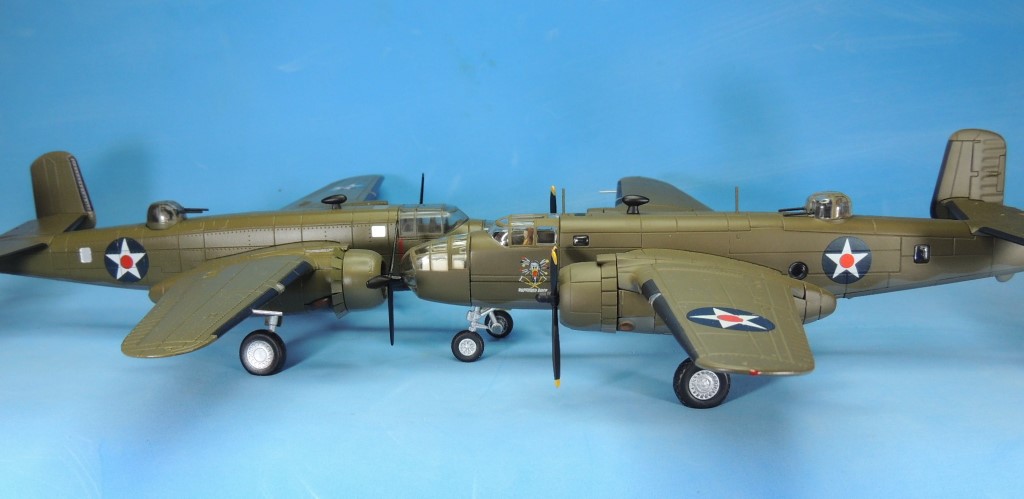
Also from Chun’s book, here’s a close-up of the insignia on the starboard side of the fuselage: the white outline of a curvaceous angel about to release a bomb. The irony of an angel ready to drop death and destruction from above should not be lost on us, biblical though it may be. Given that the Doolittle Raid occurred only four months after the U.S. entry into the war, this is likely one of the first examples of pin-up art on an American aircraft, if indeed a naked angel can be considered a pin-up. Note the dark smudge directly in front of the bomb in the angel’s hands where the name “Hari Kari-er” was overpainted in darker olive drab, though the reason is unclear. 1/72, AA35312, B-25, Corgi, diecast, Doolittle, Hari Carrier, Hari Kari-er, Japan, Lawson, Mitchell, Ruptured Duck, Thirty Seconds, TNT, Tokyo, TSOT, USS Hornet, Whirling DervishFor those of us who love color profiles, here’s one from B-25 Mitchell, Walkaround #12, by Lou Drendel, illustrated by Don Greer, reproduced here for discussion purposes under the fair use exception to the copyright laws. 1/72, AA35312, B-25, Corgi, diecast, Doolittle, Hari Carrier, Hari Kari-er, Japan, Lawson, Mitchell, Ruptured Duck, Thirty Seconds, TNT, Tokyo, TSOT, USS Hornet, Whirling DervishFinally, it’s noteworthy that the Battle 360: Season One, Call to Duty episode used the “Hari Kari-er” extensively in its computer-generated imagery video production of the Doolittle Raid. I captured the still below from that episode. Forgive the poor quality of the capture. 1/72, AA35312, B-25, Corgi, diecast, Doolittle, Hari Carrier, Hari Kari-er, Japan, Lawson, Mitchell, Ruptured Duck, Thirty Seconds, TNT, Tokyo, TSOT, USS Hornet, Whirling DervishInarguably, the “Hari Kari-er” has a terrific insignia that makes it a worthy candidate for Corgi or Air Force 1 to make it into a diecast model. The probability that it was the first American plane to down a Japanese Hien in addition to the possibility that it was the first American plane of the war to display pin-up art makes the “Hari Kari-er” irresistible. 

40-2303:  “Whirling Dervish”

The 9th plane to take off from the Hornet, the “Whirling Dervish” is credited with shooting down a Japanese fighter while completing its mission to bomb a tank factory in the south of Tokyo, where it dropped its entire load. In a famous newsreel clip, Pilot Lt. Harold F. Watson comments that he “had the satisfaction of seeing two of the bombs score direct hits.” Like all other Doolittle Raiders except the one that headed to Russia, the “Whirling Dervish” crash landed in China.

I’m unaware of any photos of the actual “Whirling Dervish,” but there appears to be a consensus that the design consisted of a stylized tornado wedged between the two words of the name.1/72, AA35312, Academy, B-25, Corgi, diecast, Doolittle, Hari Carrier, Hari Kari-er, Japan, Lawson, Mitchell, Ruptured Duck, Thirty Seconds, TNT, Tokyo, TSOT, USS Hornet, Whirling Dervish

The profile at left comes comes from the Academy 13202 USAAF B-25B Doolittle Raid 1/48 scale plastic kit, whose decal sheet provides this option for the B-25 Mitchell among several others. Other companies have produced very similar versions of the “Whirling Dervish” design so I have no reason to doubt it. 

It is also interesting to note that the 2001 film Pearl Harbor, the Touchstone Pictures $140 million extravaganza, shows this same insignia on the “Whirling Dervish” during the Doolittle Raid scene. It is unclear to me where the design originated but presumably Touchstone must have had a reference. I captured the still below from Pearl Harbor.1/72, AA35312, Academy, B-25, Corgi, diecast, Doolittle, Hari Carrier, Hari Kari-er, Japan, Lawson, Mitchell, Pearl Harbor, Ruptured Duck, Thirty Seconds, TNT, Tokyo, TSOT, USS Hornet, Whirling DervishIncidentally, the details of the Doolittle Raid sequence in Pearl Harbor are about as accurate as those in a Disney movie. Still, a flawed war history movie — even accounting for the gratuitous romantic nonsense — is better than no movie, particularly in this case where the film actually follows the general outlines of the real raid.

The “Whirling Dervish” design won’t set the world spinning faster (lame pun intended) but it’s interesting and worthy of consideration.

40-2267:  “TNT”

The penultimate Mitchell to take off from the Hornet, the “TNT,” piloted by Lt. Donald G. Smith, was assigned to drop its bombs on an aircraft factory and shipyard on the outskirts of Kobe. After completing its mission, the “TNT” barely managed to reach the coast of China, where it crash landed at sea, staying afloat long enough for the five-man crew to safely board their rubber raft before the plane sunk. Though the raft was subsequently punctured when it hit the tip of one of the plane’s broken flaps, all five were able to swim to shore.

It bears mentioning that one of the five crew members of the “TNT” was the flight surgeon for the entire mission, Lt. Thomas “Doc” White, a Caltech and Harvard Medical School graduate who was also trained as a pilot, navigator, and bombardier. Through divine providence, the “Ruptured Duck” had also crash landed at sea less than a mile from the “TNT” and three of its four surviving members required medical attention. Once on land, the two crews connected and “Doc” White was able to provide medical care to the three “Ruptured Duck” crew members, saving Lawson’s life, though the flight surgeon had to amputate Lawson’s leg.

The profile below comes from the aforementioned Academy 13202 USAAF B-25B 1/48 scale plastic kit, whose decal sheet provides this Doolittle Raid option for the B-25 Mitchell among several non-Raid others.

1/72, AA35312, Academy, B-25, Corgi, diecast, Doolittle, Hari Carrier, Hari Kari-er, Japan, Lawson, Mitchell, Ruptured Duck, Thirty Seconds, TNT, Tokyo, TSOT, USS Hornet, Whirling Dervish1/72, AA35312, Academy, B-25, Corgi, diecast, Doolittle, Hari Carrier, Hari Kari-er, Japan, Lawson, Mitchell, Ruptured Duck, Thirty Seconds, TNT, Tokyo, TSOT, USS Hornet, Whirling Dervish

Although the design appears to be widely accepted by plastic model and decal manufacturers, I’m at a loss about its origin. Lawson clearly states in the passage cited above from Thirty Seconds that “one fellow painted the chemical formula for TNT on the side of the ship.”

The design above is not the “chemical formula for TNT” mentioned by Lawson and, as far as I know, there is no photographic support for it, though I’d be delighted to be proven wrong. 1/72, AA35312, Academy, B-25, Corgi, diecast, Doolittle, Hari Carrier, Hari Kari-er, Japan, Lawson, Mitchell, Ruptured Duck, Thirty Seconds, TNT, Tokyo, TSOT, USS Hornet, Whirling Dervish

Thus, in the absence of photographic documentation, I think a reasonable and more accurate design, based strictly on Lawson’s quote in Thirty Seconds, would be the one at left, which I drew from scratch.

Ok, I get it, I’m not an artist by any stretch of the imagination. Nonetheless, this notional design, crude as it is, is more faithful to Lawson’s description than the others currently available.

Other Options

The blockbuster movie Thirty Seconds Over Tokyo, released by MGM in 1944, provides some tantalizing possibilities. Bearing in mind that all 16 bombers were lost during the raid, including the one captured and later destroyed by the Russians, it’s patently obvious that the “insignias” used in the film had to be reconstructed from pilots’ memories. Still, the movie is not a frivolous reference as it was released in 1944, when memories were still fresh, and employed Ted Lawson, upon whose book the movie was based, as a consultant. Coincidentally, Dalton Trumbo, the subject of a recent movie himself, wrote the screenplay for Thirty Seconds. (As an aside, Trumbo’s Johnny Got His Gun, written just before the war, probably left a greater impression on me as a kid than any other anti-war novel.) At any rate, I captured the stills below from the movie.

“Turkey”

At 31:17, one gets an excellent view of the “Turkey,” referenced in the movie. To be clear, those are 500 lb. bombs falling out of the bird’s behind. 🙂  Lawson did not mention this “insignia” in Thirty Seconds, so one wonders if it was conjured up specifically for the movie. Still, it’s a terrific design, in my view, and I would not be averse to seeing it in diecast.1/72, AA35312, Academy, B-25, Corgi, diecast, Doolittle, Hari Carrier, Hari Kari-er, Japan, Lawson, Mitchell, Ruptured Duck, Thirty Seconds, TNT, Tokyo, TSOT, USS Hornet, Whirling Dervish“Our Little Nell”

At 55:31, one can see “Our Little Nell.” This design, too, was probably created specifically for the movie but would still look cracking on a B-25 diecast model.1/72, AA35312, Academy, B-25, Corgi, diecast, Doolittle, Hari Carrier, Hari Kari-er, Japan, Lawson, Mitchell, Ruptured Duck, Thirty Seconds, TNT, Tokyo, TSOT, USS Hornet, Whirling Dervish“Ruptured Duck”

At 31:47, one gets a similar view of the “Ruptured Duck.” This last lagniappe photo is included for the sake of completeness and to point out that the Donald Duck design is identical to the one on the Corgi model. The one on the actual “Ruptured Duck,” however, may have been just slightly different, with Donald Duck wearing a sidecap.1/72, AA35312, Academy, B-25, Corgi, diecast, Doolittle, Hari Carrier, Hari Kari-er, Japan, Lawson, Mitchell, Ruptured Duck, Thirty Seconds, TNT, Tokyo, TSOT, USS Hornet, Whirling DervishThe Upshot

Diecast companies reportedly visit internet collector forums for information to improve their products. Thus, the goal of this post is to persuade Corgi and Air Force 1 that it’s high time to release another Doolittle Raid B-25 Mitchell with a new livery. My unequivocal choice would be the “Hari Kari-er.” In addition to the beautiful curvaceous angel design, the “Hari Kari-er” was probably the first American plane to shoot down a Japanese Hien and possibly the first American plane to carry a pin-up on its fuselage during the war. Furthermore — and perhaps more importantly — there is ample photographic documentation for it.

I hope you enjoyed these four Doolittle Raid posts. Thank you for your indulgence and, as always, comments, questions, corrections, and observations are welcome.

The Doolittle Raid, April 1942, Part 3: Take-Off Diorama in 1/72 Scale

This is a follow-up to the two previous posts, The Doolittle Raid, Parts 1 & 2. For details of the actual raid and B-25 Mitchells in 1/72 scale, please refer to those posts.

The well-known photo below, taken from The Doolittle Raid 1942, Osprey Campaign 156, by Clayton Chun, shows a B-25 Mitchell about to take off from the deck of the USS Hornet on April 18, 1942. I believe the photo is a still from newsreel footage of the actual take-off. Note the choppy waters caused by high winds on that cold, damp morning. The harsh weather conditions forced the planes to burn more fuel than they would have otherwise.4 Doolittle Raid Osprey (2)Here’s a 1/72 scale recreation. As always with these diorama photos, there is no photoshopping. It’s one of my self-imposed constraints.7 108 (8)Here’s the same photo in full color. 6 108 (5)The model is the Corgi AA35312 B-25B Mitchell “Ruptured Duck,” flown by Lt. Ted Lawson, author of Thirty Seconds Over Tokyo. For a review of this model, see the previous post.1 144 (3)The figures are from the Corgi US61005 F4U-1D Corsair. I made the checkered flag from cardboard and added it to the signal officer to match the original photo. It’s 1/4 the size of Lincoln’s head on a penny.2 147 (3)I built a section of the USS Hornet’s deck on a large styrofoam base using a scanned copy of the 8″x8″ aircraft carrier deck base included in the Corgi US61005 F4U-1D Corsair. After scanning the Corgi base, I reproduced it a dozen times and then combined the scans with graphics software to make a larger deck, ensuring the plank segments matched. The only difficulty was in blending in the white guidelines. I then printed the entire deck section on paper and glued it to the styrofoam base. Unfortunately, being made of paper, the miserable thing warped from the glue. I was so focused on the plane when taking the photos that I failed to notice the warping until I was cropping the photos. Rats!3 116 (3)I photographed the scene by the side of the swimming pool next to one of the pool jets to ensure some “turbulence,” such as it is. The result exceeded my expectations, something entirely too rare.4 156 (3)Here’s a view from the front. Note the two white lines on the deck that the pilots used as guides. The different widths of the lines and the distance between them and the edge of the deck are at scale. The propellers turn freely and I considered placing a fan in front of them for a spinning effect as I took the photo. Alas, I managed to resist the urge. Compulsive personalities will likely relate to the comment. 🙂  5 121 (3)Here’s a lagniappe photo of a B-25 Mitchell taking off from the USS Hornet. I captured it from a widely available newsreel clip of one of the B-25 Mitchells taking off. Note the flag used by the signal officer — clearly a 4×4 checkered flag. Again, note the choppy waters. The take-off runs for the Doolittle Raid were timed to coincide with the B-25 Mitchells reaching the Hornet’s bow when it was at its high point on a swell, rather than its low point on a trough, thus assisting with the take-off.3 Doolittle Raid NewsreelI hope you enjoyed this simple diorama. As always, comments, questions, corrections, and observations are welcome. Stay tuned next week for Part 4, regarding potential Doolittle Raid liveries for consideration by diecast manufacturers.

The Doolittle Raid, April 1942, Part 2: B-25 Mitchell Bombers in 1/72 Scale

This is a follow-up to the previous post, The Doolittle Raid, Part 1. For details of the actual raid, please refer to that post. To my knowledge, three diecast manufactures have produced the B-25 Mitchell in 1/72 scale — Forces of Valor, Corgi, and newcomer Air Force 1. Of these, only Corgi and Air Force 1 have liveries specifically for the Doolittle Raid, with Corgi releasing two and Air Force 1 releasing one. Forces of Valor did not release a Doolittle Raid model since their casting is of the later B-25J version of the Mitchell, rather than the B-25B used in the Doolittle Raid.

The Corgi AA35302 represents Colonel Doolittle’s plane, the “40-2344,” the first one to take off from the Hornet. The Corgi AA35312 represents the “Ruptured Duck,” the seventh bomber to take off from the Hornet. The Air Force 1 A00111 is also a model of the “40-2344,” Colonel Doolittle’s plane. While I missed the first Corgi release, I do have the second one, which is essentially identical to the first one other than the markings. Thus, this post concerns Corgi’s “Ruptured Duck” and Air Force 1’s “40-2344.”

Corgi Aviation Archive AA35312
North American B-25B Mitchell
40-2261 “Ruptured Duck,” Doolittle Raid, USS Hornet, 1942
Limited Edition (2,000 pieces)

Below are photos of the Corgi AA35312, which represents the “Ruptured Duck,” the 7th plane to take off from the Hornet. The “Ruptured Duck” was piloted by Lt. Ted Lawson, who wrote Thirty Seconds Over Tokyo, arguably the most widely-read account of the Doolittle Raid and upon which the 1944 movie of the same name was based. If you’re reading this blog, it’s a safe bet you read the book as a youngster.

The model is a beauty — casting, panel lines, finish, and markings.1/72, 40-2261, 40-2344, A00111, AA35312, Air Force 1, B-25, Corgi, Doolittle, Hornet, Japan, Japanese, Mitchell, Ruptured Duck, Thatcher, Thirty Seconds, TSOT, USAAFThe opaque olive drab finish is outstanding, as is the gray camouflage on the underside of the fuselage. Note that, according to most sources, the propeller tips on the actual Doolittle B-25 Mitchells were not yellow. 1/72, 40-2261, 40-2344, A00111, AA35312, Air Force 1, B-25, Corgi, Doolittle, Hornet, Japan, Japanese, Mitchell, Ruptured Duck, Thatcher, Thirty Seconds, TSOT, USAAFHere’s a port-side eye-level view of the ship. Note the US Army Air Force marking (the Air Force was under the Army at the time) — red disk within a five-pointed white star on a circular blue field with the shades specified for the U.S. flag — used until May 1942. The insignia was included on the fuselage on both sides aft of the wing and on the upper surface of the port wing and lower surface of the starboard wing. A curiosity of the marking is that the red “meatball” does not touch the inside angles of the star. The star, on the other hand, does go out to the edge of the blue disk, something that was later changed. These seemingly trivial details are important when dating photos.1/72, 40-2261, 40-2344, A00111, AA35312, Air Force 1, B-25, Corgi, Doolittle, Hornet, Japan, Japanese, Mitchell, Ruptured Duck, Thatcher, Thirty Seconds, TSOT, USAAFHere’s a starboard-side eye-level view. Note that Corgi correctly removed the nose gun from this release, as the Doolittle Raiders had done on the actual bombers. Corgi had mistakenly included it in their first release.1/72, 40-2261, 40-2344, A00111, AA35312, Air Force 1, B-25, Corgi, Doolittle, Hornet, Japan, Japanese, Mitchell, Ruptured Duck, Thatcher, Thirty Seconds, TSOT, USAAFHere’s a view from the rear. Note that the Doolittle Raid bombers had a crew of five, rather than six, because the tail gunner section was removed to reduce weight and increase fuel storage space. Thus, the guns were removed from the tail cone and broomsticks were substituted in their place to deter enemy fighters from stern attacks. Corgi correctly left the tail guns — or broomsticks — in place.1/72, 40-2261, 40-2344, A00111, AA35312, Air Force 1, B-25, Corgi, Doolittle, Hornet, Japan, Japanese, Mitchell, Ruptured Duck, Thatcher, Thirty Seconds, TSOT, USAAFThis close-up shows the distinctive “Ruptured Duck” motif well. Amazingly, the words “Danger Propeller” can be read clearly on the vertical red warning line, which is only 1 mm wide. Note also the pilot and copilot figures. Although Corgi had included a bombardier figure on the nose of their previous B-25 releases, including their first Doolittle Raid release, Corgi inexplicably did not include one in this release, despite the fact that Corgi’s packaging clearly shows one. 1/72, 40-2261, 40-2344, A00111, AA35312, Air Force 1, B-25, Corgi, Doolittle, Hornet, Japan, Japanese, Mitchell, Ruptured Duck, Thatcher, Thirty Seconds, TSOT, USAAFHere’s a photo of the model on its stand. Corgi provides the option of landing gear up or down. Like most of Corgi’s Limited Edition models, this piece has a numbered Collector Card.1/72, 40-2261, 40-2344, A00111, AA35312, Air Force 1, B-25, Corgi, Doolittle, Hornet, Japan, Japanese, Mitchell, Ruptured Duck, Thatcher, Thirty Seconds, TSOT, USAAFLike other heavy Corgi models, this one sits on a cradle in an inclined take-off position.1/72, 40-2261, 40-2344, A00111, AA35312, Air Force 1, B-25, Corgi, Doolittle, Hornet, Japan, Japanese, Mitchell, Ruptured Duck, Thatcher, Thirty Seconds, TSOT, USAAFThe Rub

I would be remiss if I failed to point out an exasperating design flaw in the model: it’s hopelessly tail-heavy. The model will simply not stand on its three wheels, but instead tilts back like a stubborn donkey sitting on its haunches.1/72, 40-2261, 40-2344, A00111, AA35312, Air Force 1, B-25, Corgi, Doolittle, Hornet, Japan, Japanese, Mitchell, Ruptured Duck, Thatcher, Thirty Seconds, TSOT, USAAFTo solve the problem, I carefully removed the nose piece and increased the weight at the front by inserting the sawed-off half of an Allen wrench in the crawlway leading to the bombardier compartment. It fit perfectly, though the photo shows it protruding slightly out of the crawlway to better illustrate the placement. I then added two 1/4 ounce lead weights to the nose. The extra weight did the trick.1/72, 40-2261, 40-2344, A00111, AA35312, Air Force 1, B-25, Corgi, Doolittle, Hornet, Japan, Japanese, Mitchell, Ruptured Duck, Thatcher, Thirty Seconds, TSOT, USAAFThe Crew

To personalize this model, here’s a photo of the crew of the actual “Ruptured Duck.” From left to right: Lt. Charles L. McClure, navigator; Lt. Ted W. Lawson, pilot; Lt. Robert S. Clever, bombardier; Lt. Dean Davenport, copilot; and Sgt. David Thatcher, flight engineer/gunner. 1/72, 40-2261, 40-2344, A00111, AA35312, Air Force 1, B-25, Corgi, Doolittle, Hornet, Japan, Japanese, Mitchell, Ruptured Duck, Thatcher, Thirty Seconds, TSOT, USAAFIt should be noted that Lt. Ted Lawson, author of Thirty Seconds Over Tokyo, lost his left leg due to the crash landing. Sgt. David Thatcher, on the far right, is one of only two Doolittle Raiders alive today.

Air Force 1 A00111
North American B-25B Mitchell
40-2344, Jimmy Doolittle and Richard Cole
Limited Edition Signature Series Hand-Signed by Lt. Cole

Below are photos of the Air Force 1 A00111, which represents the “40-2344,” Colonel Doolittle’s ship and the first one to take off from the USS Hornet. The first thing one notices is that the overall olive drab finish is entirely too shiny. A coat of dullcote clear flat lacquer will be necessary for a more realistic look. Similarly, the gloss black color of the propellers makes them look too “plasticky” and will require a coat of flat black. 1/72, 40-2261, 40-2344, A00111, AA35312, Air Force 1, B-25, Corgi, Doolittle, Hornet, Japan, Japanese, Mitchell, Ruptured Duck, Thatcher, Thirty Seconds, TSOT, USAAFThe casting is really not a bad effort. The panel lines and details are crisp and rivet holes are included on every panel. The casting is diminished, however, by the porthole windows, which are mere indentations in the metal that have been painted silver to simulate glass. The effect is reminiscent of windows found on hand-made wooden models. While the technique works on wooden models, since all windows on a model are represented in the same fashion, the contrast between the simulated glass of the porthole windows and the clear plastic of the nose and cockpit glass on this model is too distracting.
1/72, 40-2261, 40-2344, A00111, AA35312, Air Force 1, B-25, Corgi, Doolittle, Hornet, Japan, Japanese, Mitchell, Ruptured Duck, Thatcher, Thirty Seconds, TSOT, USAAFAir Force 1 correctly did not paint the propeller tips yellow, a mistake made by Corgi. Unlike the Corgi model, the Air Force 1 does not have pilot or copilot figures. 1/72, 40-2261, 40-2344, A00111, AA35312, Air Force 1, B-25, Corgi, Doolittle, Hornet, Japan, Japanese, Mitchell, Ruptured Duck, Thatcher, Thirty Seconds, TSOT, USAAFLike the actual B-25 Mitchell it’s based on, the model has no individual markings or artwork other than the “02344” tail number. Note that Air Force 1 did not include the words “DANGER PROPELLER” on the vertical red warning lines that mark the propeller line, a detail that stands out on the Corgi.
1/72, 40-2261, 40-2344, A00111, AA35312, Air Force 1, B-25, Corgi, Doolittle, Hornet, Japan, Japanese, Mitchell, Ruptured Duck, Thatcher, Thirty Seconds, TSOT, USAAFThe dorsal gun turret appears to have a “sloped” front, rather than a rounded one. See a comparison of the turrets in the next section below. The turret rotates but, unlike the Corgi model, the guns are fixed in place and do not elevate. 1/72, 40-2261, 40-2344, A00111, AA35312, Air Force 1, B-25, Corgi, Doolittle, Hornet, Japan, Japanese, Mitchell, Ruptured Duck, Thatcher, Thirty Seconds, TSOT, USAAFThe model sits on a sturdy all-metal display stand. Unlike the Corgi model, which has separate wheels to provide wheels up or down options, the Air Force 1 model has fixed landing gear so there is no wheels up option. Note the limited edition metal plaque with Lt. Richard Cole’s signature. One wonders how “limited” the edition really is, as Air Force 1 did not provide an edition number.1/72, 40-2261, 40-2344, A00111, AA35312, Air Force 1, B-25, Corgi, Doolittle, Hornet, Japan, Japanese, Mitchell, Ruptured Duck, Thatcher, Thirty Seconds, TSOT, USAAFThe model sits horizontally on its stand, unlike the Corgi model, which is sits at an inclined angle.1/72, 40-2261, 40-2344, A00111, AA35312, Air Force 1, B-25, Corgi, Doolittle, Hornet, Japan, Japanese, Mitchell, Ruptured Duck, Thatcher, Thirty Seconds, TSOT, USAAFThe Rub

Many collectors were disappointed in Air Force 1’s turret, noting that it appeared too tall or oversized. I think it’s neither. Instead, Air Force 1 used the wrong turret — one with a sloped front that I believe was used on later versions of the B-25 Mitchell, such as the B-25J. I would appreciate confirmation from any reader.1/72, 40-2261, 40-2344, A00111, AA35312, Air Force 1, B-25, Corgi, Doolittle, Hornet, Japan, Japanese, Mitchell, Ruptured Duck, Thatcher, Thirty Seconds, TSOT, USAAF

The Crew

Once again, to personalize the model, here’s a photo of Doolittle’s crew. From left to right, Lt. Henry A. Potter, navigator; Lt. Col. James H. Doolittle, pilot; SSgt. Fred A. Braemer, bombardier; Lt. Richard E. Cole, copilot; and SSgt. Paul J. Leonard, flight engineer/gunner. 1/72, 40-2261, 40-2344, A00111, AA35312, Air Force 1, B-25, Corgi, Doolittle, Hornet, Japan, Japanese, Mitchell, Ruptured Duck, Thatcher, Thirty Seconds, TSOT, USAAFIn addition to Sgt. David Thatcher, pictured under the Corgi section above, Lt. Richard Cole, second from right, is the only other Doolittle Raider alive today.

Side-by-Side Comparison

Finally, here are some side-by-side shots. Note the superb riveting on the Air Force 1 (left) on every single panel. On the other hand, note the simulated porthole windows on that same model, which, at least to me, blemish the entire effort.

1/72, 40-2261, 40-2344, A00111, AA35312, Air Force 1, B-25, Corgi, Doolittle, Hornet, Japan, Japanese, Mitchell, Ruptured Duck, Thatcher, Thirty Seconds, TSOT, USAAFNote the stark difference in the finish, with the Air Force 1 (left) having a distracting shine. Despite the apparent difference in size in the photos, the two models are identical in their dimensions. The difference in the photos is a result of using a close-up lens, which exaggerates perspective. 1/72, 40-2261, 40-2344, A00111, AA35312, Air Force 1, B-25, Corgi, Doolittle, Hornet, Japan, Japanese, Mitchell, Ruptured Duck, Thatcher, Thirty Seconds, TSOT, USAAFHere’s a photo of the starboard side. Note the difference in the placement of deicing boots (the black surfaces on the leading edge of the wings). As far as I can tell, Air Force 1’s depiction is correct. 1/72, 40-2261, 40-2344, A00111, AA35312, Air Force 1, B-25, Corgi, Doolittle, Hornet, Japan, Japanese, Mitchell, Ruptured Duck, Thatcher, Thirty Seconds, TSOT, USAAFThe Upshot

This being a comparison review, the reader will naturally wonder which of the two models is recommended. Let’s compare the various features:

  • Casting: Both castings are excellent, with crisp detail throughout, though I was impressed with the rivets on every panel of the Air Force 1, even if they may be slightly overscaled. However, the simulated porthole windows detract from the casting.
  • Finish: No contest, the Corgi’s opaque olive drab finish is superb, resulting in a realistic model. The shiny finish on the Air Force 1, on the other hand, will need dulling. Both have gray camouflage on the underside of the fuselage but the Corgi’s is more undulating, and more realistic. The propellers on the Air Force 1 are also noticeably shiny and look plasticky.
  • Markings: I’m a sucker for art on a model and the well-documented “Ruptured Duck” design on the Corgi is fabulous. It’s an unfair comparison, I concede, since Doolittle’s ship carried no art. However, beyond the insignia, Corgi’s attention to detail is evident in including a warning on the vertical red propeller warning line, which, truly, is only 1 mm wide.
  • Detail Accuracy: The sloped turret on the Air Force 1 appears to be that used on later B-25 Mitchells and is wrong. The Corgi’s appears to be accurate. The deicing boots and the absence of yellow tips on the propellers on the Air Force 1 are correct, though these are details that can be easily corrected on the Corgi.
  • Engineering Design: The tail-heavy design of the Corgi is exasperating and makes you wonder how Corgi could bungle a feature that they had previously done properly. The Air Force 1 stands on its three wheels, as it should.
  • Extras: The Corgi model includes pilot and copilot figures, which is always a welcome feature. Inexplicably, however, it does not have a bombardier, unlike previous Corgi B-25 releases, including their first Doolittle release. On the plus side for Air Force 1, I love having Lt. Cole’s signature. It’s as close as I’ll get to such an historic event.

While both models are excellent replicas of the B-25 Mitchell, the Corgi version is clearly superior but, given that it cost twice as much as the Air Force 1, it ought to be. It is not, however, twice as good as the Air Force 1. Thus, in my view, the Air Force 1 is a great value, particularly as the two Corgi models disappeared into collectors’ homes and are now difficult to find. Still, both models are worthy of any collection, if for no other reason than they represent an important event in World War II.

Again, thank you for your indulgence and I hope you enjoyed the post. As always, comments, questions, observations, and corrections are welcome. Stay tuned next week for Part 3, a simple diorama of a B-25 Mitchell taking off from the deck of the Hornet.

—————————————————————————————————————————-

I want to thank and remember my dear friend and fellow WWII buff David C. Brooks, who passed away in 2014. As a token of our friendship, David kindly gave me his childhood copy of Thirty Seconds Over Tokyo in 2002while we were serving in Nicaragua. Here’s a lagniappe photo for my dear friend.1/72, 40-2261, 40-2344, A00111, AA35312, Air Force 1, B-25, Corgi, Doolittle, Hornet, Japan, Japanese, Mitchell, Ruptured Duck, Thatcher, Thirty Seconds, TSOT, USAAF