The Filthy Thirteen of the 101st Airborne Division, Part 4: The Finished Figures

This is the fourth of a five-part series on the Filthy Thirteen. For a synopsis of these colorful characters, creating the figures in 1/72 scale, and selecting their weapons, please refer to the three previous posts, The Filthy Thirteen, Part 1, Part 2 and Part 3, respectively.

Although I generally paint my own figures, my skills are mediocre at best, and I was too excited about this particular set to ruin it with my efforts. I freely concede: I’m a dilettante — I dabble in everything and master nothing. Thus, I turned to a genuine hobbyist with real expertise for help. The awesome results of his skill, dedication, and patience follow.  

Before we start, let’s put things in perspective. I fully understand that most people reading this post are z 007 - Copy (2)
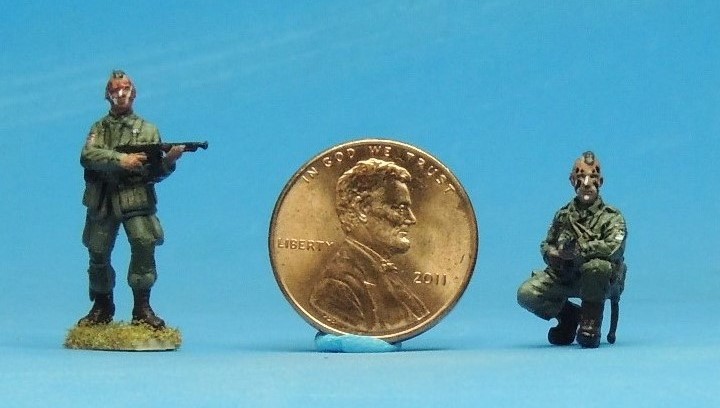
familiar with 1/72 scale and know the height of a typical figure. However, for those casual internet browsers who happen upon this site, the average 1/72 scale figure is approximately 1 inch or 25 mm tall. Borrowing a practice from the terrific WW2 Germans in 1/72 website, the photo at left provides perspective to help us understand the significant painting challenges posed by this scale. I know hobbyists who use a one-bristle paint brush for detail work. In addition, anyone who has painted 1/72 scale figures will understand the severe eye strain and occasional headache that results from concentrating on a figure — there’s a reason 1/72 is known as braille scale. And yet, those of us who engage in this activity know the nirvana with which we’re rewarded. 🙂 Yes, I love doing it; I just stink at it.

The Painted Figures

The following pictures follow the order established in the Figure Chart of the two previous posts. Unless otherwise specified, comments always refer to the photo below the comments.

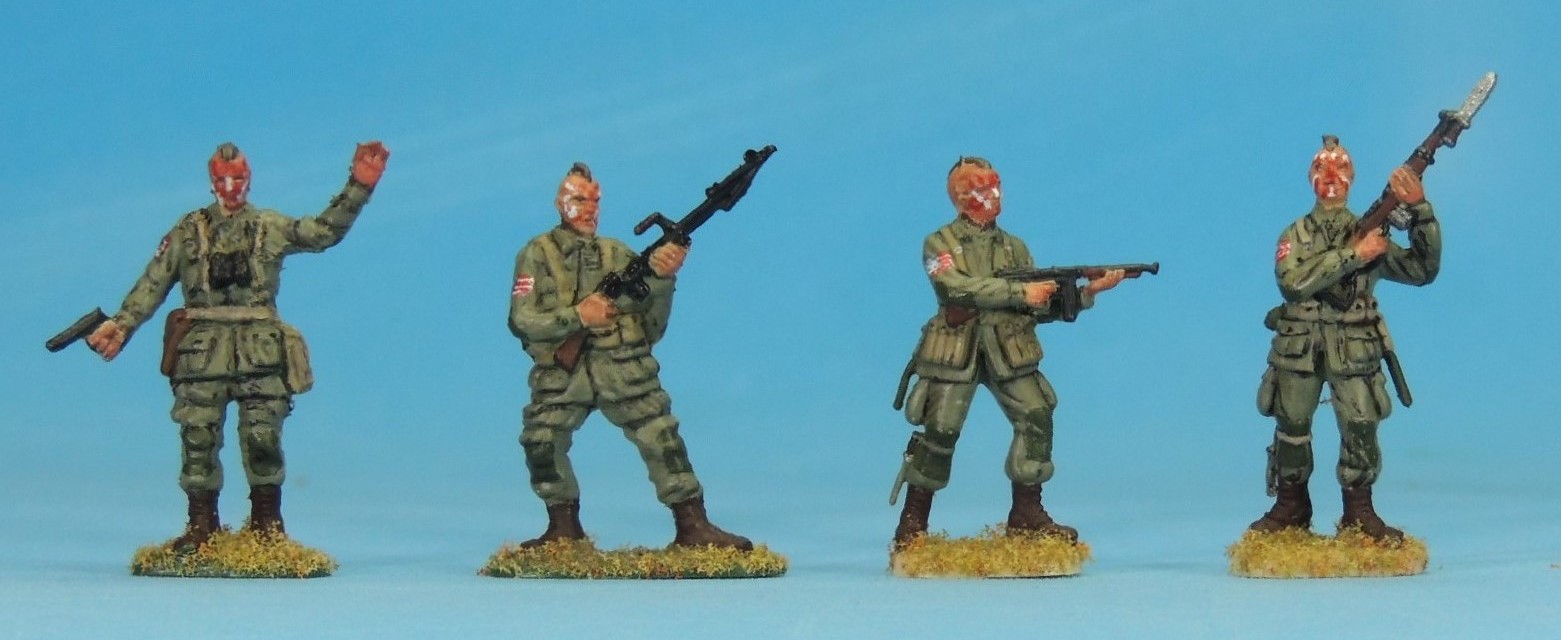
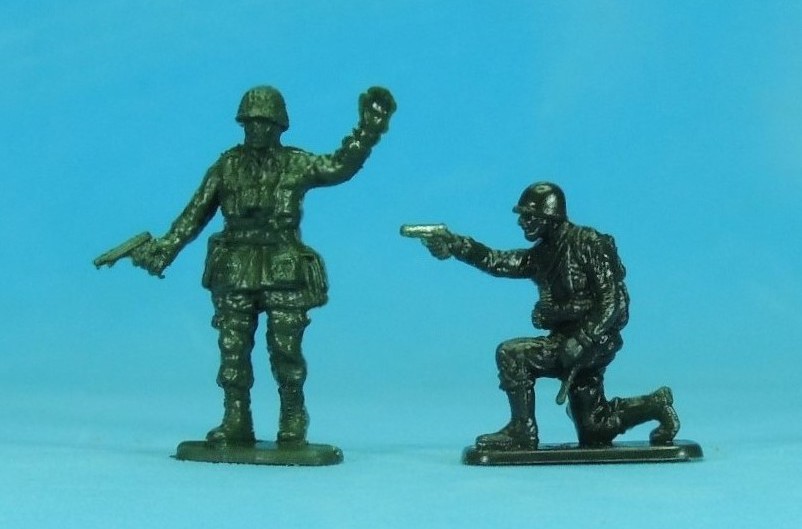
BELOW: Here are the first four figures. Note the warpaint on their mugs, bearing in mind that the width of their faces is about 2 mm. Note the patches used to reinforce the elbows and knees on the jackets and trousers, a distinct characteristic of paratrooper uniforms. The Revell BAR gunner (second from left) is wearing the BAR belt with six pockets, each for two 20-round magazines, giving him a total of 240 rounds. Note the magazine pouches on the belt of the ESCI figure with the M1A1 Thompson submachine gun (third from left).

023
From left to right: Revell, Revell, ESCI, and ESCI.

BELOW: Note the hand-painted U.S. flag patches on the right shoulder. Astute observers will immediately notice that the flag is seemingly facing in the wrong direction as the applicable U.S. Army regulation requires that the “star field face forward,” like a flag flying in the breeze as it is carried forward. In other words, the regulation requires the flag to be backwards when on the right shoulder.

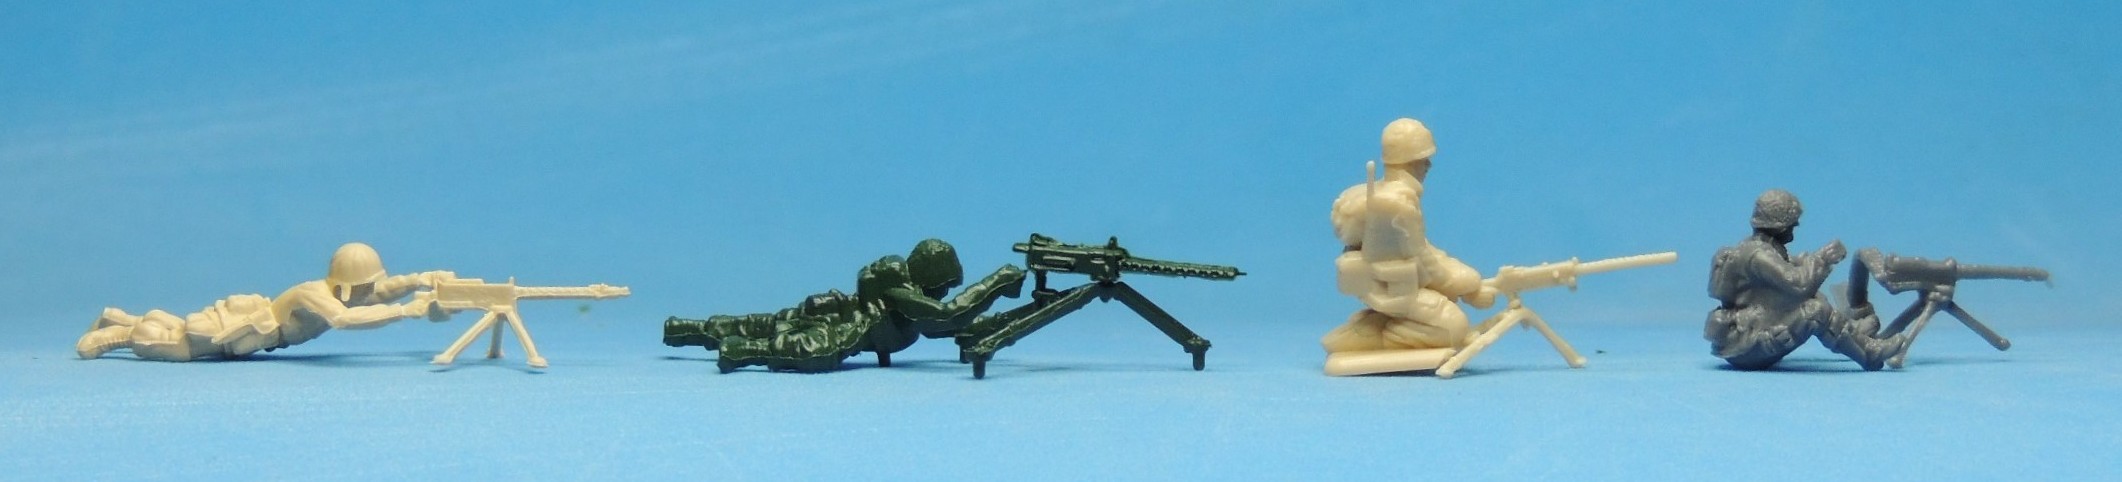
However, U.S. paratroopers were allowed to use the regular U.S. flag patch, probably because they were dropped behind enemy lines and needed to be easily identified by advancing U.S. forces. (I found at least a dozen photos of WWII U.S. paratroopers wearing the regular U.S. flag patch on their right shoulders before I was convinced.) 025
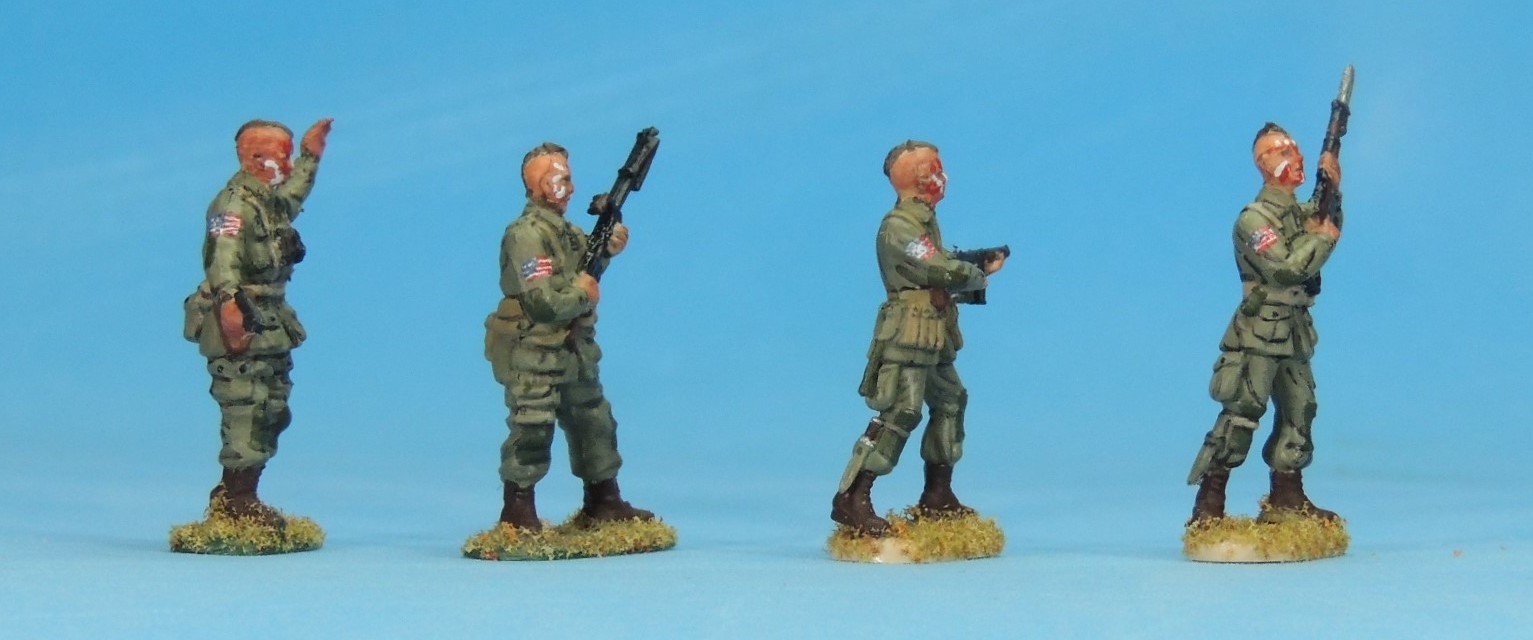
BELOW: Note the famed Screaming Eagle shoulder patches of the 101st Airborne Division on the left shoulder. Only the painter knows how much eye strain these patches are worth. Another U.S. Airborne characteristic is the M3 trench knife and scabbard attached to the lower leg, as can be seen in the picture above on the right leg of the two ESCI figures on the right. A peculiarity of the ESCI set is that 13 of the 14 figures in the set sport the knife in the same fashion — the prone machine gunner being the only exception. The other sets only have two or three figures carrying the trench knife.027
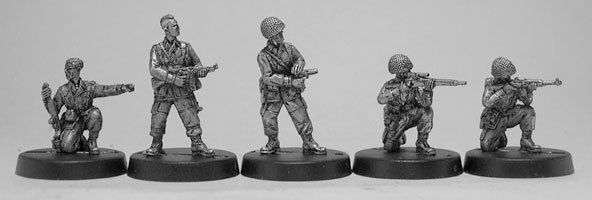
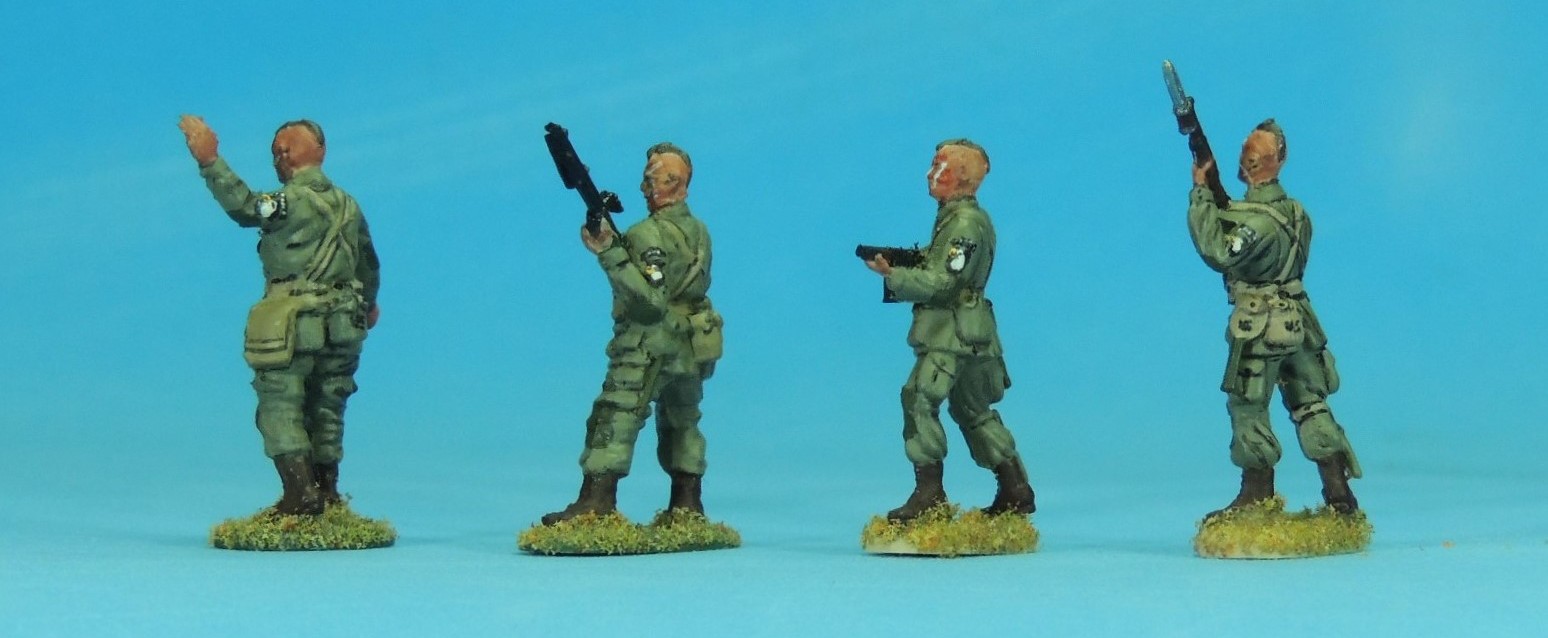
BELOW: The ESCI figure on the far right has the 10-inch M1 Bayonet attached to the folding stock M1A1 Carbine. The M1 Bayonet became standard in 1943, replacing the earlier 16-inch bayonet. Note the “U.S.” designation on the covers of the entrenching tool and canteen on the same ESCI figure. 026
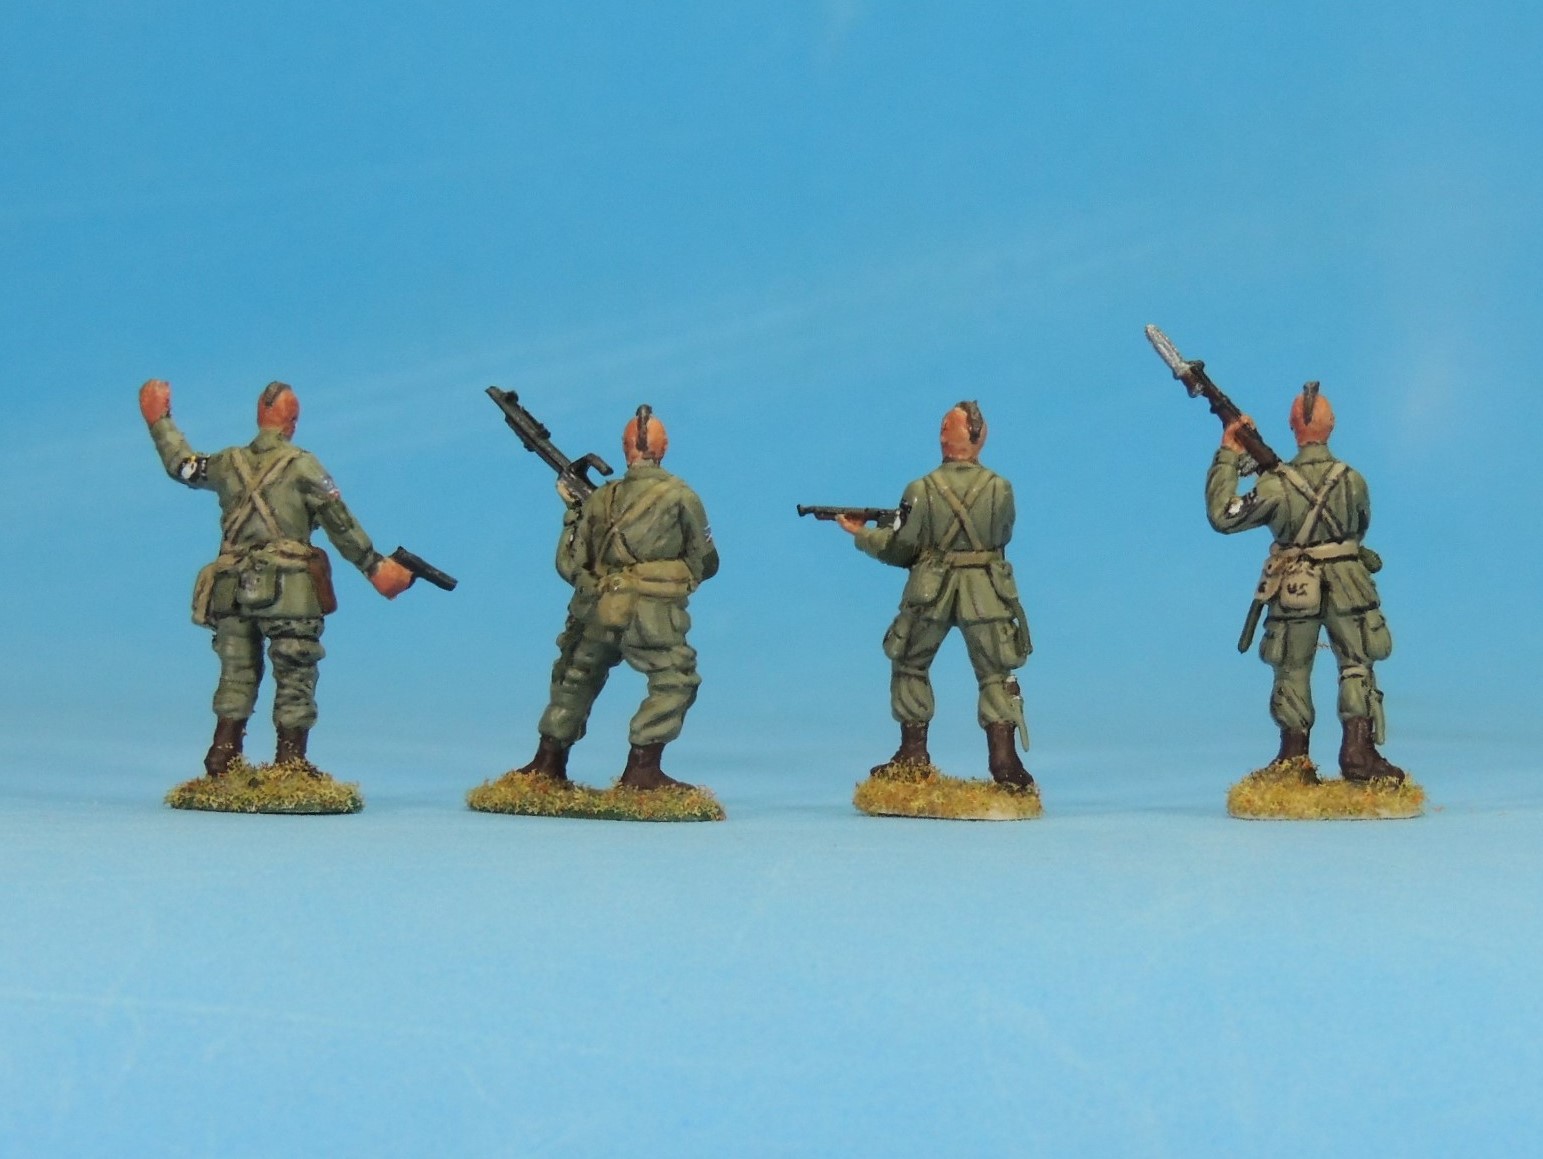
BELOW: Here are the second four figures. Note that the head on the Caesar figure on the far left is disproportionately large — a melonhead if I ever saw one. Although the Revell figure (second from left) appeared to lack facial detail, paint really brought it out. Note the 10-inch bayonet attached to the M1 Garand rifle on the Caesar figure on the far right. 

7 028
From left to right: Caesar, Revell, ESCI, and Caesar.

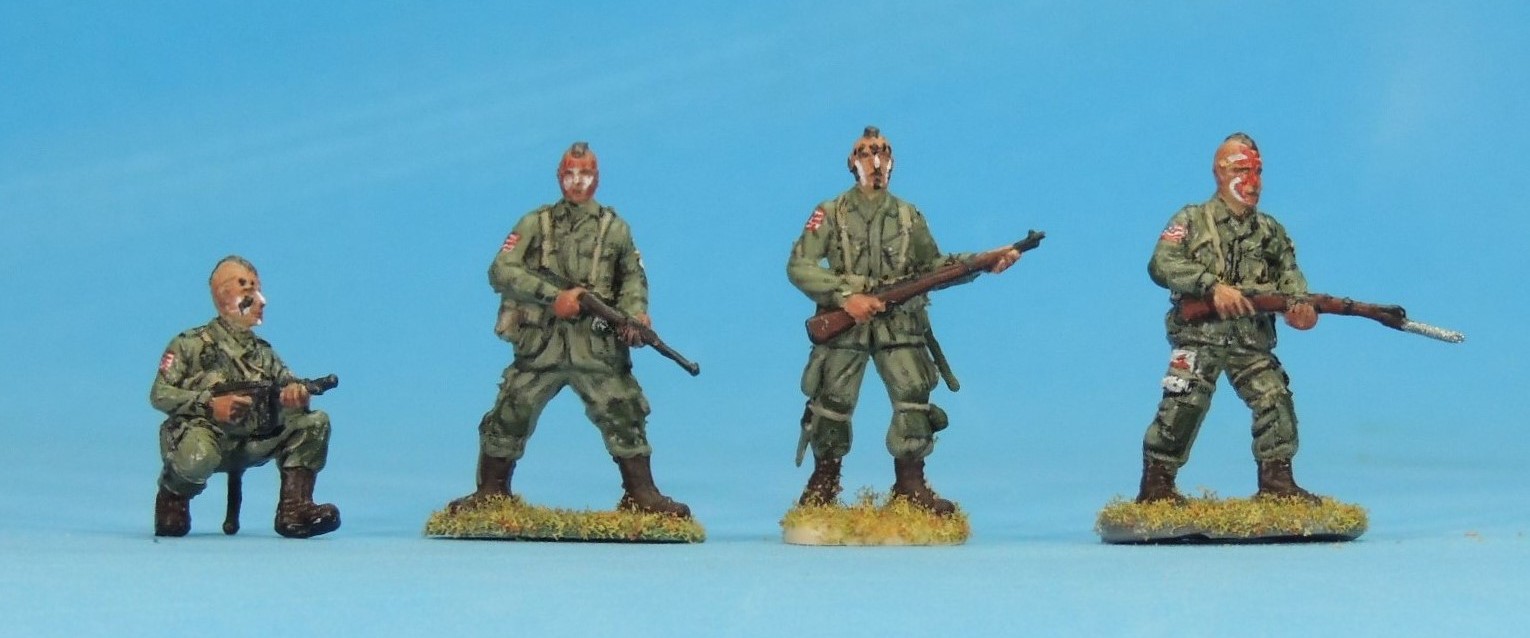
BELOW: Note that the first three figures — the three original Pathfinders with Mohawk haircuts — have the M3 trench knife attached to the lower right leg, making them honest paratroopers. Created by three different sculptors, note the difference in the heads. This variety in heads is realistic and the welcome result of mixing figures from different companies. Note the first aid pouch on the right leg of the walking Caesar figure (far right), who also sports one of the Caesar melonheads. These first aid kits typically contained field dressing and morphine.

030
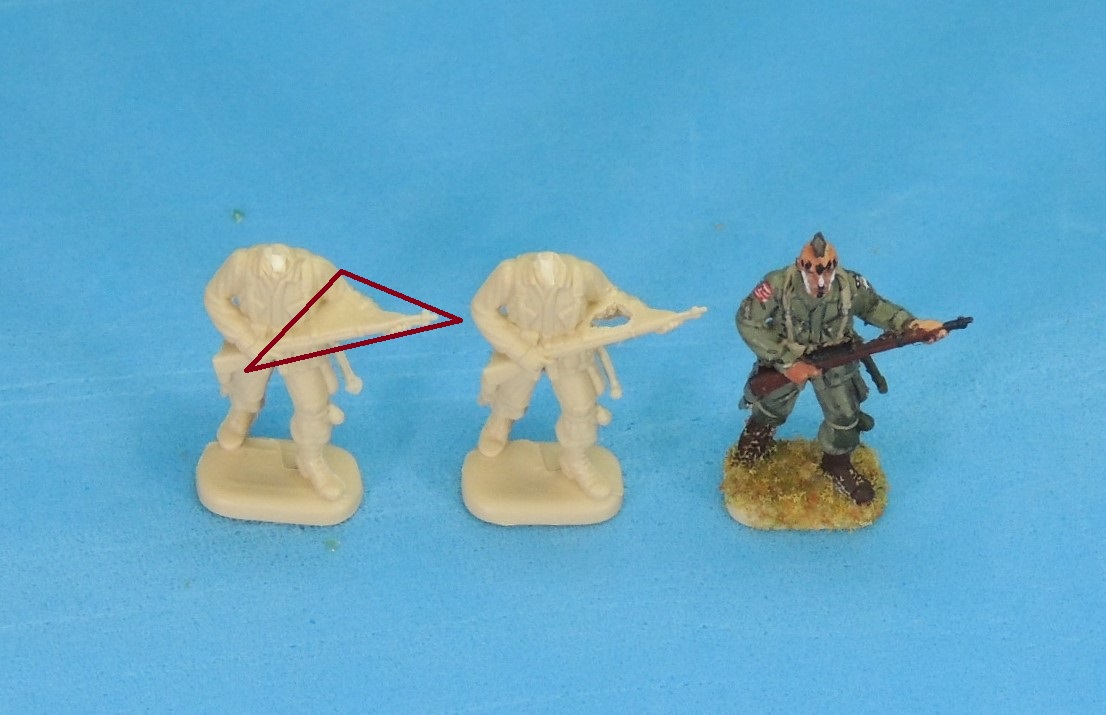
BELOW: ESCI’s attention to detail is evident in the inclusion of a helmet attached to the back of its Pathfinder figure (third from left). Neither the Caesar nor the Revell bareheaded Pathfinders with Mohawk haircuts (first and second from left) thought to include a helmet.032
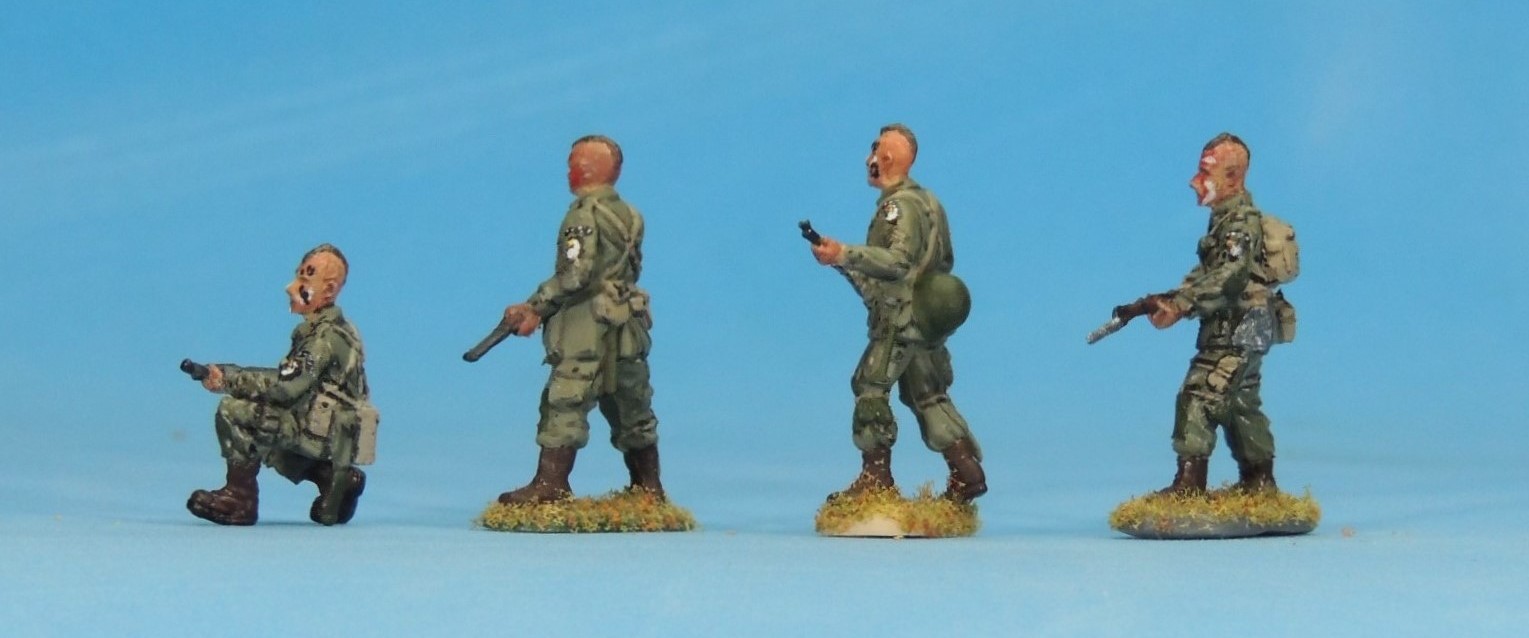
BELOW: Note the M1936 Musette Field bag on the back of the Caesar figure on the far right. Though usually associated with paratroopers, this lightweight canvas backpack was also available to officers in the regular infantry.031
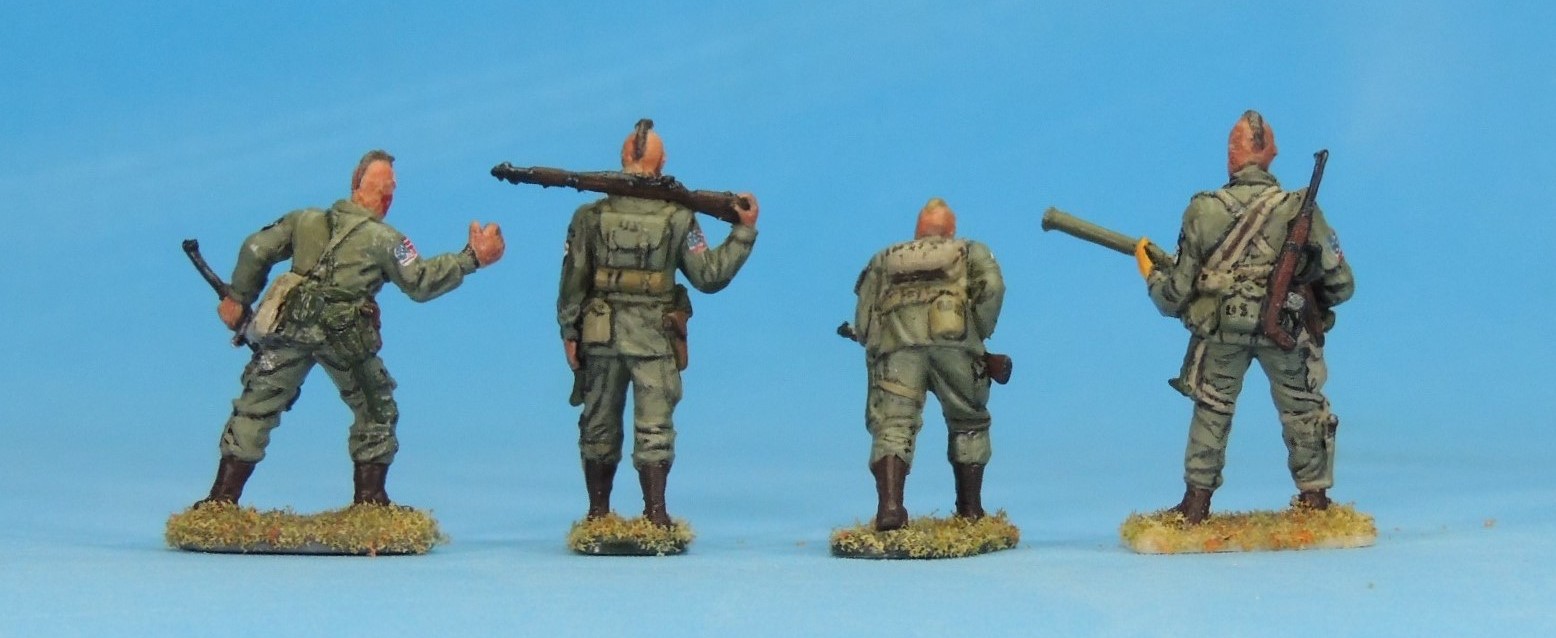
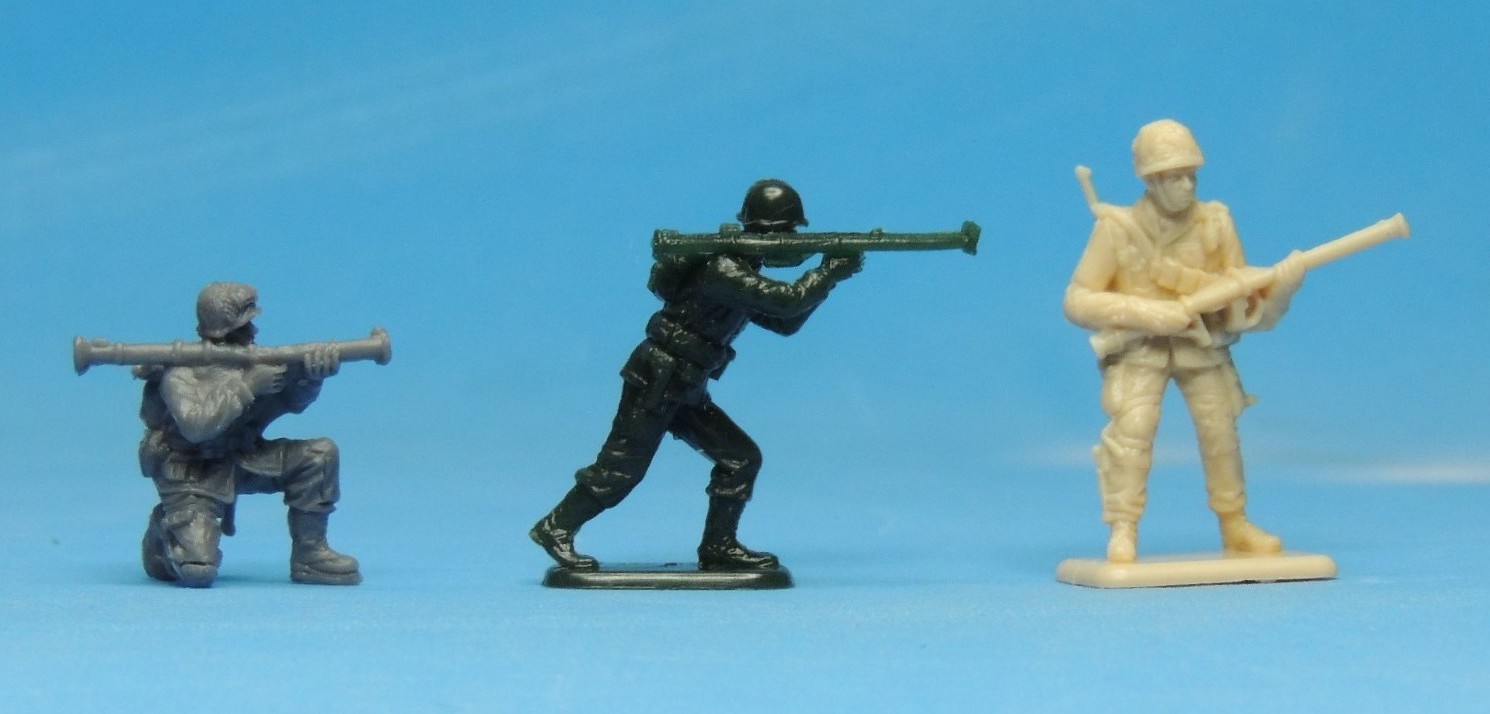
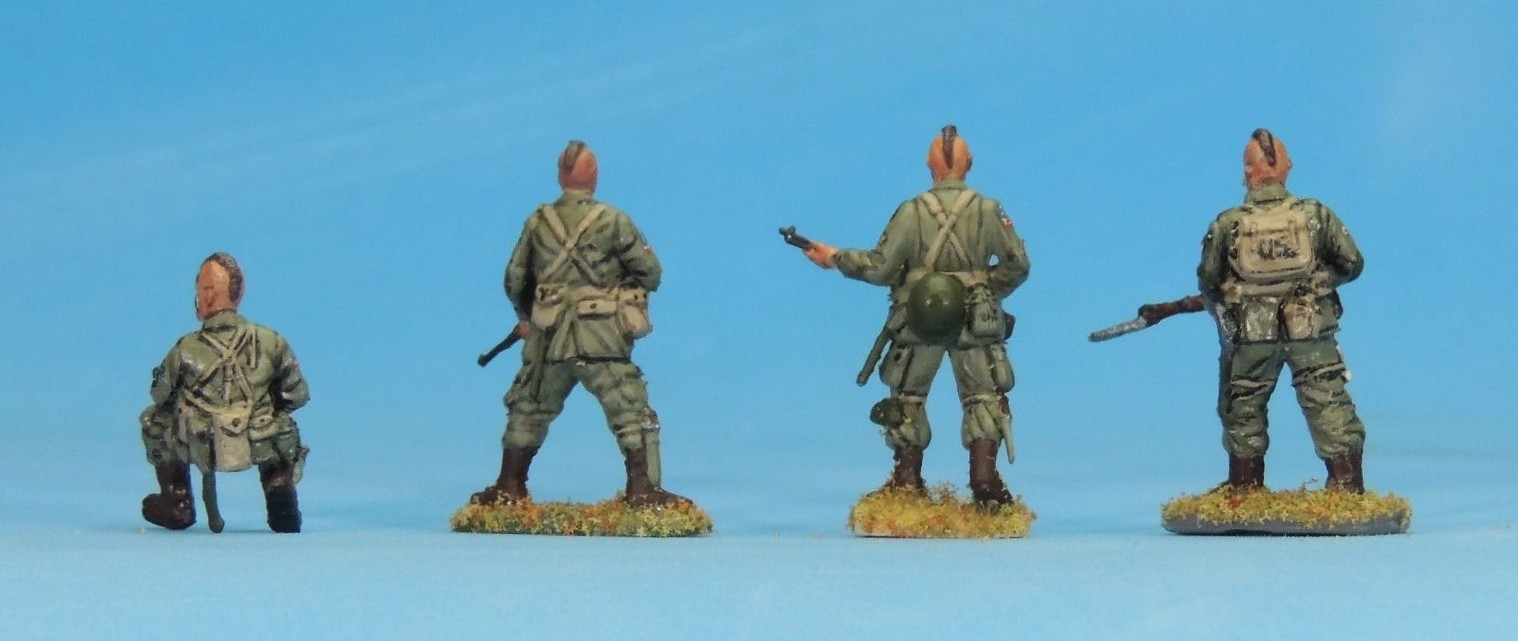
BELOW: Here are the last four figures. Note the Imex figure (second from left) is tall but slim, lending greater variety to the figures. Note the yellow gloves on the Italeri figure holding the M9 Bazooka (far right), recommended to protect the hands in case of back-flash when the rocket left the muzzle.

033
From left to right: Caesar, Imex, Imex, and Italeri.

BELOW: Note that the Italeri bazooka gunner (far right) has the M3 trench knife on his lower right leg.

034

BELOW: I could not identify the bag on the left hip of the Caesar figure (far left). While it’s probably an M1936 Musette field bag, it’s missing the two straps and buckle to close the flap, as seen on the two Imex figures next to it.

036

BELOW: Of particular interest is the folded M1A1 Carbine on the back of the bazooka gunner (far right). This may be the only folding stock M1A1 Carbine that is actually folded in the various sets. On the same figure, note as well the superb rendition of the “U.S.” designation on his canteen. Note that both Imex figures in the middle have the M1936 Musette field bag. As with the ESCI sculptor who included the distinctive trench knife on virtually all his paratroopers, the Imex sculptor’s idiosyncrasy was to include the characteristic musette field bag on all but two of his 14 paratroopers.

035
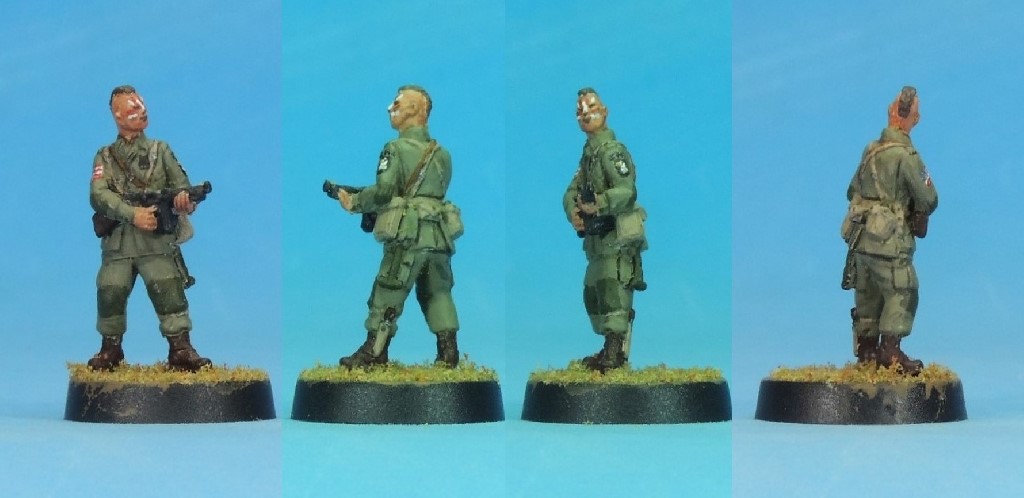
BELOW: Here are some photos of the TQD figure, completing the Filthy Thirteen. It bears mentioning again that TQD white metal figures are generally excellent, with realistic proportions, fine detail, and historical accuracy. 
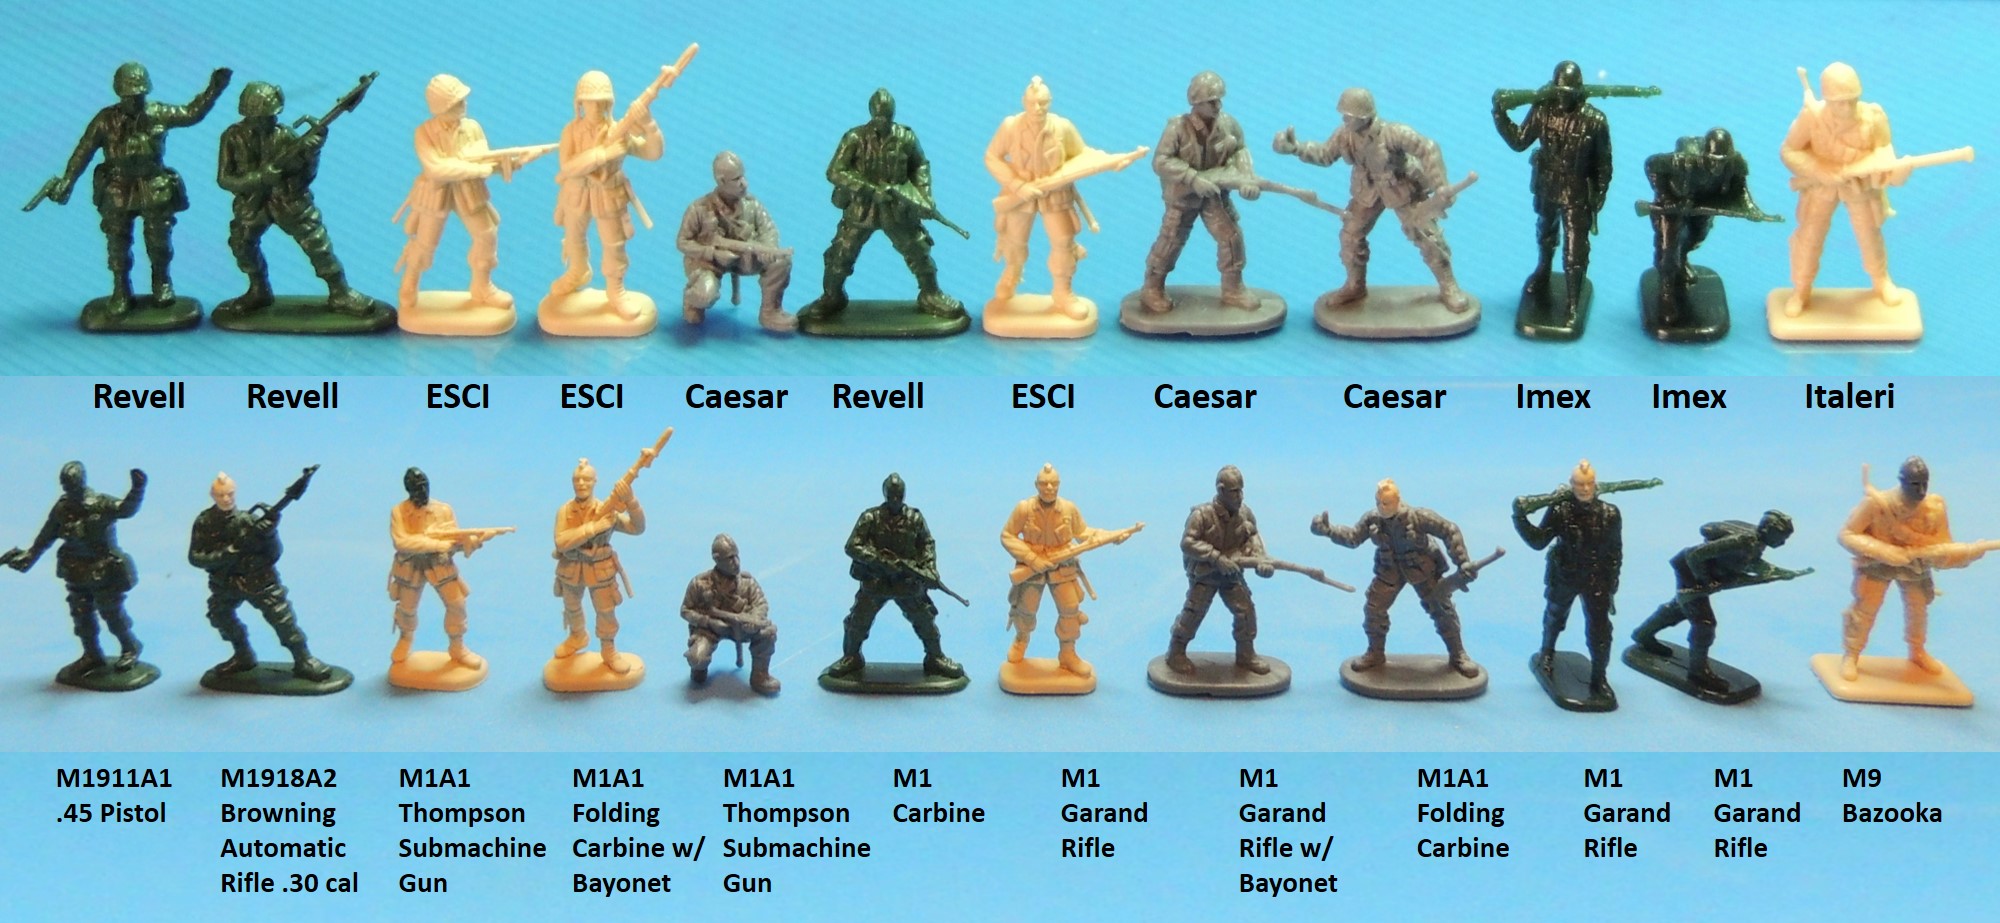
Pathfinder (2)
TQD AA5 Pathfinder white metal figure

Comparison Chart

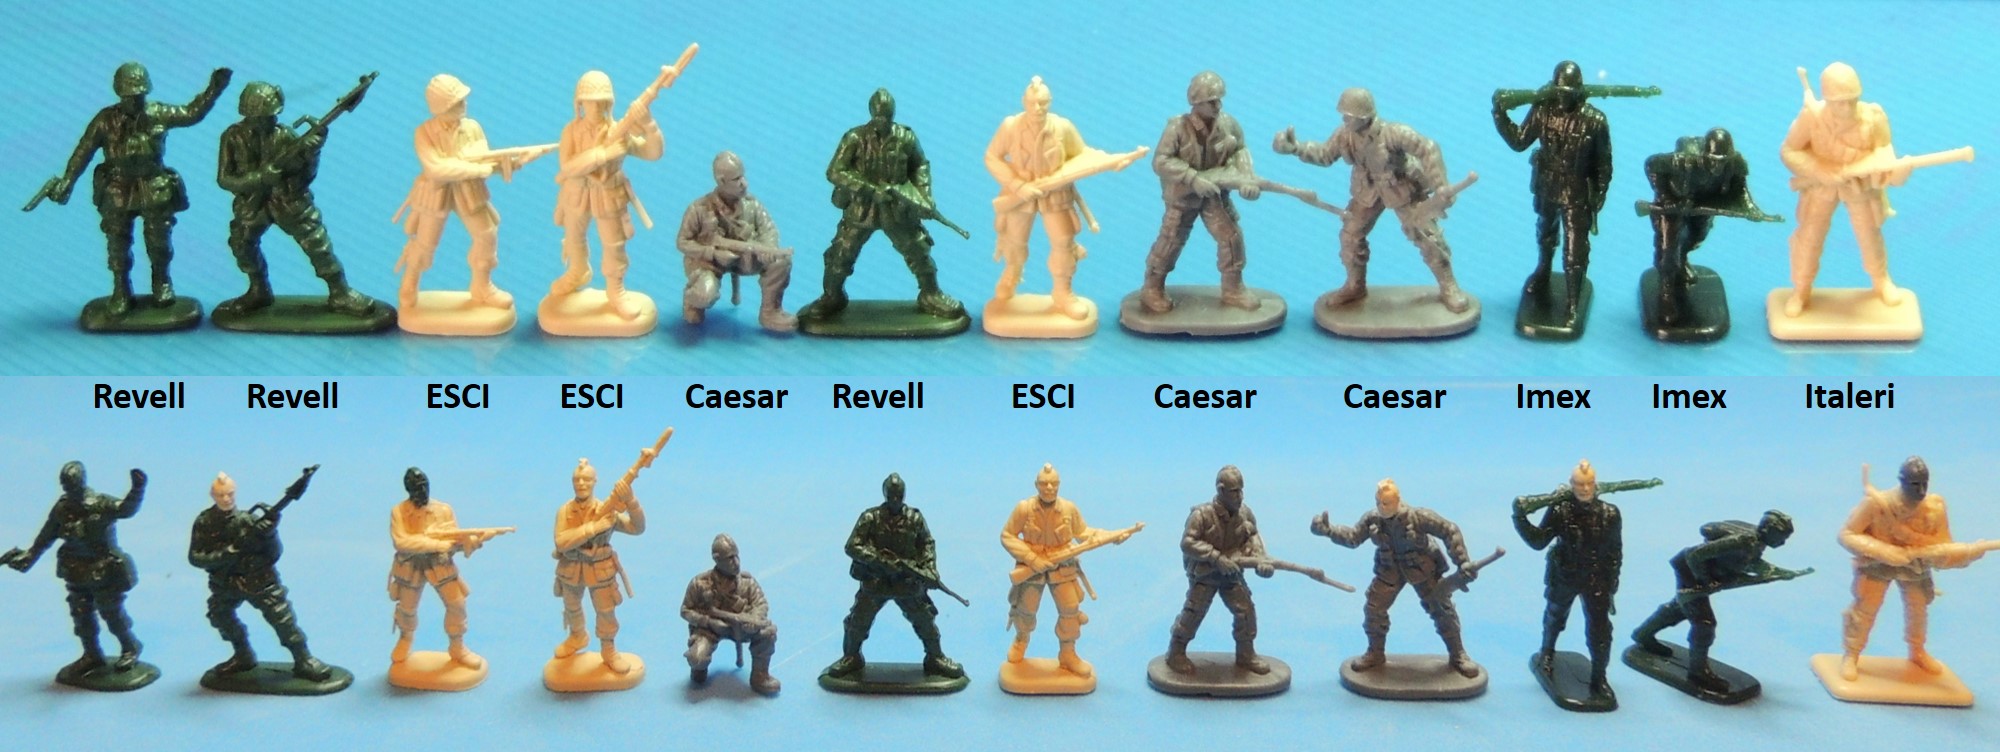
Finally, below is a lagniappe comparison chart that summarizes the project. It shows the original figures with helmets, the set they came from, the figures with the transplanted heads, and the finished figures, as well as the weapon each carries.
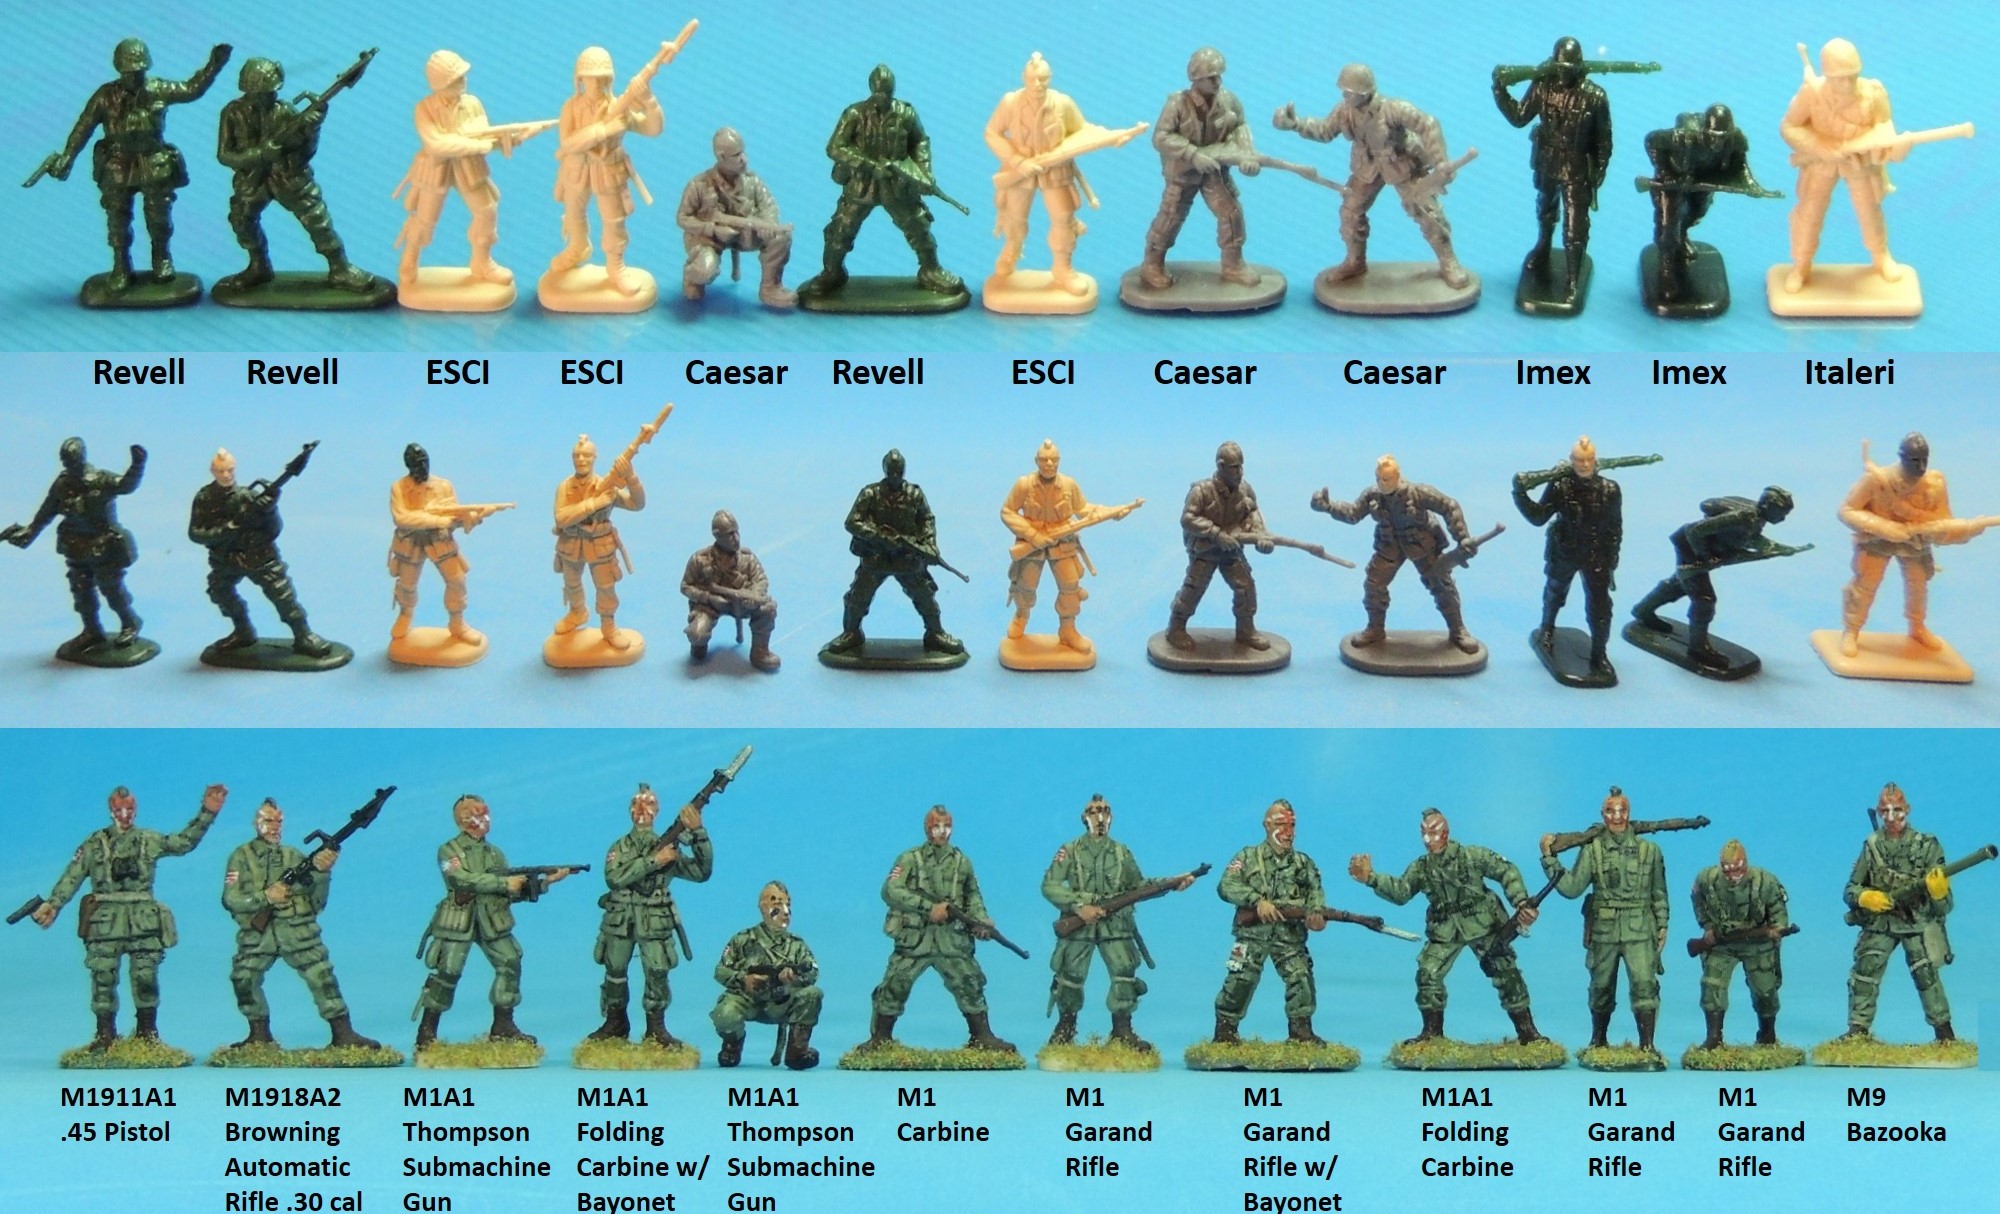
Filthy Thirteen Final 2

The Upshot

I was pleasantly surprised by the results of this project, an honest and well-intentioned 1/72 scale tribute to the Filthy Thirteen, “the orneriest, meanest group of paratroopers” who ever lived. And it was loads of fun to boot. However, I do have two regrets, as discussed previously: 1) I wish I’d used an Airfix figure to represent all available U.S. paratrooper sets; and 2) I wish I’d used a figure with an M3 “grease gun” to better represent most of the small arms used by U.S. paratroopers.

I hope you enjoyed this Filthy Thirteen series of posts. If something looks amiss, please remember that I’m just an amateur enthusiast (redundancy intended) and let me know. I would be delighted — truly — to correct inaccurate information so that this may be useful for other 1/72 scale collectors and wargamers. Stay tuned next week or so for Part 5: Preboarding Diorama, a simple diorama featuring these characters. As always, comments, questions, corrections, and observations are welcome. 

—————————————————————————————————————————-

I want to thank my friend and fellow collector Joe Buccellato, of NY, whose love of craft, workmanship, and patience far exceed mine — “therapy,” he calls it. He enthusiastically painted these figures and to the extent they succeed the credit is all his. I’m fortunate he’s a Civil War collector for I doubt he’d part with my WWII figures after he paints them. More of his outstanding work will be featured in future posts.

The Filthy Thirteen of the 101st Airborne Division, Part 3: Selecting the Weapons

This is the third of a five-part series on the Filthy Thirteen. For a synopsis of these colorful characters and creating the figures in 1/72 scale, please refer to the two previous posts, The Filthy Thirteen, Part 1 and Part 2.

U.S. Army Airborne Weapons

The nature of U.S. Airborne troops in WWII was such that their weapons had to be specialized, usually to make them lighter or more portable. Because paratroopers were often dropped behind enemy lines where resupply was uncertain, they had to schlep loads of 100 lbs. or more on their backs, making lighter, more portable weapons a must.

As I mentioned in Part 2, one of my goals was for the 1/72 scale unit to reflect as many of the weapons used by U.S. paratroopers as possible. I compiled the weapons plate below from a number of illustrations contained in various Osprey books, including US Army Airborne 1940-1990, US Paratrooper 1941-1945, US Army Airborne and Paratroops; and US Army Paratrooper in the Pacific Theatre 1943-45. The Pathfinder illustration is by renowned military artist Ron Volstad. The plate summarizes the small arms — hand-held small caliber firearms, such as handguns, rifles, manual, semi-automatic, and fully automatic weapons — used by U.S. paratroopers. US Airborne Paratrooper Weapons 13

Figure and Weapons Chart

Below is a chart showing the weapons used by each of the selected figures. A discussion of each weapon follows. Where the options were limited for a particular weapon, I’ve included photos of the various alternatives.Weapons Chart

Weapons in 1/72 Scale

1. M1911A1 Colt .45 Pistol: The venerable seven-round, semi-automatic .45 caliber “Colt 45,” introduced prior to WWI, was issued to officers, non-commissioned officers, and machine gunners and was so effective that it wasn’t replaced until 1986, 75 years and several wars after its debut.

042
Left, Revell; right, Imex.

Every unit has an officer — always with binoculars and a pistol — and the various paratrooper sets offer different alternatives. However, only the Revell and Imex officers have a pistol in hand and the latter is clearly firing his in combat, leaving the Revell figure as the only choice. See photo inset at left. While it is impossible to determine at this scale what pistols the officers are really wielding, we must assume they’re the M1911A1 Colt .45 pistol, common with U.S. Airborne officers. 


2. M3 Submachine Gun “Grease Gun”: The .45 caliber M3 Submachine gun was designed to be a simplified, cheaper ($20) replacement for the Thompson submachine gun. Commonly known as

047
From left to right: Caesar, Imex, Italeri, and Revell.

the “grease gun” because of its visual similarity to an actual mechanic’s grease gun, it was unjustly perceived to be less reliable than a Thompson, though its lighter weight (8 lbs.) made it popular among paratroopers who had to schlep loads of 100 lbs. or more on their backs.

For the most part, I succeeded in representing all the standard weapons used by U.S. Airborne troops shown in the Weapons Plate above. However, I failed to use a figure with the M3 “grease gun,” though there were four available. See photo inset above. Note how well-defined the weapon is on the Imex figure (second from left; click on the photo to enlarge). The proportions, detail, and sculpting on the Imex figures are dead-on.

3. M1 Garand Rifle: The semi-automatic, 8-round .30 caliber M1 Garand rifle replaced the 1903 Springfield rifle as the standard issue for U.S. troops in 1938, giving U.S. soldiers a distinct advantage over the slower German K-98 bolt-action rifle, which had become standard Wehrmacht issue in 1935. General Patton considered it “the greatest battle implement ever devised” and many soldiers preferred the M1 Garand’s greater range and stopping power over the M1 Carbine that was supposed to replace it. By the end of the war, over five million M1 Garands had been produced.

The various U.S. paratrooper sets included many figures with the M1 Garand rifle, reflecting the fact that it was the most common weapon used by U.S. Airborne troops. Thus, there were a number of choices and four of the selected 13 figures are carrying one, including one with the 10-inch M1 Bayonet attached. (See the Figure and Weapons Chart above.) 

4. M1 Carbine w/ Wooden Stock: The semi-automatic, 30-round, .30 caliber M1 Carbine, which replaced the M1 Garand as the standard issue rifle in 1942, was intended to be smaller and lighter than the M1 Garand. At 35.5 in. and 5.5 lbs, it was, in fact, eight inches shorter and weighed four pounds less than the M1 Garand, making it well suited for paratroopers. With more than six million wood-stocked M1 Carbines produced, it was much more widely used by U.S. forces than its cousin, the folding stock M1A1 Carbine, of which only 150,000 were made. However, designed specifically for U.S. paratroopers, the M1A1 Carbine was more common among this group.

As with the M1 Garand rifle, the various U.S. Airborne sets offered a fair selection of figures equipped with the M1 Carbine. As noted, however, the folding stock M1A1 Carbine was more widely used by U.S. paratroopers so I selected only one figure carrying the M1 Carbine, the Revell figure (sixth from left), as can be seen on the Figure and Weapons Chart above.

5. M1A1 Carbine w/ Folding Stock: Identical to the M1 Carbine except for the folding metal stock, the M1A1 Carbine was 25 inches long when folded, fully 10 inches shorter than the M1 Carbine, making it an excellent weapon for the highly mobile paratroopers.

Given that the M1A1 Carbine was specifically designed for U.S. paratroopers, it is no surprise that at least 10 figures in the various U.S. paratrooper sets are equipped with it. The ESCI set alone includes five figures wielding this weapon. There are three figures with the M1A1 Carbine in the selected 13 — the ESCI (fourth from left) and Caesar (ninth from left) figures shown on the Figure and Weapons Chart above plus the Italeri figure (far right) with the M9 Bazooka, who carries the M1A1 Carbine on his back. 

6. M1A1 Thompson Submachine Gun: One of the most recognized weapons in history, the M1A1 Thompson submachine gun was a favorite among the troops. Though generally only issued to squad leaders and officers in the regular army, it was widely used among paratroopers. Accurate up to 50 yards, it could fire its large .45 caliber rounds at a rate of 650 per minute, giving it devastating “sweeping” power within that distance. Though heavier than the M3 “grease gun,” the M1 Thompson submachine gun was more widely used.

The various figure sets provided a fair selection of figures wielding the M1A1 Thompson submachine guns, reflecting its wide use among paratroopers.  As shown in the Figure and Weapons Chart above, I selected three — the ESCI figure (third from left), the kneeling Caesar figure (fifth from left), and the TQD Pathfinder figure, a picture of which appears in the previous post.

7. M1918A2 Browning Automatic Rifle (BAR): The fully automatic .30 caliber M1918A2 BAR, which replaced the M1918 used in WWI, was designed to be fired from the hip as an automatic rifle while moving forward in support of riflemen or from a stationary position as a light machine gun.

13 002
Left, Imex; right, Revell.

However, its paltry 20-round magazines greatly limited its effectiveness as a machine gun. While used by U.S. paratroopers, the BAR’s 20-lb weight and need to be reassembled after a jump made it an inconvenient — and therefore uncommon — weapon for Airborne troops. To reduce the BAR’s weight, experienced paratroopers often ditched the bipod, buttplate, and carrying handle, lowering the weight to 15 lbs.

There are only two BAR gunners in the 69 paratrooper poses available — one in the Imex set and one in the Revell set, as seen in the photo inset above. Thus, the Revell figure (on the right) was an easy choice since the Imex figure is prone firing the weapon, clearly in combat. The Revell gunner, who has not removed the bipod or carrying handle from his BAR, is presumably a novice. 🙂 

8. M9 Bazooka: The M9 Bazooka was a portable recoil-less, anti-tank rocket launcher that replaced the earlier M1 Bazooka in 1943. At 54 inches, the M1 Bazooka was unwieldy during jumps so the Airborne command specifically requested the M9 Bazooka, which could be broken down into two parts to make it more portable. By happy coincidence, the modification allowed engineers to make it longer, increasing range and accuracy.

14 001
From left to right: Caesar, Imex, and Italeri.

Considered the perfect infantryman’s anti-tank weapon, it could immobilize a tank with a solid, accurate hit. According to the conventional wisdom, the much-feared German 88mm Panzershreck was copied from a captured American bazooka.

The M9 Bazooka was common with U.S. Airborne troops so the set would have been incomplete without a figure carrying one. There were three potential figures with a bazooka, as can be seen in the photo inset above. However, two of them are actually firing the weapon so the Italeri figure was the only non-combat choice. 

A passing glance at the Figure and Weapons Chart above quickly reveals that the Italeri figure (far right) is somewhat bulkier than the other 12, which gave me pause. In the end, I used it anyway. First, I rationalized that human height and girth varies significantly. It turned out that the figure is 26.4mm tall, which scales out to only 6’2”, totally within the acceptable range. He is crouching a bit, which means he’s actually taller. Secondly, the figure — huge as it is — represents the gentle but slow-witted giant often seen in Hollywood movies, including the one in the aforementioned Dirty Dozen. (To my mind, the all-time greatest Hollywood brute is Andre the Giant as the unforgettable Fezzik in The Princess Bride.) And finally, it makes sense that the biggest man in the unit would carry the M9 Bazooka, the heaviest weapon in the paratrooper arsenal, weighing 16 lbs — one pound more than the stripped down 15-lb BAR. 

Browning M1919A4 Light Machine Gun

I intentionally did not include the Browning M1919A4 light machine gun in the Weapons Plate or in the discussion, as there were no figures carrying it in non-combat. However, four of the six sets include such a weapon and, for the sake of completeness, I’ve included a lagniappe photo of those four below. Referring strictly to the weapon and not the paratrooper, the ESCI machine gun (far left) has the most detail and best proportions, with the Revell and Italeri weapons closely behind. The Caesar machine gun (far right) is underscaled and has very little detail, though the paratrooper figure itself is excellent.

BMG 004
From left to right: ESCI, Revell, Italeri, and Caesar.

This concludes our lightning-fast survey of U.S. Army Airborne small arms. I hope you found the post informative. Stay tuned tomorrow for Part 4: The Finished Figures, with lots of photos of the painted figures. As always, comments, questions, corrections, and observations are welcome.

The Filthy Thirteen of the 101st Airborne Division, Part 2: Creating the Unit in 1/72 Scale

This is a follow-up to the previous post, The Filthy Thirteen, Part 1. For a synopsis of these colorful characters, please refer to that post.

It is highly unlikely that any major plastic soldier manufacturer would create a 1/72 scale set of the Filthy Thirteen, as the set would lack wide enough appeal to make it financially viable. While compulsive collectors like me would welcome such figures, the wargamers who currently drive the market would probably not find sufficient uses for them to warrant their purchase. With their distinctive Mohawk haircuts, the only other possible use for such paratrooper figures would be as Pathfinders during the Normandy invasion. Thus, the subject is one more appropriate for the resin or white metal cottage industries.

U.S. Paratroopers in 1/72 Scale

So where are we to find our Filthy Thirteen in 1/72 scale? The group can be created with just a little work. As always, our point of departure is the Plastic Soldier Review (PSR) website to determine the universe of figures available. Six major plastic soldier manufacturers have produced WWII U.S. paratroopers in 1/72 scale, with various levels of success. In chronological order of release they are:

  1. Airfix 1751 U.S. Paratroops (1975) (14 poses);
  2. ESCI 209 U.S. Paratroopers “Screaming Eagles” (1983) (14 poses);
  3. Revell 2517 US Paratroopers (1995) (12 poses);
  4. Imex 527 Easy Company (2007) (14 poses);
  5. Italeri 6131 Anti Tank Teams (2009) (4 poses); and
  6. Caesar H076 US Paratroopers (2012) (11 poses). 

Of course, some of these have been re-released by other companies. Please visit the PSR website for an excellent analysis and photos of each of these six sets.

We are fortunate that five of the six sets are excellent, with high PSR ratings in both historical accuracy and sculpting — the two characteristics most important to me. The mediocre 41-year-old Airfix set is the Original 2
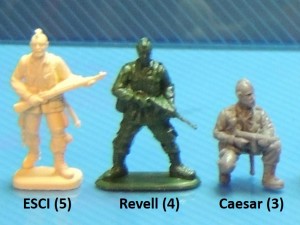
only exception, lacking sharpness in detail, though still not a bad effort. The ESCI, Revell, and Caesar sets each include one Pathfinder pose, fortunately with 5, 4, and 3 samples in each set, respectively. See photo inset at left. Thus, we have a total of 12 figures: three different ready-made figures and nine extra copies of those figures. To create 12 different figures with Mohawk haircuts, we take the heads of the nine extra copies and transplant them on the torsos of U.S. Airborne figures from the different sets. 

Selecting the Bodies: The Lucky Twelve

The inspiration for this effort was Joel Iskowitz’ painting (see The Filthy Thirteen: Part 1), which depicts most of the Filthy Thirteen without their helmets preparing to board a C-47 Skytrain. Naturally, paratroopers always wore their helmets on their heads in combat, regardless of how sporting their haircuts were. Thus, if our boys were to be shown bareheaded, we needed to use paratroopers not in action. Secondly, paratroopers used a number of different weapons, some of which were specially suited to their jumps. I wanted the set to reflect that variety. I therefore had but two simple criteria for selecting donor bodies: 1) they should not be overtly in action, e.g., aiming their weapons, and 2) they should represent as many of the weapons used by U.S. Airborne troops as possible.

These two parameters greatly limited selection but after careful consideration I judged the twelve figures below — out of a combined total of 69 poses from all six sets — to be least in combat and to represent most of the weapons used by U.S. paratroopers:FT DonorsEvery unit needs an officer with a pistol and the Revell figure on the far left best fit the bill, though he’s more animated than I would have preferred. Similarly, every unit has a gentle giant — at least according to Hollywood — and the slightly oversized Italeri figure on the far right met that need. In retrospect, I regret not using at least one Airfix figure so that every figure set was represented. As an aside, one of the Airfix figures is “the spitting image of John Wayne,” according to a 1975 issue of Airfix Magazine — something of a redeeming quality of the Airfix set, at least for me. As a further aside, I’m partial to the Imex set, which, to my eye, looks the most natural and best sculpted. Unfortunately for this project, all its figures are clearly engaged in combat except the two I used. 

Transplanting the Heads

Head transplants are fairly straightforward:

  1. Lop off the helmeted head;
  2. Drill a hole on the neck of the torso;
  3. Drill a hole on the base of the donor head;
  4. Superglue a tiny metal pin in the torso hole; and
  5. Superglue the donor head in place.

Presto! You’ve got brand new figures. For an excellent, detailed how-to discussion of head-switch conversions, see this Figure Conversion article on the oneseventytwoscale.com website.

The photo below shows the selected figures before and after the head transplant.FT Donors w New Heads 2

Of course, I cleaned up the seams and, where necessary, I removed excess plastic from the figures, particularly where the piece was 045blind to the mold, which is common between the midsection of the figure and a weapon when held with both hands. See the excess plastic marked in red in the ESCI figure at left. Though Caesar’s modern multi-mold process allows its sculptors to be adventurous, crafting poses that are more three-dimensional, the downside is that their figures often have excess plastic in these blind spots.

The Thirteenth Samurai

The title is a thinly veiled reference to Eiichi Kudo’s 1963 film The Thirteen Assassins — one of the best Samurai movies not directed by Akira Kurosawa. (The 2010 remake of this classic is also pretty darn good.) Incidentally, any reader who has not seen Ran, Kurosawa’s 1985 masterpiece, is missing out on the best war movie ever made — bar none — in my not unbiased opinion.

TQD Pathfinder
TQD-AA5 1944-45 US Airborne

But forgive the digression. As I mentioned, the plastic figure sets yielded a total of 12 Mohawk heads but I still needed one more to complete my devil’s dozen. I decided to use the Pathfinder figure from the TQD-AA5 1944-45 US Airborne white metal set — to my knowledge the only other 1/72 scale Pathfinder figure in production. The photo above is from the TQD website. TQD figures are somewhat more pricey compared to plastic but are generally superb, and this set is no exception: realistic proportions, fine detail, historical accuracy, and metal content, which, unlike plastic, takes paint well.

There they are: 13 U.S. Airborne 1/72 scale figures to represent the Filthy Thirteen. I hope you enjoyed the post. Stay tuned tomorrow for Part 3: Selecting the Weapons, covering the most common weapons used by U.S. paratroopers. As always, comments, questions, corrections, and observations are welcome.

The Filthy Thirteen of the 101st Airborne Division, Part 1: The Misfits

Caveat Lector!  I had more fun with this series of posts than a novice blogger ought to have, which means you’ll probably find the next five posts somewhat self-indulgent.

The Painting

I recently came across this fabulous painting of the Filthy Thirteen by Joel Iskowitz. It depicts the 1st Demolition Unit of the 506 Parachute Infantry Regiment of the vaunted 101st Airborne Division (that of Band of Brothers fame) as they prepared to board a C-47 Skytrain in an airfield in England on June 6, 1944. It is based on a photo published in the Stars and Stripes on June 9, 1944 — just days after D-Day. Iskowitz’s painting is reproduced here for discussion purposes under the fair use exception to the copyright laws. 1/72, 101st Airborne, 506 Parachute, 506 PIR, Battle of the Bulge, C-47, Choctaw, D-Day, Dakota, Demolition Unit, Dirty Dozen, Filthy Thirteen, Hell's Highway, Iskowitz, Market Garden, McNiece, Mike Marquez, Mohawk, Normandy, Pathfinders, SkytrainI was smitten. This is a classic example of an artist brilliantly blending art and history to create something more beautiful than either: the historical importance of the scene; the seemingly relaxed poses of the men clearly fraught with tension; the introspected expressions on their faces, which actually look like those of the real subjects; the attention to accuracy in detail, such as the weapons and equipment; the workhorse C-47 Skytrain with its alternating white-black-white invasion stripes in the background, with all the power it evokes; and the absolutely stunning sky, which despite its beauty portends the furious storm that was D-Day.

The Unit

The Filthy Thirteen — actually, it was more like “the 20 unbathed misfits” — was an elite demolition unit created and trained to undertake difficult, suicidal missions, often behind enemy lines. They were led by then-25-year-old Jake McNiece, a sergeant from Oklahoma who was half-Choctaw. They became famous after the aforementioned Stars and Stripes article was published in 1944. While the article’s overall premise was mostly accurate, it resulted in a number of myths that became the basis for the 1965 novel The Dirty Dozen, which, in turn, was the basis for the 1967 film of the same name, a blockbuster of a movie that spawned several sequels and a TV series.

Yes, the Filthy Thirteen really existed, though their story has been extensively fictionalized by a movie that bears only a passing resemblance to the real unit. No, they weren’t convicts, though some often flirted with trouble. Yes, they were filthy, bathing only once a week. No, they weren’t Native American, though they did sport Mohawk haircuts and Indian war paint in honor of their half-Choctaw leader. And yes, above all, they were misfits — the type who deliberately disobey rules they find useless, like saluting officers, yet somehow manage to get the job done. (In taped interviews, McNiece actually refers to saluting officers as “malarkey” and standing retreat as “stupid.”)

This first — professional quality — photo is the one that appeared in the 1944 Stars and Stripes article.1/72, 101st Airborne, 506 Parachute, 506 PIR, Battle of the Bulge, C-47, Choctaw, D-Day, Dakota, Demolition Unit, Dirty Dozen, Filthy Thirteen, Hell's Highway, Iskowitz, Market Garden, McNiece, Mike Marquez, Mohawk, Normandy, Pathfinders, SkytrainThe Jumps

The Filthy Thirteen participated in three of the best known episodes of the war in the European Theatre — the Normandy Invasion in France, Operation Market Garden in Holland, and the Battle of the Bulge in Belgium. During the Normandy Invasion in June 1944, the Filthy Thirteen parachuted behind enemy lines, destroying two bridges and securing a third on the Douve River, which marked the boundary between Utah Beach and Omaha Beach, to prevent the Germans from reinforcing the beach heads. Of those who jumped, more than half perished during the mission.

The group made their second jump in September 1944, during Operation Market Garden, in Eindhoven, Holland. Market Garden was dependent on Highway 69 as its only route of advance and supply and the Filthy Thirteen were tasked with holding bridges to ensure that this vital corridor, which came to be known as “Hell’s Highway” because of the carnage it witnessed, remained open. This they did —  for well over two months. (That does it: it’s time to endure A Bridge Too Far, for the umpteenth time. 🙂 )

Following those two missions, the Filthy Thirteen disbanded and the handful who survived — I believe it was six — joined the 101st Airborne Division Pathfinder Company – an elite group of specially trained paratroopers assigned to jump into enemy territory ahead of the main force to mark landing and drop zones to guide the main force. With the 101st Airborne encircled in Bastogne in December 1944 during the Battle of the Bulge, resupply became critical. Because of the heavy cloud cover, the Pathfinders were ordered to parachute in to set up electronic beacons for C-47 aircraft to follow when dropping their sorely-needed supplies. The Pathfinders completed their mission successfully and the 101st Airborne was effectively resupplied.1/72, 101st Airborne, 506 Parachute, 506 PIR, Battle of the Bulge, C-47, Choctaw, D-Day, Dakota, Demolition Unit, Dirty Dozen, Filthy Thirteen, Hell's Highway, Iskowitz, Market Garden, McNiece, Mike Marquez, Mohawk, Normandy, Pathfinders, SkytrainI captured the photo above from a widely available video clip of the 101st on June 6, 1944, just before the Filthy Thirteen took off from England. Forgive the bad quality.

This last lagniappe photo, also captured from the aforementioned video clip, shows Jack McNiece putting warpaint on someone who, to my eyes, appears to be Mike Marquez, a Texas native who was the only Hispanic member of the team, though some have identified him as Johnny Hale. Together, all three photos form the basis of Iskowitz’s painting and you can identify all three vignettes in various parts of the scene.Screenshot (3)The Books

In addition to The Dirty Dozen (1965) novel by E.M. Nathanson, at least three nonfiction books have been published about this colorful unit: The Filthy Thirteen (2003) by Richard E. Killblane; Fighting With The Filthy Thirteen: The World War II Story of Jack Womer – Ranger and Paratrooper (2012) by Stephen DeVito; and War Paint: The Filthy Thirteen Jump Into Normandy (2013) also by Richard E. Killblane. For a detailed history of the unit, the reader is directed to these books as this synopsis was intended merely as a predicate for Part 2.

I hope you enjoyed this simple post. For those who, like me, love figure conversions, stay tuned next week for Part 2: Creating the Unit in 1/72 ScaleAs always, comments, questions, corrections, and observations are welcome. 

The Doolittle Raid, April 1942, Part 4: B-25 Mitchell Insignias for 1/72 Scale Diecast

This is the last of a four-part series on the Doolittle Raid. For details of the actual raid, B-25 Mitchells in 1/72 scale, and diorama of the take-off in 1/72 scale, please refer to the three previous posts, The Doolittle Raid, Parts 1, 2, & 3

As discussed in Part 2, models of only two of the 16 B-25 Mitchell bombers that participated in the Doolittle Raid have been made into diecast — Col. James Doolittle’s “02344” and Lt. Ted Lawson’s “Ruptured Duck.” Given that Corgi’s two Doolittle Raid Mitchells have essentially disappeared from the market, Corgi would do collectors a great service by releasing another B-25 Doolittle Raider — one with a new livery (i.e., different markings).

Corgi and Air Force 1 would have interesting alternatives at their disposal, as some of the other 14 B-25 Mitchells also had memorable artwork. The following passage is from Lt. Ted Lawson’s Thirty Seconds Over Tokyo, first published in 1943. The passage follows commentary regarding constant inspections of the aircraft for possible leaks. Presumably, Lawson’s plane was found to have sprung a leak.

One morning I came out to my plane and found that somebody had chalked the words “Ruptured Duck” on the side of the fuselage. I grabbed Corporal Lovelace, a gunner I knew, and asked him to paint some sort of design on the ship. He’s a good caricaturist. Lovelace got out his stuff and painted a funny Donald Duck, with a head-set and the earphone cords all twisted around his head.

Lovelace did a swell job in blue, yellow, white and red. Then he added something that gave all of us another laugh. Under Donald Duck he drew a couple of crossed crutches.

The other boys now got busy with insignias. In a couple of days a lot of hitherto anonymous B-25’s took on such names as Hari-Kari-er (a hefty hunch), Whiskey Pete, Anger Angel, Whirling Dervish, Fickle Finger of Fate and one fellow painted the chemical formula for TNT on the side of his ship.

It is clear from the passage that several of the aircraft had personalized markings and there is actually photographic support for some.

The table below summarizes what little information I could gather from various sources on the Doolittle Raid B-25 Mitchells and their names and markings, listed in the order in which they took off from the USS Hornet:

Position Number Name Markings Insignia
1 40-2344  None No Individual Markings  
2 40-2292  None No Individual Markings  
3 40-2270 “Whiskey Pete” Name Only  
4 40-2282  None No Individual Markings  
5 40-2283  None No Individual Markings  
6 40-2298 “Green Hornet” Name Only  
7 40-2261 “Ruptured Duck”   Donald Duck Cartoon
8 40-2242  None No Individual Markings  
9 40-2303 “Whirling Dervish”   Tornado Cartoon
10 40-2250  None No Individual Markings  
11 40-2249 “Hari Kari-er”   Angel with Bomb
12 40-2278 “Fickle Finger” Name Only  
13 40-2247 “Avenger” Name Only  
14 40-2297  None No Individual Markings  
15 40-2267 “TNT”   TNT Formula Design
16 40-2268 “Bat Out of Hell” Name Only  

As is readily evident from the table, nine of the 16 Mitchells had a moniker; seven did not. Of the nine with names, four had “insignias,” as Lawson called them. Thus, our choices of liveries are limited to those four and, given that the “Ruptured Duck” has already been produced, there remain only three choices: “Whirling Dervish,” “Hari Kari-er,” and “TNT.” It is interesting to note that all three of these Mitchells were specifically mentioned in the Lawson passage quoted above.

However, it is something of a mystery why “Anger Angel,” which Lawson mentions in the passage, is nowhere to be found. Is it plane #13 “Avenger”? Did Lawson simply misremember? Is the design for “Anger Angel” lost forever? I note that since Thirty Seconds Over Tokyo was published in 1943, while memories were still fresh, it is a contemporaneous account of the episode whose accuracy should be accorded significant probative weight.

Here are the three viable alternatives:

40-2249:  “Hari Kari-er”

Let’s begin with the “Hari Kari-er,” the 11th plane to take off from the Hornet, since there is ample photographic documentation for its livery. The “Hari Kari-er” is best known for downing two Japanese fighters during the mission. According to Chun in The Doolittle Raid 1942, Osprey Campaign 156, “Hari Kari-er,” piloted by Captain C. Ross Greening, was attacked by four Kawasaki Ki-61 Hiens, known as “Tonys” to Americans, on the way to Yokohama. The Hiens were still in the evaluation phase. The “Hari Kari-er” shot down two from its dorsal turret and managed to outrun the two others, subsequently dropping its bombs on an oil refinery. Please refer to the wonderful color illustration of this episode in The Doolittle Raid, Part 1.

Below is a portside photo of the “Hari Kari-er” on the Hornet, scanned from Chun’s Doolittle Raid 1942.1/72, AA35312, B-25, Corgi, diecast, Doolittle, Hari Carrier, Hari Kari-er, Japan, Lawson, Mitchell, Ruptured Duck, Thirty Seconds, TNT, Tokyo, TSOT, USS Hornet, Whirling Dervish
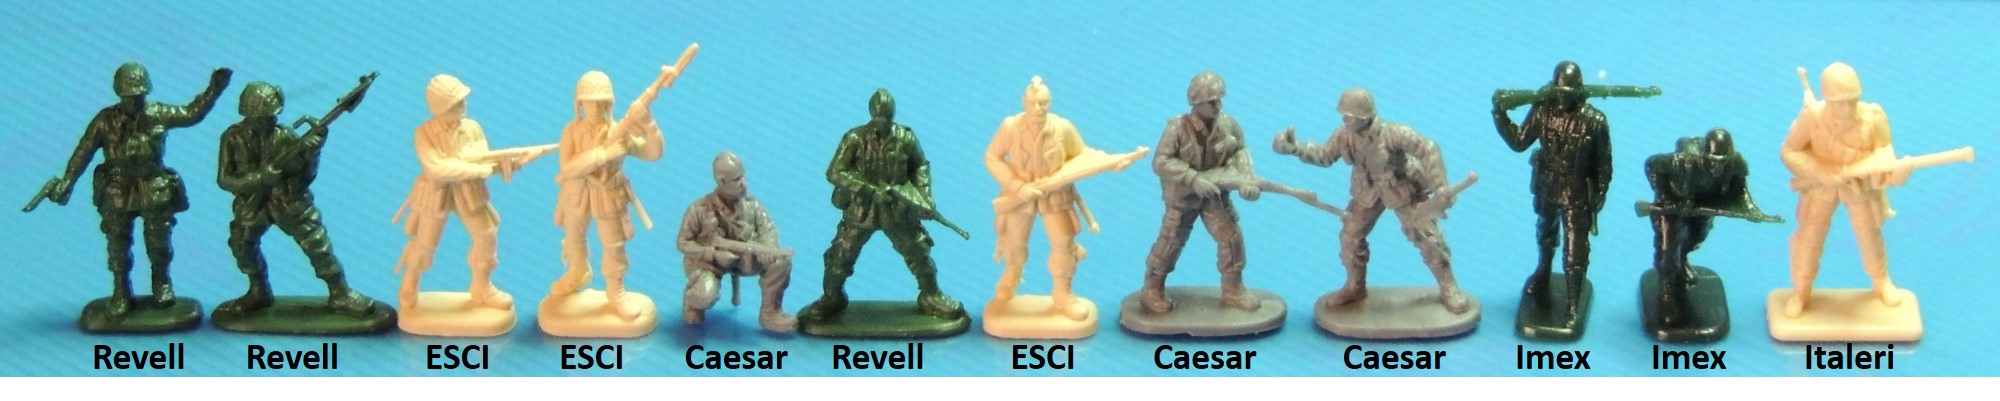
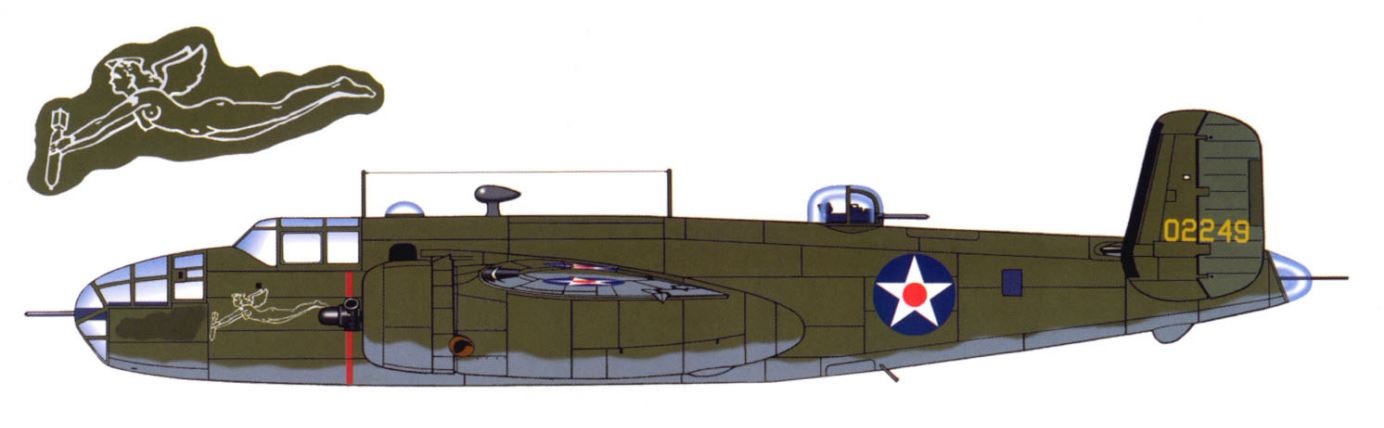
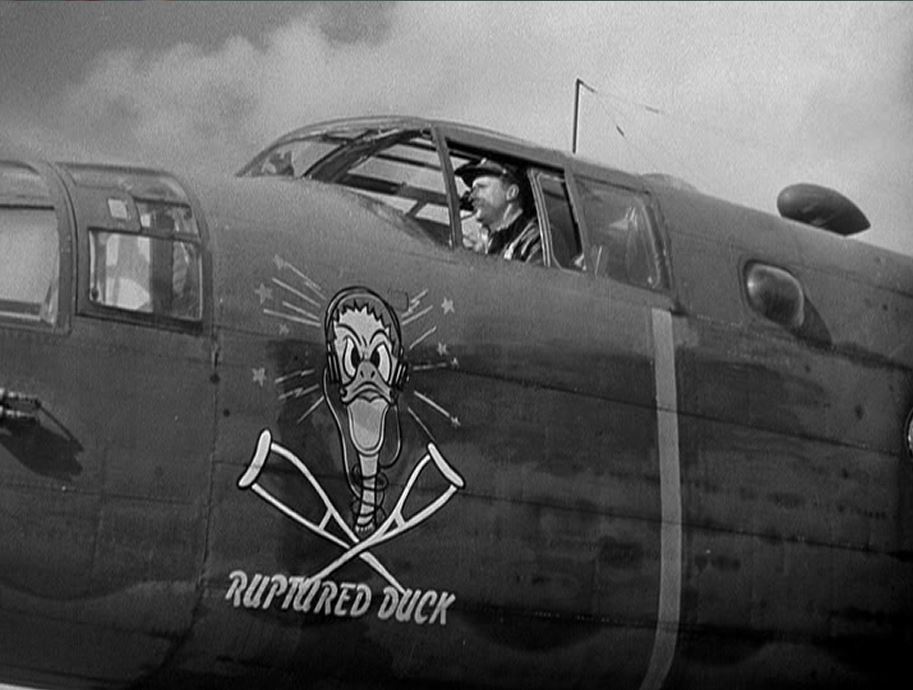
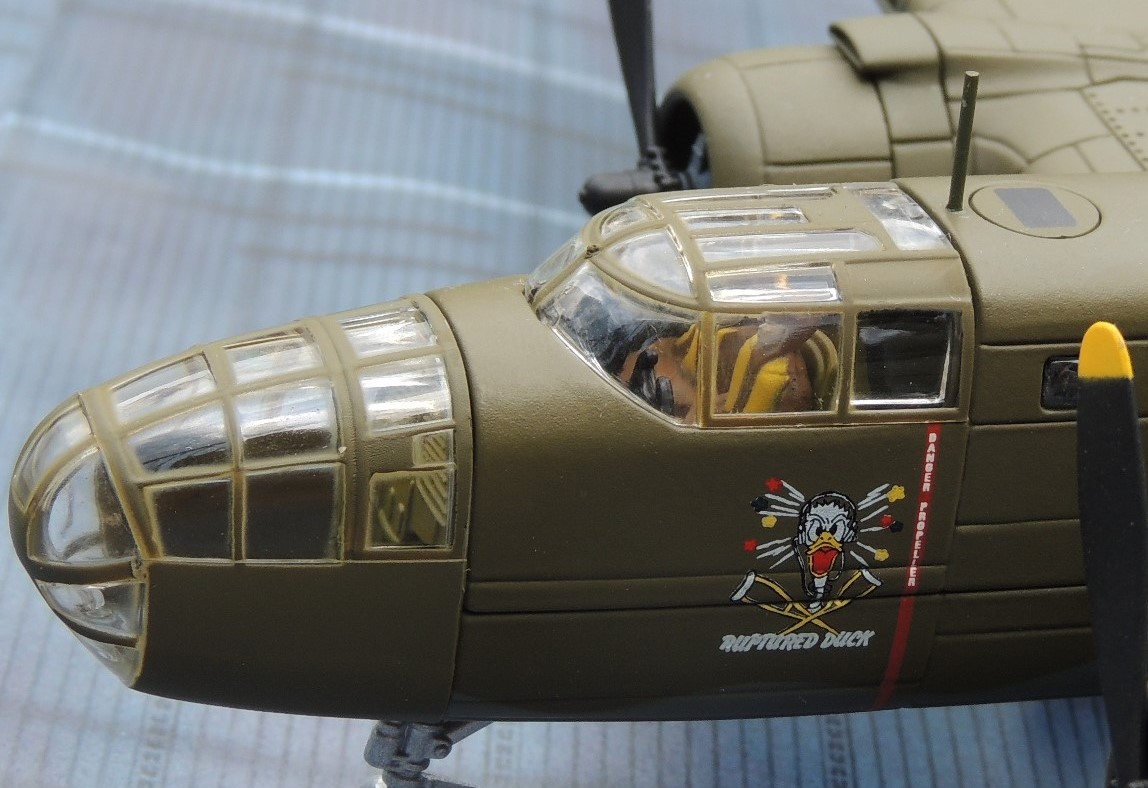
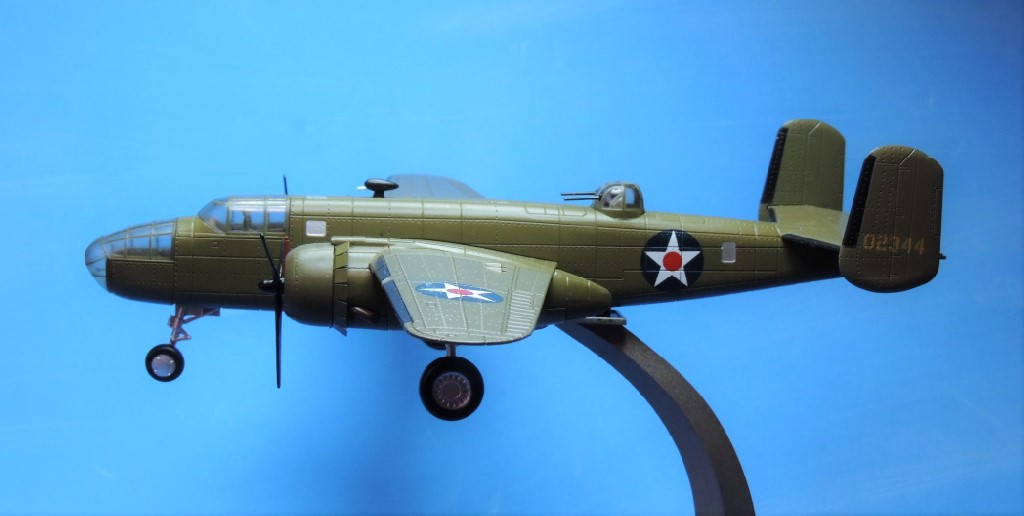
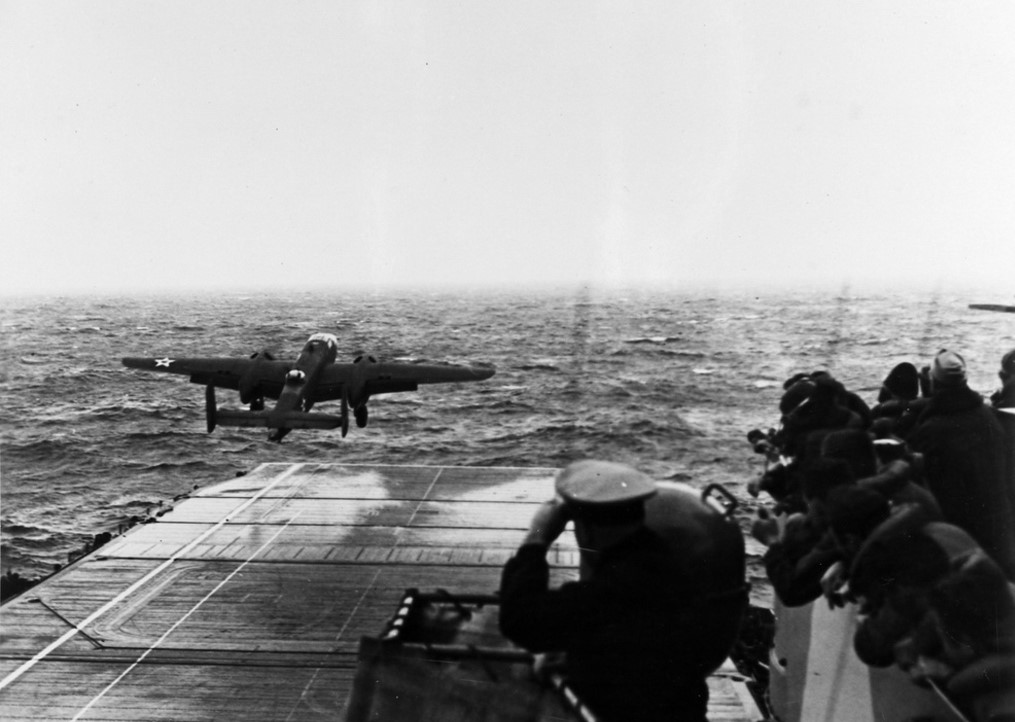
Also from Chun’s book, here’s a close-up of the insignia on the starboard side of the fuselage: the white outline of a curvaceous angel about to release a bomb. The irony of an angel ready to drop death and destruction from above should not be lost on us, biblical though it may be. Given that the Doolittle Raid occurred only four months after the U.S. entry into the war, this is likely one of the first examples of pin-up art on an American aircraft, if indeed a naked angel can be considered a pin-up. Note the dark smudge directly in front of the bomb in the angel’s hands where the name “Hari Kari-er” was overpainted in darker olive drab, though the reason is unclear. 1/72, AA35312, B-25, Corgi, diecast, Doolittle, Hari Carrier, Hari Kari-er, Japan, Lawson, Mitchell, Ruptured Duck, Thirty Seconds, TNT, Tokyo, TSOT, USS Hornet, Whirling DervishFor those of us who love color profiles, here’s one from B-25 Mitchell, Walkaround #12, by Lou Drendel, illustrated by Don Greer, reproduced here for discussion purposes under the fair use exception to the copyright laws. 1/72, AA35312, B-25, Corgi, diecast, Doolittle, Hari Carrier, Hari Kari-er, Japan, Lawson, Mitchell, Ruptured Duck, Thirty Seconds, TNT, Tokyo, TSOT, USS Hornet, Whirling DervishFinally, it’s noteworthy that the Battle 360: Season One, Call to Duty episode used the “Hari Kari-er” extensively in its computer-generated imagery video production of the Doolittle Raid. I captured the still below from that episode. Forgive the poor quality of the capture. 1/72, AA35312, B-25, Corgi, diecast, Doolittle, Hari Carrier, Hari Kari-er, Japan, Lawson, Mitchell, Ruptured Duck, Thirty Seconds, TNT, Tokyo, TSOT, USS Hornet, Whirling DervishInarguably, the “Hari Kari-er” has a terrific insignia that makes it a worthy candidate for Corgi or Air Force 1 to make it into a diecast model. The probability that it was the first American plane to down a Japanese Hien in addition to the possibility that it was the first American plane of the war to display pin-up art makes the “Hari Kari-er” irresistible. 

40-2303:  “Whirling Dervish”

The 9th plane to take off from the Hornet, the “Whirling Dervish” is credited with shooting down a Japanese fighter while completing its mission to bomb a tank factory in the south of Tokyo, where it dropped its entire load. In a famous newsreel clip, Pilot Lt. Harold F. Watson comments that he “had the satisfaction of seeing two of the bombs score direct hits.” Like all other Doolittle Raiders except the one that headed to Russia, the “Whirling Dervish” crash landed in China.

I’m unaware of any photos of the actual “Whirling Dervish,” but there appears to be a consensus that the design consisted of a stylized tornado wedged between the two words of the name.1/72, AA35312, Academy, B-25, Corgi, diecast, Doolittle, Hari Carrier, Hari Kari-er, Japan, Lawson, Mitchell, Ruptured Duck, Thirty Seconds, TNT, Tokyo, TSOT, USS Hornet, Whirling Dervish

The profile at left comes comes from the Academy 13202 USAAF B-25B Doolittle Raid 1/48 scale plastic kit, whose decal sheet provides this option for the B-25 Mitchell among several others. Other companies have produced very similar versions of the “Whirling Dervish” design so I have no reason to doubt it. 

It is also interesting to note that the 2001 film Pearl Harbor, the Touchstone Pictures $140 million extravaganza, shows this same insignia on the “Whirling Dervish” during the Doolittle Raid scene. It is unclear to me where the design originated but presumably Touchstone must have had a reference. I captured the still below from Pearl Harbor.1/72, AA35312, Academy, B-25, Corgi, diecast, Doolittle, Hari Carrier, Hari Kari-er, Japan, Lawson, Mitchell, Pearl Harbor, Ruptured Duck, Thirty Seconds, TNT, Tokyo, TSOT, USS Hornet, Whirling DervishIncidentally, the details of the Doolittle Raid sequence in Pearl Harbor are about as accurate as those in a Disney movie. Still, a flawed war history movie — even accounting for the gratuitous romantic nonsense — is better than no movie, particularly in this case where the film actually follows the general outlines of the real raid.

The “Whirling Dervish” design won’t set the world spinning faster (lame pun intended) but it’s interesting and worthy of consideration.

40-2267:  “TNT”

The penultimate Mitchell to take off from the Hornet, the “TNT,” piloted by Lt. Donald G. Smith, was assigned to drop its bombs on an aircraft factory and shipyard on the outskirts of Kobe. After completing its mission, the “TNT” barely managed to reach the coast of China, where it crash landed at sea, staying afloat long enough for the five-man crew to safely board their rubber raft before the plane sunk. Though the raft was subsequently punctured when it hit the tip of one of the plane’s broken flaps, all five were able to swim to shore.

It bears mentioning that one of the five crew members of the “TNT” was the flight surgeon for the entire mission, Lt. Thomas “Doc” White, a Caltech and Harvard Medical School graduate who was also trained as a pilot, navigator, and bombardier. Through divine providence, the “Ruptured Duck” had also crash landed at sea less than a mile from the “TNT” and three of its four surviving members required medical attention. Once on land, the two crews connected and “Doc” White was able to provide medical care to the three “Ruptured Duck” crew members, saving Lawson’s life, though the flight surgeon had to amputate Lawson’s leg.

The profile below comes from the aforementioned Academy 13202 USAAF B-25B 1/48 scale plastic kit, whose decal sheet provides this Doolittle Raid option for the B-25 Mitchell among several non-Raid others.

1/72, AA35312, Academy, B-25, Corgi, diecast, Doolittle, Hari Carrier, Hari Kari-er, Japan, Lawson, Mitchell, Ruptured Duck, Thirty Seconds, TNT, Tokyo, TSOT, USS Hornet, Whirling Dervish1/72, AA35312, Academy, B-25, Corgi, diecast, Doolittle, Hari Carrier, Hari Kari-er, Japan, Lawson, Mitchell, Ruptured Duck, Thirty Seconds, TNT, Tokyo, TSOT, USS Hornet, Whirling Dervish

Although the design appears to be widely accepted by plastic model and decal manufacturers, I’m at a loss about its origin. Lawson clearly states in the passage cited above from Thirty Seconds that “one fellow painted the chemical formula for TNT on the side of the ship.”

The design above is not the “chemical formula for TNT” mentioned by Lawson and, as far as I know, there is no photographic support for it, though I’d be delighted to be proven wrong. 1/72, AA35312, Academy, B-25, Corgi, diecast, Doolittle, Hari Carrier, Hari Kari-er, Japan, Lawson, Mitchell, Ruptured Duck, Thirty Seconds, TNT, Tokyo, TSOT, USS Hornet, Whirling Dervish

Thus, in the absence of photographic documentation, I think a reasonable and more accurate design, based strictly on Lawson’s quote in Thirty Seconds, would be the one at left, which I drew from scratch.

Ok, I get it, I’m not an artist by any stretch of the imagination. Nonetheless, this notional design, crude as it is, is more faithful to Lawson’s description than the others currently available.

Other Options

The blockbuster movie Thirty Seconds Over Tokyo, released by MGM in 1944, provides some tantalizing possibilities. Bearing in mind that all 16 bombers were lost during the raid, including the one captured and later destroyed by the Russians, it’s patently obvious that the “insignias” used in the film had to be reconstructed from pilots’ memories. Still, the movie is not a frivolous reference as it was released in 1944, when memories were still fresh, and employed Ted Lawson, upon whose book the movie was based, as a consultant. Coincidentally, Dalton Trumbo, the subject of a recent movie himself, wrote the screenplay for Thirty Seconds. (As an aside, Trumbo’s Johnny Got His Gun, written just before the war, probably left a greater impression on me as a kid than any other anti-war novel.) At any rate, I captured the stills below from the movie.

“Turkey”

At 31:17, one gets an excellent view of the “Turkey,” referenced in the movie. To be clear, those are 500 lb. bombs falling out of the bird’s behind. 🙂  Lawson did not mention this “insignia” in Thirty Seconds, so one wonders if it was conjured up specifically for the movie. Still, it’s a terrific design, in my view, and I would not be averse to seeing it in diecast.1/72, AA35312, Academy, B-25, Corgi, diecast, Doolittle, Hari Carrier, Hari Kari-er, Japan, Lawson, Mitchell, Ruptured Duck, Thirty Seconds, TNT, Tokyo, TSOT, USS Hornet, Whirling Dervish“Our Little Nell”

At 55:31, one can see “Our Little Nell.” This design, too, was probably created specifically for the movie but would still look cracking on a B-25 diecast model.1/72, AA35312, Academy, B-25, Corgi, diecast, Doolittle, Hari Carrier, Hari Kari-er, Japan, Lawson, Mitchell, Ruptured Duck, Thirty Seconds, TNT, Tokyo, TSOT, USS Hornet, Whirling Dervish“Ruptured Duck”

At 31:47, one gets a similar view of the “Ruptured Duck.” This last lagniappe photo is included for the sake of completeness and to point out that the Donald Duck design is identical to the one on the Corgi model. The one on the actual “Ruptured Duck,” however, may have been just slightly different, with Donald Duck wearing a sidecap.1/72, AA35312, Academy, B-25, Corgi, diecast, Doolittle, Hari Carrier, Hari Kari-er, Japan, Lawson, Mitchell, Ruptured Duck, Thirty Seconds, TNT, Tokyo, TSOT, USS Hornet, Whirling DervishThe Upshot

Diecast companies reportedly visit internet collector forums for information to improve their products. Thus, the goal of this post is to persuade Corgi and Air Force 1 that it’s high time to release another Doolittle Raid B-25 Mitchell with a new livery. My unequivocal choice would be the “Hari Kari-er.” In addition to the beautiful curvaceous angel design, the “Hari Kari-er” was probably the first American plane to shoot down a Japanese Hien and possibly the first American plane to carry a pin-up on its fuselage during the war. Furthermore — and perhaps more importantly — there is ample photographic documentation for it.

I hope you enjoyed these four Doolittle Raid posts. Thank you for your indulgence and, as always, comments, questions, corrections, and observations are welcome.

The Doolittle Raid, April 1942, Part 3: Take-Off Diorama in 1/72 Scale

This is a follow-up to the two previous posts, The Doolittle Raid, Parts 1 & 2. For details of the actual raid and B-25 Mitchells in 1/72 scale, please refer to those posts.

The well-known photo below, taken from The Doolittle Raid 1942, Osprey Campaign 156, by Clayton Chun, shows a B-25 Mitchell about to take off from the deck of the USS Hornet on April 18, 1942. I believe the photo is a still from newsreel footage of the actual take-off. Note the choppy waters caused by high winds on that cold, damp morning. The harsh weather conditions forced the planes to burn more fuel than they would have otherwise.4 Doolittle Raid Osprey (2)Here’s a 1/72 scale recreation. As always with these diorama photos, there is no photoshopping. It’s one of my self-imposed constraints.7 108 (8)Here’s the same photo in full color. 6 108 (5)The model is the Corgi AA35312 B-25B Mitchell “Ruptured Duck,” flown by Lt. Ted Lawson, author of Thirty Seconds Over Tokyo. For a review of this model, see the previous post.1 144 (3)The figures are from the Corgi US61005 F4U-1D Corsair. I made the checkered flag from cardboard and added it to the signal officer to match the original photo. It’s 1/4 the size of Lincoln’s head on a penny.2 147 (3)I built a section of the USS Hornet’s deck on a large styrofoam base using a scanned copy of the 8″x8″ aircraft carrier deck base included in the Corgi US61005 F4U-1D Corsair. After scanning the Corgi base, I reproduced it a dozen times and then combined the scans with graphics software to make a larger deck, ensuring the plank segments matched. The only difficulty was in blending in the white guidelines. I then printed the entire deck section on paper and glued it to the styrofoam base. Unfortunately, being made of paper, the miserable thing warped from the glue. I was so focused on the plane when taking the photos that I failed to notice the warping until I was cropping the photos. Rats!3 116 (3)I photographed the scene by the side of the swimming pool next to one of the pool jets to ensure some “turbulence,” such as it is. The result exceeded my expectations, something entirely too rare.4 156 (3)Here’s a view from the front. Note the two white lines on the deck that the pilots used as guides. The different widths of the lines and the distance between them and the edge of the deck are at scale. The propellers turn freely and I considered placing a fan in front of them for a spinning effect as I took the photo. Alas, I managed to resist the urge. Compulsive personalities will likely relate to the comment. 🙂  5 121 (3)Here’s a lagniappe photo of a B-25 Mitchell taking off from the USS Hornet. I captured it from a widely available newsreel clip of one of the B-25 Mitchells taking off. Note the flag used by the signal officer — clearly a 4×4 checkered flag. Again, note the choppy waters. The take-off runs for the Doolittle Raid were timed to coincide with the B-25 Mitchells reaching the Hornet’s bow when it was at its high point on a swell, rather than its low point on a trough, thus assisting with the take-off.3 Doolittle Raid NewsreelI hope you enjoyed this simple diorama. As always, comments, questions, corrections, and observations are welcome. Stay tuned next week for Part 4, regarding potential Doolittle Raid liveries for consideration by diecast manufacturers.

The Doolittle Raid, April 1942, Part 2: B-25 Mitchell Bombers in 1/72 Scale

This is a follow-up to the previous post, The Doolittle Raid, Part 1. For details of the actual raid, please refer to that post. To my knowledge, three diecast manufactures have produced the B-25 Mitchell in 1/72 scale — Forces of Valor, Corgi, and newcomer Air Force 1. Of these, only Corgi and Air Force 1 have liveries specifically for the Doolittle Raid, with Corgi releasing two and Air Force 1 releasing one. Forces of Valor did not release a Doolittle Raid model since their casting is of the later B-25J version of the Mitchell, rather than the B-25B used in the Doolittle Raid.

The Corgi AA35302 represents Colonel Doolittle’s plane, the “40-2344,” the first one to take off from the Hornet. The Corgi AA35312 represents the “Ruptured Duck,” the seventh bomber to take off from the Hornet. The Air Force 1 A00111 is also a model of the “40-2344,” Colonel Doolittle’s plane. While I missed the first Corgi release, I do have the second one, which is essentially identical to the first one other than the markings. Thus, this post concerns Corgi’s “Ruptured Duck” and Air Force 1’s “40-2344.”

Corgi Aviation Archive AA35312
North American B-25B Mitchell
40-2261 “Ruptured Duck,” Doolittle Raid, USS Hornet, 1942
Limited Edition (2,000 pieces)

Below are photos of the Corgi AA35312, which represents the “Ruptured Duck,” the 7th plane to take off from the Hornet. The “Ruptured Duck” was piloted by Lt. Ted Lawson, who wrote Thirty Seconds Over Tokyo, arguably the most widely-read account of the Doolittle Raid and upon which the 1944 movie of the same name was based. If you’re reading this blog, it’s a safe bet you read the book as a youngster.

The model is a beauty — casting, panel lines, finish, and markings.1/72, 40-2261, 40-2344, A00111, AA35312, Air Force 1, B-25, Corgi, Doolittle, Hornet, Japan, Japanese, Mitchell, Ruptured Duck, Thatcher, Thirty Seconds, TSOT, USAAFThe opaque olive drab finish is outstanding, as is the gray camouflage on the underside of the fuselage. Note that, according to most sources, the propeller tips on the actual Doolittle B-25 Mitchells were not yellow. 1/72, 40-2261, 40-2344, A00111, AA35312, Air Force 1, B-25, Corgi, Doolittle, Hornet, Japan, Japanese, Mitchell, Ruptured Duck, Thatcher, Thirty Seconds, TSOT, USAAFHere’s a port-side eye-level view of the ship. Note the US Army Air Force marking (the Air Force was under the Army at the time) — red disk within a five-pointed white star on a circular blue field with the shades specified for the U.S. flag — used until May 1942. The insignia was included on the fuselage on both sides aft of the wing and on the upper surface of the port wing and lower surface of the starboard wing. A curiosity of the marking is that the red “meatball” does not touch the inside angles of the star. The star, on the other hand, does go out to the edge of the blue disk, something that was later changed. These seemingly trivial details are important when dating photos.1/72, 40-2261, 40-2344, A00111, AA35312, Air Force 1, B-25, Corgi, Doolittle, Hornet, Japan, Japanese, Mitchell, Ruptured Duck, Thatcher, Thirty Seconds, TSOT, USAAFHere’s a starboard-side eye-level view. Note that Corgi correctly removed the nose gun from this release, as the Doolittle Raiders had done on the actual bombers. Corgi had mistakenly included it in their first release.1/72, 40-2261, 40-2344, A00111, AA35312, Air Force 1, B-25, Corgi, Doolittle, Hornet, Japan, Japanese, Mitchell, Ruptured Duck, Thatcher, Thirty Seconds, TSOT, USAAFHere’s a view from the rear. Note that the Doolittle Raid bombers had a crew of five, rather than six, because the tail gunner section was removed to reduce weight and increase fuel storage space. Thus, the guns were removed from the tail cone and broomsticks were substituted in their place to deter enemy fighters from stern attacks. Corgi correctly left the tail guns — or broomsticks — in place.1/72, 40-2261, 40-2344, A00111, AA35312, Air Force 1, B-25, Corgi, Doolittle, Hornet, Japan, Japanese, Mitchell, Ruptured Duck, Thatcher, Thirty Seconds, TSOT, USAAFThis close-up shows the distinctive “Ruptured Duck” motif well. Amazingly, the words “Danger Propeller” can be read clearly on the vertical red warning line, which is only 1 mm wide. Note also the pilot and copilot figures. Although Corgi had included a bombardier figure on the nose of their previous B-25 releases, including their first Doolittle Raid release, Corgi inexplicably did not include one in this release, despite the fact that Corgi’s packaging clearly shows one. 1/72, 40-2261, 40-2344, A00111, AA35312, Air Force 1, B-25, Corgi, Doolittle, Hornet, Japan, Japanese, Mitchell, Ruptured Duck, Thatcher, Thirty Seconds, TSOT, USAAFHere’s a photo of the model on its stand. Corgi provides the option of landing gear up or down. Like most of Corgi’s Limited Edition models, this piece has a numbered Collector Card.1/72, 40-2261, 40-2344, A00111, AA35312, Air Force 1, B-25, Corgi, Doolittle, Hornet, Japan, Japanese, Mitchell, Ruptured Duck, Thatcher, Thirty Seconds, TSOT, USAAFLike other heavy Corgi models, this one sits on a cradle in an inclined take-off position.1/72, 40-2261, 40-2344, A00111, AA35312, Air Force 1, B-25, Corgi, Doolittle, Hornet, Japan, Japanese, Mitchell, Ruptured Duck, Thatcher, Thirty Seconds, TSOT, USAAFThe Rub

I would be remiss if I failed to point out an exasperating design flaw in the model: it’s hopelessly tail-heavy. The model will simply not stand on its three wheels, but instead tilts back like a stubborn donkey sitting on its haunches.1/72, 40-2261, 40-2344, A00111, AA35312, Air Force 1, B-25, Corgi, Doolittle, Hornet, Japan, Japanese, Mitchell, Ruptured Duck, Thatcher, Thirty Seconds, TSOT, USAAFTo solve the problem, I carefully removed the nose piece and increased the weight at the front by inserting the sawed-off half of an Allen wrench in the crawlway leading to the bombardier compartment. It fit perfectly, though the photo shows it protruding slightly out of the crawlway to better illustrate the placement. I then added two 1/4 ounce lead weights to the nose. The extra weight did the trick.1/72, 40-2261, 40-2344, A00111, AA35312, Air Force 1, B-25, Corgi, Doolittle, Hornet, Japan, Japanese, Mitchell, Ruptured Duck, Thatcher, Thirty Seconds, TSOT, USAAFThe Crew

To personalize this model, here’s a photo of the crew of the actual “Ruptured Duck.” From left to right: Lt. Charles L. McClure, navigator; Lt. Ted W. Lawson, pilot; Lt. Robert S. Clever, bombardier; Lt. Dean Davenport, copilot; and Sgt. David Thatcher, flight engineer/gunner. 1/72, 40-2261, 40-2344, A00111, AA35312, Air Force 1, B-25, Corgi, Doolittle, Hornet, Japan, Japanese, Mitchell, Ruptured Duck, Thatcher, Thirty Seconds, TSOT, USAAFIt should be noted that Lt. Ted Lawson, author of Thirty Seconds Over Tokyo, lost his left leg due to the crash landing. Sgt. David Thatcher, on the far right, is one of only two Doolittle Raiders alive today.

Air Force 1 A00111
North American B-25B Mitchell
40-2344, Jimmy Doolittle and Richard Cole
Limited Edition Signature Series Hand-Signed by Lt. Cole

Below are photos of the Air Force 1 A00111, which represents the “40-2344,” Colonel Doolittle’s ship and the first one to take off from the USS Hornet. The first thing one notices is that the overall olive drab finish is entirely too shiny. A coat of dullcote clear flat lacquer will be necessary for a more realistic look. Similarly, the gloss black color of the propellers makes them look too “plasticky” and will require a coat of flat black. 1/72, 40-2261, 40-2344, A00111, AA35312, Air Force 1, B-25, Corgi, Doolittle, Hornet, Japan, Japanese, Mitchell, Ruptured Duck, Thatcher, Thirty Seconds, TSOT, USAAFThe casting is really not a bad effort. The panel lines and details are crisp and rivet holes are included on every panel. The casting is diminished, however, by the porthole windows, which are mere indentations in the metal that have been painted silver to simulate glass. The effect is reminiscent of windows found on hand-made wooden models. While the technique works on wooden models, since all windows on a model are represented in the same fashion, the contrast between the simulated glass of the porthole windows and the clear plastic of the nose and cockpit glass on this model is too distracting.
1/72, 40-2261, 40-2344, A00111, AA35312, Air Force 1, B-25, Corgi, Doolittle, Hornet, Japan, Japanese, Mitchell, Ruptured Duck, Thatcher, Thirty Seconds, TSOT, USAAFAir Force 1 correctly did not paint the propeller tips yellow, a mistake made by Corgi. Unlike the Corgi model, the Air Force 1 does not have pilot or copilot figures. 1/72, 40-2261, 40-2344, A00111, AA35312, Air Force 1, B-25, Corgi, Doolittle, Hornet, Japan, Japanese, Mitchell, Ruptured Duck, Thatcher, Thirty Seconds, TSOT, USAAFLike the actual B-25 Mitchell it’s based on, the model has no individual markings or artwork other than the “02344” tail number. Note that Air Force 1 did not include the words “DANGER PROPELLER” on the vertical red warning lines that mark the propeller line, a detail that stands out on the Corgi.
1/72, 40-2261, 40-2344, A00111, AA35312, Air Force 1, B-25, Corgi, Doolittle, Hornet, Japan, Japanese, Mitchell, Ruptured Duck, Thatcher, Thirty Seconds, TSOT, USAAFThe dorsal gun turret appears to have a “sloped” front, rather than a rounded one. See a comparison of the turrets in the next section below. The turret rotates but, unlike the Corgi model, the guns are fixed in place and do not elevate. 1/72, 40-2261, 40-2344, A00111, AA35312, Air Force 1, B-25, Corgi, Doolittle, Hornet, Japan, Japanese, Mitchell, Ruptured Duck, Thatcher, Thirty Seconds, TSOT, USAAFThe model sits on a sturdy all-metal display stand. Unlike the Corgi model, which has separate wheels to provide wheels up or down options, the Air Force 1 model has fixed landing gear so there is no wheels up option. Note the limited edition metal plaque with Lt. Richard Cole’s signature. One wonders how “limited” the edition really is, as Air Force 1 did not provide an edition number.1/72, 40-2261, 40-2344, A00111, AA35312, Air Force 1, B-25, Corgi, Doolittle, Hornet, Japan, Japanese, Mitchell, Ruptured Duck, Thatcher, Thirty Seconds, TSOT, USAAFThe model sits horizontally on its stand, unlike the Corgi model, which is sits at an inclined angle.1/72, 40-2261, 40-2344, A00111, AA35312, Air Force 1, B-25, Corgi, Doolittle, Hornet, Japan, Japanese, Mitchell, Ruptured Duck, Thatcher, Thirty Seconds, TSOT, USAAFThe Rub

Many collectors were disappointed in Air Force 1’s turret, noting that it appeared too tall or oversized. I think it’s neither. Instead, Air Force 1 used the wrong turret — one with a sloped front that I believe was used on later versions of the B-25 Mitchell, such as the B-25J. I would appreciate confirmation from any reader.1/72, 40-2261, 40-2344, A00111, AA35312, Air Force 1, B-25, Corgi, Doolittle, Hornet, Japan, Japanese, Mitchell, Ruptured Duck, Thatcher, Thirty Seconds, TSOT, USAAF

The Crew

Once again, to personalize the model, here’s a photo of Doolittle’s crew. From left to right, Lt. Henry A. Potter, navigator; Lt. Col. James H. Doolittle, pilot; SSgt. Fred A. Braemer, bombardier; Lt. Richard E. Cole, copilot; and SSgt. Paul J. Leonard, flight engineer/gunner. 1/72, 40-2261, 40-2344, A00111, AA35312, Air Force 1, B-25, Corgi, Doolittle, Hornet, Japan, Japanese, Mitchell, Ruptured Duck, Thatcher, Thirty Seconds, TSOT, USAAFIn addition to Sgt. David Thatcher, pictured under the Corgi section above, Lt. Richard Cole, second from right, is the only other Doolittle Raider alive today.

Side-by-Side Comparison

Finally, here are some side-by-side shots. Note the superb riveting on the Air Force 1 (left) on every single panel. On the other hand, note the simulated porthole windows on that same model, which, at least to me, blemish the entire effort.

1/72, 40-2261, 40-2344, A00111, AA35312, Air Force 1, B-25, Corgi, Doolittle, Hornet, Japan, Japanese, Mitchell, Ruptured Duck, Thatcher, Thirty Seconds, TSOT, USAAFNote the stark difference in the finish, with the Air Force 1 (left) having a distracting shine. Despite the apparent difference in size in the photos, the two models are identical in their dimensions. The difference in the photos is a result of using a close-up lens, which exaggerates perspective. 1/72, 40-2261, 40-2344, A00111, AA35312, Air Force 1, B-25, Corgi, Doolittle, Hornet, Japan, Japanese, Mitchell, Ruptured Duck, Thatcher, Thirty Seconds, TSOT, USAAFHere’s a photo of the starboard side. Note the difference in the placement of deicing boots (the black surfaces on the leading edge of the wings). As far as I can tell, Air Force 1’s depiction is correct. 1/72, 40-2261, 40-2344, A00111, AA35312, Air Force 1, B-25, Corgi, Doolittle, Hornet, Japan, Japanese, Mitchell, Ruptured Duck, Thatcher, Thirty Seconds, TSOT, USAAFThe Upshot

This being a comparison review, the reader will naturally wonder which of the two models is recommended. Let’s compare the various features:

  • Casting: Both castings are excellent, with crisp detail throughout, though I was impressed with the rivets on every panel of the Air Force 1, even if they may be slightly overscaled. However, the simulated porthole windows detract from the casting.
  • Finish: No contest, the Corgi’s opaque olive drab finish is superb, resulting in a realistic model. The shiny finish on the Air Force 1, on the other hand, will need dulling. Both have gray camouflage on the underside of the fuselage but the Corgi’s is more undulating, and more realistic. The propellers on the Air Force 1 are also noticeably shiny and look plasticky.
  • Markings: I’m a sucker for art on a model and the well-documented “Ruptured Duck” design on the Corgi is fabulous. It’s an unfair comparison, I concede, since Doolittle’s ship carried no art. However, beyond the insignia, Corgi’s attention to detail is evident in including a warning on the vertical red propeller warning line, which, truly, is only 1 mm wide.
  • Detail Accuracy: The sloped turret on the Air Force 1 appears to be that used on later B-25 Mitchells and is wrong. The Corgi’s appears to be accurate. The deicing boots and the absence of yellow tips on the propellers on the Air Force 1 are correct, though these are details that can be easily corrected on the Corgi.
  • Engineering Design: The tail-heavy design of the Corgi is exasperating and makes you wonder how Corgi could bungle a feature that they had previously done properly. The Air Force 1 stands on its three wheels, as it should.
  • Extras: The Corgi model includes pilot and copilot figures, which is always a welcome feature. Inexplicably, however, it does not have a bombardier, unlike previous Corgi B-25 releases, including their first Doolittle release. On the plus side for Air Force 1, I love having Lt. Cole’s signature. It’s as close as I’ll get to such an historic event.

While both models are excellent replicas of the B-25 Mitchell, the Corgi version is clearly superior but, given that it cost twice as much as the Air Force 1, it ought to be. It is not, however, twice as good as the Air Force 1. Thus, in my view, the Air Force 1 is a great value, particularly as the two Corgi models disappeared into collectors’ homes and are now difficult to find. Still, both models are worthy of any collection, if for no other reason than they represent an important event in World War II.

Again, thank you for your indulgence and I hope you enjoyed the post. As always, comments, questions, observations, and corrections are welcome. Stay tuned next week for Part 3, a simple diorama of a B-25 Mitchell taking off from the deck of the Hornet.

—————————————————————————————————————————-

I want to thank and remember my dear friend and fellow WWII buff David C. Brooks, who passed away in 2014. As a token of our friendship, David kindly gave me his childhood copy of Thirty Seconds Over Tokyo in 2002while we were serving in Nicaragua. Here’s a lagniappe photo for my dear friend.1/72, 40-2261, 40-2344, A00111, AA35312, Air Force 1, B-25, Corgi, Doolittle, Hornet, Japan, Japanese, Mitchell, Ruptured Duck, Thatcher, Thirty Seconds, TSOT, USAAF

The Doolittle Raid, April 1942, Part 1: The Mission

In the early hours of April 18, 1942, just over four months after the Japanese surprise attack on Pearl Harbor, the USS Hornet, escorted by its sister aircraft carrier, the USS Enterprise, got within 650 miles of Tokyo when it was spotted by a Japanese patrol boat. The Hornet, on its maiden voyage, was on a mission to launch 16 B-25 Mitchell bombers off its deck to strike Tokyo and other Japanese cities as retribution for Pearl Harbor. The Enterprise was accompanying to provide protection from Japanese air attack, as the Hornet’s fighters were below deck to make room for the B-25 bombers.

This photo provides an excellent view of the Hornet’s deck.Doolittle, Halsey, B-25, Mitchell, Tokyo, USS Hornet, USS Enterprise, Japan, Pearl Harbor, Japanese

The photo below shows six of the 16 B-25 Mitchells staggered on the deck of the Hornet. With a 67-foot wingspan, the B-25 Mitchell barely fit on the deck. Note that the port-side wings of the aircraft on the left overhang the deck.Doolittle, Halsey, B-25, Mitchell, Tokyo, USS Hornet, USS Enterprise, Japan, Pearl Harbor, JapaneseFearing the mission had lost the element of surprise and the carriers would come under attack, Admiral William “Bull” Halsey, who was in overall command of the carrier task force, ordered the B-25 bombers to launch, despite the fact that the Hornet was to get within 400 miles from the coast of Japan — still 250 miles away. Although the 1,300 mile range of the B-25 bombers was significantly increased for the mission, the bombers would be lucky to hit their targets in Japan and still have enough fuel to make it to landing strips just outside occupied China.

I’ve modified the map below, captured from Battle 360: Season One, Call to Duty episode to provide a graphic sense of the distances involved. The green circle, at 400 miles, shows how far the Hornet needed to reach for the B-25 bombers to strike their targets and safely land in China. The yellow circle, at 650 miles, shows how far the Hornet actually got before launching the bombers.Doolittle, Halsey, B-25, Mitchell, Tokyo, USS Hornet, USS Enterprise, Japan, Pearl Harbor, JapaneseOne by one, the 16 B-25 bombers, each with a five-man crew and carrying 2,000 pounds of explosives, precariously took off from the deck of the Hornet on their four-hour flight to their targets. Colonel James Doolittle, who had planned and led the operation, was the first and, being at the front of the line, had the least runway to take off.

The feat warrants explanation. For obvious reasons, aircraft carriers provide a limited stretch of runway. Aircraft-based fighter planes are specifically designed so they can take off from the short runways on a carrier. Larger bomber planes are a horse of a different color. The B-25 Mitchell, a medium-sized bomber, required 1,500 feet of runway and a speed of 90 mph to take off. With 16 medium-sized bombers parked on the rear of its 814-foot-long deck, the Hornet afforded the Mitchells only 500 feet of runway — one-third of the required length — and permitted acceleration to only 50 mph. In fact, Col. Doolittle’s bomber only had 467 feet of runway.

To accomplish such take-off, the aircraft were supplied with high octane fuel, while the carrier was positioned so that the bombers could take off against the wind, providing them additional lift. Although the aircraft were also stripped of all non-essential equipment to lessen their weight, that reduction was offset by the extra fuel to allow them to reach and land in China, as it would be impossible to return and land an aircraft the size of a Mitchell on a carrier. Doolittle, Halsey, B-25, Mitchell, Tokyo, USS Hornet, USS Enterprise, Japan, Pearl Harbor, JapaneseAll 16 B-25 bombers took off safely, though at least two dipped down after leaving the deck and seemed to skim the “drink” dangerously before finally lifting up and continuing their trajectory to their targets. While some encountered resistance from Japanese fighter planes, all successfully completed their mission, each dropping four 500-lb bombs on Tokyo, Kobe, Nagoya, Osaka, Yokohama, or Yokosuka. It bears noting that all targets were military — factories, munitions plants, shipyards — though the crews understood that there would be civilian casualties.

I couldn’t resist including this fabulous centerfold painting from The Doolittle Raid 1942, Osprey Campaign 156, by Clayton Chun. The painting is by Howard Gerrard. It is posted here for discussion purposes under the fair use exception to the copyright laws.Doolittle, Halsey, B-25, Mitchell, Tokyo, USS Hornet, USS Enterprise, Japan, Pearl Harbor, JapaneseAs a result of the additional fuel consumption caused by the premature launch, 15 of the 16 aircraft either crash-landed in China or were ditched at sea, killing three crew members. Japanese soldiers in occupied China captured eight crew members and later executed three, while one died in captivity. Only one aircraft, dangerously low on fuel, managed to land safely by flying to the Soviet Union, which was closer than China, though its five crew members were held by the Soviets for more than a year. Thus, of the 80 crew members who participated in the Doolittle Raid, seven never returned.

While the Doolittle Raid caused negligible damage to Tokyo or other cities, the psychological impact on Japanese morale was immense. Japanese leaders had convinced the populace that Japan was invulnerable to surprise attacks. The Doolittle Raid dispelled this myth and sowed doubt in the Japanese public about its leadership. Moreover, the raid showed the Japanese that the islands were not immune to American bombs, persuading Japanese officials to pull troops from the field to protect the home islands and ships from the Pacific to patrol the coasts. More importantly, it convinced Japanese officials that it was imperative to destroy the U.S. fleet once and for all — something they had failed to do at Pearl Harbor — prompting them to gamble most of their fleet at the Battle of Midway, which was to prove disastrous to the Imperial Japanese Navy.

Conversely, the Doolittle Raid provided a significant morale boost for Americans, particularly its fighting forces, many of whom harbored a thirst for revenge. The Raid also marked the first time that medium bombers had launched from an aircraft carrier and is a textbook example of successful joint Air Force/Navy operations.

Today, 74 years after that fateful day, let us remember the 80 men who selflessly and courageously volunteered for an operation that was in all respects a suicide mission. Of those 80 brave men, only two remain alive today.

I hope you enjoyed the post. Stay tuned next week for Part 2, regarding available B-25 Mitchell bombers in 1/72 scale specifically representing the Doolittle Raid.

Softskins of the Afrika Korps in 1/72 Scale

The German Afrika Korps (Deutsches Afrikakorps) arrived in Libya in February 1941, following Mussolini’s appeal to Hitler for assistance in light of Italy’s dismal performance fighting the British in North Africa. Within weeks of arrival, Rommel’s Afrikakorps had reversed Mussolini’s fortunes, handily defeating numerically superior British forces time and again in rapid succession, and in the process becoming a source of fascination for many a WWII buff despite their eventual defeat in 1943.

Countless books have been written on this subject and the reader is directed to them. This post is merely intended to provide collectors a survey of Afrikakorps-specific prebuilt softskins available in 1/72 scale. The reader should note that major manufacturers such as Dragon and Panzerstahl have also produced more than a dozen prebuilt Afrikakorps tanks, but information on these is readily available and not the subject of this post.

By my count, there are approximately 20 prebuilt Afrikakorps softskin vehicles. Photographs are provided below. To provide perspective on the size of the vehicles, included in the photos are figures from six of the eight different Afrikakorps sets released thus far. They range from the Airfix set released in 1973, more than 40 years ago, to the Caesar set, released in 2010. The name provided for each of the vehicles and soldier sets is the one given by the manufacturer, thus the lack of consistency in the use of “Afrikakorps,” “Afrika Korps,” “Africa Corps,” and “DAK.”1/72, Afrika Korps, Afrikakorps, Airfix, Altaya, Atlantic, Caesar, DAK, Desert, Deutsches, Dragon, El Alamein, ESCI, Flak 38, German, HM, Hobby Master, Horch, Italeri, Kubelwagen, Libya, Matchbox, Nikolai, North Africa, Opel Blitz, Panzerspahwagen, Revell, Roden, Sd.Kfz. 11, Sd.Kfz. 7, Softskin, Soldiers, Steyr, Tunisia, War Master, Zvezda1. Altaya Opel Blitz 3.6-36S (Kfz. 305), 21.Pz.Div., Medenine, Tunisia 1943. Other than the lack of weathering and fake window flaps on the canvas cover, this is a neat little piece that would greatly improve with a simple umber wash.

Figures: Zvezda 6143 German Medical Personnel set. In my view, Zvezda is now producing the best 1/72 scale figures on the market.


1/72, Afrika Korps, Afrikakorps, Airfix, Altaya, Atlantic, Caesar, DAK, Desert, Deutsches, Dragon, El Alamein, ESCI, Flak 38, German, HM, Hobby Master, Horch, Italeri, Kubelwagen, Libya, Matchbox, Nikolai, North Africa, Opel Blitz, Panzerspahwagen, Revell, Roden, Sd.Kfz. 11, Sd.Kfz. 7, Softskin, Soldiers, Steyr, Tunisia, War Master, Zvezda2. Left: Hobby Master HG3903, Opel Blitz German Cargo Truck, 21st Panzer Div, North Africa 1942. This little truck is a beauty. Note the crispness of the DAK palm tree. The divisional and tactical markings on the fenders are an added plus.

3. Right: Hobby Master HG3911, Opel Blitz German Cargo Truck with 20mm Flak 38, DAK, WWII. The Flak 38 anti-aircraft gun is metal and is detachable. About the only quibble with this piece is the lack of divisional markings on the fenders and rear.

Figure: Matchbox PK35 Sd.Kfz. 232 plastic kit. This is one of two figures included in this 1/76 Matchbox kit. The figures themselves are actually 1/72 scale, however.


1/72, Afrika Korps, Afrikakorps, Airfix, Altaya, Atlantic, Caesar, DAK, Desert, Deutsches, Dragon, El Alamein, ESCI, Flak 38, German, HM, Hobby Master, Horch, Italeri, Kubelwagen, Libya, Matchbox, Nikolai, North Africa, Opel Blitz, Panzerspahwagen, Revell, Roden, Sd.Kfz. 11, Sd.Kfz. 7, Softskin, Soldiers, Steyr, Tunisia, War Master, Zvezda4. Left: Hobby Master HG4501 Horch 1a with 20mm Flak 38, DAK 1941. This vehicle came with a Flak 38 anti-aircraft gun worthy of comment in its own right.  Regrettably, I did not photograph it.

5. Right: War Master Steyr 1500 A/01 + 20mm Flak 38, 10th Panzerabteilung, Tunisia 1942. I failed to include the Flak 38 on this vehicle as well.  Though War Master gets credit for including the swastika on the palm tree, they managed to place it facing left, which is incorrect. One wonders whether the “error” was by design to get around laws in various countries that prohibit Nazi symbols.

Figure: Revell 2513 Africa Corps. This particular figure in the Revell set is one of the most ubiquitous in Afrikakorps dioramas, probably due to its casual pose as the vast majority of a soldier’s time is spent not in battle but performing pedestrian daily activities.


1/72, Afrika Korps, Afrikakorps, Airfix, Altaya, Atlantic, Caesar, DAK, Desert, Deutsches, Dragon, El Alamein, ESCI, Flak 38, German, HM, Hobby Master, Horch, Italeri, Kubelwagen, Libya, Matchbox, Nikolai, North Africa, Opel Blitz, Panzerspahwagen, Revell, Roden, Sd.Kfz. 11, Sd.Kfz. 7, Softskin, Soldiers, Steyr, Tunisia, War Master, Zvezda6. Left: Dragon Warbirds 50120 Me 109G-2 Trop & Kubelwagen, III./JG 77, North Africa 1942. This hard-to-find Cyber Hobby exclusive aircraft model included this kubelwagen. Of note are the balloon sand tires, designed specifically for the desert campaign.

7. Center: Altaya Kfz. 15 Horch + 10.5cm le FH18M, Art.Reg. 119, 11.Pz.Div., Kursk USSR 1943. Admittedly, this model is not marketed as an Afrikakorps vehicle, but given the wide use of the Kfz. 15 Horch in North Africa and its dunkelgelb base color, the straightforward application of DAK palm tree decals would easily do the trick.

8. Right: Dragon 7434 Sd.Kfz.181 Tiger I Mid Production w/Zimmerit & Kubelwagen. This vehicle, which was included as a plus in a Dragon Tiger kit, is identical to the one in the Dragon Warbirds 50120 set described above except for the standard tires and darker desert yellow.

Figure: Airfix 1711 Afrika Korps. Despite its release 43 years ago, the Airfix Afrikakorps set remains one of the most beloved among collectors, for obvious reasons — this was Airfix sculpting at its pinnacle.


1/72, Afrika Korps, Afrikakorps, Airfix, Altaya, Atlantic, Caesar, DAK, Desert, Deutsches, Dragon, El Alamein, ESCI, Flak 38, German, HM, Hobby Master, Horch, Italeri, Kubelwagen, Libya, Matchbox, Nikolai, North Africa, Opel Blitz, Panzerspahwagen, Revell, Roden, Sd.Kfz. 11, Sd.Kfz. 7, Softskin, Soldiers, Steyr, Tunisia, War Master, Zvezda9. Left: Dragon 60514 Sd.Kfz. 223 Leichte Panzerspahwagen, 21.Pz.Div., North Africa 1941.

10. Center: Dragon 60498 Sd.Kfz. 222 Leichte Panzerspahwagen, Unidentified Unit, North Africa 1942. A quick comparison of this Dragon piece with its Altaya counterpart to the right immediately reveals why Dragon has been king of the 1/72 scale hobby. There is absolutely no comparison in terms of detail, finish, and weathering.

11. Right: Altaya Sd.Kfz. 222, 10.Pz.Div., Tunis, Tunisia 1943. Given the existence of the vastly superior Dragon 60498, this Altaya 222 model is only for the hardcore collector.

Figure: Atlantic 88 German Afrikakorps. This hard-to-find set was maligned from its release almost 40 years ago (1977). Today, it’s highly sought-after by collectors.


1/72, Afrika Korps, Afrikakorps, Airfix, Altaya, Atlantic, Caesar, DAK, Desert, Deutsches, Dragon, El Alamein, ESCI, Flak 38, German, HM, Hobby Master, Horch, Italeri, Kubelwagen, Libya, Matchbox, Nikolai, North Africa, Opel Blitz, Panzerspahwagen, Revell, Roden, Sd.Kfz. 11, Sd.Kfz. 7, Softskin, Soldiers, Steyr, Tunisia, War Master, Zvezda12. Left: Altaya Schwerer Panzerspahwagen (8 Rad), Sd.Kfz. 232, 5.le.Div., Agedabia, Libya 1941. Dragon has produced an Sd.Kfz. 232 that is immensely superior to this piece. Unfortunately, Dragon has not released one in an Afrikakorps desert livery.

13. Right: Altaya Sd.Kfz. 250/5, Afrikakorps, Tobruk, Libya 1942. Desert campaign enthusiasts will immediately recognize this vehicle as Rommel’s “Greif.” In retrospect, it would have been more appropriate to use a Rommel figure for the photo. As is Altaya practice, neither vehicle has swastikas on the palm trees.

Figure: ESCI 206 Afrika Corps Soldiers. This ESCI set, their second effort at producing Afrikakorps soldiers, was summed up by Plastic Soldier Review (PSR) as a “perfectly solid effort.” The first set, now extremely hard to find, was somewhat unattractive.


1/72, Afrika Korps, Afrikakorps, Airfix, Altaya, Atlantic, Caesar, DAK, Desert, Deutsches, Dragon, El Alamein, ESCI, Flak 38, German, HM, Hobby Master, Horch, Italeri, Kubelwagen, Libya, Matchbox, Nikolai, North Africa, Opel Blitz, Panzerspahwagen, Revell, Roden, Sd.Kfz. 11, Sd.Kfz. 7, Softskin, Soldiers, Steyr, Tunisia, War Master, Zvezda14. Left: Dragon 60294 Sd.Kfz. 251/10 Ausf. C Unidentifed Unit, El Alamein 1942. Photographs exist of the actual vehicle upon which this model is based. Unfortunately, the actual vehicle was an Ausf. B, rather than an Ausf. C, which is immediately apparent by the location of the hull side lockers.

15. Right: Dragon 60281 Sd.Kfz. 251/2 Ausf. C, Eastern Front 1942. Despite Dragon’s “Eastern Front” label, this piece is actually from the DAK, as can be easily concluded from the 21.Pz.Div. formation marking on the vehicle’s front plate. The actual vehicle upon which this model is based was an Afrikakorps 251/1 Ausf. C, rather than a 251/2 Ausf. C. To make it accurate, one need only remove the mortar from the back of the vehicle.

Figure: Caesar H070 German Afrika Korps. This 2010 release is the most recent Afrikakorps set on the market. According to PSR, the figures have “well-defined detail and faultless proportions” and the use of modern molds allowed Caesar to produce figures that are appealing from every angle without resorting to multiple pieces that require assembly, as Preiser often does.


1/72, Afrika Korps, Afrikakorps, Airfix, Altaya, Atlantic, Caesar, DAK, Desert, Deutsches, Dragon, El Alamein, ESCI, Flak 38, German, HM, Hobby Master, Horch, Italeri, Kubelwagen, Libya, Matchbox, Nikolai, North Africa, Opel Blitz, Panzerspahwagen, Revell, Roden, Sd.Kfz. 11, Sd.Kfz. 7, Softskin, Soldiers, Steyr, Tunisia, War Master, Zvezda16. Left: Hobby Master HG5104 Sd.Kfz. 11, 33d Pz.Art., 15th Pz.Div., North Africa. This vehicle carries an interesting but non-standard Afrikakorps palm tree.

17. Right: Altaya Sd.Kfz. 11, 15th Pz.Div., El Alamein, Egypt 1942. To my mind, this is not a bad effort by Altaya and the difference in quality between it and the HM piece is not that great. Note again Altaya’s failure to include the swastika on the palm tree on the port-side front fender.

Figure: Caesar H070 German Afrika Korps. See comment in previous photo.


1/72, Afrika Korps, Afrikakorps, Airfix, Altaya, Atlantic, Caesar, DAK, Desert, Deutsches, Dragon, El Alamein, ESCI, Flak 38, German, HM, Hobby Master, Horch, Italeri, Kubelwagen, Libya, Matchbox, Nikolai, North Africa, Opel Blitz, Panzerspahwagen, Revell, Roden, Sd.Kfz. 11, Sd.Kfz. 7, Softskin, Soldiers, Steyr, Tunisia, War Master, Zvezda18. Hobby Master HG5002 Sd.Kfz. 7 German 8 Ton Semi-Track, Luftwaffe, Africa 1942. While this is, in fact, an Afrikakorps vehicle, HM neglected to include the distinctive Afrikakorps palm tree. I pilfered the palm tree decals from the Airfix A02303 Sd.Kfz. 7 Tractor half-track kit.

Figure: Italeri 6099 D.A.K. Infantry. As can be seen in the photo, the detail on this figure is superb. In PSR’s words “detail is everywhere clear and sharp, while clothing looks natural and human proportions are spot on.”


1/72, Afrika Korps, Afrikakorps, Airfix, Altaya, Atlantic, Caesar, DAK, Desert, Deutsches, Dragon, El Alamein, ESCI, Flak 38, German, HM, Hobby Master, Horch, Italeri, Kubelwagen, Libya, Matchbox, Nikolai, North Africa, Opel Blitz, Panzerspahwagen, Revell, Roden, Sd.Kfz. 11, Sd.Kfz. 7, Softskin, Soldiers, Steyr, Tunisia, War Master, ZvezdaFinally, here’s a lagniappe photo of an Opel Blitz bus, widely used by the Afrikakorps in North Africa.

19. Roden 721 Plastic Kit, Opel Blitz Omnibus (model W.39 Ludewig-built, late). This model is not available as a prebuilt. I commissioned this piece from a master modeler in Poland.

Figures: Various Afrikakorps Sets; Nikolai ARB04 Arabs in the Streets 2 resin set. Without a doubt, resin figures allow more detail than plastic ones as exemplified by the three wonderful figures from the Nikolai set. However, the short runs and resulting high cost of resin sets often present an obstacle for collectors.


I hope you enjoyed the photos. As always, comments, suggestions, and questions are always welcome.

A Tank Named “Besposhadniy”: Russia’s Illustrious KV-1 Tank

I have consistently and unabashedly stated my somewhat juvenile affinity for tanks with distinctive markings or colorful artwork. I’m hardly alone in this view, as the KV-1 “Besposhadniy” – meaning “Merciless” – is one of the best known Russian tanks of the Great Patriotic War. Its vaunted kill record – 12 tanks plus numerous other vehicles and guns – certainly contributes to its mystique, as does the fact that artists, poets, and dancers, whose names appear on the sides of the turret, donated the funds to purchase it. The patriotic poem carried on its turret undoubtedly adds to its celebrity, and its skipper, ace Lt. Pavel Khoroshilov, further augments its fame. Yet, I submit that it’s the distinctive and irresistible artwork on the sides of its turret that sets it apart from others, for who could forget a cartoon depicting Hitler being blown to smithereens by volleys from a tank with a red star? The cartoon is an apt metaphor for the resolution of the German-Russian conflict in WWII.

The Actual Tank

The “Besposhadniy” belonged to the Soviet 12th Tank Regiment, 1st Moscow Motor Rifle Division, and fought the German 9th Army Group Center in what was for the Soviets the Western Front, in the winter-spring offensive of the Red Army in early 1943.

Below is a photo of the “Besposhadniy” from the Polish publication Stalin’s Tanks, Wydawnictwo Militaria 212. Note that this photo is from the early days of the “Besposhadniy,” as its occupants had yet to paint kill marks on the sides towards the back of the turret.1 ActualThis photo, from Stalin’s Heavy Tanks 1941-1945: The KV and IS Heavy Tanks (Concord 7012) by Steven Zaloga et al, provides a clear shot of the geometric kill marks added by the crew as their victims accumulated.2 Merciless Kill MarksAccording to Soviet Heavy Tanks (Osprey Vanguard 24) by Steven Zaloga and James Grandsen, the stars, disks, and triangles represent 12 tanks, 10 trucks, 7 armored cars, 7 mortars, 5 motorcycles, 4 anti-tank guns, 3 artillery pieces, a staff bus, and a partridge in a pear tree. 🙂

This photo of Paul Khoroshilov, the tank commander, taken from the “Paul Khoroshilov” entry (“Хорошилов Павел”) on the Russian Wikipedia, provides a clear view of the patriotic poem on the sides of the “Besposhadniy.”

П.М.Хорошилов

According to Zaloga and Grandsen in Soviet Heavy Tanks, the Russian inscription on the front part of the turret sides is a poem that translates thus:

Storming through fire goes
Our KV heavy tank
From the heartland it rolls
To smash the Nazi flank

Crewed by heroic men
Never showing fear
As they carry out commands
Of their homeland dear


This front-view photo of the “Besposhadniy,” shows that it carried its name on the upper glacis plate. I found references – though no photo3 Merciless Namegraphic evidence — that claimed the tank also carried its name on the rear part of the turret.


Although the markings on this last photo of the starboard side of the “Besposhadniy” are barely visible and almost indiscernible, the photo does provide an excellent view of the drive sprocket, idler, and later-type road wheels. Note also the sharp angle of the rear of the hull.

Merciless Starboard Side

The Hobby Master Model

Even a passing glance at the following photos of the Hobby Master HG3010 quickly reveals that HM has produced a beauty of a model. The finish is superb, with subtle shades of the base color throughout the tank. You will also notice a finely applied wash on the turret that brings out the bolts on the mantlet. Note also the realistic tow chains on the front plate that extend to the middle of the hull. They’re as realistic as can be found in 1/72 scale. Note also the silver dry brushing on the tracks that make the detail pop out. On the down side, note that the name of the tank is missing from the glacis.4 HMThis profile shot shows off the artwork and markings on the turret well. The road wheels used by HM are the earlier road wheels found on KV-1s and are clearly incorrect, as can be easily seen in the starboard side photo of the actual tank above.5 HMThis photo of the starboard side of the model shows that HM used the mirror image of the markings on the port side. Note that there are no kill marks on the starboard side, which looks to be correct from the photo above.6 HMThis last photo from the rear shows that HM used the KV-1 hull with the gently curved rear. Again, the side photo of the actual tank conclusively reveals that this is incorrect. The rear of the hull should have been sharply angled. 7 HMHere’s a close-up photo of the HM turret. The two columns of text just below the Hitler cartoon comprise a list of artists, poets, and dancers who pooled their resources to donate the tank, naming it “Besposhadniy” to distinguish it from other tanks. Interestingly, among them is Sergey Mikhalkov, commissioned by Stalin in 1944 to write the lyrics of the Soviet National Anthem, and almost 60 years later, in 2001, by Putin to write the National Anthem of Russia.Merciless Turret GuideIt’s plainly evident that the HM “Besposhadniy” is an awesome little model – a proud little replica of the original.

The Rub

So what’s the rub? And there’s always a rub! Well, in addition to using the wrong rear hull and road wheels, HM used the Model 1941 initial turret, rather than the Model 1941 up-armored turret. The three-way comparison below graphically demonstrates the problem. On the actual tank the bottom part of the turret goes straight back and then turns in behind the turret ring at a sharp 90-degree angle, whereas on the HM model it curves around the rear of the turret ring. The Easy Model version, on the other hand, used the correct turret, as discussed in the comparison section below.

Merciless Turret ComparisonSecondly, as indicated above, HM used a mirror image of the port side graphics on the starboard side — literally — without regard to the fact that the name “Besposhadniy” would be backwards — as in a mirror. Thus, the port side carries the inscription “Беспощадный”; the inscription on the starboard side, Besposhadny Backwards 2, is gibberish — unless, like Da Vinci, you’re adept at mirror-reading.

Hobby Master / Easy Model Comparison

Let’s compare the HM version of the “Besposhadniy” with the Easy Model 36288. Here are five equivalent photos of the EM version.9 EMLike the HM, the EM lacks the name on the front plate. The EM also lacks the tow cable included on the HM. The EM version has a much darker shade and lacks any kind of dry brushing on the tracks. Here’s a portside view.

10 EMNote that the turret is the correct Model 1941 turret, with the skirt of the turret going straight back and then turning in at a sharp angle, as opposed to curving around the rear of the turret ring. Note also that EM did not make HM’s risible mistake in using on the starboard side the mirror image of “Besposhadniy” used on the port side of the turret. 11 EMNote also that, unlike HM, EM used the correct later type of road wheels. In defense of HM, the wheels could have been changed in the field; a turret swap, however, would be highly improbable.

Here’s a rear-side view. Note that EM also used the correct hull with a sharply angled rear, as opposed to HM, which used the curved rear.12 EMHere’s a close-up photo of the EM turret. While EM used the correct turret, note that the tampo-applied markings are not as well defined as those on the HM. Though they’re not out of register, they’re simply not as crisp.13 EM TurretFinally, here are some side-by-side photos of the two, with the HM on the left and the EM on the right. 14 3-4 Port Comparison15 3-4 SB Comparison16 Front Comparison17 Top Comparison18 FacingHere’s a lagniappe photo of the EM version to show off the Hat 8263 WW2 Russian Tank Riders.19 BonusThe Upshot

While I’m tolerant of most imperfections in a model, I agonize where the inaccuracy lies in the use of a wrong turret or hull – characteristics that I consider immutable. By that standard, the HM “Besposhadniy” — with its incorrect turret, rear hull, and road wheels — is fatally flawed. The absurd error in using the mirror image of “Besposhadniy” on the starboard side exacerbates the problem.

The EM version, on the other hand, is accurate throughout, though the lower quality of its finish and markings leave something to be desired. Thus, we’re left with a difficult choice: HM’s inaccurate high quality versus EM’s accurate but lower quality. I leave that choice to the reader as I love them both; they both represent an illustrious tank with a fascinating origin, outstanding combat history, patriotic slogan, and striking artwork.

Final Thoughts

Collectors often forget that these models represent vehiclesekipaj crewed by young men who fought and often died together. As a reminder, here’s a picture of three members of the crew, though I was unable to identify them. I would appreciate help in doing so.


I’d like to leave the reader with a first-hand account of the “Besposhadniy” in combat from the memoirs of Yegor Sergeyevich Tsarapin, the mechanic-driver of the tank, taken from the aforementioned Russian Wikipedia entry. The passage vividly illustrates the tremendous courage of the crew:

In February of 1943, defensive fights started in north of Zhizdra. Blazing like a torch, “Besposhadniy” rushed towards the enemy artillery gun. The crew caught on fire, but continued attacking, ignoring the pain from their burns. Twenty meters, ten meters, and now the enemy artillery gun is being crushed under the heavy tank treads. Only then did the crew begin to put out the fire. I had a burnt back, a broken leg, and three fractured ribs. Egorov [the radio operator] could not feel his right hand. Filippov [senior mechanic-driver] wanted to help me out and take over the driver’s seat, but he was not able to as his lower back was badly burnt. We barely extinguished the flames on ourselves. You could see the crew members’ poorly dressed and still bleeding wounds through their ragged overalls, torn and burnt. We shouted to Fateev [the gunner], “you’re quite charred,” and he replied: “start the engine/move forward!” Collecting the last remnants of our energy, we once again rushed forward, knocking a Nazi tank along the way. By the time we reached our troops, Fateev [the gunner] was dead as well as Paul Khoroshilov [the commander]. We buried them together.

The “Besposhadniy” lasted just over nine months, from late May 1942 to early March 1943, before it was sent for repair. During that time, the tank crew shot down 27 enemy tanks, 9 mortars, 10 guns, 17 machine guns, 30 vehicles, and 13 units of armored vehicles, according to the Russian Wikipedia (though Zaloga reports different numbers). After the war, “Besposhadniy” was transferred to the Kubinka Tank Museum in Moscow, where, sadly, it was melted at the “Hammer and Sickle” Moscow plant in 1948.

———————————————————————————————————–

I want to thank Tim L., friend and fellow collector who provided invaluable research, photos, and observations. Sincere thanks also to my colleague Elmira B., who translated the first-hand account of the “Besposhadniy” in battle. Thanks also to my friend Joao S., of Cascais, whose incredible painting skills brought the Hat figures to life.